Morning Peeps... today sees the start of a series of interviews with the team and we are starting with the Boss... Jennie. I asked everyone the same questions... so you will be able to find out a bit more about the Artistic Stamper team... So, without further ado...
AS: Introduce yourself, what are your interests, likes/dislikes etc?
I am Jennie, owner of The Stamp Connection, which manufactures Kling-On Repositionable Cushioning and The Artistic Stamper range of rubberstamps. Aswell as owning The Stamp Connection, I also have an online store, The Artistic Stamper. I have been crafting forever and love stamping, collage style work, drawing, sewing (a little known fact, I also have a Cup for this from school!) I cannot knit or crochet to save my life though! The main love of my life is jewellry making - but I have little or no time to do this anymore. My other life consists of my two gorgeous (of course they are) grown-up children, my hubby Mal and three cats. My favourite place in the World is sitting on a sun drenched beach with a pina colada in hand... what more could a girl want?
AS: What or Who inspires you?
I am always inspired by other artists, be they collage artists from the crafty world, or great artists like Monet, Manet and Van Gogh. I am a total aficianado of Impressionism and adore colour in all art. I will often blog hop these days rather than look through a book of art to get inspiration, or if I am in London, I try to visit the Victoria & Albert Museum for complete inspiration.
AS: How do you make a piece of art... what is the process?
Great question! Often it will be a new product - a mould, or inks, or of course, new stamps! As a general rule, I start with a base, a tag or a card, a canvas or these days, a large puzzle piece and then gather my stash that I want to put on it. Sometimes I have an idea in my head but they never ever come out like I envisage... and sometimes they are just plain awful and get consigned to the trash can! I almost always have a 3D piece or element in all my artwork and give me beads and wire and I will create. That is a challenge for anyone to take up with me LOL
AS: If your Mojo goes on holiday, what do you do?
My Mojo often goes on holiday, most days in fact - but I will never tell you that (ooops, just did!) I will grab one of our stamps, or maybe one of someone elses and go back to basics - or take out my Melt Pot and create a moulded piece to see if that will kick start the Mojo. If nothing happens and the piece of paper stays white, I will go and have a large Vodka and Tonic (sounds like I am an alcoholic!)
AS: What is your favourite technique?
Without a doubt it is using Alcohol Inks. Since I first discovered them several years ago - before Ranger brought out theirs - I have almost always used them when I am stuck for ideas. Next to that, the Melt Pot - a very big favourite of mine. Make it 3D - get out your Melt Pot!
AS: If you were on a desert island and could only take 5 items of stash with you, what would you take?
Well, I just couldn't.. could you? I would need a trunkful of stuff. I did try it once, going on holiday with just a few things and ended up shopping for stuff. But if you push me; a craft knife with a blade that never needed sharpening, a paintbrush with built in water, a bottomless bottle of glue, a rubber stamp that said HELP! and an inkpad that lasted forever! Now, what would you do with those 5 items?
So... there you have it folks, a few snippets about Jennie... I hope you have enjoyed reading this and seeing a few pieces of Jennie's art along the way. Many thanks to Jennie for agreeing to be grilled!
TTFN
Hels x
Tuesday, 31 August 2010
Saturday, 28 August 2010
A Remarkable Woman By Sid Haselden
It's been great thrill to be Guest Designer for The Artistic Stamper Creative Team for the month of August and as it's very nearly the end of the month this is my last creation.
Ingredients:
Heavy White Card
Glossy Accents
Stickles Glitter Glue (purple)
UTEE (silver)
Waterbrush
Distress Inkpads (barn door, dusty concord & milled lavender)
Distress Re-Inker (dusty concord)
Gold mica powder
Versafine (onyx black)
Versamark
Foam Pads
Masking Tape
Brads (purple)
Stamps:
Flourish Swirls Plate
Girl With Clock
I used a template I had made from heavy board some while ago and cut out two identical pieces from heavy white cardstock. The height is 6 inches and width 4 inches. One of the panels has been cut in half vertically and these two pieces form the side panels.
The panels were adhered at the back on 'hinges' made from masking tape, allowing the panels to move.
A third flourish stamp was inked with Versamark ink, stamped twice and heat embossed with silver UTEE. These were coloured with dusty concord ink and cut out to give them a 3D spiral effect. Blobs of the purple stickles were added as shown. These were put aside until later.
Next the Girl with Clock stamp was inked in onyx black Versafine ink and stamped on white card. The image was coloured with a waterbrush and the distress inks until happy with the colours. The clock was painted with one coat of a sheer gold glaze. More purple Stickles were added on the dress to highlight. When dry this was trimmed out using scissors and a craft knife and adhered with foam pads as shown.
The two 3D flourishes made earlier were adhered with Glossy accents and some printed words were painted with the sheer gold glaze, edged with purple pen and stuck in place with Glossy Accents. Finally, two purple brads were applied as shown.
The Triptych is free standing and could be adapted to fit any subject. Hope you like the piece.
Thanks go to Jennie and Hels and the rest of the team all of whom do some stirling work in the name of craft ! Thanks also to everyone for their comments on my pieces which are always greatly appreciated.
Sid xx
It's a Triptych and has been made to stand up in a shrine-like way that has been made from heavy card in an arch shape. I have used some of my favourite colours again and a variety of stamps and materials many of which can be obtained from the bountiful choice available in the Artistic Stamper online shop. As usual I have listed all ingredients with links.
Ingredients:
Heavy White Card
Glossy Accents
Stickles Glitter Glue (purple)
UTEE (silver)
Waterbrush
Distress Inkpads (barn door, dusty concord & milled lavender)
Distress Re-Inker (dusty concord)
Gold mica powder
Versafine (onyx black)
Versamark
Sheer Gold Glaze
Printed words
White opaque penFoam Pads
Masking Tape
Brads (purple)
Stamps:
Flourish Swirls Plate
Girl With Clock
I used a template I had made from heavy board some while ago and cut out two identical pieces from heavy white cardstock. The height is 6 inches and width 4 inches. One of the panels has been cut in half vertically and these two pieces form the side panels.
The panels were adhered at the back on 'hinges' made from masking tape, allowing the panels to move.
I then got going with Cut'n'dry foam and my inking tool with barn door & dusty concord Distress inks to colour the entire background, shading the edges with more barn door. This was dried with a heat gun.
The flourish stamps were then inked in barn door & dusty concord and overstamped on the background. I then made a mica spray (but you could use the Crafty Notions mica sprays), with dusty concord re-inker and gold mica powder in a mini- mister. This was sprayed in a random way until happy with the effect. The gold sheen is subtle but adds to the background. The white pen was then used to draw on little circles all around the edges of the Triptych.
.
A third flourish stamp was inked with Versamark ink, stamped twice and heat embossed with silver UTEE. These were coloured with dusty concord ink and cut out to give them a 3D spiral effect. Blobs of the purple stickles were added as shown. These were put aside until later.
Next the Girl with Clock stamp was inked in onyx black Versafine ink and stamped on white card. The image was coloured with a waterbrush and the distress inks until happy with the colours. The clock was painted with one coat of a sheer gold glaze. More purple Stickles were added on the dress to highlight. When dry this was trimmed out using scissors and a craft knife and adhered with foam pads as shown.
The two 3D flourishes made earlier were adhered with Glossy accents and some printed words were painted with the sheer gold glaze, edged with purple pen and stuck in place with Glossy Accents. Finally, two purple brads were applied as shown.
The Triptych is free standing and could be adapted to fit any subject. Hope you like the piece.
Thanks go to Jennie and Hels and the rest of the team all of whom do some stirling work in the name of craft ! Thanks also to everyone for their comments on my pieces which are always greatly appreciated.
Sid xx
Friday, 27 August 2010
Less Steam More Punk! by Nicky Cresswell
Hello lovely people, nice of you to hop on by.
So as you may be able to guess from the title the whole Steampunk wave has hit the crafting world and left me for dust..
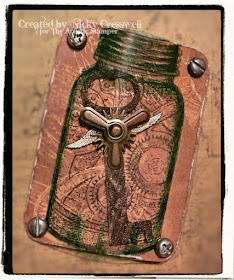
Don't get me wrong the style is kinda quirky and usually that's totally me but i just can't get my head around it at all! The best i could manage was this one ickle ATC...
I stamped the coggy jar onto the base, Layered up a ferro coated grungeboard key with a couple of wing charms, a timmy gear and 3 photo anchors with a brad in the centre to create the propeller. I then used some green stazon to stamp the plain jar onto some acetate, and i mounted this over the base to encapsulate the piece, held on by faux screw snaps.
So after many further failed attempts.. you could say i ran out of stream!! lol
All that was left was the Punk!
Some nice pinky paper, a couple of fab background stamps, {i used dogtooth and punk plaid} Some grungeboard skulls coated in Black and White Enamel Accents, a few stamped and cut out Stars with a bit of bling to finish them off and Jobs a good'en!
*****
So is there a style you just can't master!!
Why not leave me a comment..
I'll pick 3 random winners, each winning one of the above ATC's.
I'll announce the winners next time i post which will be on the 7th Sept so plenty of time to enter.
*****
Well thats all from me today,
Have a creative weekend and i'll see you all again soon x
Thursday, 26 August 2010
and the winner is...????
I am amazed by the wonderful number of comments on the blog candy post, and that you all seem to love anything with a Mr Holtz product in it!! rofl.. who wouldn't? I know I am waffling.. get on with it , Jennie, reveal who has won!! I used random.org to find our winner, so please step up to our podium at The Artistic Stamper Creative Team blog..... drum roll please maestro...
Congratulations! Please email me your snail mail address( you can find the email on our website) so I can get your candy into the post right away!
Thank you everyone who joined in :)) and good luck next time. Just keep popping in to see our wonderful Team at work....you never know it could be you next time....
Have a Creative evening!
Jennie
Cogs 'n Roses...
...Morning Peeps... a quickie post from me today... just to remind you that there are still a few days left to join in with our first ever challenge... the theme is Something Old, Something New... and to see all the deets, please click here.. oh and there is candy up for grabs for one randomly picked entrant :O))
So, in keeping with the Something Old, Something New, I altered a wooden frame. I coated it with a layer of Traditional Tan paint to start off with. Once this was dry, I used some Viva Ferro, putting a generous layer in patches on the frame. I used spritzed up some background stamps with water and then stamped them into the Ferro... this gives a really cool effect - I used one of the new backgrounds and one of the older coggy ones :O)) There is my Something Old, Something New :O)) I used a heat gun to zap the Ferro - and because the layer was quite thick, it bubbled a bit in the heat... fabby effect! I then used some Terra, which is totally different to the Ferro when heated.. it goes into little bubbles... these two Viva products have to be my faves at the moment! Once this was all dried, I used some Cut & Dry and painted it all with Trad Tan again - then went over with a mix of Trad Tan and Sable Brown, then once this was dry, I highlighted the bobbles with Sable Brown... and finished with a bit of Gold Dabber. There were woodey patches still showing on the frame, so I filled these in with Rock Candy Cracklepaint... loving this effect! When the Rock Candy was crackled, I rubbed some Viva Inka Gold into the cracks to make them pop a bit.
I made some metal flowers using the large Flower Power flower, stamped onto Ten Seconds Studio metal (this one is Spiced Rum). I then used the Cog background to make a pattern over the flower... used Ten Seconds Studio's tools to add definition to the cogs and then made them into five petal flowers - to do this is the same at the first layer on a dimensional rose :O)) I hand drew some leaves, decorating with the TSS tools.. and popped these onto the frame. I added some Idea-ology to the frame to finish it. I haven't thought what to put in the middle yet... because the frame is quite decorative, I think maybe just a little photo would look nice! Anyways, thanks for looking... hoping you like this... and all of the stashy bits used on it are available from The Artistic Stamper. TTFN
Hels x
Saturday, 21 August 2010
Tissue Technique Tutorial by Lucy Edmondson
Hello again,
I hope you will find today's tutorial helpful. I use the tissue paper technique a lot in my crafting as it is a good way of working with awkward shaped or difficult to stamp on items. I use it mainly with canvas as it gives crisp images whilst still allowing the natural weave of the fabric to show through, but it is also great with papier mache items. You can use a variety of 'gluey' mediums: Claudine Hellmuth Studio Multi Medium, spray adhesive, decoupage glue, Mod Podge, gel medium, or even Klear floor polish! My favourite, which I will use here, is gel matte medium, as I like the matte finish. The main tip, and I will labour the point a bit in my step photos (!) is to use plenty, and spread it evenly, as this is what your tissue will sink into in order to become transparent. The other important point is to use StazOn to stamp on your tissue paper as the wetness of the 'glue' may cause some ink pads to run. However, you can use any colouring medium you wish for the canvas itself - inks, paints, sprays, etc. The colour needs to be vibrant at this stage, as the tissue will mute it a little.
If you haven't used tissue before, do persevere, as it is a great thing to have in your technique arsenal. For this particular project I have decorated a canvas covered sketch book, which would make a great gift as a crafting journal. These are the ingredients that I used:-
Birds of a Feather and Free as a Bird Stamps
Bird Song Elements Stamps
Music Script Stamp
Black StazOn Ink Pad and Colours
Gel Matte Medium by Claudine Hellmuth
Distress Inks or Other Colouring Medium
Tim Holtz Tissue Tape Symphony
Fibres
Cut N Dry Foam and Nibs
Metal Corners
A5 Canvas Sketch book - I get mine from Tesco Extra for about £4.50. Any cheap white tissue paper.
1. Assemble everything you will need.
2. Cut a rectangle of tissue paper to fit the front of your book.
3. Open out the book so you don't get ink on the pages, ink up the canvas cover, using the Cut N Dry nibs to get behind the spiral binding.
4. It will look something like this, with quite strong colours.
5. Start to build up your design on the tissue paper, with the music script top left and bottom right, in Cactus Green StazOn, then the Bird Cages in Jet Black in opposing corners.Work with a piece of white scrap paper underneath to pick up any ink that soaks through so it doesn't transfer, and to make it easier to see your design.
6. Now add the small detailed bird to the large bird cage, the wording, and the larger bird as shown.
7. Fill in any gaps with sequin waste and StazOn in Teal Blue, dabbing lightly as it is a strong colour.
8. Apply plenty of Gel Matte Medium to the book cover.
9. Spread it evenly.
10. Place your tissue paper in position and pat down, pressing any wrinkles with your fingertips then use your heat gun briefly to further iron out wrinkles.
11. Add the music script tissue tape to the bottom.
12. Touch up any areas of white tissue paper (which is where there wasn't quite enough gel medium) using residual ink from your foam, in the relevant colour. Use this to blend the Tissue Tape in as well.
13. Dab a little Teal StazOn onto the metal corners, add these with strong glue, and to finish off, tie some co-ordinating fibres to the spiral rings.
Thanks for looking and I hope you enjoyed my first tutorial here, there are plenty more to come, so please do call back again soon.
Lucy
Friday, 20 August 2010
Roll up, roll up...
Have a go at our blog giveaway this week... grungepaper, new stamps from The Artistic Stamper ..Flower Blooms, Kling-On Repositionable Cushioning, Idea-ology Accroutrements, and Nostalgic Tissue Tape! What more could you wish for? lol
All you have to do is make a comment, add it to your blog for another dip in the candy, and become a follower, (if you are not one already).. that's three goes at hitting the blog candy!!! I have even thrown in one of my tags :))
We love candy, and we love giving it away even more.... It will end on Thursday 26th at 6pm UK Time, and we will even ship overseas:))
Have a very creative and lucky day!
Jennie x
All you have to do is make a comment, add it to your blog for another dip in the candy, and become a follower, (if you are not one already).. that's three goes at hitting the blog candy!!! I have even thrown in one of my tags :))
Have a very creative and lucky day!
Jennie x
Thursday, 19 August 2010
And The Winner Is....
...Or should I say... ARE!! The time is here to chose the winners of the two ATC's I popped here the other day... I had 32 lovely comments (thank you all) and the Random.org contraption chose #20 which tallies with Andrea, Wales UK and... #25 which tallies with Tigs.
Thanks for all your lovely comments... please can you both send me you addy so I can pop them into the post for you :O)) Oh and not forgetting, there's one ATC left up for grabs... the one featuring Freddie ... click here to see it and enter!
TTFN
Hels x
Thanks for all your lovely comments... please can you both send me you addy so I can pop them into the post for you :O)) Oh and not forgetting, there's one ATC left up for grabs... the one featuring Freddie ... click here to see it and enter!
TTFN
Hels x
Tuesday, 17 August 2010
Copy Cat Stamping by Nicky Cresswell
Now i could be wrong, but am I one of the only people in the entire universe to not own a set of Wendy Vecchi stamps.. {to be honest i think Hels brought them all so there were non left for me to buy!!}
But being the crafty mare I am I knew with a bit of fiddling I would be able to copycat the look using a selection of Jennie's stash.. namely the Flower Power, Flower fever & new Flower bloom stamp sets,
oh not forgetting a few Backgrounds too.
Add them all together with a bit of ink and this is what you get.
For the base i used an A6 book blank chipboard piece, I cut 2 of the sides with the 'brackets' on the edge die.
Next i distress inked the top with bundled sage and the bottom with brushed corduroy, i stamped both sections with the dots background in the respective ink colour.
I stamped a strip of paper with the houndstooth, inked it over with a bit of distress ink and gave it a scalloped edge with a border punch then placed it along the centre to cover where the 2 base colours met.
I placed a very large grungeboard flourish that had already been inked with dried marigold across the whole piece.
To make the flower i stamped the largest of the flower power and the 2 largest of the flower fever sets onto grungepaper, I roughly cut round each one, gave it some brushed corduroy ink, then stamped with a different background, I used dots & gingham, but the possibilities for these are endless. I cut each one out and curled the edges. {I did the foliage in the same way, stamp, ink, cut out.}
I added an old wooden bingo chip that used to be red, but i inked black to complete the look.
All that was left to finish up was to stamp 'create art' using the sentiment from the flower bloom set {missing out the blooming from the stamp by just inking each word at a time, you could of course cut the sentiment into 3 to give you more freedom with placement} and there you have it, my copycat Wendy Vecchi piece.
I am actually going to make this into a little journal/notebook, I've already cut the back in the same shape as the front, just need some pages and to bind it together and hay presto.. Sadly I ran out of time but i'll try and pop a pic on my blog of the finished book later in the week for you.
Right thats me signing out.
Any questions feel free to contact me, I'm alway happy to help x
Monday, 16 August 2010
Bottle Caps & Number Plates...
...Morning peeps... so... did you go to Stamperama yesterday? And... if you did... did you come and play at making rosebuds with me? And did you see Jennie doing her stuff demo-ing? And... what did you buy??? I had a fab day yesterday, it was so lovely to meet everyone who came and sat with me for 10mins and made one of the little roseybuds from Grungepaper. As promised... here are a couple more ATC's to be given away... same as before, if you leave me a comment here, I will add your name to the draw and a randomly picked name will win one of the ATC's... so that means I will be doing the randomly picked thing twice :O))
The first ATC explains the title of the post... cos I used Tim's Lost & Found stack to make it - the roses are made using the little 2" square pieces, stamped onto using the medium Flower Power stamp and then curled into roses. I added some of Tim's mini stamps to the background, used some Distress Inks to blend it all together and popped some Idea-ology on for decoration.
The next ATC was made using my fave Retro Grunge stack - the colours in this pack are right up my street and I used an ATC sized piece of paper, popped a generous layer of Rock Candy Cracklepaint over it and once it was dry, added some Rock Candy Stickles to the crackles. I used the 2" square pieces again for the roses... added some fibres and more Idea-ology and there you go... another ATC. So, if you would like to be in with a chance of winning one of the ATC's, please leave me a comment... I will use that Random.org thingy to pick out the winners on Thursday August 19th... and they will be announced here :O)) Thanks for looking... have a goodly day... I am off to lay down... yesterday wore me out... all that yakking that I did! LOL TTFN
Hels x
Sunday, 15 August 2010
Paper Roses ATC's....The Winners...
Hey Peeps,
Just a quicky to announce the two winners of the Paper Roses ATC's giveaway... I had 37 comments so, Random.org picked out the first number to be... 21 which tallies with Tracy Evans' comment... and the second number picked was... 28 which tallies with Chrissie's comment. Thank you to everyone for your lovely comments... I will send out the pink one to Tracy and the Coffee one to Chrissie as that was the order they were blogged in... hope that is okies? :O)) Please can you both email me with your addy's - I will pop them into the post tomorrow for you.
In the meantime... I thought I would quickly show you a sneaky peek at the Sunday Stamper challenge this week *click the name to see the theme etc* which includes the Make & Take project for today's show at Stevenage... and also the new bottle stamp - isn't it a fab image??? Anyways... if you are coming to Stevenage... hope to see ya there! Thanks for looking and have a brill day...
Hels x
Saturday, 14 August 2010
Life's A Machine By Sid Haselden
Steampunk and machinery seem to be very on trend at the moment so I have designed this piece with that in mind. The grungey look has been attained by using Distress Inks and fab stamps from The Artistic Stamper as well as a bit of hardware and I have tried to produce a 3D piece with depth too !
I started with a a sturdy box lid as the base and covered this with the printed paper adhered with glue stick. Once dry the base was coloured with the Distress inks applied with an applicator to add shading. All edges were worked with a heavy dose of shabby shutters to define. The Small Cogs stamp was inked with onyx black Versafine ink and stamped at the corners of the base as shown.
The base was then embellished with some brass hardware held in place with brass brads, copper wordplates, gold drops (applied with Glossy Accents) and a brass frame stamped with the words 'Machine Of Life'. The white card had been first coloured with the Distress inks.
The back of the piece was made from white foamcore board which was cut to size to match the base. The background cogs stamp was used with onyx black versafine and stamped in a repeat over the printed paper which was then adhered with glue stick to the back. A couple of other stamps of people and parts vere stamped, cut out and adhered on the back. More of the copper wordplates were added and some green adhesive gems added at places on the background. One brass hinge was added with a brad at the top left. All edges were coloured with lots of the shabby shutters Distress ink also.
All links are clickable to take you direct to The Artistic Stamper store.
Ingredients:
Printed background paper (Basic Grey)
Wood dowel
Sticky back gems (green & brown)
Metallic printed wordplates (copper)
Metal hardware (brass frame, hinges & brads)
White foamcore board
Gold Drops
Glue Stick
Stamps:
Avant Gard 1&2 (A stamp in the Hand)
The base was then embellished with some brass hardware held in place with brass brads, copper wordplates, gold drops (applied with Glossy Accents) and a brass frame stamped with the words 'Machine Of Life'. The white card had been first coloured with the Distress inks.
The back of the piece was made from white foamcore board which was cut to size to match the base. The background cogs stamp was used with onyx black versafine and stamped in a repeat over the printed paper which was then adhered with glue stick to the back. A couple of other stamps of people and parts vere stamped, cut out and adhered on the back. More of the copper wordplates were added and some green adhesive gems added at places on the background. One brass hinge was added with a brad at the top left. All edges were coloured with lots of the shabby shutters Distress ink also.
This shot of the piece is taken to show the dimensional aspects as the gears are suspended at different levels for the effect. This was achieved by first die cutting the TH gadget gears out of heavy card and using paint dabbers applied roughly in the three metallic colours allowing them to dry thoroughly.
Next five pieces of dowel were cut at various lengths and painted with the silver dabber. These were then held in place on the background with a drawing pin through the foamcore from the back and Glossy Accents. The painted diecuts were then adhered to the tops of the dowels and a brown adhesive gem applied in the centre of each.
The back was then glued to the base with lots of Glossy Accents to complete.
I am very happy with the effect achieved and will certainly have some more attempts at 3D pieces. Hope you like it and that it might have inspired you try something 3D in your own design.
Sid xx
Friday, 13 August 2010
On a Rose Role....by Jennie
Seems that roses are the order of the week here on The Artistic Stamper Creative Team blog! I am no exception! I love making them when I have time, and these are made from grungepaper, using the large and small Flowers from the Flower Power set. I painted them with Claudine's Studio paints from Ranger, in altered orange, yellow pastel and dab of yellow. When they were glued together, and guess what my silicone glue is still working!! ( who'd have thought it! lol), I painted rock candy crackle paint over them. If you have absolutely no idea how to make them, then I did do a video which you can see here.
I actually covered the large jigsaw puzzle piece in Sticky back canvas, and painted it in a mixture of the same paints, and then stamped over it with a couple of background stamps in Rusty Hinge distress ink. I tore some of Tim's Tissue Tape and stuck it on top for added texture.
I stamped the birdcage on top of the painted canvas with black Archival ink. Then i liberally(I did actually pour more rock candy crackle paint over it!)
The gold and black bird cage was made by pouring clear and gold, and spoonful of flex ( mixed gently together) utee onto a non stick craft sheet, and allowing it to cool for a few seconds before stamping into it with the stamp, which was inked up in black archival.
Allow it to cool for a few more seconds..do not burn your hands, and remove the stamp. Whilst still warm, cut round the birdcage. I added more silicone glue!! to the back of it, and added it slightly to the side of the stamped image.
A couple of leaves ( picked up in a big bunch from a charity shop, and a button at the bottom finished it off!!
See what I mean about the role of the rose here... lol
Don't forget Hels is giving away some rose filled ATC's and if you are coming to Stamperama we have all the ingredients to all of our projects by the Creative Team there, plus a special make and take :))
Have a very creative day
Jennie x
I stamped the birdcage on top of the painted canvas with black Archival ink. Then i liberally(I did actually pour more rock candy crackle paint over it!)
The gold and black bird cage was made by pouring clear and gold, and spoonful of flex ( mixed gently together) utee onto a non stick craft sheet, and allowing it to cool for a few seconds before stamping into it with the stamp, which was inked up in black archival.
Allow it to cool for a few more seconds..do not burn your hands, and remove the stamp. Whilst still warm, cut round the birdcage. I added more silicone glue!! to the back of it, and added it slightly to the side of the stamped image.
A couple of leaves ( picked up in a big bunch from a charity shop, and a button at the bottom finished it off!!
Don't forget Hels is giving away some rose filled ATC's and if you are coming to Stamperama we have all the ingredients to all of our projects by the Creative Team there, plus a special make and take :))
Have a very creative day
Jennie x
Thursday, 12 August 2010
Paper Roses... Plus ATC Winner... AND...
...another giveaway... I have to say THANK YOU to everyone who left lovely comments about the last ATC that was up for grabs... I decided to make another couple of ATC's for give aways... so as before, please leave me a comment here if you would like one of these new ones. Oohhh, and I very nearly forgot (I didn't really... just joking LOL) the winner of the Cogs & Roses ATC was chosen at Random.org by the machiney thing that is in the computer... not very scientific way of chosing, I popped the numbers 1 - 40 in (I had 40 comments) and it chugged, churned and chucked out... number 30... which tallies with NETTY.... so thank you hun and please can you email me your addy and I will post it to you :O))
So these old paper roses are as addictive as the ATC's they are being made for. I can't tell you how much I lurve the Tim Holtz papers... well, I could tell you but I would be here for yonks, extolling the virtues of the patterns, colours, quality etc...see, I am off again *even over here I have no control over my wafflings ROFL* Anyways, the roses were made with the medium sized flower from the Flower Power set (note a pattern of addiction emerging here?) I stamped them onto the ickle 2" square bits of the papers... cut them out, assembled them into roses... and cos this paper is soooo lush, it stays curled! I used the Vintage Shabby stack for this first one... adding some ATC sized paper onto mountboard... using Idea-ology Foliage behind the roses, tying some Jute around the ATC, using the Mini Brads for the corners, using my old date stamp... a couple of Tim stamps in Aged Mahogany and colouring the edges with this... and some Pumice Stone...these DI's were made to go together weren't they? The ticket..erm... is a new one, from the 100th collection.. which should be here by early October... we will keep you posted about that though... erm, my ticket stamp is from the gold signed 100th collection... oh, I mentioned that before did I?? ROFL
This next ATC was made with the Lost & Found Stack, using the same Flower Power stamp, adding on some Jute, stamping with mini Tim Holtz images (that reads funny, not Tim Holtz is mini, the stamps are!!!) I used a Memo Pin under the rose, dangling a Philosophy Tag from it with a Jump Ring... the letters are also from the stack... popped onto mountboard, then inked edges, sanded a bit and then coated with Glossy Accents.
Thanks for looking... if you would like to own either of these ATC's, please just leave me a comment and I will do the Random jobby again and announce the peeps drawn on Sunday 15th...
And if you are coming to Stamperama, I can hand them over to you in person, otherwise, I will post them out to you .. I am doing Make & Takes on Sunday... so if you are there, please do come and say hi... it would be lovely to meet you! `:O)) have a great day... TTFN
Hels x
Wednesday, 11 August 2010
Gibson and his Girls! by Lucy Edmondson
Charles Dana Gibson was a pen and ink illustrator at the turn of the 20th century whose models epitomized his ideal of female beauty, with long hair, tiny waists, and long slender necks. They became known as the Gibson Girls! I have had the two full size sets for a long time now and they are great favourites, so I was delighted when the tiny images came out last week, and I have combined them with some other old favourites for Minxy's 'Something Old, Something New' challenge. I love the flexibility you get with The Artistic Stamper stamps that enables you to mix and match.
Well, the first bit of the 'pocket Art History' was true, but I now get a bit fanciful so humour me! I decided that Collage Man would be Gibson, standing by the door outside his smart studio, where inside await his models, ready to be sketched. I think in reality he was a bit fatter than this distinguished gent, but if he can dream then so can I!
What you will need:-
Artistic Stamper stamps: Collage Man, Collage Lady Elements, Artist's Plate No 1, Words Set Nudes,
Small but Beautiful Gibson Girls
Distress Inks: Tattered Rose or Spun Sugar, Vintage Photo, Shabby Shutters, Dried Marigold, Tumbled Glass
Distress Crackle Paint - a pale/neutral colour such as Tatteered Rose or Picket Fence, etc
Crafty Notions Spray in Co-Ordinating Colour
2 Hinges
Pen Nib
Black Archival Ink Pad
Inkssentials White Opaque Pen - Optional
Brad or Tiny Button or similar for the door knob
You can get everything you need except the tray from Jennie, but if you don't have anything similar (sometimes embellishments come in them), you might like to use four small matchbox drawers glued together. You will need a small piece of strong card, approx 7.5 cm by 9 cm ( ins).
What I did:-
1. Brush a neutral shade of Crackle Paint around the inner edges of each of the compartments in the tray and set aside to dry.
2. Stamp the Collage Man in black onto the strong card, and cut it into a rectangle to fit your compartment tray (mine was a little smaller than the stamp). Turn it over and stamp the poem from Collage Lady to cover the piece. Sponge both sides with the Distress Inks, using the Tattered Rose or Spun Sugar for Gibson's face, and either leaving the collar bare or filling it in with the white pen. Edge both pieces with Vintage Photo to frame, and flick some water at the pieces with your fingers.
3. Stamp three of the Gibson Girls onto white card, and the ink bottle from the Artist Plate, and cut to fit the compartments then colour as above.
4. Stamp a pen nib from the Artist Plate and the Woman, Mystery, Passion, Beauty words onto white card and ink up. Cut out a continuous strip of words to go around the outside edge of the tray, and cut a rectangle around one of each of the words for the back of the door. Edge with Vintage Photo and stick in position as shown.
5. Once the crackle paint is dry, sponge with Distress Inks and spray with mica sprays. Stick the four tiny images into the compartments and add the pen nib.
6. To finish, stick the hinges in place with strong glue, allowing plenty of drying time. Add a brad head or tiny button as a door knob, as shown.
I do hope you have enjoyed this project and it would be great if you gave it a go! Do tell me what you think as I would love to hear! Thanks for looking.
Lucy