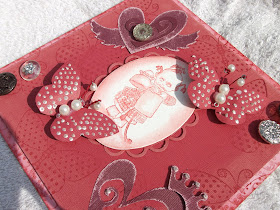
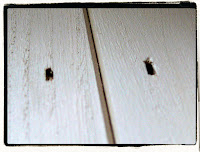
Goodly Morning! I have been playing with Distress Stains and Perfect Pearls Mists and am here to show you a card I have made... instead of my usual tags. I have made the card so it is tag sized (ish) and used loads of different elements on it to layer it up. I usually jiggle my photo's in PSP to sharpen up etc... but these haven't been adjusted... this is the actual real colour that I achieve... scorchio!!
Starting with a piece of cream cardstock, squidged Fired Brick and Wild Honey Distress Stains onto my non-stick craft sheet and dipped the card straight into the inks, twisting it as I went so I blended the colours together. I used a heat gun to dry the cardstock and then re-dipped it onto the remaining in to pick up little bobbles of colour. Next I went in with Forever Red & Sunflower Sparkle Perfect Pearls Mists, giving a generous spritz right across the card with both colours - again using the heat gun to dry it off. I wanted to decorate the background a little without taking away from the inky pattern I had achieve so I used Vermillion Archival Ink (in my opinion a MUST for any crafty stash and the colour on the website is more pink than it is in real life)) and stamped some a Stipple background and then a nice Calligraphic Mat #4 background too. I edged the whole piece of card with Black Soot Distress Ink to nicely "close in the edges".
The embellishments are made up of the Movers & Shapers Mini Butterflies - cut from card and coloured as the background, with little Idea-ology Spinners and Brads for bodies. The flower is made from bookpages cut using the Tattered Florals Alterations die - colouring the layers with Mustard Seed DI and Sunflower Sparkle PP Mist, Fired Brick DI and Forever Red PP Mist and finally, Spiced Marmalade and Copper PP Mist. I cut a Movers & Shapers Flourish and coloured with Peeled Paint Stains and Kiwi PP Mists. The sentiment is stamped onto a Movers & Shapers Heart, again cut and coloured as before... popped into an Idea-ology Memo Pin. The Seam Binding was stained with Distress Inks/Stains and I added a Mini Safety Pin with a couple of Idea-ology Baubles and a Tassell to dangle. Oh and the centre of the flower is an Idea-ology Fanciful Accoutrement , BTW, these are on special off ATM... spritzed with Copper PP Mist to colour it.
Well, that's all for me for the moment... ooh, while I think of it... the brand new Distress Stains are arriving at The Artistic Stamper by the 5th August... so if you would like to pre-order, HERE are the deets! Thanks for looking... have a fab weekend!! TTFN
Hels x
Saturday, 30 July 2011
Thursday, 28 July 2011
Tattered Bird ....
Good Morning ... Gillian here back with my 3rd and final post as July's Guest Designer. I would like to say a huge thank you to Jennie & Hel's for having me .... I've had a great time ladies.
My last project as you can see is "Bird" inspired. I came across this little fella at the bottom of my alterable stash, he was orginally bought from The Artistic Stamper. I started out by painting him in Distress Crackle Paint (Vintage Photo), setting aside to dry naturally. Once dry he was grunged up abit with Distress Inks (Walnut Stain). The base of this project was a piece of chipboard/plyboard from a Wooden Shrine Frame. I painted the base in Distress Crackle Paint (Old Paper).
Once the base was dry I then stamped Europe Map Background in Archival Ink (Coffee). I inked the edges of the base with Distress Inks (Walnut Stain). I have filled a Cork Vial with Mini Fasteners piercing a Memo Pin through the cork lid. The Adage Ticket was inked with Vintage Photo.
For the flowers I stamped Flower Fever onto Kraft Glassine Sheets , rather than cutting around the flowers I let my Tim Holtz scissors do all the work, they glided through the glassine sheets effortlessly giving more of a tattered effect. I then inked the flowers with Distress Inks (Rusty Hinge). Each layer was adhered with a dot of Ranger's new Glue N Seal.
For the flower centre pieces I have used Wooden Bingo pieces from Maya Road.
The wings have been stamped onto a Journalling Ticket using the Crowning Glory Plate
The Wooden Bobbin has been inked with Distress Inks and adorned with an Accoutrements Button.
Here you can see a close up of the crackle from the Distress Crackle Paint.
Well that's all from me folks. TTFN Gillian x
Wednesday, 27 July 2011
The Fabric Of Time! by Nicky Cresswell
Morning peeps
Today I have a fun little project for you to try..
All your gonna need is some plain fabric,
An assortment of watch face and gear stamps from the tick tock plate
some archival ink pads {I used black and plum}
and a good pair of scissors {like Tim's}
{you will also need a needle and thread, I used wax linen thread but you can use anything, oh and a packet of Tim's accoutrements}
Start by stamping your choosen fabric with a selection of the gears and watch faces
Next cut them out
Then your gonna want to pick some accoutrements that have this sort of backing to them, Mine are from the accoutrements fanciful set
Now your going to need to thread them in ascending order, largest at the bottom working your way up to the smallest.
Once your needle reaches the top, thread one of the accoutrements on, then go back down through the stack and tie tightly at the bottom.
And there you have it, A fast fun fabric adornment you can add to a bag, apron, top or just wear as a brooch.
To make it so they weren't so flat
I tied a small piece of thread in-between each layer.
So what ya waiting for,
Get out your supplies and have some fun.
Stay Inky
Tuesday, 26 July 2011
Red red red .... by Tina Barnett
Hi !
It's Tina here and I am back with another Mabel Lucie Attwell stamp called "Time for bed".
I have used red distress inks to colour the image and for shading.
It's Tina here and I am back with another Mabel Lucie Attwell stamp called "Time for bed".
I have used red distress inks to colour the image and for shading.
I started with an 8 inch by 8 inch card and used the same colour distress ink to blend in to the base card. I then over stamped with the same ink again, using the Baroque background stamp by The Artistic Stamper .
I then cut a piece of Coredinations card and over stamped with a butterfly stamp. I used the same stamp on a separate piece on card and cut out the stamps to give me two butterfly's. I added some bauble baubles to the butterflys along with some liquid pearls Using a different colour Coredinations card I used a Tim Holtz die and then distressed the pieces, adding them to the card.
I then finished off the card with some buttons.
Well that's me for now!
Take care, until next time!
Hugs
Tina xx
Monday, 25 July 2011
MY D.T JOURNEY BEGINS HERE TAG.....
Well actually it officially started at the beginning of the month (lol)
Hi all,
Kat here, AKA Kat's craft creations
I'm here with my final project of the month,
this time I thought I would make a tag
(one of my favorite surfaces to work on)
this one is to commemorate being a fully fledged member of the design team,
so I guess it should have been the first project of the month but never mind (lol)
here it is,
I started with a manila tag
stamped & embossed the Harlequin background
& clear powder,
(I showed you how I altered the stamp to get this affect
in my first project of the month)
next I stamped the Music & Stipple Backgrounds
& distressed the edges with Tim Holtz Paper Distresser
I then splodged my Brushed Corduroy Distress Ink pad
onto my Craft mat, sprayed it with water,
then smooshed my tag into it,
& dried it with my Heat Gun,
I then blended the whole thing with
to get this affect,
Here's a close up of the finished background,
I added a paper ruler piece from my stash
near the bottom of the tag,
I embellished the tag with,
Tim Holtz dress form off the Haberdashery stamp set
I stamped it with Coffee archival ink
cut it in half, put 4 holes in & added the
pearles from the Baubles idea-ology set
(on offer this month at a fab price)
& stuck it with foam pads to give it dimention,
I stamped wings off the Crowning Glory set
& added them to the top of the dress form,
I finished her off with a heart locket from my stash,
I printed out MY JOURNEY BEGINS HERE
from my computer, screwed it up into a tiny ball,
opened it again & blended
Brushed Corduroy Distress Ink all over,
cut it out & added it to the tag as shown,
I added twine & more Baubles to the hole
to finish off.
Hope you like it!
that's it from me for this month,
I'll be back next month,
untill then TTFN,
Kat x.
Sunday, 24 July 2011
Seaside Tag by Alison Hall
Hello Stampers! Today, I have a little seaside themed tag to share with you, as I'm currently sunning myself in Italy! Yes, that's me on the tag, enjoying a paddle in the waves (wrong colour hair, I know, & hopefully I'll have a better tan! lol)!
So, anyway, back to the tag!
I stamped the seahorse & a couple of shells from Seaside Plate 1, a few times, using distress embossing ink, then embossed the images with clear embossing powder. Then I spritzed the tag, using butterscotch & stream colour wash sprays. I wiped the ink away from the embossed images, then stamped the starfish with stream adirondak ink. I stamped the phrase from the Stamper's Anonymous Nature Moments plate, in the top right of the tag, using black archival ink.
Next, I stamped the lady bather from the Seaside Plate on white card. I sprayed a small bit of the colour washes on my craft sheet, then coloured the image, using a waterbrush. I cut the image out, then glued it to the left of the tag.
I stamped a row of shells onto white card, using butterscotch adirondak ink, cut them out, & glued them to the bottom of the tag.
The ribbon is a piece of seam binding, that I spritzed with stream colourwash. Then I stamped it with the seahorse & shell, using black archival ink.
Finally, I added some Tim Holtz lace chain, a few of his pearl Baubles ( currently on special offer HERE), and a little shell charm.
Thanks for looking!
Alison x
Thursday, 21 July 2011
Baroque Earring Hanger by Sioux Jenneys
I've got a dimensional piece today for you :)
It's an earring hanger....so now instead of dumping my jewellery on the all too small bedside cabinet at night I can hang them on this ready for the morning ;)
1. Start by using a Baroque die and two of the Mover and Shaker hole punch dies to cut the base shape from mount board.....and a banner from the Regal Crest die
They are all on special offer here ;)
2. Then stamp the Baroque background onto the baroque base with Versamark and heat emboss with gold powder and colourise all over with Distress Ink bundled sage...
...love that colour and it goes so well with my bedroom decor! ;)
Additionally add a touch of faded jeans all around the edge too.
...love that colour and it goes so well with my bedroom decor! ;)
Additionally add a touch of faded jeans all around the edge too.
3. I cut some silk and organza fabric from the Tattered Florals die.....folded them in quarters and sewed the point where the fold is to keep them together.....this makes a fuller looking flower.
Then sew all the folded bits together and add the button from Accroutrements Fanciful to the centre. They are still on special offer so get them whilst you can ;)
Here is a close up of the completed flower.
4. Stamp the word Beauty onto the banner in Archival aquamarine and colourise with Distress Ink Wild Honey......then edge both the base and banner with a gold Krylon pen and punch holes along the bottom edge for hanging your earrings from.
5. I made the button embelishments on each side capable of draping a necklace or bracelet from by using a spacer to extend how far the buttons stick out.
Just cut multiple paper re-enforcers out of mountboard with the Tag and Bookplate die and glue together.
Then for added security, punch two holes in the base where you want the buttons to be, take some wire, thread it through the button, through the spacer and through the hole and secure at the back with some tape.
7. Use two Ideaology Swivel Clasps to hang the hanger with.
That should help in my task to organise myself and keep things tidy round here :)
See you again soon!
Don't forget the monthly challenge to use Hot Colours....you just might win a prize!
See you again soon!
Don't forget the monthly challenge to use Hot Colours....you just might win a prize!
xoxo Sioux
Tuesday, 19 July 2011
HOT, HoT, hOt
Hiya! it's the boss here again!
This month's challenge here on the Creative Team blog is using hot colours, and a little bit of stamping. I had a few of the 3 frames that had broken, and I couldn't sell, so I removed everything from them , and added some Terra to the frame with a wooden spatula.
Stamp into it with a wet stamp, and make sure you clean the stamp immediately or it will dry and ruin the stamp.
Allow the frame to dry, and then spray with hot colours from Ranger's Adirondack Color Wash. I used Butterscotch and Sunset Orange.
I printed out the words create and everyday on my computer and added a stamp with the new Archival Saffron and Venetian Orange to the middle...
add a little distress ink , and this is what I should be doing everyday!!
To make the hanging baubles and the wings add a few drops of alcohol ink to a small plastic bag ( make sure there are no holes in it, and shake your baubles into it! Remove from the bag and allow to dry!
I think this fits perfectly into the challenge for this month, and there is still loads of time to enter too!
P.S. did you spot the sneaky peeks of our new stamps???!!! lol
Have a very creative day
Jennie
Sunday, 17 July 2011
Love Icon! by Nicky Cresswell
Hello my lovelies, Minxy here for my second visit of the month
Today i'm sharing a little altered wooden icon..
And as I went a bit mad with the photo's you can make one too if you like!
***
For this piece you will obviously need 1 blank Wooden icon
Then gather together the following:
Traditional tan studio paint, A mini-mister, antique linen distress re-inker and heirloom gold from the perfect pearls aged patina set, {or you could use a distress pad and perfect pearl mist spray}, coffee and black archival inkpads, heat gun,
accoutrements and baubles={WHICH ARE STILL ON SALE BTW} metal photo corners, cotton twine, white gloss card,Before you start painting, notch out 2 holes where you're buttons will sit to allow the backs to sit in and make them a little more secure when gluing.
Apply 2 coats of studio traditional tan paint.
Then spray with an antique linen and heirloom gold mini mister mix and heat set using a heat gun straight away to get the speckled effect.
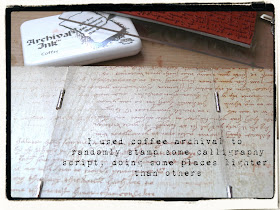
Use coffee archival to randomly stamp some calligraphy script, doing some places lighter than others by stamping off first. {stamping off is when you ink your stamp and stamp a piece of scrap paper before stamping your real piece so you get a lighter more faded image}
Stamp the window from the Architecture 1 plate in black archival in areas where there is little or no script
Stamp the 'The Kiss' statue onto white gloss card in coffee archival ink, and cut out.
I coated with matt accents as I didn't like the gloss look, {but you don't have too} when it was dry I straightened it out as it had curled a bit and this caused the accents to crack a little but that actually added to the statues look which was a happy accident!
I stuck the image straight in the middle of the icon and stamped the phrase straight below it in black archival ink.
The treatment of the outside was very much the same as the inside only I didn't use any pearl mist because I wanted it to stay a little lighter.
I used one of the fancy sconces from the architecture 1 plate to add an almost hinge like effect before gluing the accouterments fanciful buttons on, I also added a piece of cotten twine round each button so the doors are easier to open.
I used silver-plated metal photo corners to give the front a nice finish.
flattening one side with pliers so it sat flush {ish lol}
You can also see in the pic I used some ball chain to hang the piece by cutting out a small groove for the chain to sit in and gluing in place. {I used E600}
I added some mini hooks to the bottom to make it useful, so I could hang earrings and chains on the piece, but for display purposes i've added some twine & baubles for show.
And there you have it
I hope you've enjoyed todays art
I'll see you again soon but till then..
Stay Inky