So, on the desk is a whole lot of new clay and all the tools I need to get going., including my pasta maker.
Each pack needs to be cut and then -
popped into the pasta machine to be conditioned...
When all my colours were conditioned and softened
they were cut and layered with each other and with some gold foil... is she ever getting to the stamping, I hear you cry!! Yes I am so see below...
I lay the mini polka dots background stamp on top of the stack and pressed down hard to imprint the image through the clay. The beauty of this technique is that you never really know the beauty of what you have made until you cut into the stack...
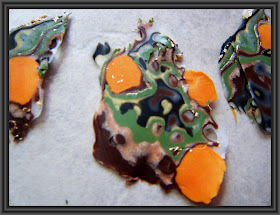
I slotted some orange clay into the stack then started to slice...
The blade slices as thin slivers as possible, being careful not to cut your own fingers!!!! Tee hee...
So I used the mini polka dots and the cogs background stamps - yummy deep-etched rubber and below it is possible to see their influence!!
This slice shows the cogs and the dots beautifully...
On another stack, I used the grid backround stamp and made some holes with my pokey tool!! Just look at the wonderful clay markings that produced...
Beautiful squares of colour... and such texture...So I wrapped some beads made from spare clay. I will make something with them and show you the finished articles in a later post...
Here are some of them, surrounded by a bracelet I made recently. They will match beautifully...
Woo, such lovely colours and swirls, and I LOVE those cogs and squares!! Great stampimg!!
With another stack, I decided to create a frame for one of the 15cms collage alterable frames. I laid thin slices around the edge and trimmed ...
Look at the bright sunshine streaming in through my craftroom window... and the frame finished and waiting to be "cooked""... I use my halogen oven, it's quick and easy and less costly than my large cooker.
I made a Tim Holtz-type background with distress inks and stamping using the dots and checks background stamps, and then added the teeny tiny butterfly. The beetle in the bottom corner and the beautiful large buttlerfly are from the same plate called insects and butterflies.
The leaves are from the Graphic 45 Tropical Paradise Pad. I fussy cut them. I used the pad because my frame reminded me of the paper when it was finished...
Love and Light
Frankie xx


I love what you done, can I do fimo?
ReplyDelete...wow... what an amazing 1st post all the colours & layers & threaded with gold too, you've enriched our crafting with this new to us technique...thank you...Mel :)
ReplyDeleteWow, what fun! I have never worked with clay at all, but this is a great trick.
ReplyDeleteWhat a fab technique and the projects are really fantastic !
ReplyDeleteGosh! Love this effect. So unsuual. Thanks for sharing with everyone - so inspiring.
ReplyDeleteHugs, Buttons x
A great technique, love. The rich colours!! Fab hugs trace x
ReplyDeleteWowsers, this is soooo cool!! Amazing technique and results!
ReplyDeleteJust gorgeous Frankie I love this technique as you never know what you will end up with. Love Elizabeth xxx
ReplyDeleteWow! Fabulous ;)
ReplyDeletexoxo Sioux
Where did you get your sharp cutter from?
ReplyDeleteFabulous card project and so excited to see what you'll be creating next for us...thank you, so much for joining us as our Guest Designer.
ReplyDeleteLove Emma xx
Amazing artwork!!!
ReplyDeletegreetings, Alie :-)
Brilliant work. Love it.
ReplyDeleteJanet xx
Wowwwwww this is beautiful
ReplyDeleteGreetings Janny
So creative! I love your beautiful frame Frankie! x
ReplyDeleteall I can say is WOW! beautiful and such an awesome technique thanks for sharing!
ReplyDeleteAmazing Frankie, thank you for inspiring us!
ReplyDeletexx
Thanks for all your lovely comments, especially from the Boss Lady herself!!!
ReplyDeleteFrankie
xx
Wow, what a great technique, and i love what you came up with in the end Frankie. D'you know i have about 12 packs of that type of clay from about 4 years ago i bought cheap when a shop was closing own and have never used it, you have inspired me to try something with mine, thankyou hun, Namaste, Vick
ReplyDeletethe-artful-codger.blogspot.com
YT vixcrafts
Oh and i dont know if its just me but didnt you think that at some stage that looked like a bar of chocolate had got mixed up in there once you added the gold leaf, good call by the way, would never have thought of adding my gold leaf to clay, genius!! xxx Vick
ReplyDeleteWow, what a great technique, and i love what you came up with in the end Frankie. D'you know i have about 12 packs of that type of clay from about 4 years ago i bought cheap when a shop was closing own and have never used it, you have inspired me to try something with mine, thankyou hun, Namaste, Vick
ReplyDeletethe-artful-codger.blogspot.com
YT vixcrafts
Wow such an amazing technique! and I love the photo frame. So very inspiring - thankyou!
ReplyDeleteWoW isn't that pretty amazing :)
ReplyDeleteVon x☻x