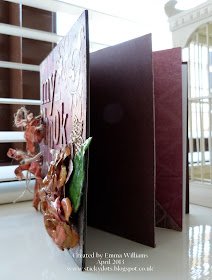
Hi everyone, Emma here and it's already time for me to share my second little creation of the month and today, I'm sharing a mini book that I made...
To begin with, I cut some chipboard to the size that I wanted my book to be and then, using the Tim Holtz Word Play die, I cut out my letters from more of the chipboard and stuck each of them onto the cover. Next, I applied some Grunge Paste through a Crafter's Workshop stencil onto two of the corners and once the paste was dry, I used a combination of Claudine Hellmuth paints and Adirondack Paint Dabbers (Wild Plum, Charcoal Black and Traditional Tan) and started randomly applying the colours to my cover. When the paint was dry, I then applied some white acrylic paint through the Mini Harlequin Crafter's Workshop template, dried off this layer of paint and then added another coat of the Wild Plum, using a dry brush all over the top. Once I was happy with the colours, I then added Metallic Gold Adirondack Paint Dabber and some gilded wax, over the raised areas of the cover to make them pop.
To complete my cover, I stamped random areas of it using black Archival Ink and the Ink Blot Background stamp and the Mini Calligraphic 18 stamp and added one of Tim's Chit Chat stickers, to finish the title of my mini book.
Next, I made my dimensional flowers and leaves, using the Tim Holtz Tattered Florals and the Tattered Leaves Die. I covered each individual petal with Fired Brick and Tarnished Brass Distress Stain, dried them with a quick blast of the heat gun and then made my blooms. Once the flowers were made, I added a touch of gold gilded wax over the top before popping them into UTEE, melted in the Melt Pot and enamelling them.
I added the cluster of enamelled flowers to the corner of my book, together with some metal embellishments from my stash, which I coloured using Distress Paints. I added a few pearls and some decorative pins to the arrangement.
I created the inside of the book by using old 12 x 12" papers, that I made into pages and pockets.
I used the Imagine and Creative stamps to stamp the words onto cream card, blended with Old Paper Distress Ink and added these to my flower arrangement.
I punched two holes through all the pages and the front and back cover of my book and added some book rings to hold them all together. Finally, I dyed some cream seam binding with a combination of Fired Brick Distress Paint and Tarnished Brass Distress Stain, dried it with the heat gun and then tied it around each of the book rings, together with some twine.
So, that's it from me for today and as always, thank you for popping by and visiting and I really hope you like what I've created ~ I can't wait to read all your comments.
Don't forget if you want to join in with this month's TEXTURE challenge, then just pop over HERE and you can see all the details of how to enter and good luck if you do!!
See you all again very soon,
Emma x


This is beautiful Emma. Love that mix of paints, especially the diamond stencilling and textured corners, and yes, those flowers are every bit as yummy as I expected. Hugs, Jenny x
ReplyDeletebeautiful!
ReplyDeleteStunning book Emma and those roses are so beautiful! Great lettering too!!
ReplyDeleteLoving that Emma. Your flowers are gorgeous ;)
ReplyDeletexoxo Sioux
What a gorgeous book, Emma - it looks stunning. But how do you cut your chipboard so neatly? You must have a super-strength cutter!
ReplyDeleteA truly beautiful creation. And the roses are exquisite.
ReplyDeleteYou are so talented.
An absolutely stunning book Emma. Beautiful vintage distressed style and colours and those flowers are superb. Love the Wordplay letters and wouldn't like to be without my die now. Thanks for the different photos.
ReplyDeleteHugs
Lesley Xx
Absolutely stunning, Emma!
ReplyDeleteAlison x
Your book is great, Emma, and I loooove the little flowers, awesome !!
ReplyDelete