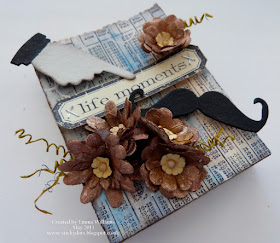
Hi everyone...hope you are all ok and had a fantastic week and now, looking forward to a relaxing weekend!! Today, is my turn to share my "Tag in a Bag" and I've taken lots of photos for you to see all the detail that has gone into this piece!! So, enjoy and as always, I really hope you like what I've created...
To begin with, I created my bag using the Tim Holtz Alterations, In The Bag die from my stash and I used Manila cardstock, to die cut my basic shape. I decorated the die cut bag, whilst flat and not made up, and covered the surface with Weathered Wood, Brushed Pewter, Salty Ocean and Antique Linen Distress Paint.
Next, I used the large stamp from Katy Fox's Numerical Plate and stamped directly onto the painted surface of my bag. I blended Walnut Stain DI around the edges and then used Snowcap Adirondack Paint Dabber and added streaks of white paint onto the bag and a small bottle top to create the circles. I then made up my dimensional bag.
To decorate the front, I used white paper flowers, which I sprayed with Perfect Copper Perfect Pearls Mists. I heat dried the flowers before adding wired stamens to the centres and then attaching them to the front of my bag.
I used the Sizzix Movers and Shapers Mini Moustache and Finger die to die cut chipboard which I then painted using Adirondack Paint Dabbers. I added these, together with a stamped message from the Tim Holtz Simple Sayings Stamp Set, attaching it to the front with the Tiny Attacher.
To create the tag, I used a Manila Size 8 tag which I had to trim down slightly so that it would fit into the bag. Once again, I covered the surface of the tag with the same coloured Distress Paints that I had previously used on the bag.
I built up the background of my tag, using some of the smaller stamps from the Katy Fox Numerical plate and added small amounts of torn tissue tape.
Next, I covered chipboard in sticky back aluminium and I used the Sizzix/Tim Holtz Fleur di Lis and Eiffel Tower Bigz die, to die cut just the tower. I then embossed the tower with the Eiffel Tower and French Script Texture Fade. I applied Alcohol inks to the surface of the tower and then added some Brushed Pewter Metallic Distress Paint over the top.
I attached the embossed tower to my tag and added a strip of Film Ribbon down the side, together with some Idea-ology Mini Gears and a Game Spinner.
As final touches to complete my tag, I added a Idea-ology Muse Token, attached to the side with a Swivel Clasp on a Hinge Clip. Finally, I coloured some cream seam binding with Distress Paints and Distress Stains and threaded this through the hole in my tag and tied it into a bow.
Thank you so much for stopping by to take a look and I can't wait to read all your comments. Also don't forget that we have a fab new challenge this month and it's all about WORDS. So, if you would like to join in, we would love to see your creations.
Have a fabulous weekend and see you soon.
Emma x


So stunning, Emma - the bag looks just amazing with Katy's stamp over the painty background - delicious, and the dimension and finish on your Eiffel Tower is fabulous - a big old WOW from me!!
ReplyDeleteAlison x
Love it...it is so beautiful!
ReplyDeletesimply....gorgeous!
ReplyDeleteOh Emma, I love this!! A totally stunning make! So many fantastic details, all combined into a fabulous composition, gorgeous!!!
ReplyDeleteThat is beautiful, Emma!!
ReplyDeleteGorgeous project Emma xo
ReplyDeleteCompletely gorgeous!!!!
ReplyDeleteDetailed and well crafted - perfect, in fact. Stunning photography as always. So professional - uber-artist!
ReplyDeleteOh Emma, this is stunning, I love the gorgeous colours and all the elements and techniques you have used on your tag and holder - fabulous work!!
ReplyDeleteStunningly beautiful what a fantastic project I love it
ReplyDeletePatricia x
Wow, I love this, so many layers and textures - I wish I had the confidence to do something like this!
ReplyDeleteThis is fabulous, and as for all the photos its great to be able to see different parts of your work as it is all so well coordinated and enjoyable to look at. can see all the work you've put in and its brilliant x
ReplyDeleteWow! Stunning work ;)
ReplyDeletexoxo Sioux
So many details in your card & tag !! I love your work !
ReplyDeleteWow. Amazingly beautiful art
ReplyDelete