
I LOVE tags, and I would be remiss if I didn't share one with you. So I'll take you through a tag of many layers that is simple in design and easily duplicated with any of your favourite stamps.

I start with a #8 tag Manila Tag. To get deep rich colours, you have to use several Distress Inks over the top of each other to create a completely solid coating of colour.

Here I used Broken China, then Salty Ocean and Peacock Feathers to get a deep, rich blue at the top. Then Dusty Concord and Seedless Preserves are added to the bottom. To add a bit of brightness to the centre area, I used Picked Raspberry.
Last a bit of the purples on the top edges to blend in the colours.
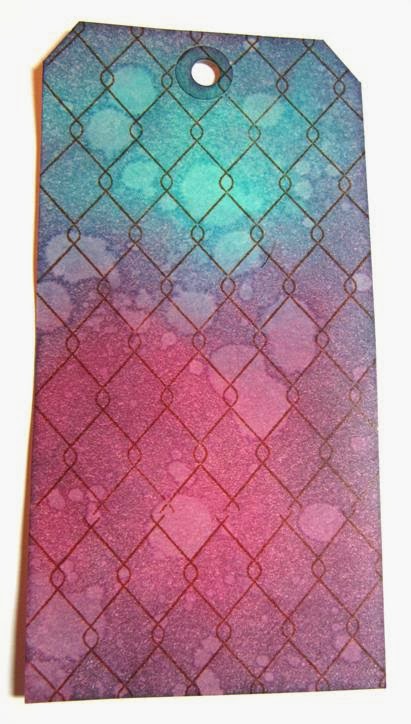
Since you have a nice deep layer of inks, when you add water droplets, let them sit, and then blot off, you get a great effect without loosing all your colour.
Then stamp with Sepia Archival Ink and the Chicken Wire Background stamp.

I used Jet Black Archival Ink to stamp the Darling Child and the Small Bingo Card at the bottom of the tag.
Then I broke out the white Sharpie White Poster Pen to add some detail.

I added the large Bubbles Border and Stitches stamps with Snowflake Fresco paint. The Numbers across the top are from the Numerical Plate by Katy Fox.

I stamped 3 different inks and paper combinations with the boy from from Darling Child. One on Manila Tag and one on Stamping Paper with Jet Black ink, the last one on Stamping Paper with Sepia ink.
I decided I liked the black ink on Stamping Paper the best.

More stamping was added from the Numeric and Darling Child plates.

I used a permanent Gold Sharpie to add colour to the Tag Label, the Arrow, and the Number Brad. Stream Alcohol Ink was used on the Mini Numeral 7 and sanded it down to distress a bit.

For the bow, first spray a bit of water onto the Crinkle Ribbon, then add the same colours of Distress Inks directly from the pad to the ribbon.
Crumple it up and dry with a Heat Tool.

The ribbon is tied into a bow with the #5 Tag Label added with 2 jump rings. I punched a hole through all the layers and added the Number Brad over the stamped number 8.
The Boy is cut out and added with black foam squares for some depth.
Well people, that's it for me. I enjoyed being here with all of you.I hope you've learned something or just had fun following along.
Check out all the links to The Artistic Stamper store and as always, ask any questions you want.
I'm here to serve!
Your Friend in ART,
Linda
This is a very beautiful tag Linda. Thank you for sharing your talent on this blog.
ReplyDeleteA fabulous tag to finish - absolutely love the colours, and of course all the stamps and embellishments. Thanks for some wonderful projects, Linda.
ReplyDeleteFantastic tag Linda! Love the colours and the design. Sue C x
ReplyDeleteGorgeous Tag Linda, love all the layers. Thanks for the inspiration:-)
ReplyDeleteFab tag Linda !!
ReplyDeleteTotally stunning tag Linda, wow!!! Love the colours and I absolutely admire what you did with that little boy stamp, it looks fantastic! The background looks brilliant too. I LOVE this!!!
ReplyDeleteThanks so much! Your works of art always blow me away!!! XXX
Deleteamazing tag Linda - love the background and thanks for showing us all how you created it. fab image too! Hugs rachel x
ReplyDeleteA beautiful tag Linda...I love that image too!
ReplyDeleteDot x
A Gorgeous Tag, and great step by steps. Thank you for joining us at The Artistic Stamper . It has been a pleasure having you on the team for this month xx
ReplyDeleteLoved it! Thanks again Jennie! XXX
DeleteOh my Linda!! I just love the colors and how you used the stamps on this tag. Fabulous make!! -- Mary Elizabeth
ReplyDeleteAb fab! Xoxo Sioux
ReplyDeleteawesoem as always Linda!! TFS!
ReplyDeleteGorgeous vintage tag Linda. Love the colours. Hugs Rita xxx
ReplyDeleteLove this tag ! It is FAB !
ReplyDeleteCorrie x
Fantastic tag Linda! Gorgeous colours & embellishments.
ReplyDeleteWonderful tag!!! TFS! Coco x
ReplyDeletesuch a beautiful tag..made in my favorite colors
ReplyDeletesusan s
Linda... Just LOVE your tag ! Your color choices are amazing as your combination of stamp designs. The end result is awesome. Thanks for sharing this step-by-step tutorial.
ReplyDeleteHugs from SPAIN
une tréjolie étiquette avec des couleurs mafnifique!!!
ReplyDeleteAbsolutely stunning tag, Linda - it's been a real joy seeing your work here at Artistic Stamper this month!
ReplyDeleteAlison xx
A work of art Linda! So many fab details!
ReplyDeleteAlison x
Thanks so much Jennie, and everyone who stopped by. It was a blast!!!
ReplyDelete~Linda
So gorgeous, Linda! I love your work. Thank you for talking us through the process. The stamps you have used are gorgeous,
ReplyDeleteLucy x
OMG, such colours, such depth, so gorgeous. Love it
ReplyDelete