Let me take you through some of the steps it took to get here...
I started by applying various blue/green alcohol inks to the exterior of the jar... The new colours Mermaid and Botanical are in there, as well as Meadow, Stream and Denim.
I just kept dabbing until I was happy with the effect - I love it on the inside too! This would be a good place to stop if you just want a really simple way to light your summer garden evenings.
I debated doing some powder embossing with the flourish stamp, but in the end decided it was way too long since I'd played with the gilding flakes I bought way back when I started this whole crafting hoo-ha. No idea any longer what colour mix this is - and I may even have mixed in various colourways together in my little plastic box.
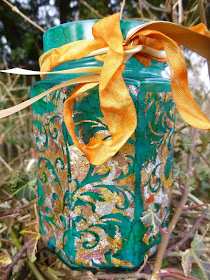
As you can see, I didn't quite get a clean stamping with the Flitterglu on most of the sides of the jar (wouldn't want to attempt this on a round jar, by the way!), but I actually don't mind that, on two counts. One: it means you get a really distressed look, like the lantern has been around the block a few times, and has some history...
Two: it means you get a proper look at the alcohol ink patterns in lots of places, which are attractive in themselves.
Again it was pretty cool from the inside...
... but since the flakes were multi-coloured, I found it a bit hard to tell what was going on with only the very translucent alcohol inks underneath. It was too translucent... I think you can see what I mean here.
I dyed some seam binding with Rusty Hinge Distress Ink and wound some gold and beige satin ribbons together with it to create the finishing touch at the top.
It's a bit wild and extravagant, but I thought it suited the rococo style of the candle lantern itself.
Thanks so much for stopping by today. You've still got about a week to come and play in our Spring is Coming challenge here at The Artistic Stamper. You have to include some stamping, but you don't have to use Artistic Stamper stamps for that... although if you do, you automatically get a double-entry to the prize draw. Hope to see you there!
Ingredients used:
Artistic Stamper stamps - Flourish Background
Alcohol Inks - Mermaid, Botanical, Stream, Meadow, Denim
Seam Binding
Distress Inks - Rusty Hinge
Gilding Flakes - probably a mixture of various colours
From my stash - Jam Jar, Satin Ribbon (but there are plenty of options here too)


Lovely makeover to the jam jar, Alison! A little different from your usual worn out creations that have a "history"...this is one is colorful and vibrant. The gilding flake compliments the alcohol inks and the inside is beautiful too. Thanks for taking us thru the steps. Hugs, Rupa
ReplyDeleteGreat jar!! I haven't used gilding flakes forever either, lol!
ReplyDeleteFab project Alison, it's so good it's making me want to have another go at gilding flakes, each time I have used them I end up in a very sticky mess lol!! This is just gorgeous.
ReplyDeletePretty colours be they jar or ribbons :-) I've never been very successful with gilding flakes but as I have a jar like this sitting empty.....I might get creative later!
ReplyDeleteSally
Stunning, gorgeous, beautiful....need I go on? This is yet another amazing jar transformation! Just love the new flourish stamp and your colour choices! Chrisx
ReplyDeleteLove the colours Alison. I always run screaming from the gilding flakes as they're so messy!! Might have to dig out some jam jars and give this a go though!!
ReplyDeleteAnita x
A stunning result with the flakes and alcohol inks Alison!
ReplyDeleteGreetings, Alie :-)
Alison you have such a way with colours and make the always behave beautifully together. I love the magical tones of this and those flakes are just gorgeous xx
ReplyDeleteGorgeous! I haven't used gilding flakes yet but I'm going to! Thanks Alison.
ReplyDeleteBeautiful project, Alison!
ReplyDeleteAlison, a wonderful and great glittering jar , love the gilding flakes !
ReplyDeleteDorthe ,xo
Lovely lantarn... I have some of those flakes too. Might give them an airing !
ReplyDeleteCorrie x
You did a great job with the gilding flakes, I love the distressed look you achieved! Anne x
ReplyDeleteGorgeous Alison and the addition of the fresco paint really makes your beautiful gilded stamping pop. Wonderful!
ReplyDeleteGenius creation Alison! Nxx
ReplyDeleteWow, Alison, this is sensational! How lovely it will look on summer evenings. This magical creation brings them just a little bit closer. xx
ReplyDeleteYes! Gilding flakes is what I meant, not foiling. Very, very nifty. I didn't realize the newer Tim colors were made into alcohol inks too. This is dangerous info to have. I love the look of the jar after you finished dabbing it. I mean, that's something even I could do. That final product is just glorious!!!
ReplyDeleteWhat a fabulous makeover! Love the colours and all the wonderful gilding flakes. Jennie x
ReplyDeleteWow, absolutely gorgeous jar, the use of gilding flakes combined to this great stamp and this set of alcohol inks colours is a brilliant idea!!! Coco xx
ReplyDeleteThis is absolutely fantastic I bet it looks amazing lit up at night. Brilliant. Dee x
ReplyDeleteBeautiful looking jar, gorgeous colour combo!!
ReplyDeleteI would to a hurricane lamp like this. Lovely. -- Mary Elizabeth
ReplyDelete