Wednesday, 29 July 2015

Small Journal by Gemma


Hi All

So the summer holiday is here and I like to have a little art journal, that I can just toss in my bag when I am out and about.

 I have some 12x12 grunge board that sits around waiting for projects like this as it can take a little rough treatment and that's what happens to anything sitting in the bottom of my bag.


I covered the board with Gesso and left it to completely dry, Then using a brayer I added Phthola Turquoise Acrylic and Dylusions Vibrant Turquoise, I love the fact that because its on the grunge board you get a bitty texture with lots of the Gesso showing through. Using the same colours I stamped over the top with the Grid and Dots background stamps.


On card I stamped the clock,key and dancer. The clock and key were stamped on card painted black and covered with gilding flakes. The dancer was just stamped in black ink. I used the words mask to add the word Art to the corner with texture paste.


Once they were dry I added the swirls using Phthola Turquoise. After deciding I did not like the word white, I painted it black and added a little gilding flake. I finished off by adding some circles using a white pen and a little doodling with a black pen. I then stitched in the pages and added a ribbon to close.

And of course I couldn't waste the left over paper so I made this note pad.


Here I have just added more words from the same mask with black paint, and stamped the Decay swirl,

Thank you for reading
Gemma (inkykitty)

Sunday, 26 July 2015

Tag on my Journal page by Shilpa

Hello Everyone,
Shilpa here,
Hope you are liking our challenge theme this month- Tag. I've seen some fabulous entries already....
you still have time to join in the fun to win some exciting stamps from Artistic stamper.

I would like to share my second post for this month with tag.
I incorporated tags in my journal page.


I've used floral stamps from Botanical plate 1


To start with I adhered tag and textured papers, washi tapes, tissue papers on my page. I gave base coat of thin gesso. Next I applied acrylic paints and inks, spritzed water to allow them to spread. Dried them completely with Ranger Heat tool.


For texture, I used stencil and Prima modelling paste, at some places it took colors from background. To highlight them I used Inka Gold. I stamped texture with text and random dots.


I prepared two more tags which are stamped with Artistic Stamper flowers. I colored them with Big Brush pens.

Hope you enjoyed step out tutorial.

Thanks so much for stopping by.

Products used from Artistic Stamper:


Friday, 24 July 2015

A Spoonful of Good Spirits

Hi Everyone,

Debs here with another Tag to hopefully inspire you to enter this months challenge.

I started off with a large #10 Kraft tag, a plastic spoon some netting, corrugated cardboard and some tape I used Tim Holtz but any washi tape is fine.  And positioned it all on the stage down one side and down to the bottom.


Then I gave it a coat of gesso, and then added Fresh Lime, Lemon Zest and Squeezed Orange Dylusions paint, blending the colours into one another, I made sure that the orange and green didn't touch so as not to make a muddy mess.


After this had dried i then knocked it back with white linen, and then sprayed with Dylusions Sprays in the same colours, this adds a bit more texture to colour.  


I stamped the Flower Fever stamp twice and the Into Each Day once onto tissue paper.  I cut out the flowers and used one of the big one and two each of the rest of the stamp expect the smallest blocked.   Stamped them all with the mini calligraphic mat 20.  Turned them over and painted them lightly with Lemon Zest.  I painted the spoon with gesso and then brushed pewter Distress Paint, when that was dry I put some silver gilding wax over the top to make it shiny!  Added some metal embellishments.


Once i had assembled it all together i added some Brushed Pewter Distress Crackle Glaze.  It does say not to heat it with a heat gun but if you do it bubbles and gives it a lovely effect!


Thanks for checking by and don't forget you still have a week to enter this months challenge.

Products used
Ranger #10 Kraft tag
Washi tape
Metal Embellishments
Dylusions Sprays
Dylusions Paints
Flower Fever
Mini Calligraphic mat 20
Into Each Day

Wednesday, 22 July 2015

A Heart full Of Swirls By Dee


Hi everyone hope you are all well and enjoying your summer.
In keeping with our challenge this month I have a
Tag for you today.
I was having a play with the New Artistic Stamper stamps, I had stamped 
the decay swirl in blue and painted over with sage 
fresco finish paint. 
Next I stamped the swirl stamp in frayed burlap distress ink
and clear embossed.
I coloured a piece of card with delusion sprays and 
then applied Finnabair's 3D gel through the 
swirl mask.
It was swiped with silver gilding wax I ripped pieces
of and attached them onto the tag.
I cut the heart out of black foam board I clear embossed the
swirl stamp onto the foam board ad painted it in green.
next I swiped silver to make it stand out.
I wrapped metal wire around the heart and cut out some of the dylusion 
coloured card and attached that to the heart to break it up.
Next I wrapped ribbon around the tag and attached the
silver beads to the tag.
Well that's it for today I hope you have enjoyed this post
please let me know what you think.
Cheers Dee x
Products used
  1. Artistic Stamper Stamps decay swirl background, open swirl stamp, swirl mask.
  2. Dylusion sprays in Chopped Pesto & Pomegranate Seed.
  3. 3D Matte Gel.
  4. Fresco Finish paint in Sage
  5. Distress ink frayed burlap
  6. clear embossing powder
  7. Silver gilding wax


Sunday, 19 July 2015

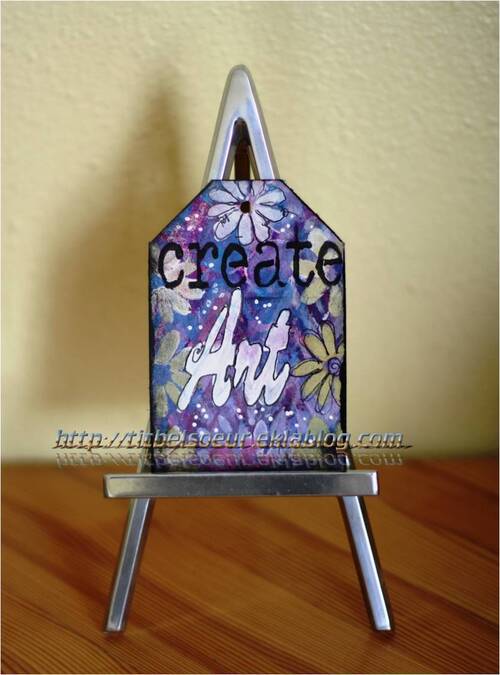
Another tag by Titbelsoeur


Hello happy taggers !
Another tag to help you participate in our July challenge !


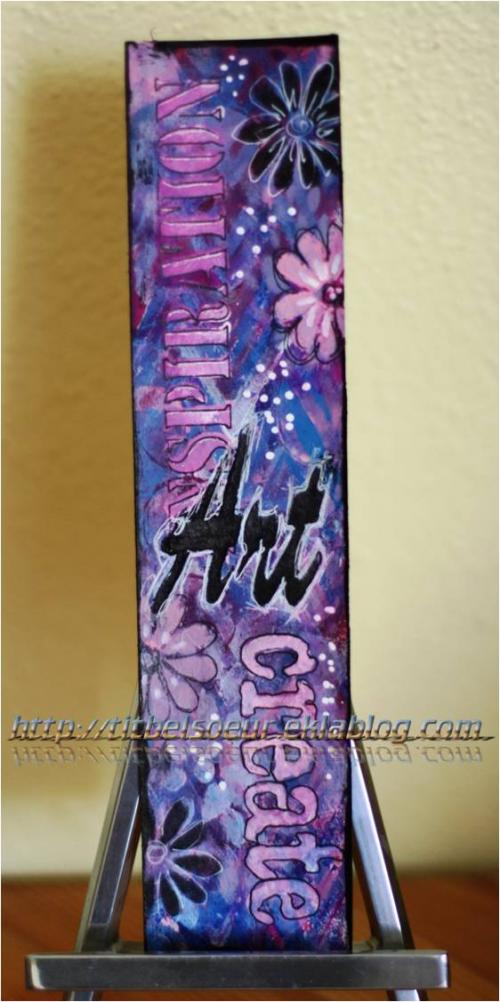
 This one is made with masks, but not only ! I have also used some of the fabulous Artistic Stamper new stamps !
The words "create", "inspiration" and "art" come from the Words mask, and the stamps are Decay Alphabet lower case and Decay Swirl Background
The Create words were masked with gesso and I heated it so that it bubbles :


Thanks so much for stopping by,
your comments are very much appreciated.
I hope that my tag did inspire you and that
you will participate in our July challenge
 to win some fabulous Artistic Stamper stamps.

Titbelsoeur

Thursday, 16 July 2015

Altered CD by Gemma Hynes

Hi All

So this is my very first post for The Artistic Stamper Creative team. I was honoured to be invited to create along side such a  talented group of people and needless to say there was a lot of jumping around when I got home and shared the news with my partner.


I have always loved music and have collected just a few CDs, Recently I started to add them all to the laptop. Leaving me with lots of now useless disk's, that I could not possibly just put in the bin. So after some very good suggestions from people, I decided to paint them.


 To start I coated them with a layer of Gesso. Over that I used Dylusion's Squeezed Orange and Fresh Lime paints which I applied with a brayer. Using Squeezed Orange  I stamped over the top with the Grid Background


On a stamping block I arranged all the words from the Dance stamp set and stamped over the CD repeatedly to cover the whole disk. I heat embossed this using a clear embossing powder.


On a small piece of card that I had painted earlier with the left over orange paint. I stamped the Dots background in a couple of places, after I stamped the clock face twice to cover the hole in the disk both sides of the CD. To finish off I stamped and embossed the dancer from the dance stamp set and doodled with both a black and white pens.

Thanks for reading,
Gem (inkykitty) xxx


Monday, 13 July 2015

Rustic Tag by Shilpa

Hello Everyone,
Shilpa here,
Today I would like to share with you a tag...which is the theme of July challenge at Artistic stamper

I've used here Bird stamp from Artistic Stamper Birds of a Feather set,  AS Calligraphy mat 13, AS Free as a bird set.

I've small step by step for this tag,

I chose thick chipboard to make this tag. To start with I applied thick layer of modelling paste and stamped on it with AS Calligraphy mat text at one corner. On other corner I used stencil and modelling paste. Let it dry completely.


For base, I applied black gesso. It looks exactly like this..somewhere you will find the texture. :)


As I wanted rustic look, I applied distress paints - Gathered Twigs, Antique Bronze, Pine needles, cracked Pistachio with dry brush.


To highlight texture, I gently applied Inka gold old silver on raised area. 


this is a close up view.


 I stamped the bird with black archival ink and colored it with watercolors.
Leaf stamp is from AS Botanical plate2, which I stamped with distress paint, fussy cut it.
 Frame is from Tim Holtz industrial stickers


Are you liking it? Do let me know !! :)

And don't forget to participate in our monthly challenge to win fabulous stamps from Artistic stamper.

Thanks so much for stopping by. I'll be here with another project in two weeks, between you can find more mixed media inspiration at my blog - Neon diary


Friday, 10 July 2015

Make me live tag by Debs

Hi All

I had a bit of fun with sprays and stencils on this tag.


I started with a large craft tag and covered it with gesso

Then out came the ink sprays, I used Dylusions and Distress ink sprays and stencils.  I started by putting a layer of just ink down, waited for that to dry off and then sprayed more ink through stencils until I was happy with the background.  Whilst I waited for it all to dry I stamped one of the Gibson girls onto plain white card with brown archival and coloured her in with distress markers.


Once the ink was dry, I then stamped the swirly stamp from the Decay Journaling stamp set in Peacock Feathers and Salty Ocean, after these were dry i also did a couple in Archival black.  The words were stamped as a block onto white card with Archival and then cut out the words that I wanted.  I used grunge paste with the swirls and splodges stencil, one of the nice things about grunge paste is its ability to soak up the ink that is underneath it, meaning in. This instance I didn't need to colour it.  I made a large paper flower with a die, some book pages and stuck a wooden bead in the middle.  Then re-arranged the words and stuck them down.

Hope you are all enjoying this months challenge.  See you all soon

Debs

Products used

Artistic stamper Masks


Tuesday, 7 July 2015

No stamp for this project ! By Titbelsoeur

Hello happy maskers and stencilers ! this project is for you !
My challenge for this post was to use NO STAMP AT ALL, but Artistic Stamper's products though... and I succeeded !

And I hope you will appreciate this step by step :
Starting with spraying ink through Chevron Mask 6 x 6"


 positive and negative ways :
 then applying acrylic paint with a brush :

then Large Dot Mask 6 x 6" 

 which hid the chevrons... then back to chevrons, gesso with a brush :
 here it is :

Now let's use new masks such as Petal 6 x 6" 


 When finished, I cut the paper in 3 pieces : 2 tags and a bookmark

Last but not least : Word Mask 6 x 6" and Flowers & Leaves long © Lesley Matthewson 4" x 11"


tag
tag
tag

You will find all these masks HERE


Thanks so much for stopping by,
your comments are very much appreciated.
I hope that my tutorial did inspire you and that
you will participate in our July challenge
 to win some fabulous Artistic Stamper stamps.
BUT you must use at least one stamp to participate...
I am the only one allowed not to use one :o)

Titbelsoeur