Saturday, 30 August 2014

Simple card - Flower power

Good day)) 
Here is Maria Porapovich (mellpellmell) for you today)

Today I want to share with you another one of my simple card.

As always, lately I've been trying very much to make a card as easy as possible - fewer layers, fewer parts, but more sense, more effect...


At this time, the only distinguishing this card from the remaining cards with flowers the detail - this vase. It is made in the simplest way - from a rectangular piece of paper - folded and glued. 
It is the vase which I put a flower in.


Looking closely, you will see that the flowers are painted using watercolors, colored pencils and gouache pens, and there are few drops of acrylic paint appeared on the card's background.


I've used the Botanical Plate 1 (A5) stamp for creating this card.
Isn't it lovely?)))


Thanks for visiting us today and will see you next time! <3 <3 <3

Wednesday, 27 August 2014

Mixed Media Canvas - You & Me

Hello Everyone,
Shilpa here,
Today, I've a Mixed Media Canvas to share with you.


In my this canvas I made 'the Light bulb stamp'  as a  focal point. Those stamps are from Artistic Stamper 'Steampunk' Collection stamps.


It all started with layers of design papers and graph papers from stash. I attached flowers, shells, buttons, small light bulbs,small wooden heart with 'love' carved on it, paper clips, small cloth clips as my second layer. Applied gesso, as I wanted to get uniform colour on them. When it dried  completely, I stared layering my ink colours.


I've used blue , green and yellow from Lindys stamp gang spray inks. I stamped text with Artistic stamper calligraphy mat 4.


I stamped the Light bulbs with Artistic stamper Inspiration Light bulb and Ranger Archival Inks. Fussy cut them and attached them with foam tabs.


It is always fun to mix and match crafty and artsy ingredients to create something beautiful. I hope you liked my adventure here. Waiting for your comments!!
Thanks so much for stopping by today.

Supplies used:
Lindys stamp gang ink sprays
Design papers from my stash


Tuesday, 26 August 2014

For all of your Truckin Needs by Astrid

Hi everyone, thanks for dropping in. This is Astrid with my second August project.
Life has been a bit like a truck for me just lately, and I needed a project that was quick and easy, well this wonderful new Debbie Cotton stamp came to the rescue, - a quick and easy card.
The card is a large 7 x 7" card, so this is a pretty big stamp. I stamped it in Jet Black Archival ink and then clear embossed it.
Next I cut myself a couple of masks from some scraps of card:
I then started on a first layer of colour using Vintage Photo, Gathered Twigs and Stormy Sky Distress inks.
At first I had thought to keep it all quite neutral and masculine, but then I felt that the sky (and clouds) looked rather weird, so decided to add more colour to the truck to distract from it.
I used some water colours and water soluble coloured pencils to further colour the image and also added some hand drawn grasses and tried to do some more work on the sky to make it look slightly better. This is what it looked like then:
I mounted it on two layers of craft card and then created some autumnal embellishments with the help of some of the fabulous Katie Leitch Leaves Stamps, stamped, coloured and then fussycut. I also added a few die-cuts and berries from my stash.
Well, there you have it.... life sometimes runs in the fast lane and if you are in need of a quick project, these fabulous new stamps certainly come to the rescue.
Thanks for visiting today and see you next time!

Sunday, 24 August 2014

Gentle Journalling

Hello all, Alison (butterfly) here.  I've been trying to be gentle with myself in the run-up to my big journey.  It's been so busy round here that I needed the little play time I've had lately to double as mind-calming relaxation, so I just did some gentle journalling in the pages of a book.  It's only looking at it now that I realise how much of a story it's telling about my imminent adventure!


All being well, I should be en route to the States later today - yes, the passport arrived with the visa inside just in time!  I'll be in New York working on a production of Christopher Marlowe's Tamburlaine.  So while these pages provided a little respite in a crazy August of work and admin and preparation and packing, they also clearly have that sense of taking flight into new adventures built right into them, along with some ancient text.  (Okay, it's not ancient text I'll be working on, but it is more than four centuries old!)


I started from the idea of wanting to "preserve" some of the original book text, and I used Katy Leitch's butterfly silhouettes to do it.  They're stamped in Versamark and then clear-embossed.


Next came a wash of Chalk Fresco paint, and while that was still wet, I swept some Turquoise on too.  (Both colours are from the new Limited Edition JOFY set.)


Through all the later stages I did my best to keep them clean and clear so that the text would stay fully present.  I do like how they'll still catch the light and gleam at certain angles.


I used one of the Artistic Stamper masks to create my largest bubbles of positivity sweeping across and up the page spread.  (That seems to be the direction my art journal pages move in - look!) I sponged through the mask with Faded Jeans and Broken China Distress Inks and then did some shading and highlighting with pastel pencils.


Over that I stamped the Artistic Stamper Large Random Dots in both the Chalk and the Turquoise.  And finally I did some spattering with the inner stick of the Dylusions White Linen spray.


I seem to be a little bit obsessed with the meadow grasses from Tim's Spring Sprung stamp set at the moment, so they put in an appearance along the foot of the page.  And I used the Mini Polka Dot Background to add extra texture around the sky.


The tags had been soaked in tea and coffee, and then I stamped the beautiful Calligraphy Mat 4 in Sepia Archival Ink.


The large words from Journalling Words 2 are stamped in Sepia, as are the blots and splotches from the Katy Leitch Messy Art plate.  The big words got a bit of clear embossing for that magical extra shimmer. 


Once they were glued down, I used a couple of Inktense pencils to shade and outline them.  I really love how that makes them pop against the turquoise sky behind. And I tied some rustic twine through the tops of course.


There's a little bit of Vintage Photo and Gathered Twigs inking all the way around the edge, but that's about it.  This was just a little oasis of calm in my crazy August, and I had a lovely gentle time playing with it!

Thanks so much for stopping by.  There's still a week to enter our Anything Goes challenge this month - no need to use Artistic Stamper stamps, but if you do you get two entries to the prize draw.  Hope to see you there.

Ingredients used:
Artistic Stamper masks: Large Dot Mask
Dylusions - White Linen
Fresco Finish Paints - Chalk and Turquoise from the new JOFY Limited Edition
Archival Inks - Olive and Sepia
Versamark embossing ink
Distress Inks - Faded Jeans, Broken China
From my stash: twine, book, Spring Sprung stamps, tea and coffee!

Saturday, 23 August 2014

Journey of the Butterflies by Dee

Hi everyone! I hope you are all enjoying the summer.
Today I have a tag for you.


I put grunge paste through a Tim Holtz cargo stencil to spell Fly.
Once dry I painted the tag with Fresco Finish Paints in the 
following colours Inky Pool, South Pacific,
Beach Hut, Ice blue, Hey pesto &
Guacamole. 


Once dry I stamped the flowers from Encyclopaedia Botanica down both sides
in black archival and highlighted areas with pumpkin soup and ice blue.
The newspaper print from the stamp I stamped with snowflake
down the right hand side at the bottom of the tag.


To the left hand side I stamped the squiggle line from the borders plate
 in chipped sapphire and gold embossed it. On a separate piece of card I
coloured it with distress inks in wild honey and faded jeans
I then stamped the flowers from the botanica plate,
and the butterflies from the insects and 


I triple embossed the clocks of the Tick Tock plate and cut them out.
I used a small clock face to finish this off.


Once I had cut out the butterflies and flowers and highlight areas I
 embellished the centres with sequins and beads.
Next I sprayed the butterflies with perfect pearls in Blue Patina,
Cappuccino and Heirloom gold. The wings were then
 highlighted with glossy accents.


Small beads were applied to make up the bodies of the butterflies along with


The bottom was finished off with a Tim Holtz die cut painted in gold leaf.


That's all for today I hope you have all enjoyed this project . 
Please feel free to leave me comments 
Happy stamping!
Dee x


Materials used :- 
Fresco Finish paints, Inky pool, South Pacific, Beach Hut, Ice Blue,
Hey pesto, Guacamole, pumpkin Soup, and snow flake.
Distress inks, Faded Jeans, wild honey, glossy accents.
Perfect pearls, Blue patina, Cappuccino, Heirloom Gold.

Thursday, 21 August 2014

Step by step card by Titbelsoeur

Hello happy card-makers !
Are you ready ? 
I receive a lot of thank-you cards from charities. And I don't send a lot of cards. And would I send such cards, my friends would think I don't care a lot about them, otherwise I would send them my own home made cards...
And I hate to waste things...
Hence this tutorial !


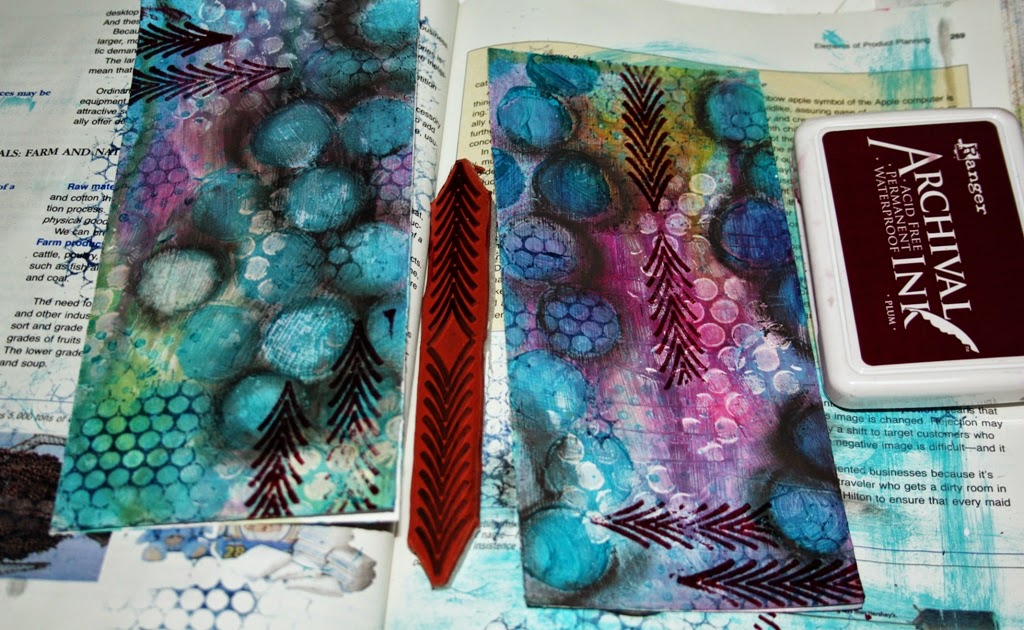
I started gessoeing the cards with a rough brush to create structure, I have completed with a small cap on the left card and a credit card on the right one :


I then sprayed the cards with inks and let the ink drip


and wiped the remaining with a kitchen roll


I wanted to have a try on a technique...


 ... but it didn't work as I wanted to... so I spread the paint on the whole of the cards


and sprayed ink again...


 I made circles with white and turquoise-blue acrylics on the circle dots Mask :


and used another mask from my stash to make small dots in white :


Some blue paint on the Dots stamp in the Backgrounds


 and Cobalt archival ink on the Sequin one


 Plum Archival ink on a Chevrons Element, and charcoal pencil around the circles to underline :


Some drops of white here and there, then I coloured the edges with the remaining of my blue melange, applied with an umbrella brush for a random effect :


 Here it is !

Now it lacks of a bit of sentiment, doesn't it ? I stamped these Grungy greetings on to a background :


and... do you remember ? I showed you this technique some time ago, here :

Background stamps part II by Titbelsoeur

I stamped the Neil Walker's Franswar on to this page :


and here he is :


I have taken the opportunity of a quick sunshine to take the pictures of the finished cards in my backyard :


And... last but not least... don't throw your paper towels away ! I will show you how to make recycled cards with it... stay tuned !


Thank you so much for stopping by, I am always looking forward to reading your comments below...
 
A tout bientôt !