Sunday, 29 May 2016

Kiki stamp tag by Gemma


Hello Everyone

For my post today, I have created a very grungy tag with the fabulous Kiki stamp designed by Neil Walker. 


I ripped up some book paper, glassine paper and tin foil that I had run through an embossing folder, and glued them onto a plain manilla tag.


I then dragged some gesso over the top, leaving some patches bare. While the gesso was still wet I pressed some Finnabiar art ingredients texture powder into it.


I then mixed some espresso coloured acrylic paint with some Decoart tinting base, applying it over the tag using a palette knife. After running the heat gun over the top I stamped in places with calligraphy mat 11 using archival ink. I added some more espresso coloured paint and some texture powder, to the paint I had previously mixed. I added enough power to form a thick paste, which I spread through the new random dots mask.


Onto tissue paper I stamped Kiki and a few cogs from the Tick Tock stamp plate, once the ink was dry I went around each image with a water brush before tearing them out.


I glued these into place on the tag with gel medium, both underneath the tissue paper and on top to seal them.


I went around the tag with more espresso brown paint, and stamped some cogs over the top with ground espresso Distress Ink. To finish I stuck down some torn bits of washi tape and scribbled in places with a white paint pen.


Thank you for reading
Gemma (inkykitty)

Thursday, 26 May 2016

Farewell to Artistic Stamper and my top picks

Hello Everyone,
Shilpa here, 
and sadly this is my last post at Artistic Stamper Creative Team Blog.
I was on design team for 2 amazing years. This was my first international team and I owe to Jennie and earlier talented team members Alison Bomber, Alison Hall ,Astrid  for choosing me.
I literally grew here, in a creative way as well as personal way!
Jennie is fantastic boss, very generous, very supportive! Thanks Jennie for being there, ALWAYS!!
And my current team mates are inspiration to me.
With all mixed feelings.. saying goodbye.

Today I would like to share with you my few of my favourite posts on Artistic Stamper Creative Team blog. (Picture heavy post)


Hope you enjoyed looking at my past projects!
I would like to say thanks to you all for your support and comments.
I will see you around in our blog land.
here are my Social Media sites


Sunday, 22 May 2016

My Farewell to The Artistic Stamper

Hi everyone! Dee here with my farewell post for the Artistic Stamper.
I am sad to be saying goodbye to a fabulous team and I would like 
to say a huge Thank You to Jennie for being an 
amazing boss over the last two years.

I have learnt and developed so much from being part of this amazing team and
I have looked through my past two years and brought you 
my top viewed posts over that period.

The team challenges and all the amazing pieces of art that 
are entered into 
them.


The result of a play with Ariondack colour wash you have got to
love how vivid these colours are.

The Book Of Halloween

My first piece of art using Deco Art products. I visited The Artistic Stamper
 for its annual Birthday weekend & Mark Gould was demoing there. 
I created this piece after he had showed me the technique
 using the antiquing creams.

Ohh!! I Do Love a Dragon fly By Dee

This is one of my favourites I think this is one of my most favourite
stamps along with the Neil Walker ones.

A Colour Explosion!

A play with pigment powders and the lovely effects they 
create.

Gothic Arch's By Dee

This one is one of the top viewed post's that I have done for
The Artistic stamper I love the window arch stamps 
I really struggled with this post as I wasn't
happy and changed it 3 times but
you guy's loved it.
I hope you all enjoy the reflection and let me know which is you 
favourite one.

 If over the last two years I have managed to inspire
you in some way through my art that would 
give me a great sense of satisfaction.
Thank you to you guys for being a source of 
amazing support.
Thank You
Dee x


Thursday, 19 May 2016

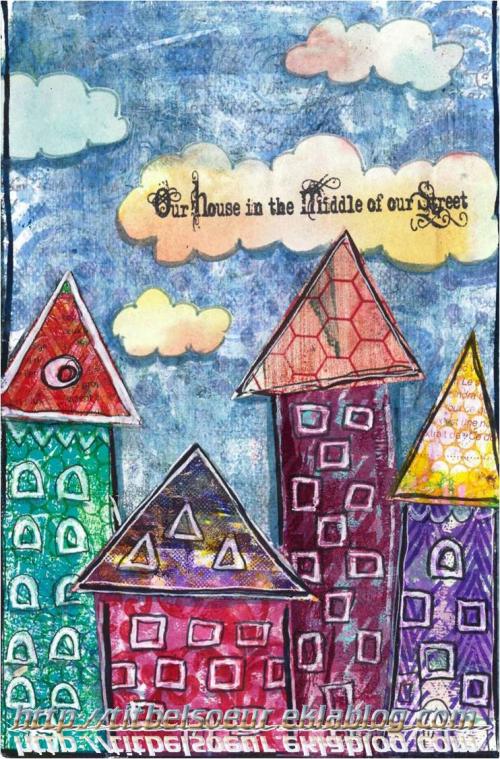
Village by Titbelsoeur

Hi there !
Do you want collage ?
Do you want a village ?
This is good news, since here is the one I made for you :

I started stamping paper scraps with Artistic Stamper background stamps (Did you know that we have 90 background stamps ?) :

Here are the ones I have stamped on my scraps I had cut as houses and roofs :


AS


To give volume to my sky, I have used another background stamp, Large Random Dots,  and Journaling spirals from Decay stamps and cut clouds in other monoprinted paper scraps, then stamped the Our House sentiment from Kat's creations on one of them :


AS

Did you notice that in the end, I have replaced the "dots" roof by a "honeycomb" one ?

Thanks so much for stopping by,
your comments are very much appreciated, 
here, on my blog, or on the Artistic Stamper's Facebook page

Did my project inspire you to participe in our
 to win some fabulous Artistic Stamper stamps ?

Titbelsoeur

Monday, 16 May 2016

Bird Canvas by Gemma


Hello Everyone


This canvas roughly measures 5 x 6.5 inches. The background for this canvas changed a lot while I was working on it. I started off by tearing two pieces of patterned paper and gluing them to the canvas with a gel medium, over that I scraped some crackle paste and paint. I was fairly unhappy with the results and ended up going over the top with gesso, but some of the texture can still be seen underneath.


On the bottom third of the canvas I stuck bits of washi tape, and as the gesso was still wet I blended in blue acrylic. I then watered down some Teresa Green Fresco Finish paints and wiped it over the washi tape. I dried off those layers and then stamped over the blue paint with a slightly darker shade of blue and the honeycomb stamp. I stamped over the washi tape with a darker shade of green and the petal stamp.


On a sheet of white card I stamped out two birds and nine circles using black archival ink. I painted them using Tangerine Twist, Banana, Tango and Cherry Red Fresco Finish paints. I stamped over the top of the circle with the petal stamp using the same colour paints.


I then cut them out and using gel medium I glued the bird in place and the circles layering them up largest to smallest.


 I brushed some ground espresso distress ink around the edges, and then using a black pen I drew in the stems of the flowers. I edged everything with the same black pen and drew in few leaves on the stems.


There is still plenty of time to join in this months challenge both on the blog and on the facebook page here

Thank you for reading
Gemma (inkykitty)


Friday, 13 May 2016

Collage Journal page by Shilpa

Hello Everyone,

We have the theme for this month's challenge - Collage

I created this journal page with Artistic Stamper Collage Art 1 stamp set.

Actually Collage is fun and very easy technique. Here on my pages, first of all I adhered old book pages, Tim's tissue paper, washi tapes. Next I stamped that collage lady image and butterflies images onto the pink paper, fuzzy cut them and attached. 
Further I used distress paints- worn lipstick, Broken china and evergreen bough, to bring on color on the pages.
Hope you liked my page and got inspired,
Don't forget to join us for Collage Challenge this month

Products used from Artistic Stamper:


Tuesday, 10 May 2016

3D Collage by Debs

Hi All

Debs here with my latest project to tempt you to join in with this months challenge.  The dictionary gives the definition of collage as a piece of art that is made up of fabric and different pieces of paper.  See if you can see how many different types i have used, before you read on.


I took a canvas and flipped it over

I lined inside with a piece of hessian and added some grunge paste through the new stencils from The Artistic Stamper i used the Honeycomb and Random Dots, this helped to cover the staples


I painted the hessian and dried grunge paste with Paper Artsy Fresco Finish in Dusty Teal, Teresa Green and Baltic Blue.  I stamped the Border A6 plate and stamped the dotty border onto a piece of tissue paper, and glued onto the frame/canvas


I used a piece of green felt and die cut Tim Holtz and stamped it over with the cogs border again from the Border A6 set

I stamped the birds from the Small but Beautiful Bird stamps onto a book page

I also stamped the birds onto tissue paper

I stamped Imagine from the Journaling Words 5 plate

I had great fun making this and am looking forward to seeing more of your wonderful projects on here and on the Facebook group.  So get sticking with those bits of paper

Debs


Saturday, 7 May 2016

Butterflies and dragonfly by Titbelsoeur


Hello everyone !
To meet our monthly challenge about collage, I have made this tag which is made with 3 layers of collage.
Here is how I made it :
First cut the cardboard as a tag, then peel it here and there and add gesso there and here :)
When dry, glue paper on it, such as dictionary, map, book or phone book scraps, this is the 1st layer.
As a second layer, glue template scraps, stamped tea bags (Collage tag in Collage & Retro)...
And the third layer gives volume to my tag, as I stick butterflies and dragonfly from Butterflies & Birds


Thanks so much for stopping by,
your comments are very much appreciated, 
here, on my blog, or on the Artistic Stamper's Facebook page

Did my project inspire you to participe in our
 to win some fabulous Artistic Stamper stamps.

Titbelsoeur

Wednesday, 4 May 2016

Crystal Encrusted Flourish Chest by Dee

Hi everyone Dee here with a encrusted chest that 
I have made out of various techniques.
I started with putting modelling paste in the middle and 
corners of the box.
Once a skin had formed on the modelling paste I used the 
flourish from the ornate 2 plate to stamp
into the paste.
I used silver sequins from my stash to embed in the modelling
 paste.
Next I covered it all with white gesso followed by 
crackle paint on the lid sides.
Deco arts prussian blue hue was painted on in washes
till happy with the result.
A mix of silver, pewter, white & turquoise embossing powders 
was used to add extra interest.
White embossing powder was sprinkled over to add 
to the contesting colours.
I triple embossed the flourish into melted embossing
 powder.
A close up.
Another showing micro beads that I applied around the 
corner and the base of the box.
Thats all for today thank you for popping by.
Cheers Dee x
Products Used
  1. Artistic Stamper Stamps used were the Flourish BackgroundFlourish Ornate 2
  2. Deco Art Prussian Blue Hue.
  3. Modelling paste
  4. Crackle paint
  5. Embossing powders