Friday, 27 June 2014

A Journey is measured in Friends

Hello Everyone,Shilpa here,
Hope you loved the theme of our June challenge and linked up your beautiful projects here. If  you have not yet... I brought you bit of inspiration,


I started off with thick chipboard 8*10" which I gessoed first. To create the texture I stamped the Calligraphic Mat 4  and  Random dots on the tissue paper with  Black Archival Ink. And adhered it on the surface. And gessoed again to push it in background.


I blended Peacock feather, Tumbled glass, Stormy sky and Picket fence Distress paints and sprayed water to get the colour on, as I was trying to make it blue sky. Allowed it to dry thoroughly with my heat tool. For some more texture I used Crafters workshop spinning tops stencil and peacock feather distress ink. I stamped circles with white acrylic paint randomly on the background.


I stamped these small green branches at the edges with Katy Leitch's  Botanical plate2  stamp set and Fern Green Archival ink  Aren't they lovely?


 At the bottom corner, I stamped  with small flower from  Botanical plate1 and Staz on Blazing Red and coloured them more with PIIT pens


And these beautiful butterflies are from New Neil Walker stamp collection at Artistic stamper. I stamped them with same Blazing red Staz on ink. I also applied Mod Podge and sprinkled Clear Rock Candy distress glitter. I've taken this photo in sun, hope you can see the shimmer.


And finally added these words from Traveling stamps set.

We have theme 'Red' for June challenge, you still have 3 more days to create and participate in the challenge.  Hope I inspired you... Thank you so much for your visit today....see you next month!!

Supplies used :
Artistic Stamper Stamps:   Calligraphic Mat 4, Random Dots , Botanical Plate2, Botanical plate 1, Butterfly - Neil Walker stamps

Staz On Inks: Blazing Red
Ranger Jet Archival Ink, Fern Green Archival Ink
Crafters Workshop Stencil - Spinning tops
Distress Paints - Peacock feather, Tumbled glass, Stormy sky, Picket fence
Faber Castell - PIIT Pens
Clear Rock candy distress glitter
From my stash - Chipboard, Tissue paper


Thursday, 26 June 2014

Playing with Paperclay

Hello everyone, this is Astrid with my second June project.
It's the wedding season and I decided to make a romantic vintage piece that could work as a wedding gift, or indeed any occasion gift.

Did you know that the shop sells a fantastic collection of moulds? These seem to be ever more popular, and for my project I decided to have play with them.
Moulds can be used with all sorts of products, embossing powder, Utee, - there is even a special product made by Modge Podge, called Modge Melts.
For this project I chose to play with paper clay, as it is light, can easily be painted and works beautifully with the more delicate moulds.
These are the products I used:
Stamps:
Botanical 2 by Katie Fox (now Leitch)
Leaves Background
Regency Background
Botanical 3
Moulds:
Floral Circle
Silicone Butterfly Trio
I also used Distress Paint in Antique Linen and Pumice Stone and Black Stazon and Coffee Archival Ink and Antique Linen, Gathered Twigs and Walnut Stain Distress InksShrink Plastic, and Distress Markers.

I started by die cutting a fancy frame from Kraft card and stamped the Leaves background in Coffee Archival onto it. This was a second generation stamp impression as I wanted it fairly light and my ink pad was very juicy.
Next I cut another fancy shape out of white card and stamped the Regency Background in Antique Linen Distress Paint.
Then I painted both my frame and butterfly with the same paint
I darkened the edges a bit with Pumice Stone paint and then rubber over it with some Treasure Gold to bring out the detail of the designs.
For my vocal image I chose the largest rose from the Botanical 3 set, stamped it onto Shrink Plastic in Black Stazon and shrunk it with my heat gun and then coloured it with Distress Markers. It was now the perfect size to fit inside the little frame!
Finally I cut a banner with the new Tim Holtz banner dies and stamped the word  Les Fleur from the Katie Fox Botanical set onto it with Coffee Archival.


Then I inked around the edges of my main background pieces in Gathered Twigs and Walnut Stain Distress Inks and layered them all up until I was happy with my composition:


The little embellishment at the bottom was from another mould from my stash and I hung my little hanger from some cord.
Here are some details still:
I love the detail you get when stamping onto shrink plastic, I think it makes the rose look so dimensional.
With really detailed moulds like these, I found it works best to let the paper clay dry in the mould over night. The clay shrinks just a little bit and then easily can be pushed out of the moulds.
I was really happy the Fleur sentiment fitted just perfectly on the banner.
Well, there you have it. Hope you like my banner, thank you so much for visiting today, and don't forget, there are just a few days left to join our challenge!!!

Tuesday, 24 June 2014

Simple Cards

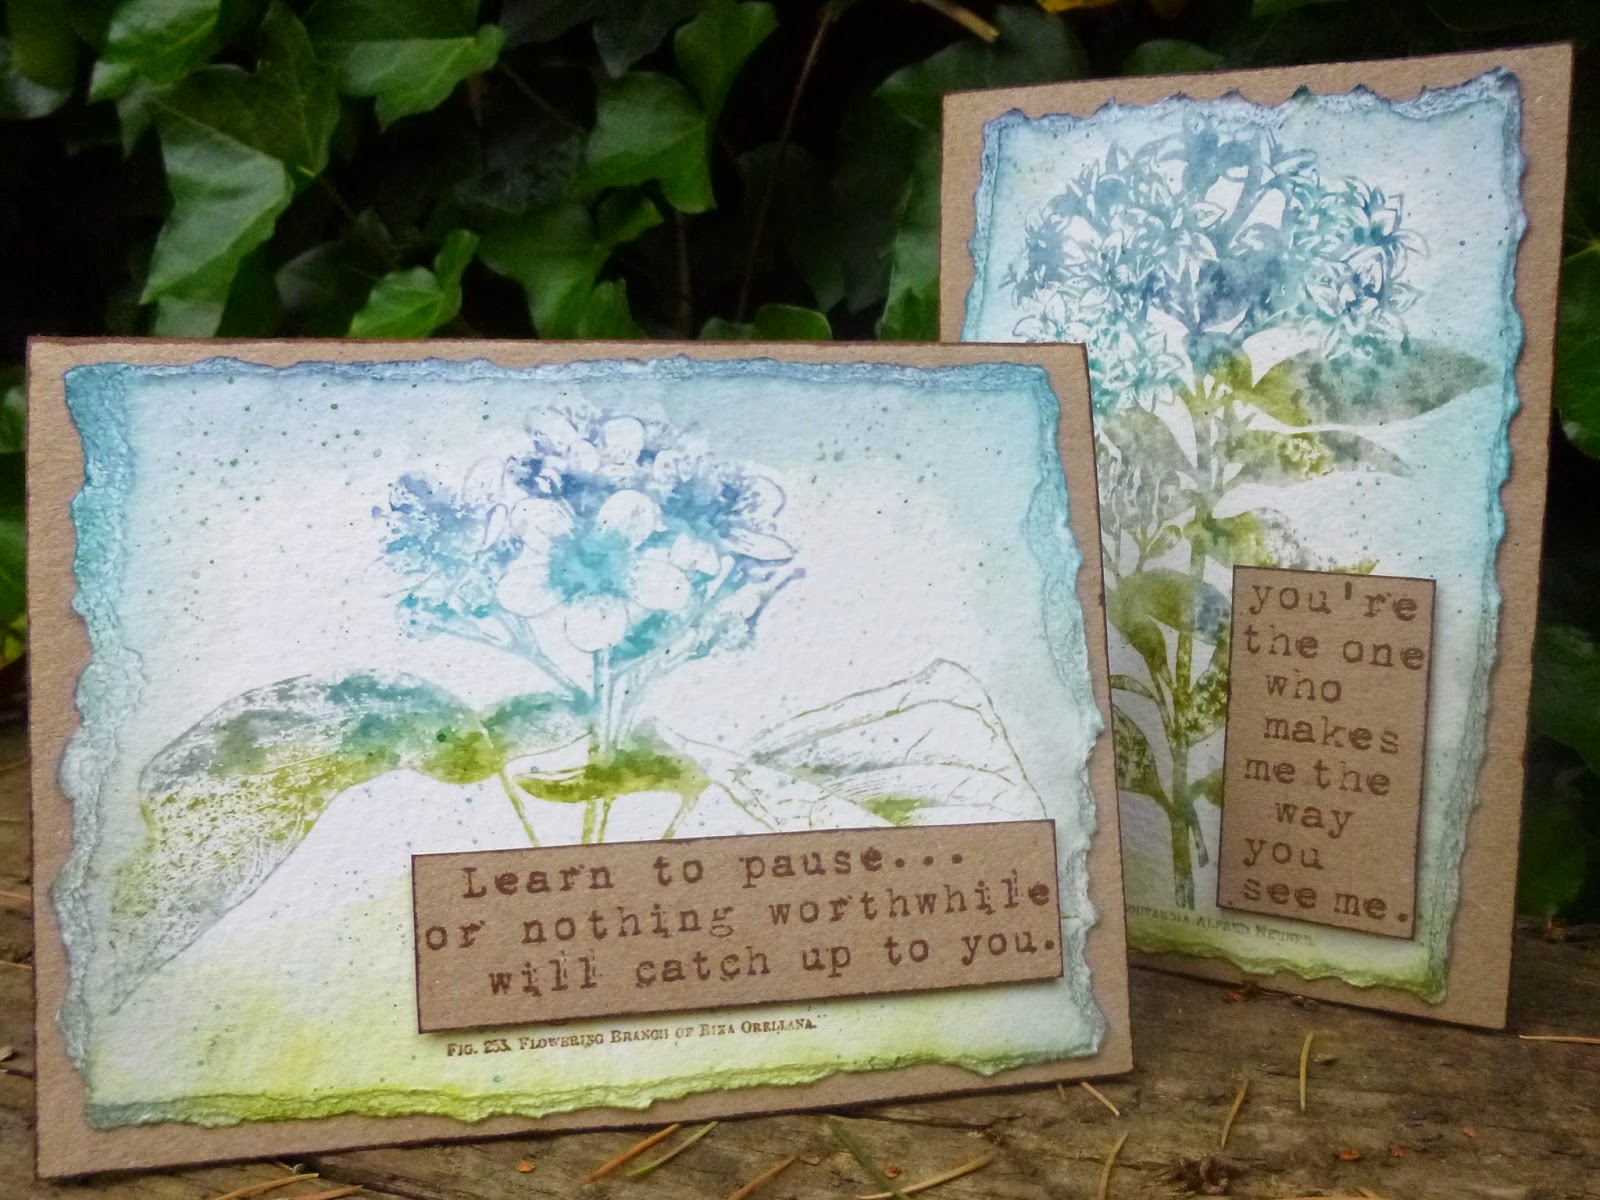
Yes, it is Alison (butterfly) here and yes, you did read that right...  Not only is today's project very simple, it also consists of a pair of cards.  Regulars at Words and Pictures will know that's a very strange double whammy indeed!  Still, it should mean a shorter post than usual!!


I wanted to play with the magnificent giant flower stamps, new from Katy Leitch.  I started by applying Distress Inks to the stamps, graduating the colours roughly from top to bottom.  I used Faded Jeans, Broken China, Iced Spruce and Peeled Paint.


Once it was inked, I gave the stamp a light spritzing of water and stamped onto watercolour cardstock.


I tapped Archival ink onto the little words at the bottom, just to keep those sharp and fresh whatever came next...


With that done, I then borrowed some techniques from one of last year's Tim Holtz tags - the June 2013 tag... I inked around the edges with a blending tool and then used a water brush to draw the ink in towards the image.


And I also put some ink onto the craft mat from Distress Markers in those same colours (except the Iced Spruce - don't have that as a DM as yet), and then let them soak into the nib of the brush.  Then you splatter delicate little ink droplets over your image.


I grabbed a couple of sheets of thick kraft card in A4 and, using the paler side, cut them to size to fit the watercolour panels I'd created.  I used the leftover cardstock to stamp my two sentiments - selected from various Tim Holtz sentiment sets - in Coffee Archival.


Obviously they were chosen partly because the font is similar on each, but also specifically for the shaping of the words - a long tall one, and a wide flat one!


I inked both the sentiment panels and the borders of the card with the Coffee Archival ink pad, just brushing the pad against the card edges.


And inside each card, there's just a little echo of the image on the front.


This time they're stamped in Coffee Archival.


It's nice to get both versions of the stamping - the sharp clarity of the Archival, and the delicate softness of the "watercolour" Distress Ink.


Two cards, and they really hardly took any time at all...  I could get into this simple thing!!


Though it seems the post isn't that much shorter than usual.  I just like having lots of pictures, that's the trouble.


But that really is that for today!  Thanks so much for dropping by.  There's still nearly a week to play in our Colour It Red challenge for June... Hope to see you there.

Ingredients used:
Artistic Stamper stamps: Katy Leitch stamps - Jumbo Bouvardia and Jumbo Flowering Branch
Distress Watercolour Cardstock
Distress Inks - Faded Jeans, Broken China, Iced Spruce, Peeled Paint
Distress Markers - Faded Jeans, Broken China, Peeled Paint
Archival Ink - Coffee
Kraft Card A4 sheet
From my stash: Stampers Anonymous sentiment stamps

Monday, 23 June 2014

The Old Curiosity Shop Butterflies By Dee


Hi everyone I hope you are all well! for my second piece 
I have coloured a tag with 


With my distress blending tool and craft sheet I blended Faded Jeans,
 Chipped Sapphire, Peeled Paint and Mowed Lawn onto 
a size 8 Manila tag.


I spritzed with a small amount of water. Once dry, I glued a torn piece from the page of 
an old book, to the top left hand side of the tag. I inked up the Artistic Stamper Neil Walker border stamp with Chipped Sapphire and stamped it down the tag in three lines. Next I poured 
gold embossing powder down the tag so that it only caught in places and
the ink randomly showed through, then melted with the heat gun.


I coloured a piece of lint with distress stains in scattered straw, faded jeans and peeled paint, I also coloured the fibres to go through the top of the tag.

I applied crackle paste to a card with a palette knife, once dry I then coloured it with various inks. I cut a strip out and outlined it with a gold pen, the old curiosity shop paper was then glued on to the strip and then fixed on to the base of the tag with hinge fasteners.


On an old mop up card I stamped the butterflies from the Artistic Stamper 
 outline with crackle accents.


For the bodies of my butterflies I used beads that I had in my stash.


This was all backed onto a hessian panel.


Finally I attached an old Chinese coin to the fibres as a 
finishing touch.


I hope you have all enjoyed this and please feel free to leave your comments.
I look forward to creating my next piece for the Artistic Stamper creative team blog!
 Happy stamping
 Dee x

The Artistic Stamper Stamps:- Insects and butterflies,
 Neil Walker Border stamp.
Distress Stains:- Scattered Straw, Faded Jeans and Peeled Paint
Distress Inks:- Faded Jeans, Chipped Sapphire, Peeled Paint and Mowed Lawn
Ranger:- Crackle accents, Black Archival ink & idea-ology hinge fasteners.
Crackle paste and gold embossing powder.


Saturday, 21 June 2014

Easy to make : paintbrush cups

Hey you !
Do you sometimes feel like you could sort the various paintbrushes or pens you use on your artistic activites ? Why not make their storage containers just as nice as your other pieces of art ? And why not make these from cans, helping clean the planet at your tiny level ?
This is what today's project is aiming to...

Materials you have to gather :
3 cans of different sizes (or not ;-)
white gesso
a phone book
a string
black Archival Ink
and of course the amazing Artistic Stamper's Birds New Stamps

How-to :
  1. Start by painting the cans with white gesso and then allow it to dry.
  2. Once dry, tear 3 phone book pages up to size the tour of each can.
  3. Using Black Archival Ink, stamp the birds and words all along the width.
  4. Glue each paper on each can.
  5. Tie up the string around each can.

Et voilà !


Thank you so much for stopping by, 
I hope you like my project and tutorial and am looking forward to reading your comments !
A tout bientôt !

Wednesday, 18 June 2014

Flutterby Hanging by Alison Hall

Hello Stampers! I have a piece of hangy art to share with you today.


I sponged a little papier mache icon with Honeydew Fresco Finish paint, then sponged some Guacamole & Pumpkin Soup on.

I stamped some text with Calligraphy Mat 11 & Potting Soil Archival ink.

I added a little drop of Bora Bora FF paint to some Grungepaste, then used a palette knife to apply it through PaperArtsy Lin Brown stencil ELB002.

I stamped some butterflies from the new Flutterby plate onto music sheet, with Potting Soil Archival, using secondary stamping for 4 of the butterflies. I cut them out, added some bead chain bodies, & glued them to the icon. 

I hope my little hanging inspires you,

thanks for looking,

Alison xxx

Sunday, 15 June 2014

Free your soul - Mixed Media Canvas

Hello Everyone, Shilpa here today,  with my first project with ASCTB and I am super excited about it. I have created a Mixed media canvas with beautiful Artistic stamper stamps.


 I started with 6*8" canvas. And applied Wendy Vecchi white embossing paste through Crafters workshop stencil- Pomegranate.


I wanted to use Dona's - Free your soul stamp, which is image of lady experiencing freedom. I chose shades of pink and purple for my background.

I spritzed water on the canvas. After this at random places I applied Milled Lavender, Spun Sugar, Worn Lipstick, Dusty concord Distress paints. I heat set it with my heat tool.


I stamped this lovely image with Dona's Free your soul stamp and Tree Branch Archival ink. I've also used Pen and ink hatched background stamp and Calligraphic Mat 13 to create more layers in the background.  


To make these butterflies, I've used New Flutterby stamp set and Spun sugar and worn lipstick Distress paints. I stamped them on watercolour paper, let them dry and cut them out, applied walnut stain distress ink (Mini) on the edges. I also applied Vintage photo DI at the all edges of canvas.


Thanks so much for visiting today. Looking forward to your feedback and comments.

Supplies used:
Artistic stamper stamps - Dona's - Free your soul,
Pen and Ink hatched background stamp
Calligraphic mat 13
Flutterby stamp set 
Distress paints - Spun sugar, worn lipstick, milled lavender, dusty concord
Archival Ink - Tree branch
Distress inks - Mini set with walnut stain, vintage photo