Tuesday, 28 August 2012

Art Journal Page by Marjie Kemper


The month has flown and I'm back with my last piece as Guest Designer.  I went with an art journal page for my this project.  I started the page with layers and layers of blues:  multiple shades of different paints, distress inks, and archival inks. 

Having been on a bit of a 'sun' kick lately, I used a masking tape roll to draw an outline, and the numbers background from the Family Values set to fill it in.  I stamped the Hold Fast sentiment onto manila card stock, inked it with distress inks and cut it up to form my version of rays coming from the sun.

I used three of the stamps from Borders A5 as a partial frame around the left and bottom of the page,  as well as random spots and dots across the page. The branch is a cutting from the Sizzix tree die, and the clear acrylic bird is from Heidi Swapp.  I stamped it with the Grid Background to give it some weight and gave it an eye with Enamel Accents.  

I also used the Grid Background on my diecut "Fly" letters, which were also inked with several inks and paints. The finishing touches were made with  Crafters' Workshop stencils.

Thanks very much to Jennie and Emma for the opportunity this month!  I really enjoyed meeting so many of The Artistic Stamper blog readers through this endeavor and hope we'll keep in contact going forward.  You can find me here, usually with new posts three days a week.

Marjie

Monday, 27 August 2012

Astrid's Creative Art Thoughts give away number 2

Hello everyone!
Well by now I'm sure you'll all know that we are celebrating this month with fantastic give aways to mark the second anniversary of the creative team blog. All you need to do to win the two stamp sets I have chosen is to leave a comment here or on my own blog here, or both if you want to be in with two chances.
Just as a reminder these are the two stamp sets I have chosen:


This time I am showing you a notebook I made.


I'm sure like many of you passionate about paper crafting, I am always walking about with ideas buzzing around in my heads for projects to make. So often though, I forget them again by the time I get round to actually doing them. Solution? - Create a book with blank pages to keep track of them. The front cover was made by covering a piece of 6 by 81/2" piece of card cut from a cereal pack with a piece of old scrapbook paper from my stash. I covered it with some texture with the help of Viva Terra, corrugated card and some wisps of gauze fabric, using pva glue. Once this had dried I brushed some watered down Gesso over it and then  added some strips of paper which I had previously stamped over with the Ephemera 1 plate. Next I added some thin washes of acrylic paint and then added some more Gesso in places and a bit of random stamping with the Swirls, Splats and Dots plate.   The next step was to stamp the central panel Creative Art Thoughts on a piece a stamping paper with Archival Black inkthen inked over it with 3 colours of Distress Ink, Brushed Corduroy, Broken China and Vintage Photo, to match my background colours. Time to embellish:

The heart was created by cutting out a heart from black Fimo and stamping the Calligraphic Mat 12 into it. I made the wings by stamping the wings from the Crowning Glory plate onto Mirri card, cut them out and glued them in place as shown. I added various other embellishments from the  Ideaology Findings range as well as some bits an pieces from my stash. I then sprayed various glimmer mists all over them until I was happy with the result

For the back I used a piece of 7 Dots Studio paper from my stash and stamped stamps from the Journaling Words 3, Artists Dictionary words and Watch Background
Now all that was left to do was making the inside pages and separating them with some file tabs and putting the whole thing together with some book rings.

Saturday, 25 August 2012

Ah! There You Are!...and the 2nd Anniversary Giveaway by Emma

Hello everyone!

Once again, I can't believe how time has flown this month but as you all know by now, this month we have all been celebrating the 2nd anniversary of The Artistic Stamper Creative Team blog and giving you the chance to join in with our celebrations with a giveaway from each member of the team. Once again, anyone who leaves me a comment on this post, or on my own blog post HERE will be in with the chance of winning these stamp sets pictured below...so, good luck and I can't wait to read all your comments!!!
  
...and this is what I created using those stamp sets. I decided to purposely make something completely different from my last creation to show everyone the versatility of these sets and I combined it with a Mabel Lucie Attwell stamp. I wanted to create a soft, vintage style card and one that would be very much in keeping with the style of Mabel Lucie Attwell and I really hope you like what I've created....
To begin with I made my own shadow box card, using a Tim Holtz Sizzix Die from my stash, to create the aperture on the front of my card. On the front section of my card, I blended the background with Tumbled Glass DI to give a soft blue tone on the cream and then using the small flower from the Flower Power Stamp set, I stamped randomly all over the front of the card. I then blended the edges with Vintage Photo DI.
Next, using black Archival Ink, I stamped the "Ah! There You Are!" stamp from the Mabel Lucie Attwell range onto another piece of cream card and coloured it with Distress Marker Pens and a waterbrush, to give a vintage, washed feel to the image. I then blended the background with Tumbled Glass DI to give the appearance of the sky and added the completed artwork onto the inside back section of my shadow box card.
Next, I inked up the small butterfly stamp from the Tick Tock Butterfly set, stamped three separate butterflies onto cream card and then blended some more Tumbled Glass DI over the top of each before carefully cutting them out.
I then added the completed butterflies to the front of my card and added tiny buttons from my stash.
I stamped "Memories" from Journalling Words II onto cream card, trimmed it to size and added the word banner to my card. Finally, I adhered small buttons to the four corners as a finishing touch.
WHAT I USED:

Don't forget if you leave a comment you might be the lucky winner of these fab stamp sets. All winners will be announced on the 7th September, so don't forget to check back!

Hope you have a very creative weekend and see you all again soon!
Emma x

Friday, 24 August 2012

Opening tomorrow!! A bricks and Mortar shop!

Hello from The Boss! it is Jennie here with exciting news! After 19 years making rubber stamps, and selling all the peripheries on line, we finally took the plunge and are opening a bricks and mortar shop in Faversham Kent!


We open tomorrow Saturday 25th August, and will be open this Bank Holiday Monday and from Tuesdays through to Saturdays every week from 10am to 5pm.
We would love to see you if you are passing through or live in Kent, and as we are having an Art Bar and workshops too, coffee and tea will always be on tap, so to speak!
Can you tell I am getting excited? LOL
Hope to see some of you soon,
Have a very creative Bank Holiday weekend
Jennie

Wednesday, 22 August 2012

Titbelsoeur's tag to celebrate

I want to ride my bicycle
I want to ride my bike
I want to ride my bicycle
I want to ride it where I like....

I am sure you are now well aware that it is the 2nd anniversary of  "The Artistic Stamper Creative Team" blog this month and that to celebrate it, Jennie is giving away stamps to some lucky followers.

Here is a reminder on how to win these stamps...
Each Team member has chosen which stamps they would like to work with this month and those are the stamps you could win with me :

this bicycle plate you can find it in the Collage stamps section
PLUS this one from the words_and_sayings section


To win this set you must leave a comment on one of my posts this month (either here or over on my personal blog which you can find HERE)

At the end of the month , I will pick out a winner from the comments on MY posts.. and that person wins the stamps. The other members of the team also have stamps to give away and its the same process : leave a comment on their posts and you can win the stamps they are giving away. 

All the winners will be announced in a separate post on the 7th September

Here is my second use of these stamps :

I have used a cereal box as cardstock and glued a book page on it, then inked it through a stencil. I stamped a piece of the set on the pair of jeans I made the flower of my previous creation with and teared it up. I made a flower with the remains of the zip and wrapped around it a twisted strip of fabric. Little strips of ribbon and lace here and there...the top tie is made with the weaving of the sheet I used to cover my tin can (see my August 8th post) :
I am sure you all wish you won this fabulous set of stamps, don't you ?
Already told you : simple as good morning ;-) 

Leave a comment here or/and over on my blog, then make a wish... and it may come true !!!

A la revoyure les copines ! 

Sunday, 19 August 2012

Alison's Seaside Giveaway - Part Two


Hello Stampers! As you probably know by now, it's the 2nd Anniversary of The Artistic Stamper's Creative Team Blog, and to mark the occasion, we have lots of giveaways this month.
Each member of the team has chosen some stamps to work with in August, and those are the stamps you could win, just by leaving a comment on our post, or on our personal blog posts. You can see my blog post HERE.
Here are the Seaside stamps that I have chosen to use...
And here is my second piece of artwork for August...
I started off by stamping the central image from the Seaside No. 1 plate, using Black Versafine Ink, then clear embossing it. I masked the image, then inked around it with Tumbled Glass and Gathered Twigs Distress Ink.
I stamped the sandworm image (I think that's what it is!) from the Shells 001 plate, using crushed olive Distress Ink onto my background. I inked the fish with peacock feathers DI, then added some gathered twigs ink around the edge, & stamped it on my background. I smeared some rocky candy distress stickles on the fish, & dried it with a heat gun.
I added a layer of Glossy Accents to the central image, then left this to dry.
I stamped the phrase Carpe Diem from Journaling Words 3 Plate onto white card, then used the alphabet stamps from the Scrabble & Tags Plate to stamp the rest of my quote. I cut out each word, inked them with antique linen DI, then edged them with black versafine ink.
I stamped the fish onto shrink plastic, coloured it with distress ink, then cut it out & shrank it with my heat gun.

I attached a strip of bandage across the card, using 2 brown brads, glued on my words & the shrink fish, then finished by attaching my artwork to a square card blank.
Thanks for looking, and don't forget to leave a comment here & on my own blog, to be in with a chance of winning the Seaside No. 1 plate.
Alison xox


Friday, 17 August 2012

Zuzu's Anniversary give-away post: Part 2 "wooden frame"


 By now, you cant have failed to notice, it's the 2nd anniversary of  "The Artistic Stamper Creative Team" blog this month, and to celebrate Jennie is giving away some stamps to some lucky followers.
Here is a reminder of what to do and how it works...

Each Team member has chosen which stamps they would like to work with this month and those are the stamps you could win.
For example: I  Have chosen to work with the 'collage art 1' sheet shown here...
 To win this set you must leave a comment on one of my posts this month (either here or over on the creative team blog which you can find HERE )

At the end of the month , I will use a random number generator to pick out a winner from the comments on MY posts.. and that person wins the stamps.

The other members of the team also have stamps to give away and its the same process.. leave a comment on their posts and you can win the stamps they are giving away.

This is my second post for this month and your last chance to comment for a chance to win the above stamp set:
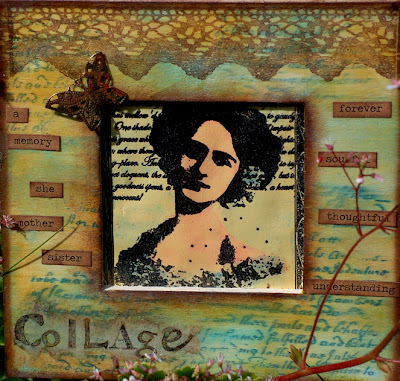
I have decorated a wooden frame and used the lady from the stamp sheet, as the focal point. I have also stamped out the word "collage", from the sheet,  on to tissue paper and added that to the frame. Please remember, it is only the collage stamp sheet that you can win. (the additional stamps I have used are not part of my give-away.)


Supplies used from the Artistic stamper:

Collage art 1 stamp sheet... HERE
wooden frame HERE
chit chat stickers HERE
lacy border stamp HERE
text stamp (calligraphic mat 13) HERE (scroll down)


Thursday, 16 August 2012

Dancer Card by Sioux Jenneys

So the 2nd anniversary fun keeps on going!

I'm here to share a 15cm square card today.

For once....because I had to think clearly about the order of stamping and masking... ...I remembered to take some additional photo's as I went ;)


1. To make the flowers I stamped various cogs and clock faces from the Tick Tock plate onto plain old copy paper (80gsm weight) using Archival black then spritzed them with Dylusion inks and Distress Ink and cut them out.....the ink coverage does not have to be perfect and neither does the cutting out! My kind of happy.....as you can see in the following picture.


2. Stack your layers and secure the stack with a brad through all the layers. Next fill a mini mister with water and liberally wet the flower.....carefully scrunch each layer into the centre....you will need to spritz each layer as you go....it works best with more rather than less water.


3. When all the layers have been scrunched leave them to dry thoroughly.

This will take some time...you can speed it up a bit by a blast with a heat gun...but you will burn the outside layers long before the centre is dry using this method alone! Trust me!!! ROFL


4. Open out the layers when they are dry to reveal your flowers.


5. I cut a slightly smaller square of card than the base card to work on and stamped the large dancer from the Dance plate using Archival black and masked it...stamped the smaller clock face from Tick Tock plate and masked that....stamped the wings from the Dance plate and masked them.


6. I cut some funky foam with a Sizzix die and used it as a stamp.

(Distress Ink wild honey).

7. I then masked that and stamped some of the smaller cogs in Distress Ink weathered wood.


8. Removing the die mask only.......I then lined the words from the the Dance plate onto an acrylic block and stamped them in Archival black....I inked the edges of the square with Distress Ink wild honey and faded jeans and attached it  to the base before adding the flowers with silicone glue.


Hope you liked :) See you soon!

Don't forget to leave a comment both here and on my blog post for the best possible chance to win one of the two stamp sets I used in my piece today ;)

Thanks for looking .
xoxo Sioux

Tuesday, 14 August 2012

Bright Ideas Notebook by Marjie Kemper

Today I'm sharing a little notebook I made with the Inspiration Lightbulb stamps.  I stamped the blank bulb twice on manila cardstock and then 'filled' one bulb with mini gears from Borders A6 and another with the Notebook background stamp.  I stamped the bases of the bulbs onto Ranger's metal foil tape and popped the bulbs up on cardboard.  
The main tag is inked with distress inks and covered with the mini gears again.  Can you tell what I used for the frame around the tag? They're the rooftops and doors from Kat's Creations Our House plate.  I couldn't stop playing with them after making my first AS piece back at the beginning of the month.   The inside is filled with a combination of blank tags and notebook tags. 
I've used heavy black cardstock to reinforce my covers and Dylusions ink sprays, distress inks, black archival ink, and distress markers for my coloring.  
I'd love it if you'd visit my blog (and please let me know you came by so I can come see yours, too.)

Hope you have a wonderful day, and find some time for creative play!

Marjie


Monday, 13 August 2012

Anniversary give-away part 1 by Astrid


Hello everyone. Well if you are a regular visitor here then you will know by now that the Artistic Stamper is celebrating the second anniversary of the creative team blog, and all of us designers are giving away some stamps. All you have to do is leave a comment on this post to be in for a chance to win one of the sets I am showing, and for another chance hop over to my blog and leave a comment there too. As all teamies are doing the same, make sure you leave comments on their posts and blogs too if you haven't done so already.
First of all, here are the two sets you could win from my posts:


Now to my project: I decided to alter a box; it is the Papier Mache Wave Box
It started life looking like this:
Now before I tell you how I altered it, I first want to mention that this project was inspired by the work of my team mate Zuzu We both live quite close together and when I visit her house I always get totally inspired by all of her beautiful boxes, so thanks Zuzu for the inspiration!!

So this is how I made my box: First I coated both the in- and the outside of the box with Gesso. Next I painted it with some Burnt Sienna acrylic paint. For the inside of the box I took a piece of ordinary A4 copier paper and stamped the Ephemera #1 plate all over it in 3 colours of Archival Inks, Jet Black, Vermillion, (in some small patches, hard to see on the photo) and Coffee Brown, I then sponged some Distress Inks in Antique Linen and Tea Dye over it, to give it an old and faded look and then lined the inside of the box with this paper.

For the outside I took some tissue paper and spritst it all over with various brown ink sprays, including Dylusions melted chocolate. Once it had dried I glued it in strips all over the outside of the box and distressed it further with the help of various metal coloured embossing powders. I also added some strips of Prima Printery Papers from my stash which I distessed with some ink to blend them into the background.
Next I used some gold acrylic paint and painted it over a small piece of smooth stamping paper and once it was dry I stamped the wings and one of the crowns from my main give- away stamp set, the Crowning Glory set in  Jet Black Stazon Ink. I cut them out and glued them with a vintage image from my stash onto the box.


I added one of the Tim Holtz word bands and one of the Time Pieces and various other bits and pieces from my stash
As a final step I stamped two of the words from my other give-away set the Creative Art Thoughts on some other bits of scrapbook paper and glued them to the side of my box.

I found that the box was just the right size for an altered spoon I made (hence the spoon image at the bottom of the box)

Here is the spoon
Here is the spoon in the box
 Well that's it from me for now, see you next time and happy creating!