Sunday, 30 November 2014

Watercolor fruit cards

Hi, it's me, Maria Potapovich (mellpellmell) here for you today.

As you know I like to use stamps not in scrapbooking or cardmaking (in the classic sense).

But I like to add stamps to my watercolors.

Sometimes the work looks unfinished, but I do not know what to do ...
Then the simplest solution might be to add a background stamp.
Here's the truth!

Be sure of it )))))


Don't you think it's too simple?
And now you can see the same picture, but with a slight modification - I added two stamps.


And here's another one the same:


And with the added stamps:


I believe that you can see everything without my words and explanations)))))

By the way, here stamps that I have added:


Encyclopaedia Botanica Size A5 © Katy Fox

Have a good day ;)


Thursday, 27 November 2014

Christmas ATB

Hello Everyone,
Shilpa here,
I've another inspiration project for our this month's Christmas Challenge.. I made Christmas ATB


Artistic stamper has wonderful sets of Christmas theme stamps and here, I tried to use as many I can :)
I cut out shape for Artist trading block with white card stock and kept it flat. Distressed the edges with Barn door and Vintage photo  Distress inks.

With other five white papers , I made panels to attach onto this ATB. 
Here, you will see,  I've used Pine Tree stamp and olive Archival Ink to get the image. Before that, I applied weathered wood and Iced spruce distress inks on that white square. I also used snowflakes stamp in the background.
I created small embellishment with Cute little Christmas Tree stamp from Christmas Greetings plate, Oval glass Cabochons and Oval Charm. I adhered it on flower. It is attached at the bottom corner.


Here, I've used Tic Tock Christmas Baubles stamp set . I stamped wordings first with Coffee Archival Ink. On another paper, I stamped baubles with Vermillion Archival ink, fussy cut them, applied Distressinks- Barn door and vintage photo at the edges and adhered them on this panel.


I stamped the snow scene with Victorian Christmas stamp set and Jet Black Archival Ink. Poinsettias are made with Cheery lynn die and Graphic 45 papers.


This Santa image is also from Victorian Christmas Stamp set which I stamped with Coffee Archival ink.

 
This is top view of ATB
some more pictures are here....


Thanks so much for stopping by today... don't forget to join our Christmas Challenge this month to win some fab stamps from Artistic stamper.

Supplies list:


Monday, 24 November 2014

I am... journalling again

Hello all, Alison (butterfly) here with a journal page for you today.


This one started a while back, and got as far as having all the texture in place and a sharp monochromatic look.  But then it got a bit stuck, wondering where to go next.


Then the new Distress Stain Sprays appeared, and suddenly the game was on!  Faded Jeans and Vintage Photo and we're away.  I'll show you some close-ups of my favourite bits as I let you in on the steps I took to get here.


I started with strips of tissue tape across the page and added crackle paste in various areas.


I spread it quite thinly so that the crackle would be very fine.


The large heart was created with a hand-torn stencil shape, through which I first spread texture paste and then added a coat of crackle once that was dry.  I wanted a really thick, dimensional look, and that's what I got.


I embedded the pen nibs before the crackle heart had set, so no need for glue.


This was the point at which things ground to a halt.  However, once I knew there was spraying in the offing I gave the whole thing a wash of Fresco paint in Chalk.  It's part of one of the JOFY Limited Edition sets.  As well as muting the tape, it gives a lovely warm base colour.


In order to really add depth to the crackles of the heart, I splodged Black Soot Distress Stain over it, then wiped it back, leaving it just in the cracks.  Then I let loose with the two chosen Distress Stain Sprays.  It's such a delight finally to have sprays in the Distress colours without having to tip my Distress Stains into spritzers.  Perfectly possible, yes, but fiddly and always with the risk I'd knock the lidless stain over and lose it all!!


I added some of the fabulous Katy Leitch splodges and blots from the Messy Art plate, stamped in Coffee Archival.


And I used the I am... stamp from the Journalling Words #5 set on a Chalk-washed tag also stamped in Coffee Archival.


It wasn't quite popping enough, so I drew around the edges with a PITT pen and used an embossing ink pen to fill in the letters, followed by clear embossing powder to give it a hint of shine.


As you can see, I also used Treasure Gold to add a touch of warmth and glamour.  It also helps to highlight all that texture.


So there you have it.  I am... rather happy with this one.  It pleases me, and I'm looking forward to lots more Distress spritzing!


Thanks so much for stopping by today.  It's always lovely to hear what you think.

You've still got a week or so to come and play in our Christmas is Coming challenge.  You don't have to use Artistic Stamper stamps, but if you do you get two entries in the prize draw.  Hope to see you there.

Ingredients used:
Artistic Stamper stamps: Journalling Words #5Katy Leitch Messy Art
Distress Stain Sprays - Faded Jeans, Vintage Photo
Fresco Paints - Chalk (JOFY Limited Edition Autumn 2014)
Coffee Archival Ink
Croco Crackling Colour - White
DecoArt Crackle Paint
Idea-ology Tissue Tape
PITT pen
Inkssentials Embossing Pen
Clear Embossing Powder
Treasure Gold - Florentine

Sunday, 23 November 2014

Wooden Post Christmas Wall Hanging


Hi everyone hope you are all well! I have a wooden wall hanging that 
I have made out of a wooden garden boarder post.

Sweet poppy snowflake stencil,
Wooden garden boarder post from any garden centre,
treasure gold. crackle paste,
Clear micro beads, white acrylic paint. Black pepper corns
Rag for knocking back, black fimo clay, white Gesso


I started by prepping the wooden post with white Gesso.


I used crackle paste through the snowflake stencil onto card.


Once dried I then tore up the paper and glued it onto the 
post at the top and bottom.


Next I painted the entire tag with white acrylic paint.


When the paint was dry I applied crackle paste to the top and down the 
right hand side of the post, I then placed the small glass beads
 into the wet paste.


I left the crackle paste to dry overnight. I rolled out the 
Fimo clay and spritzes the two stamps with water
 before placing into the rolled out clay.


Once I had cut out the clay I then baked it in the oven.


Now comes the best bit I gently paint around the snow flakes and the crackle paste 
with the Deco Art Cobalt blue and a touch of the quinacridone gold.
 Once this is dry I painted the crackle paste with carbon black 
then drying with my heat gun.  


Now I take my rag and dampen one end with water and start to work over the post till I am happy with the result. Out comes the treasure gold or your preferred product  to 
just highlight the areas that you want to.


I glued on the pepper corns to the centre of the snowflakes and attached 
a large brass ring from my stash, glued on the Fimo clay baubles 
that had been highlighted with treasure gold.

 I keep meaning to not have such longwinded posts and abbreviate them
 I will have to make it my new years resolution.

I hope you enjoyed my project and and hope that it inspires you to look at every day pieces 
and think how you can alter them. 
Please feel free to comment as your feed back helps to inspire me.
Cheers Dee x


Friday, 21 November 2014

Thinking of you...

Hi there, Titbelsoeur here with another card !
You know that I love to try new techniques, so here is another one. How have I made it ?
I first took a background paper from my stash, one I made while my last workshop. Then I stamped here and there letters and numbers from Family Values with Broken China Distress ink. After that I sprayed the Large Sequin Waste Mask  with a mix of Festive Berries and Pink Raspberries inks.
Thinking of you from Grungy Greetings was stamped with Archival Black and the Time & Keys clocks with Archival Plum
A spray of Lemon Zest Dylusions ink, then some white acrylic on the edges and on spots here and there.


And, of course, a personalised signature from the Handstamped set on the back of the card :


Do you like this card ?
Thank you so much for stopping by, I can't wait to read your comments !
See ya, 

Tuesday, 18 November 2014

Faux Dichroic Glass Domino Book by Alison Hall

Hello Stampers! I have a little domino book to share with you today, & I used a fabulous faux dichroic glass technique by Julie Dandy of It's a Scrappy Life.


Ingredients...( I used a LOT of stamps!)


Post-it Notes
Copier Paper
Glass Beads

Instructions...

1. Spread a layer of gold Viva Croco on the smooth side of the domino, about 1 mm thick. Allow it to dry & crackle, or use a heat gun to speed things up. You'll get better cracks if you let it dry naturally, but I was impatient! Lol!

2. Apply alcohol inks to the Croco, leaving some of the gold showing through. I also inked the domino edges & other side.


3. Press the crackled side of the dominos into embossing ink, then apply clear embossing powder and heat. If you use normal clear powder, you may have to do 3 or 4 layers, but with ultra thick, 2 layers should suffice.

4. Cut a piece of white card, 7 ins x 1 7/8 ins, then score & fold every 7/8 ins. 

5. Swipe Vintage Photo Distress Ink on the craft mat, mist it with water, then dip the white card in it. Dry & re-dip until you are happy with your background. Do this on both sides, then ink the edges & all of the folds with the Distress ink pad.


6. Use the black archival ink to stamp your chosen images, masking each segment as you go. Stamp both sides, omitting the edges you will stick to the domino. Stamp & cut out the phrases on copier paper, ink with vintage photo, & adhere to the pages.


7. Use extra sticky tape to adhere your domino covers to the little book.

8. Stamp the words from Journaling Mini Words onto copier paper, ink & cut out your chosen words, then use the extra sticky tape to adhere them to your front domino cover.

9. Thread ribbon through the owl charm, tie it around the book, gluing the owl in place with matte medium. Finish off with some contrasting glass beads.


I hope my project inspires you to make a little domino book of your own, they're a lot of fun! They also make lovely gifts for arty friends :-)

Alison xxx


Monday, 17 November 2014

Don't paint things

Hi)

It's me, Maria Potapovich, here for you today.
Today I am not alone - I came with little card).

It's made for the artist.
You know, it's hard to come up with a wish for the artist - everything seems small and insignificant in comparison with the art.

So I've made a card on which are written Henri Matisse's words (slightly modified)  - "I do not paint things. I only paint the difference between things".

As it turns out, it's easy enough to illustrate these words - I only need one stamp from the Botanical Plate 2 (A5) set

Here it is:


I only put three times the stamp (leaf), carved them, painted the different watercolors on both sides and attaching them with the help of 3D-foam squares.


I think card turned minimalistic and creative.

What do you think?

Saturday, 15 November 2014

Christmas Card

Hello Everyone,
Shilpa here,
Artistic stamper has got lovely Christmas theme stamps....you can see them here.
 I made Christmas card today!!


I've some close view photos to share with you


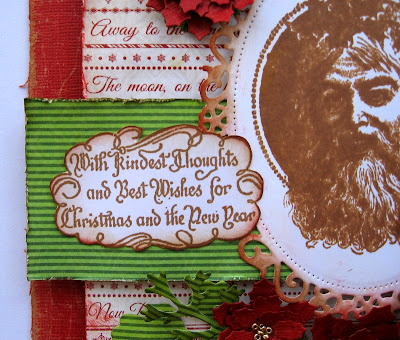
I stamped Santa image from Artistic stamper Victorian Christmas plate #1 with Coffee Archival ink on diecut frame. I used barn door and vintage photo distress inks to color the edges of frame.

.
Sentiment stamp is from Christmas Greetings plate # 1


I made a card with red craft paper from Tim Holtz Kraft-core shattered collection. Distressed edges with distressing tool, we can see Kraft color paper and it gives grungy look!!
I also applied barn door distress ink at the edge .
Design papers which I've used here are from Graphic 45 Twas the Night Before Christmas collection.


 I made Poinsettia with same red kraft core paper and Cheery Lyn Poinsettia die. I've used golden beads for the center of flowers.
At the corner, you will find golden Jingle bells !!


Hope you liked the card!!
Thanks so much for stopping by today.
Dont forget to join our 'Christmas is coming' challenge for November

supplies used:
Tim Holtz Kraft core shattered collection.
Cherry Lyn Poinsettia die and Spelbinders  Foliage die