Wednesday, 13 February 2013

"His and Hers" Key to my heart

Hello everyone it's Astrid here and welcome to the blog. Hope you have enjoyed all the fabulous projects so far this month.
Well, seeing it is the day before Valentine's today, I thought I'd share a quick and easy Valentine's project with you and use this opportunity to wish you all a day full of love and blessings tomorrow☺


This is what I used:
Calligraphic Mat 12
Time and Keys
Girl with Clock
Ideaology Locket Keys
Adirondack Dye Ink Espresso
Archival Ink Jet Black
Claudine Hellmuth  Studio Matt Medium and Studio Gesso
Ranger Acrylic Paint Dabber in Snowcap,Hazelnut and Cloudy Blue
Distress Crackle Paint Clear Rock Candy
Distress Inks in Tattered Rose, Victorian Velvet, Chipped Sapphire, Black Soot and Pickled Raspberry
Viva Ferro texture paste
and from my stash:
Paper Mache hearts with magnet on the back, paper napkin, flowers, stencil, die cut, Onyxite and White Fire Treasure Gold paste.

All right, first for the "His Heart"


I started by covering the heart in two coats of Gesso, followed by a thin coat of Snowcap dabber. I then stamped the Calligraphic mat randomly over both the front and the side of the heart and then covered it with a further layer of watered down snow cap to tone it down a bit. I added a layer of watered down Hazelnut dabber and when that was dry inked all around the edges with the Espresso Dye Ink. Next I stamped one of the keys from the Time and Keys set in Black Archival. I computer generated the sentiment Key to my Heart, cut it with one of my dies and adhered it to the center of the heart. I added a rose and one of the Idealology locks and then brushed some rock candy crackle paint around my embellishments. I finished the edges by rubbing on some of the Treasure Gold. Here are some detailed photos:
One of the keys from the Time and Keys plate


For the "Hers Heart" I started by giving it some textured swirls by scraping the Ferro through a little stencil.

When it had dried (with a heat-gun to make it puff up a bit) I covered the whole thing with a thick layer of Gesso and when dry I painted it light blue. When the paint had dried I collaged part of a paper napkin over it with the Matt Medium and then darkened the edges  with Chipped Sapphire and Black Soot DI. Next I stamped the Girl with Clock on smooth card, cut her out and then coloured her with Tattered Rose, Victorian Velvet, Pickled Raspberry and Chipped Sapphire DI, adhered her to the heart and embellished again with a little flower.


Well, that's it, - hope you enjoyed this little project and thanks for visiting . Happy Valentines!

Saturday, 9 February 2013

Secrets by Alison ( Craftytrog)

Hello Stampers! Today, I have a little frame to share with you.
I used an antique copper memory frame by Ranger, and frosted glass slides. 
First I cut a piece of glossy card the same size as the glass slides (1"x3"). I used cut & dry foam to ink it with  aquamarine & deep purple Archival ink, then lightly stamped a script with the purple ink, avoiding the top where the nude's face would go.
I inked the image from the Nudes Plate with jet black archival, then laid my inked card down, on the part of the image that I wanted. 
I took the word 'secrets' from the Chit Chat Stickers, inked the edges with purple archival, then attached it to the image. I sandwiched the image between the two glass slides, then inserted them in the memory frame. 
I used glossy accents to add some Beadazzles, then attached a key charm with a jump ring.
I'm going to attach a brooch back to my frame, & I'll probably be wearing it as you read this ;)
Thanks for looking,
Alison xxx

Friday, 8 February 2013

Silhouettes by Titbelsoeur

Salut les patouilleuses !

This is Titbelsoeur here, showing you my last canvas... I wanted to use silhouettes on this piece, so I selected a man and a woman on a clothing catalogue (they are perfect !). And I traced their silhouettes on a OHP slide (you know, things from the former century, that nobody ever uses now ;-) and cut them out so that I kept both parts.

But before using them, I had a ball with a few background stencils you may find HERE and THERE,and when I was satisfied with my background, I finger-painted my silhouettes around :


To end, I used the watches background and calligraphic mat stamps here :


 and the dots background and the words Man and Woman from the Collage art plate there :


I hope you like my canvas,

thanks for stopping by, 

I am looking forward to reading your comments ! 

A très bientôt !!

And if you want to read the story of this canvas,
just pop over to my blog 

Tuesday, 5 February 2013

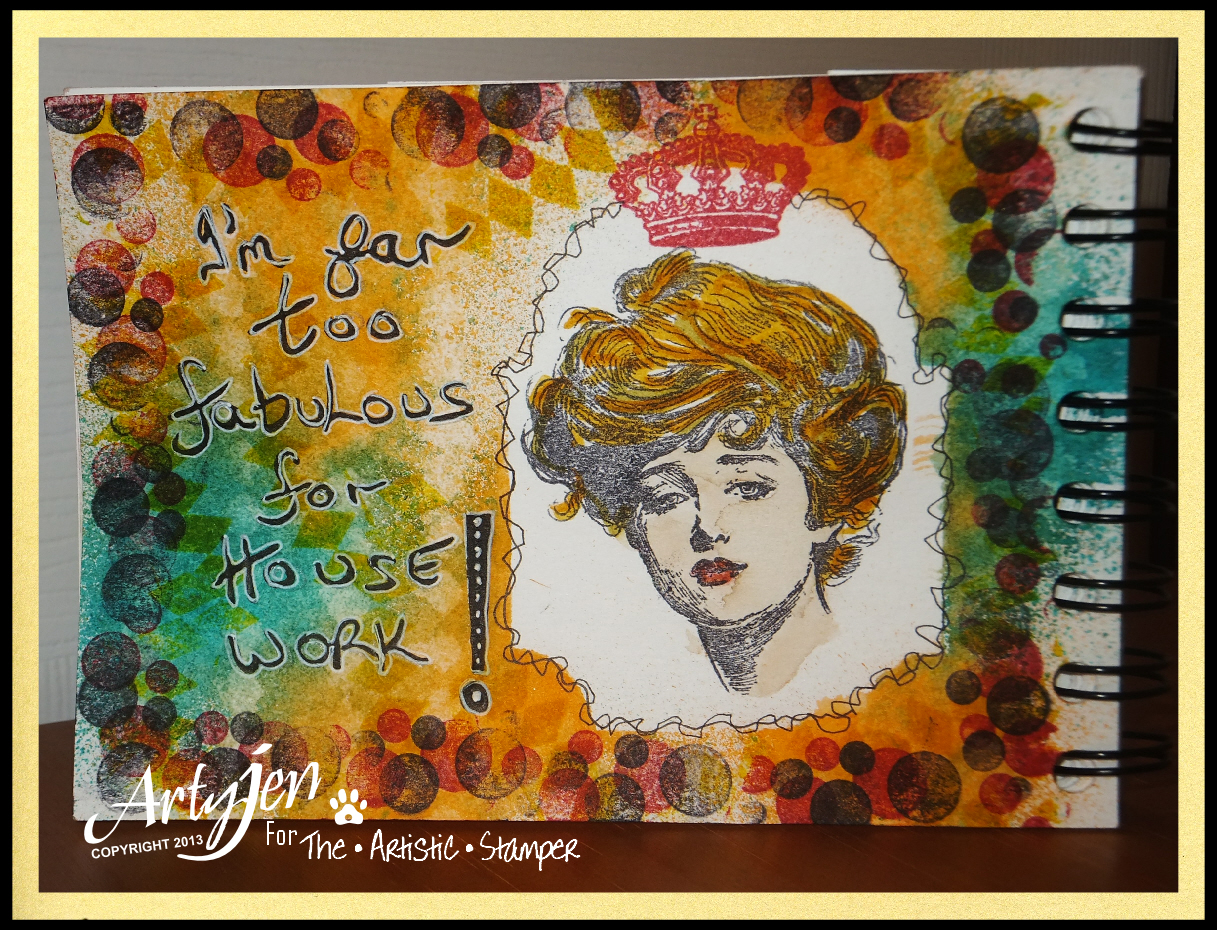
Far too Fabulous by Sioux Jenneys

I made a small journal page today :)


1. I placed a die cut shape on my page to use as a mask and sprayed Dylusions in vibrant turquise and squeezed orange over the top, blotting off the excess ink.

2. Then I used the diamond border from Borders A6 to stamp over the inks using water as my ink! Leave the water to seep in a bit and blot off for a subtle ghost effect. Then stamped it randomly in Distress Ink mustard seed.

3. Stamp the Gibson Girl 4 in Archival black then coloured with Distess markers. The crown from Crowning Glory was stamped in Archival crimson.

4. The dots border from Borders A6 was stamped around the edge using firstly Archival black and then a second offset stamping with Archival crimson.

She just looks far too fabulous for house work don't you think?

It's one of my motto's to live by ROFLIA :)
See you again soon!
xoxo Sioux

Monday, 4 February 2013

Winner of the Creative Team January Challenge

Hi, Jennie here again with the winner of last month's blog Challenge...the one with your favourite stamp! We loved all of the entries, and thank you once again for taking time to join in. Sadly there can only be one winner, and this month Mr Random.org picked.....
 with this gorgeous creation


Congratulations, and please email me to arrange your prize. Don't forget that this month is the month of love, and what better way to celebrate than with hearts and flowers, which is the theme of February's challenge.
We look forward to seeing your creations.

Have a very creative day
Hugs
Jennie

Saturday, 2 February 2013

Butterfly's Butterflies by Alison Bomber

Hello all!  Alison here... no, this is Butterfly, not Craftytrog!  I'm absolutely thrilled and honoured to be Guest Designing for The Artistic Stamper this month... you could have knocked me down with a feather when the email pinged into my inbox before Christmas, and it took all of about a second to say "yes, please"!

But then, of course, your brain starts to buzz with all the possibilities of the amazing stamps on offer - what to do, what to do?   Well, here's my starter for ten... a mobile, and possibly one of the trickiest things to photograph that I've ever made!  So I'm afraid there are quite a few pictures, trying to capture its essence... and it's well worth clicking on them for a larger view occasionally!
Now my "crafty" name of Butterfly was pretty much an accident - I've never really been much of a lepidopterist, but having adopted the name, I do seem to be drawn to them, craftily at least, quite often.
I'd seen quite a few "specimen cabinet" projects on my travels, and when I decided to work with the amazing Insects and Butterflies plate that was sort of what I was thinking of trying.
But in the end, I couldn't bear to pin them down, and so I decided to try to find a way to let them fly free - why do we create these difficulties for ourselves?!
It all started with a little floristry frame I bought in the Czech Republic.  I got three of them at the time, and last time I used one it gave me headaches, so I knew the chances were it would go that way again!
I experimented with stamping the butterflies and dragonflies and colouring them in various ways, but it wasn't really taking off for me, so I decided to try it the other way up and create my colours first.  I did lots of wrinkle free distress technique with a mixture of Distress Stains in blues, greens and turquoises.
I also added some Perfect Pearls Mist both to the craft mat and onto the paper as I was drying it so that I could create lots of iridescence within the colours.
Then I got busy stamping...  I used Archival inks, mainly in Cobalt, Olive and Library Green - either individually or blending them on the stamp - but occasionally I also zhuzhed it up with a bit of Aquamarine!

Then there was lots of fussy-cutting - absolutely NOT my favourite thing to do!  Some of the images are virtually symmetrical, so those I was planning to glue back to back and colour any edges that were still showing.
But others were too asymmetrical for that.  I toyed with stamping on tissue and using the reverse, but in the end I decided to go for something more abstract.  I used my Viva metallic paints - one in Turquoise and one in Golden Green - to paint the backs of the asymmetrical insects.  These are some of the most beautiful iridescent paints I've ever seen!
Then I used one of the lovely Calligraphic Mats stamped in either Library Green or Cobalt Archival to provide some decoration across the gleaming paint.
Then it was UTEE time!  And this was where I had one of my accidental brainwaves.  As I was adding the UTEE - great for protecting vulnerable antennae, and adding beautiful glossiness, as well as having the effect of intensifying the colours - I realised that it made the wings mouldable. So once everything was safely coated on both sides, I went through again, heating lightly and shaping the wings for flight.

Let's skip over the part where I tried all sorts of ways to string'em up - raffia, twine, gold wire - and go straight to the elegantly simple solution: ribbon.  Not only easier to thread onto than most of those others, but also they were all far more prepared to sit nice and perkily with just the folded ribbon holding them in flight... no need for knots beneath each insect, or glue. 


Still fiddly - don't get me wrong! - to get them all threaded in the right order, the right way up, balancing the different insects and heights.  But eventually I was pretty happy...

Once the "flying" insects were sorted, I needed to have some perching ones, some who'd just alighted for a moment on top of the mobile.
Cue lots of fun and swearing as I attempted to glue minute portions of glossy butterfly to a single twig within the frame at exactly the angle required.
And then a couple just balancing on the upright tower part at the centre... more angling, more bad words, and a bit of cheating by tucking bits of dragonfly into the weave of the twigs!
Thank you for sticking with me through one of my trademark lengthy posts. I've tried to give you some idea of the journey and some idea of the finished piece... Of course the real joy lies in the movement as the butterflies and dragonflies flutter in the breeze.  (Not when you're trying to take photographs of it in a biting wind, though!)  I'll have some more projects to share with you through the course of the month, but for now I'll wish you very happy crafting.

Alison Bomber 

                  Viva Metallic Paints: Turquoise, Golden Green
                  Clear UTEE

Friday, 1 February 2013

February Challenge ~ Hearts and Flowers

Hi, it's Jennie here. Emma is taking a short break from posting on the blog as she has been rather unwell, and we wish her the speediest recovery. Get well soon, Emma!

Thank you so much for all your wonderful entries for January. We loved all of the wonderfully creative entries, and do check back in a few days to see if you are winner.
 
Our guest designer for February is Alison Bomber, and we cannot wait to see what she will create for us, and for you.... Do check back tomorrow to see her creation.
The new challenge for February is all about your HEARTS AND FLOWERS and the whole team are all looking forward to seeing all the wonderful and varied creations that you submit. To join in with this challenge is simple; make a piece of artwork, making sure that you include the theme and some rubberstamping. Pop back here to link up using the Froggy at the bottom of this post, so that we can see what you've made and then, leave us a comment to let us know you have joined in with the challenge. As always, there will be candy for one randomly picked entrant - the winner will receive £15 worth of The Artistic Stamper stamps of your choice plus the Kling On to mount them onto. And don't forget....if you use Artistic Stamper stamps on your entry, you will entered into the draw, twice!!!!
If you do need any inspiration, then look no further some of the Creative Team's stunning creations for this month's challenge.


Sioux decided to make a tag, just for a change ROFLIA ;)
And used a variety of stamps in it's creation including;


I made a tag with one of my dies.


I made the heart using Sculpey clay, - I rolled it out, then pressed in the Calligraphic Mat 12 into it and then cut out a heart free hand. I baked it following the packet instructions and then coloured it with Dylusions ink sprays and Distress inks.

The crown was made by stamping one of the crowns from the Crowning Glory set onto copper Mirri card with Jet Black Stazon Ink and once dry I cut it out and adhered it to the tag together with the hear. The tag was further embellished with some little flowers and and die cuts from my stash.
 
 
I have made a card which is almost unheard of for me!


 I made a flower using part of the Tim Holtz Tattered Flower die, and dipped it into clear UTEE to create a faux porcelain effect.
 
 
The hearts were made using red UTEE and Crafty Notions Heart mould. Add a small strip of rick rack ribbon, and the torn edge stamped with the mini polka dots background added a little extra effect.
 
 
We hope you will join in with this month's challenge and we're really looking forward to seeing your interpretation of our theme and all your amazing creations and artwork. Please, don't forget to add a comment when you post your entry.

Have a very creative month
hugs
Jennie