Showing posts with label Steampunk stamps. Show all posts

Tuesday, 19 July 2016

Let's have a drink, by Titbelsoeur

Hello there, this is Titbelsoeur on board today,
I am happy to present you my last creation for the Artistic Stamper :


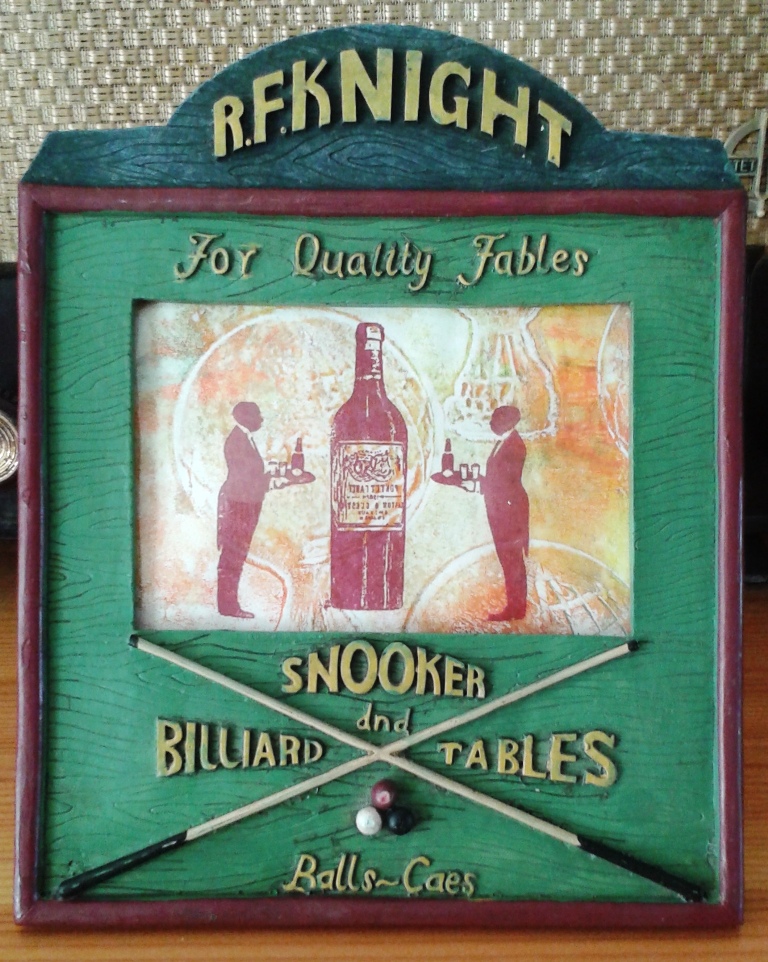
I first stamped Round the World on to my gelli plate to make ghost prints, let the background dry and then stamped the bottle & butlers from Men’s Plate 001 # 035 A5 on it with Plum Archival ink.
Here are the details :


Thanks so much for stopping by,
your comments are very much appreciated, 
here, on my blog, or on the Artistic Stamper's Facebook page

Do not forget to participe in our

MONTHLY CHALLENGE 

 to win some fabulous Artistic Stamper stamps !

Titbelsoeur

Thursday, 7 July 2016

Home sweet home by Titbelsoeur

Hi there !
Are you crafting this summer ? ready to participate in our July challenge and delight us with bright and beautiful pieces ?

Here today is a card for all those who are travelling around the world.

I first stamped this fabulous Round the World stamp from the Steampunk section on to my gelli plate and made a few tests. Then I chose this very piece 


to be inserted into the card. On the card, I stamped this little house from Houses with Black Archival and highlighted some details with a white pen :


Same thing for the sentiment :

and here is my card :


Thanks so much for stopping by,
your comments are very much appreciated, 
here, on my blog, or on the Artistic Stamper's Facebook page

Do not forget to participe in our

MONTHLY CHALLENGE 

 to win some fabulous Artistic Stamper stamps ?

Titbelsoeur

Monday, 7 September 2015

Titbelsoeur, yes she can !

Hello everybody !
Today, my project is to decorate a sardine can. I have collected some beads, shells and other stuff from my stash, I have painted the can with pink acrylics and stamped the clock and lady on to a tissue paper that I have then glued on the bottom of the can.


To have it stand, I have drilled 2 holes in the can and fixed a light bulb


and then glued two wings and a crown that I had stamped on a cardstock. And tadamm, here is my can :


Pink acrylic paint and Blue archival ink
Crown and Wings : Crowning glory from Steampunk
Clock : Tick tock from Time
Face : 20's Ladies Plate from Costume

Thanks so much for stopping by,
your comments are very much appreciated, 
here, on my blog, or on the Artistic Stamper's Facebook page.
I hope that my can did inspire you and that
you will participate in our September challenge
 to win some fabulous Artistic Stamper stamps.


Titbelsoeur

Sunday, 2 March 2014

Phineas Pinchbeck Steampunk Shrine with Linda Cain

Hi, Linda Cain here for a fun time on the Artistic Stamper's Blog with a little tutorial using a Steampunk Shrine Kit. I was really thrilled when Jennie asked me to be a Guest Designer. So let's get started!

 
I LOVE the Fresco Chalk Paints from PaperArtsy, so that's what I use here. 
 
 
These kits are from Masonite and so I lay the pieces out and base coat with Stone paint. The great part is you can paint and stamp on a flat surface, then glue it together! Pretty cool!

 
The next layer is with Pumpkin Soup, Tango, Autumn Fire and Blood Orange. Just a touch of Brown Shed is tapped here and there.

 
I used Mermaid, Bora Bora, Beach Hut and Inky Pool on the other sides that will become the outside surfaces. I added a bit of Guacamole on the edges. Don't be too picky as your backgrounds are going to be covered up with LOTS of STAMPS! 
 
Now comes my favorite part! I get really excited when I see how awesome the Jet Black Archival Ink shows up on the colorful backgrounds!!! The tiny gears from the Borders fill in the spots, and Numbers go on the sides.
  
I'm all about Numbers...they just do something for me.
 
 
 I flipped the pieces over and stamped the outside pieces. I absolutely LOVE this Sequin Waste stamp with Goose Grease! Another Border stamp fills in the edges around the Winged Wheel.
  
Using small stamps from the Numerical Plate on the propeller and a 45 in the gear will add some interest. The Calligraphic Map is stamped on the top piece of the Shrine and white pen marks are added for more contrast.
 
 
After you glue this together with a small amount of glue, you can see how cool the stamping is on the back.
 
I added a Screw Eye to the side and 3 Gears hanging with Jump rings.
 
 
I glued vintage labels to 2 Apothecary Bottles with Glue-n-Seal.  A Label Clip fit perfectly on the front, and the Clock Key looks good in the middle of the gear stamp. I used a Dremmel to drill the hole for the key.
 
 
White pen marks along the edges make the colors pop.
 
So, that's it for me for today. I'll be back again later in the month with another project using these wonderful stamps from
The Artistic Stamper!
 
Your Friend in ART,
Linda
 
 
Artistic Stamper stamps:
Numerical Plate A5 - Katy Fox
 
Other Products:
Crafter's Pick The Ultimate White Glue 

Saturday, 22 June 2013

Altered bottle by Titbelsoeur

This is a small (approx. 15 cm high) altered bottle I chose to show you today. It comes from the Ukraine and in a former life it contained spicy vodka !
Today it is prominently exposed on my dresser, after a little refreshing ;-)

I started with a slight coat of gesso all over the bottle, but not regularly applied to obtain a crackled aspect.
After dried, I poured some liquid inks (Distress and other) on the gesso and mixed them with my fingers.
The Phineas Pinchbeck stamp was the exact size to replace the original label :


I stamped it with archival ink on a junk kraft envelope, cut it out and glued it on the bottle.

And it was soooo pleasant to take pictures in the back yard !!!

I hope you like my tiny bottle,

Thanks for stopping by, I am really looking forward to reading your comments !


A tout bientôt !


Monday, 22 October 2012

St...st...st...STeamPunK by Titbelsoeur

Hi There, Salut les Cop's !
The page I am showing you today was made to be sent to a friend of mine, for her circle journal... sure you guess the subject of the journal !
Steampunk, yes you right !
I LOVE the steampunk style ! to make the background, I have used some masks and stencils like the Mini Gear template and, amongst others, the fabulous Tick Tock and Cogs Background plates. Ranger inks sprayed or stamped, and that's it...


An Old Lady and a young one... the young one needed some jewels, thus I opened my toolbox to gem her with cogs, coins and watch mechanisms :


I hope you like my steampunk style,
thanks for stopping by, 
I am looking forward to reading your comments ! 
See you again soon...

Wednesday, 6 June 2012

Phineas Pinchbeck's shop window.

Hi there. Zuzu here...
Well here I am with my very first full post as a member of the Artistic Stamper's Creative team... Cant tell you how pleased I am as it was on my mission statement a year ago. (A mission statement I announced only to a few close craft friends and it was more fairytale imagination that expectation.) So I MADE IT... lol

Today I have an altered shadow frame. Its made from one of the "papier mache 3D frames" (I used a deep one for this project).  I covered it on the inside with old book pages. I covered the frame part, with sheet music that I had rusted, in a rusty tray with vinegar, a few days beforehand. As its a Papier mache frame, I treated the papers I was covering it with in a similar way. I wasn't too precise and i put them on in bits, just forcing it to mould into shape by getting it wet with the glue.
when it was all dry, i stamped out the crow collage stamp on to another bit of text paper and collaged him on to the background.
The next step was preparing my jars. I used the chipboard shapes to go along with the stamps. I used some antique linen distress ink on them first, as they were too white for this project. I stamped the empty jar out on to the chipboard and then again on to paper to make a mask. I cut out the centre of the mask so that I could stamp the crow in to the jar. I then coated it heavily with Ultra thick embossing powder to give it a glass jar look, by coating it in Versamark ink first... now the crows head looks a bit like a specimen steeped in some chemical fluid inside an old jar. (well sort of lol)

I treated the second jar in much the same way but without the need to create a mask. I then stamped out Phineas Pinchbeck a few times and cut him out to mount him on my verdigris patina column. I used a second image of him to just cut out the clock part to mount it in front of the column to give a 3D look.. and a third image of him, was used to make the sign at the bottom (middle) of the frame.

Next i used some distress inks to colour a piece of plain cardstock (I used rusty hinge and scattered straw). when it was dry I stamped on some sheet music in brown (so that it carried on the theme from the music paper on the frame)  and then stamped on the bunting in black. I cut it out and glued it at an angle to the top of the frame. All that was left to do was fill the frame up with clock type items and rusty bits and bobs....

Z x


Supplies Used from The Artistic Stamper:

3D frame HERE
Phineas Pinchbeck stamp and Jar stamps HERE
crow stamp HERE  (scroll down )
Bunting stamp HERE
Music stamp HERE
Jar chipboard HERE
Distress inks HERE

Friday, 16 September 2011

Autumn Jigsaw Piece by Alison Hall

Hello Stampers! This week I have altered a jumbo jigsaw piece. It was originally part of a Tweenies puzzle I bought in a charity shop.

First I covered the whole of the back of the jigsaw piece with tissue tape, which is currently on special offer HERE. Then I inked the tape with alcohol inks. I used butterscotch, terra cotta & red pepper. I stamped the Bare Tree twice, using black Archival Ink.

I stamped the leaf, from Tick Tock Flowers, three times on book paper, then cut them out & layered them on the bottom right of the jigsaw piece, with some skeleton leaves.


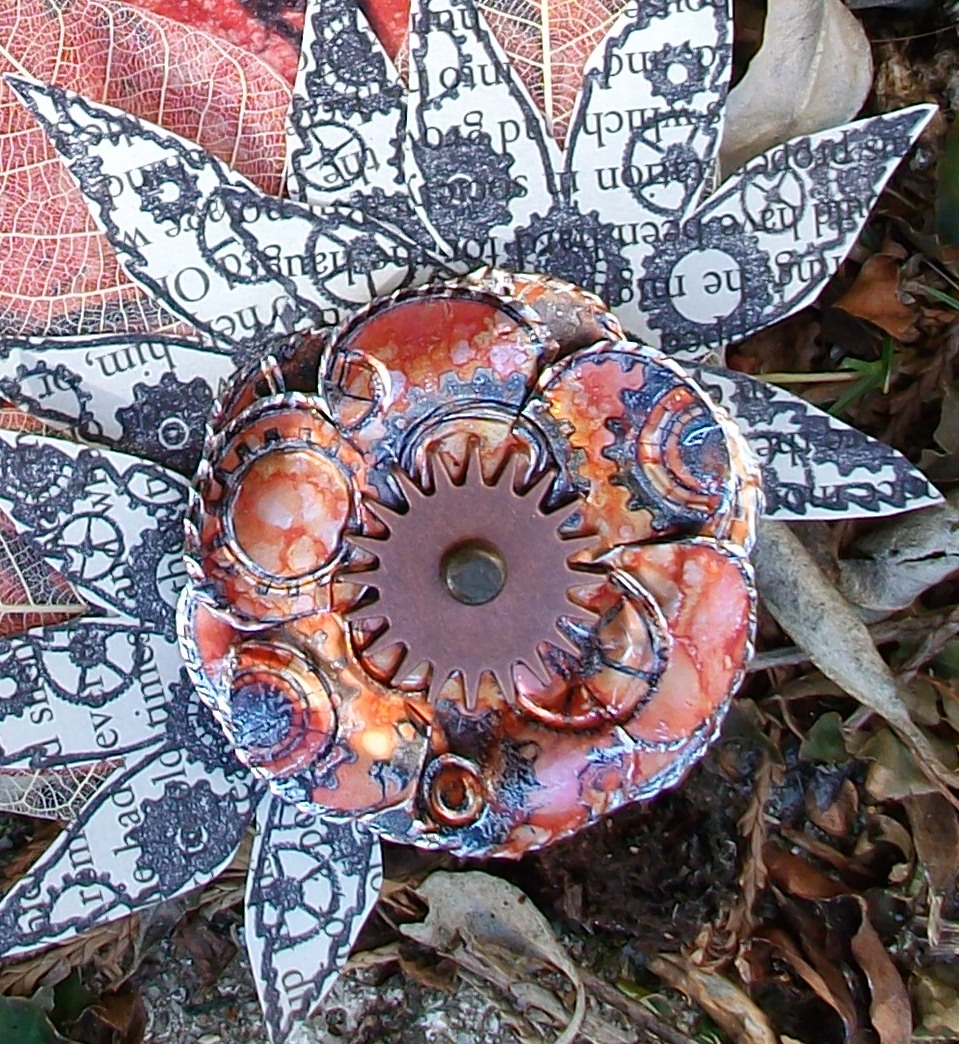
To make the flower, I cut out a piece of sticky back aluminium sheet, 4x2 inches, inked it with the same alcohol inks as before, peeled off the backing paper & stuck it to some black card, the same size. I stamped the small Tick Tock Flower twice, using Black Stazon, then cut them out, leaving a small border around them, about 1mm. I used a metal tool to emboss the cogs on the flowers, & a wheel tool to edge the flowers. Then I curled the petals, layered them together with a Tim Holtz sprocket gear & long fastener, & glued the flower on top of the leaves.

Finally, I stamped AUTUMN from the Greetings & Words plate, on a piece of alcohol-inked glossy card, edged it with black Archival ink, & attached it to the jigsaw piece with 2 Long Fasteners.

Thanks for looking,
Alison xx

Wednesday, 24 August 2011

Tick Tock by Alison Hall

Hello Stampers! I'm back with my final piece for August. I had a lot of fun with this card, I can tell you! It has a bit of a manly theme going on, so it fits nicely with the August Challenge of Macho Men. There's still a few more days to join in! I also used Core'dinations paper, which is on special offer this month HERE.


Here's how I made my card...

Using a deckle-edged metal ruler, I tore a 5.5 inch square of peeled painted Distress Core'dinations paper. Next, I thinned down some Claudine Helmuth traditional tan Studio paint with a spritz of water, & applied a wash across my paper. I sanded over the edges with a sanding grip to give a distressed look.

I used vintage photo distress ink to stamp the Winged Wheel over my background. I stamped Phineas Pinchbeck on the left, using archival black ink, then, using the same ink, carefully stamped the empty Inspiration Jar over the top of Phineas. I coloured this in, using peeled paint & vintage photo distress inks, dried it with my heat tool, then covered the jar with a layer of glossy accents.


Whilst the glossy accents was drying, I stamped some pocket watches from the Time & Keys plate onto the clear side of some frosted shrink plastic, cut them out, then shrank them with my heat tool. Next I stamped the words Tick Tock onto white card, using the large & small scrabble tiles from the Scrabble & Tags plate. I cut out the words, then inked them with vintage photo distress ink.

Going back to my now dry background, I smeared bead gel around the edges, using my fingers. You can use a palette knife if you wish! Once this had dried, I applied lava green Inka Gold to highlight the little beads. Told you I had fun!


Finally, I glued the words & watches to my background, attached it to a square card blank, then inked the edges of the card with more vintage photo distress ink.

Thanks for looking!
Alison xx

Sunday, 17 April 2011

Bright Idea! by Nicky Cresswell

Hello to all you creative peeps out there, I'm back again, this time with a little wall hanging.
It's made from cardboard, I like to do my bit with the old recycling you know!
I started by cutting a square of card from an old box and ripping the top layer off in places, I then gave it a coat or 2 of paint.
I cut a section from the top of the card and glued old christmas lights that i'd coloured with permanent markers in top and bottom.
I stamped the cog inspiration light bulb onto some mica in brown stazon ink first, I then used the clear bulb and over stamped in black stazon to define the shape.
I used the mini scrabble tiles from the Scrabble and Tags plate to write bright & to make them pop I added a bit of colour using a yellow permanent marker and then glossy accented over the top.
***
To fill behind the fairy lights I stamped the cogs background onto parchment in brown ink, and then dry embossed around the cogs making the parchment turn white.
I randomly stamped the small cogs cluster all over the piece in vintage photo distress ink and heat embossed with distress embossing powder.
***
 As I had already used stamped mini scrabble tiles I thought it would be cool to incorporate actual old scrabble tiles into the piece, I sunk them into the cardboard by gently slicing all the way round each one then just pushed them in place, that way they didn't go all the way through the card.
 The piece was looking distinctly flat so to 'build it up' in keeping with this months challenge I cut out a bunch of cogs using my Vagabond and the gadget gears die {again using up more recycled cardboard}.
I distress embossed them all and then layered them using foam tape, and finished the middles by gluing old screws and bolts that I coloured again with permanent markers, I also coloured a little on the cogs to make it look like oil and grease.
***
Well thats your lot from me today, I hope you enjoyed my project and it inspires you to dig out some cardboard and get creating!
Until then Stay Inky