Showing posts with label Fresco Paints. Show all posts

Wednesday, 22 April 2015

Gothic Arch's By Dee

Hi everyone hope you are all well and having a crafty time. I have a plaque 
for you today using the new stencils from The artistic Stamper,
and some Artistic stamper stamps.


Firstly I brayered on the fresco paint till it resembled old stone.


I then used a pallet knife to apply the grunge paste to the top left
I applied this quite thickly so it would resembled old stone 
once I had stamped into it using the circular column toppers
of the architecture plate.


I inked up the stained glass window off the architecture plate
stamped it twice with black stazon once onto the background
and once onto spare card. This was then cut out and
 stuck into the frame of the main image of the arch.


I used the Artistic Stamper lace background stamp & inked it up with stazon black ink 
This resembles peeled paint if you used the right area's. Stamp around the 
Arch window.


I put texture paste through the Artistic Stamper flourish stencil, I then
sprinkled a mix of pale blue and gold embossing powder and dried 
with a heat gun.


I used the Framelits die and glued this up the side after I had sprayed it with spiced
 marmalade and rusty hinge distress spray stains.


I wasn't keen on the colour although it did look like an old Gothic 
building I wanted it to look vibrant and highlight the swirl
texture.


I stamped the calligraphy mat 4 on distress treated paper which had
been swiped with old page and stained walnut.


I used the distress stain sprays to spray the entire piece to make it more vibrant.


I highlighted in area's with gilding wax. I applied a three
embellishments to look like old rusty bolts.


I must admit looking at it it reminds me of Rapunzel maybe the swirl is her hair
That's it for today as always let me know what you think remember look
at your stamps and see what other patterns they can create.
Cheers Dee x

Products used

  1. The following Artistic Stamper Stamps Architecture Plate, Caligraphy Mat 4 & Lace background stamp.
  2. Fresco finish paint  Chalk, Slate and Blue Oyster.
  3. Distress Stain Spray's in the following colours Rusty Hinge, spiced Marmalade & Salty Ocean.
  4. Grunge paste
  5. Texture paste
  6. Sizzix Thinlets mixed media die
  7. Embossing powders.


Sunday, 22 February 2015

Florishes and Butterflies


Hi everyone I have for you a picture  for my next post the background came out of a
 session playing with a brayer and using Paper Artsy Fresco Finish paints 
in shades of blue,  I watched Leandra's you tube brayered 
backgrounds and that was the result.


Instead of their waxed paper I used kitchen grease proof paper
and gradually built up the layers.


You have to be very careful not to have to much paint on the brayer and be gentle rolling 
it across make sure all the paint is off the brayer before you use a different colour. 
Start with dark colours first then and then gradually add the lighter ones.


It left a lovely mottled effect and the grease proof paper gets stronger
 with each application.


To finish the background I used Tim's Flourish stamp inked up with snowflake fresco
 finish paint then stamped randomly across the paper.


I triple embossed The Artistic Stamper butterfly off the insects & butterflies plate 
three times with gold embossing powder.


I then layered it up and highlighted areas with treasure gold after using alcohol
 inks to colour the recessed bits.


Little sequins were glued onto both wings and the body was made up with beads
 from my stash. The curly twig with berrys on I had laying around and 
two sparkly circles were glues on.


The frame was made with grunge paste through a stencil once dry painted with deco art
media paint in Cobalt Turquoise, once dry I used Deco Art Antiquing cream 
if you haven't tried this product yet you need to get some its amazing.

Products Used
  1. Fresco Finish Paint in marlin, lake wanaka, antarctic, bora bora and snowflake. 
  2. Deco Art Media Cobalt turquoise Hue, and Antiquing cream Raw Umber.
  3. Grunge paste
  4. Speciman Stencil
  5. The Artistic Stamper Insects and Butterflies plate, Tim Holtz flourishes.
  6. Gold embossing powder.
  7. Treasure gold classic.
  8. Alcohol Inks in stream, and denim.

I used beads and sequins from my stash, The very talented Jools Robinson inspired this piece by suggesting that I framed the paper I had made. So with that in mind this was where I ended up.
I would be very pleased if you let me know what you think.
Cheers Dee x

Tuesday, 10 February 2015

How does your garden grow?

Hello all!  Alison (butterfly) here with a gentle tag for you today.  I've been playing with some of the lovely new gardening stamps just released here at The Artistic Stamper.  There are some fantastic new releases.  If you haven't seen them yet, do check them out.

So here's my relaxing garden tag - a fairly simple affair, but it gives me lots of pleasure.


I started by putting Distress Ink onto a large acetate gridblock, spritzing it with water and stamping onto a watercolour paper tag.  I did some spritzing and flicking of water to create even more of a textured look.


The fork and spade from Garden #1 are stamped in a combination of Coffee and Potting Soil Archival inks and clear embossed.


I stamped the very useful "extra bit of earth" from Garden #2 next to the main image, so as to 'fade out' the earth rather than have it stop abruptly.


I added another layer by stamping the tiny bubbles from the Borders 2 plate in colours to coordinate with the background.  And there's plenty of white splatter to create more life and movement.


The sentiment is from a PaperArtsy set, and is stamped in graduated Archival inks - Cobalt, Leaf Green and Olive, I think, and then clear-embossed as usual.


I tried out a number of different embellishments, but each time I preferred the simpleness of the tag without any extras until I suddenly remembered these tiny wooden confetti circles, hiding in my stash.


I glued them in place and gave them a tiny swipe of Chalk Fresco paint from one angle.


The Distress-dyed ribbons at the top are tied with some Idea-ology paper string, and the whole thing is mounted on some distressed corrugated cardboard for that rustic look.


And that's your lot for today.  Thanks so much for stopping by - your comments and visits really mean so much.

I hope you'll come and play along in our Love challenge here at The Artistic Stamper this February.  You don't have to use Artistic Stamper stamps, but if you do you'll qualify for a double entry in the prize draw.  What have you got to lose?!  Happy crafting!

Ingredients used:
Artistic Stamper stamps - Garden #1, Garden #2, Borders #2 A6
Distress Inks - Broken China, Stormy Sky, Vintage Photo, Gathered Twigs, Walnut Stain, Peeled Paint, Mowed Lawn, Pine Needles
Archival Inks - Coffee, Potting Soil, Cobalt, Leaf Green, Olive
Fresco Paints - Chalk
Seam binding
From my stash - watercolour paper, paper string, corrugated cardboard, wooden confetti, sentiment stamp

Monday, 3 November 2014

Phineas Pinchbeck

I loved the Phineas Pinchbeck stamp from the moment I saw it. For this
 project I used the following Artistic stamper stamps, Numerical plate, 
glory and Ephemera 1. Tim Holtz cargo stencil  & 
 photo and scattered straw.  


Firstly I painted grey board with fresco finish paints in stone, nougat,
and mushroom, through a honeycone stencil I put squid ink
paint that I then knocked back with nougat. 


I stamped the two sets of numbers off the Numerical 
plate in chocolate pudding.


The two stamps of the postal plate were stamped in claret
 and baltic blue. The ruler of the Ephemera plate was 
stamped in archival ink. 


Grunge paste was put through the cargo stencil numerical 
once dry this was coloured with 
geletoes and treasure gold. 


Gauze was coloured with claret fresco finish paint then darkened 
with black soot distress ink.


Card coloured with distress inks was stamped with the Phineas
 stamp and the crown from crowning glory which I 
then highlighted with liquid pearls.


The clock face x 2 from Phineas stamp was covered in crackle 
accents. this was layered up with the clock faces of the 
time and keys plate. I used a cog die that I had in
my stash.


The sign at the bottom was hand written with white gel pen on 
black card and then backed onto kraft card.


I then backed it onto burlap and black card and finished off with 
 four gold brads on all corners. Thank you for stopping by 
please feel free to leave your comments as your
comments help to inspire me.
Cheers Dee


Monday, 18 August 2014

Our House Journal page by Alison Hall

Hello Stampers! I have a journal page to share with you today.


Ingredients...
Kat's Creations Stamps - Bunting & Home Sweet Home
Fresco Finish Paint - Bora Bora & Chartreuse
Dylusions Ink - Squeezed Orange
Archival Ink - Jet Black
Old credit card

Instructions...
1. First, I lightly brayered Fresco Bora Bora to the top left of my page, then Chartreuse to the bottom right, then dried with a heat gun.
2. Next, I placed the Lin Brown Stencil on my page, masked off the images I didn't want, and the rest of the page, then spritzed the Dylusions Squeezed Orange ink.
3. I stamped the flowery hill in black, at the bottom of my page, then used the waterbrush to paint the flowers with the Dylusions ink.
4. On another piece of watercolour card, I stamped the houses, words & lots of butterflies in black, then cut them out. I added colour with the paints & ink, & doodled some dots on the butterflies.
5. I used glossy accents to glue everything onto my page, then finished off by adding some black archival ink lines, using the edge of an old credit card.

Alison xxx

Thursday, 24 July 2014

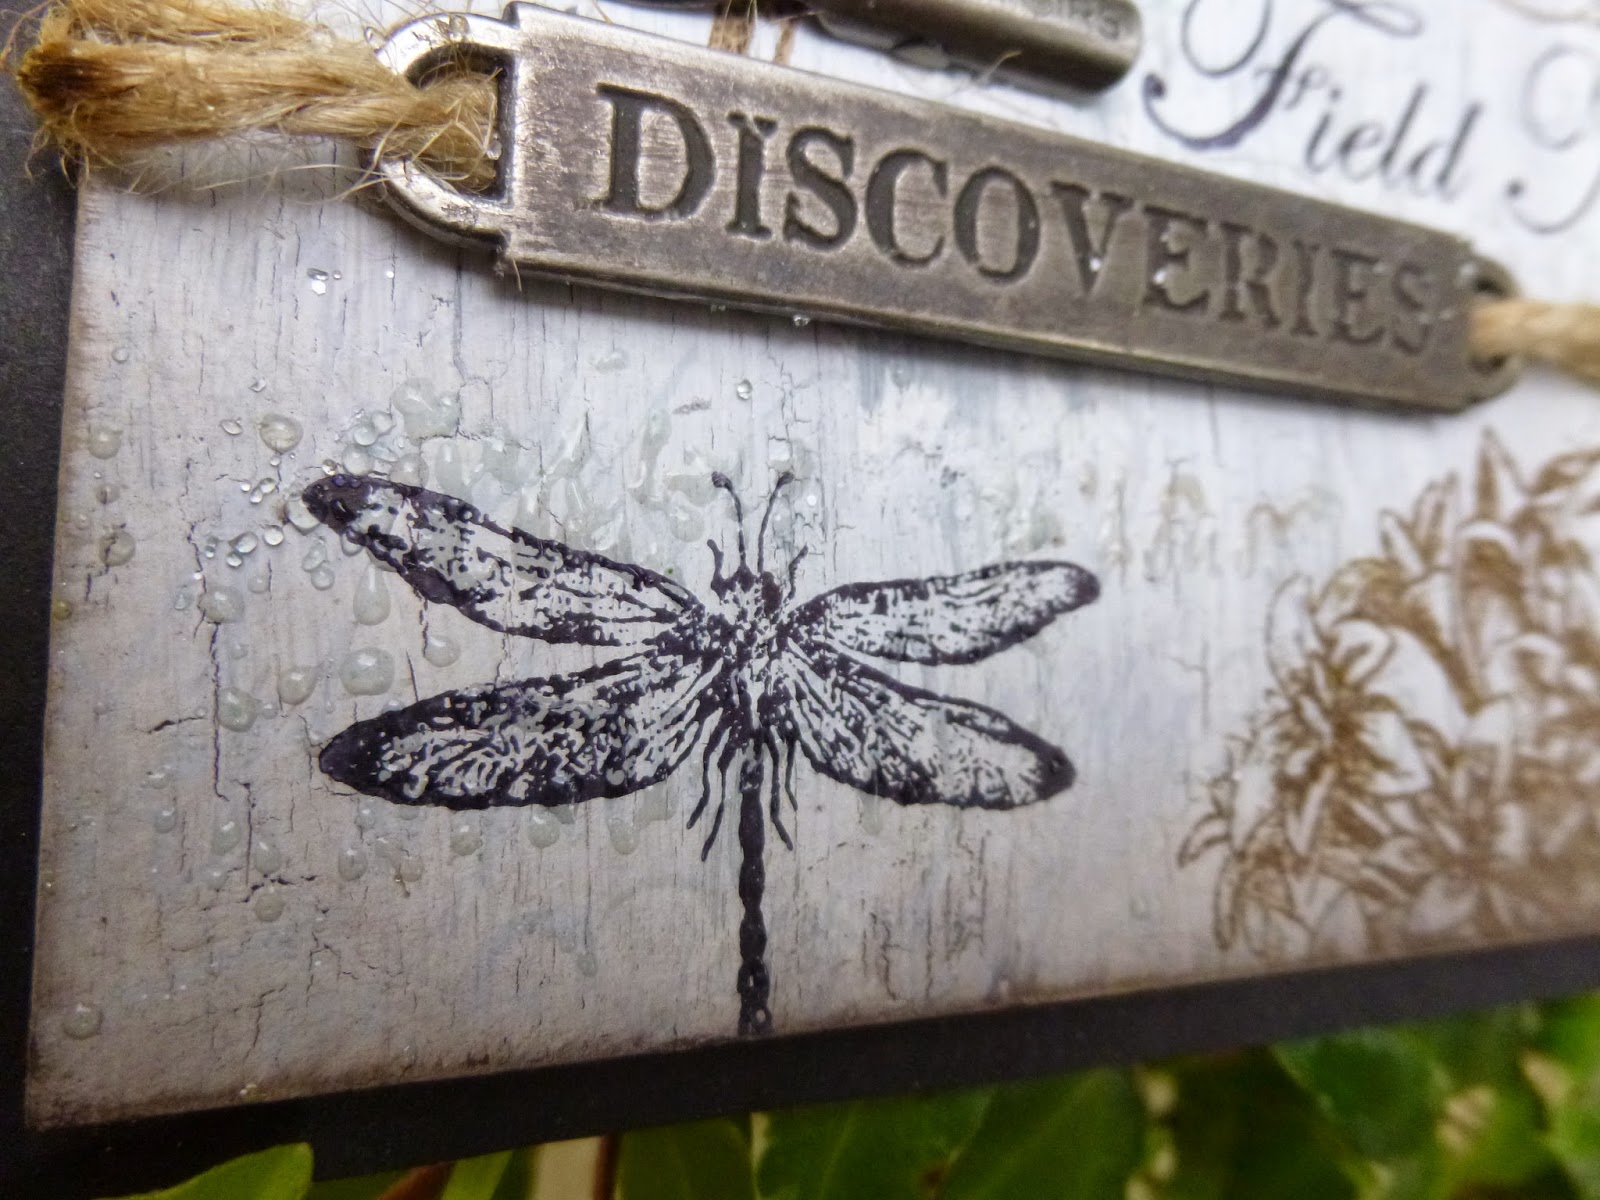
Field Notes of a Naturalist

Hello all, Alison (butterfly) here with a Victorian naturalist's field notes from his day's excursion in the fields... and we're back to the neutrals!  It's a simple stamped tag, using Katy Leitch's fabulous new Jumbo Flowers along with one of the Stampers Anonymous Classics releases from earlier this year.


I kept the stamping simple over a background of Fresco paints and crackle glaze.  I couldn't resist a spot of clear-embossing though!


The flowers are done in Potting Soil Archival, which seems an appropriate enough colour for botanical sketches.  This is the Bouvardia, tucked away at the bottom...


Here's the Flowering Branch...


And the Camellia...


The insects are stamped in Jet Black Archival...


... carefully labelled to keep track of genus and species.


In between, you might catch sight of the sparkle of some handwritten notes about what he's found.


I stamped the Calligraphy Mat #9 in Pumice Stone Distress Ink, and then clear-embossed it.  I love the dewy shimmer as it catches the light, so I don't mind the occasional places where it's spots rather than writing - just more dew drops!


There's some simple embellishing - a word band attached with rustic twine, and the pen nib with which he's been scratching his field notes in his journal.


At the top some seam binding, dyed with Pumice Stone and bound with more twine, is fastened with a Muse Token celebrating the new knowledge he's acquired in today's nature ramble.


The whole thing is matted onto black card, to give a little extra definition, and that's your lot.


Thanks so much for stopping by today.  There's still time to enter our By the Seaside challenge this month... hope to see you there!

Ingredients used:
Artistic Stamper Stamps: Katy Leitch Jumbo Flowers - Bouvardia, Camellia and Flowering Branch, Calligraphic Mat #9
Stampers Anonymous - Classics #17
Fresco Finish Paints - Crackle Glaze, French Roast, Chocolate Pudding, Stone, Snowflake
Ranger Archival Ink - Potting Soil, Jet Black
Distress Inks - Pumice Stone, Walnut Stain, Gathered Twigs
Idea-ology Findings - Word Band, Pen Nib, Muse Token