Friday, 13 June 2014

Summer Wings

Hello everyone, Astrid here to share my first project for June with you.
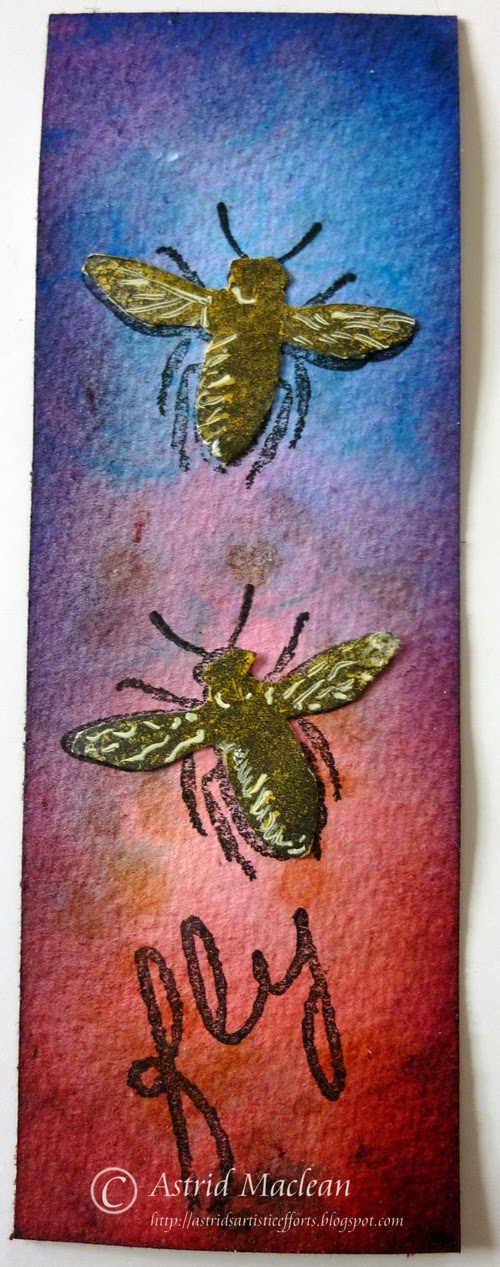
Summer always gets me in the mood for colour, so for my project today I decided to have a play with some of the gorgeous Dylusions Spray Inks. I made three cards as you can see and the colours I used were: Pure Sunshine, Calypso Teal, Vibrant Turquoise, London Blue and Postbox Red.

I started by cutting 3 panels from Watercolour paper, I then applied my inks with a paint brush.
For this one I used yellow and blue, I applied them with a  brush and then sprayed water and dabbed a bit with some kitchen towel. When dry I inked around the panel with Distress Inks in Peacock Feather and Chipped Sapphire.
Next I did some stamping, I used the Speckle and Regency background stamps and stamped in Hydrangea Archival Ink. Next I stamped the butterflies from the Stampers Anonymous Classics 17, first straight onto my card and then on smooth stamping paper, fussy cut, coloured with Distress Inks and then glued onto the panel.
For this panel I used Postbox Red and London Blue. I then inked using Picked Raspberry, Chipped Saphire and Dusty Concord Distress Inks to deepen the colour. The bees are from the Insects and Butterflies set and I used the same technique.
The word Fly came from the new Katy Leitch Fly set.
+
For this one I used Calypso Teal, Vibrant Turquoise and London Blue. I then inked using Salty Ocean, Peacock Feather and a bit of Chipped Sapphire DI. I used the same two background stamps again, this time in Tree Branch and Coffee Archival. The little dragonflies are from the Stampers Anonymous Classics 17 set too.

After all my inking and stamping was done I mounted each little panel first on white and then on Kraft card. The fold is at the top.


Hope you like my cards and thank you so much for visiting!

Tuesday, 10 June 2014

Dappled and Drowsy

Hello all, Alison (butterfly) here from Words and Pictures, with another musically-inspired tag for you today.

Simon & Garfunkel fans may have already clocked the post title, and be humming along.  It's the 59th Bridge Street Song"I'm dappled and drowsy and ready to sleep"... those were the words running through my head as I was playing with this one, with light and shade playing across the leaves.


I started from what was basically a mop-up tag.  There's definitely paint involved, and some Dylusions sprays.  It also has some texture from being pressed against another tag while all the paint and ink was wet on the surface.


Over that, I started clear-embossing some of Katy Leitch's lovely Leaves, stamped in Versamark and heat-embossed with some Clear Detail powder.


That glossiness captures the sunlight and makes it twinkle and reflect at you as you move the tag around.


I also stamped some of the smaller leaves in Olive and Leaf Green Archival inks, building up the layers... like lying beneath a tree and looking up through the layers of branches above you.


By this point, the song was in full flow (well, at least those couple of lines going round and round incessantly!)...


... so there was no difficulty in choosing the words to go on the tag.


The torn edges give a lovely textured surface for inking.


For the background layer, I added some ink and stains to a piece of watercolour paper, and stamped some more of the leaves in Archival ink of various colours.


And the torn edges again absorb the ink really well, so you get a lovely intense colour around the border.


A little bit of Distress Stain-dyed seam binding and some curly white twine keep things simple at the top.


And I did lots of splattering - most of it Dylusions, as far as I remember (taking the top out and splattering using the end of the spray attachment).


I was just having fun dappling and splattering by this point, so I wasn't really paying much attention!


Hope you're getting to enjoy a few drowsy afternoons in dappled sunlight...


Don't forget to come and play in our June challenge: we'd like you to Colour It Red.  And if you're thinking I'm not setting a very good example with all these greens, hop by Words and Pictures tomorrow for some redder inspiration - yup, even I've been tempted into the red zone!


Thanks so much for dropping in, and I'll see you again soon.

Ingredients used:
Artistic Stamper Stamps: Katy Leitch - Leaves
Dylusions Sprays - White Linen, Dirty Martini, Calypso Teal, Cut Grass, Vibrant Turquoise, Chopped Pesto
Archival Inks - Olive, Leaf Green, Aquamarine, Fern
Versamark Ink Pad
Wow Clear Gloss Superfine embossing powder
Manila Tag
Seam binding
From my stash: white twine, watercolour paper, Hero Arts alphabet stamps

Sunday, 8 June 2014

Heart Flower Card by Alison Hall

Hello Stampers! I have a card to share with you today, on which I used Neil Walker's fabulous new Heart & Fantasy 2 Border stamps.


Here are the ingredients...
Circle punches

And, here's the instructions...

1. Use the Gelli Plate and paint to create backgrounds in blue & red. 
2. Cut a 13.5cm square of the red background, & stamp the straight edge of the Fantasy2 Border around the edge, using black archival ink. You will need to stamp a random part of the border to fill in the corners.
3. Glue the background to a 6x6" white card.
4. Stamp the Large Heart onto the blue background six times, & cut each heart out. 
5. Assemble & glue the hearts to the card in a flower shape, as shown in the photo.
6. On left over red background, stamp the Fantasy 2 Border, & punch a 1" circle for the flower's centre. Stamp the part of the border with the small swirl 6 times on red, & once on blue, cut out & glue to the flower's centre & petals, as shown in the photo.
7. Add some doodled dots with a white pen, to finish.


I hope my card inspires you to get inky & painty :-)

Alison xxx

Friday, 6 June 2014

Art journal page by Titbelsoeur

Hello Happy Crafters !
This is Titbelsoeur here with a journal page. I got inspiration from a video from RachO113 on Youtube and followed her process - almost - entirely.... let's say as much as I am capable of !

Anyway, I am quite satisfied with my page.

I stamped the houses from Our House A6 with Archival ink on drawing paper, cut them out and colored them with watercolor chalks and pencils.

Then I stamped the quote from French medieval poet Joaquim du Bellay whose poem was put to music by a French rapper a few years ago :


Materials used :
drawing paper
Our House A6 
Dylusion inks 
Archival Ink
Stencil from my stash but you will easily find yours in the Artistic Stamper shop

Voilà, I hope my journal page does inspire you,
thank you so much for stopping by, 
I am looking forward to reading your comments !

A tout bientôt,
 

Tuesday, 3 June 2014

Copper birdz by Dee Adams

 
Hi everyone!, i am thrilled to have been chosen to join the Artistic Stamper Creative Design team. I would like to thank Jennie, for all the fantastic stamps I will be designing with over the coming year. I hope you all enjoy my creations and are inspired by my work to create your own interpretations. So here is my first piece for the Artistic Stamper using the Neil Walker Birdz A6 stamp plate.


I stamped the bird stamp onto a copper sheet with black archival ink (you can use any cloud metal) then I heat set it with my heat gun. I then picked up the copper with tongs and held it over the naked flame on my gas cooker, you will see a green flame it only takes a few seconds for the colour to change. BE VERY CAREFUL DON'T TOUCH UNTIL IT HAS COOLED DOWN.

Using a stamp matt, follow the stamped image with a pointed teflon tool. Once completed flip it over and puff it out using a paper stump. fill it in with polyfiller or glossy accents, once dry stick black card onto back, so that it has a flat surface to stick onto the main piece. Carefully cut it out.


Take a piece of black card, and using a bronze acrylic paint, dab it through the mini tile stencil. Cut this into rectangles, and glue one of the copper birdz onto it, repeat so all of the birdz are done.


Using grey board, I stencilled grunge paste through the leaf and swirl border stencil and dried.  I then applied haystack and honey dew fresco finish acrylic, Using cut and dry foam (or your fingers if you wish!). I followed theses colours with smoked paprika, pumpkin soup, and a small amount of south pacific. Once dried i applied blood orange to the artistic stamper random dot stamp, and stamped it randomly, followed by south pacific and pumpkin soup. I distressed the sides and sponged spiced marmalade around the edges.

I didn't like the colours so i went over with a thin coat of fired brick distress paint


White fire treasure gold was applied around the grunge leaf pattern. Then everything was mounted to black card.

I hope you have all enjoyed my first piece, I look forward to reading any comments (be kind!!)


Monday, 2 June 2014

Winner of May's Challenge


Hi! 
I am here again with the winner of May's challenge, which was In The Garden, and a  Big Thank you to everyone who joined in. What gorgeous creations you showed us!
I have chosen a winner by the way of Mr Random.org, and a huge round of applause please for

with this gorgeous creation :)


Congratulations and please email me so we can arrange your prize.
This month's challenge is Colour it Red, and you can interpret it any way you like, as long as it has stamping in it. We look forward to seeing your creations!
Have a very creative day
{hugs}
Jennie

Sunday, 1 June 2014

June Challenge- Colour it Red

Hi to all of our blog readers

A BIG thank you to everyone who joined in May's Challenge, We loved all the entries, and Hope you will join in this month's too.
 
Our new challenge for June is Colour it Red. . You can interpret this anyway you like :) as long as it has rubber stamping in it.
 
We are  looking forward to seeing all your fabulous artwork and stamped projects that you submit in relation to this theme. To join in with this challenge (and you can join in as many times as you want), is simple; all we would like you to do is, make a piece of artwork, making sure that you include the theme and some rubber stamping. Pop back here to link up using the Inklinkz at the bottom of this post, so that we can see what you've made and then, leave us a comment to let us know you have joined in with the challenge. As always, there will be candy for one randomly picked entrant - the winner will receive £15 worth of The Artistic Stamper stamps of your choice. And don't forget....if you use Artistic Stamper stamps on your entry, you will entered into the draw, twice!!!! You can also enter as many times as you like!

Here are Mine and Astrid's take on the challenge. We hope you find inspiration from them :):


© Astrid Maclean
Red always suggests passion to me. It's not a colour I use often, so it was quite a challenge. In the end I made a card using two of the gorgeous new stencils. I also used the beautiful rose from the Botanical 3 set and a word from the Grungy Greetings.


© Jennie Boxall
I took the Distress ink embossing resist technique as a starter and inked up my tag with Festive Berries, and after drying it, clear embossed Katy's new stamps, and after heating and allowing to cool, added more distress ink to the tag, along with one of the Jumbo Flowers. If you ink Distress ink over embossing, it doesn't colour it, and can be wiped off easily, showing the base colour through, which was red! A couple of idea-ology pieces added focus.

We hope you will join in this month's challenge and look forward to seeing you creations. Don't forget to add a comment when you have posted your entry.

We are also looking forward to the month of June, when our new team members will be showing us their creations, Watch out for their posts later this month.
I will be back in a couple of days with the winner of May's Challenge.
Have a very creative month
{hugs}
Jennie