Tuesday, 31 May 2011

Sweet Dreams...

Hi, it's Jennie here again. All this month, the Creative Team have been using Mabel Lucie Attwell Stamps, and now it is my turn! All of the images we have in the collection are vintage, and very evocative of the mid 20th century, and do lend themselves to the distress inks so well. I have created an ATC using the Time for Bed stamp, and I first stamped the girl, then masked her off with a post-it note, distress stained around the outside with Wild Honey, and a smidgen of Fired Brick. I then added distress inks for depth to the colour.
My colouring skills are far from good, so I used some of my own pens, and attempted to colour her in!
The stickers are from The Girls Paperie Kitch sticker pad.

I do hope you ave enjoyed this month's take on Mabel, and if you haven't seen them, have a look, all of the artwork is stunning!
Have a very creative day!
Jennie

Sunday, 29 May 2011

It's Raining - By Kat Fullman

Hi all,
It's Kat here, AKA Kat's craft creations .I'm back today with another card using a stamp from the Mabel Lucie Attwell range The image I have chosen to use this time is the very cute It's Raining! stamp,

So here's my card,
(do you think the raspberry cream chocolates
I was eating at the time influenced my colour choice at all) lol.


I have made a multi folded card here that's so easy to make
but very affective when it's finished,

Here's a picture of a plain folded one for you to see how it's made,
start with a piece of card measuring 6inches high by 18inches long
score & fold as shown at 6inch, 12inch & 15inch.


next you need to glue your patterned papers on the panels
shown below.


then edge the whole card with Vintage photo Distress Inks


Onto the image panel,
onto a classic square nestie then
coloured it with Distress inks in aged mahogany, worn lipstick
vintage photo & frayed burlap.
I took a lacy square nestie coloured with aged mahogany distress ink
& matted & layered them with foam pads,
I added glossy accents to her buttons & hat .


I then made 2 sentiment panels using
classic rectangle & scalloped rectangle nesties,
one for the Tim Holtz sentiment on the front of the card,
& one for the just for you on the inside of the card.


next up is the flowers & leafs,
I used a Wendy Vecchi leaf stamp coloured
with aged mahogany & worn lipstick Distress Inks
& then cut out,
& for the flowers I used, flower creations 3 die
& cut 4 of each size (small, medium & large)
out of the patterned paper,
shaped the petals & layered them together
finally I glued a gem in the centers.


I assembled all the bits on the card
glued with silicone glue,
and there you have it.


Hope you like it!

This is my last creation for this month,
thanks to Jennie & Hels for asking me back,
hope to see you on this blog again from time to time,
& thank you for the lovely comments on my creations
I have received from you all on previous posts here
they are all very much appreciated.

Kat x.


Friday, 27 May 2011

Room for Improvement! by Nicky Cresswell

Good day fellow crafters, I hope you are well and happily creating art.
This is my last piece of the Mabel month and I saved the best for last.
I created a door plaque from a thick piece of cardboard.
I covered it with a sheet of retro grunge paper.
I then started by putting some chipboard letters onto squares of grungeboard, then covering with TSS metal, using the TSS tools to define the letters and jazz up the edges. I then smooched on some alcohol ink over the top to give a more grungy look.
I used some more chipboard letters coloured with distress ink and stamped with the 'star background' stamp, using the bubble as one of the O's, but it looked a little bare so I filled it by stamping the star inside.
I used the 'I'm forever blowing bubbles' mabel stamp coloured with my copics and then grungied up with distress inks.
 I stamped the 2 largest stars from the 'Star Plethora' plate, 1 on metal {which I embossed slightly} and one on grunge, and layered them up, and the finishing touches were a couple of retro grunge paper roses and an idea-ology hinge clip to hang it.
***
 And here is the finished door hanger perfect for any little Mabel's room
Thanks for stopping by, Until next time 
Stay Inky

Tuesday, 24 May 2011

Time Will Never Wait by Alison Hall

Hello Stampers, I've a little canvas board hanging to share with you today, featuring the Mabel Lucie Attwell White Rabbit.


Firstly, I stamped the large White Rabbit onto tissue, using black archival ink, then adhered it to a 7x5" canvas board, using matt medium.

Then I applied a layer of Viva Ferro around the edges. I stamped into this with watches & the word Time from the Time & Keys plate. Remember to wet your stamps when you do this, & clean them straight away after. Leave this to dry, or if you're impatient like me, use a heat gun.


I painted over the Ferro & around the rabbit with purple palette Studio paint, then with touches of sky blue. I painted over the embossed areas of the canvas with silver Viva Precious Metal paint, then edged the canvas with the sky blue paint.

I used a fine paintbrush to sketchily paint the rabbit with Studio paint.


The phrase from the Time & Keys plate is stamped onto silver Ten seconds studio metal sheet, using black Stazon. I mounted it onto black card, then edged it with a patterned wheel tool. I brushed a thin layer of sky blue Studio paint over the metal, then edged it with the same paint, before gluing to my canvas.

Finally, I punched holes at the top, added eyelets & ribbon, then embellished the canvas with a silver clock charm.

Thanks for looking,
Alison xx

Saturday, 21 May 2011

Comfy by Sioux Jenneys

Hi folks! Like a bad penny I'm back again to share a fun little hanging piece for my bathroom door just in case I forget where it is! LOL :)

'Tis ultra simple so not much waffle from me today.


1. Stamp the "Aufully Comfy" image in Archival black and colour with your chosen medium.

I've opted for my favourite way......water colouring with Distress Inks in broken china, aged mahogany, scattered straw, wild honey, brushed corduroy and walnut stain......the green was made with a mix of the blue and the yellow inks.

2. Just to add a bit extra I used an embossing ink pen to outline the watch and embossed with gold then filled the middle with a touch of glossy accents.


3. Cut the letters from the Crowded Attic paper stash using the Vintage Market die and attach with silicone glue just so that you can move them a bit till they are just right!

4. Cut a slightly larger dark blue card mat and an even larger light blue card mat and use a corner rounder on all of them before attaching the layers together.

5. Punch two holes to thread the hanging fibres through and knot the ends.

6. To make it more robust it might be an idea to laminate it, if you have access to a machine, before threading the fibres.


He certainly does look comfy...hope he is not going to hog the bathroom all night! LOL

I'll be back at the beginning of next month (June).....where is the time flying too! :)
xoxo Sioux

Thursday, 19 May 2011

Do Not Adjust Your Colour...

...Goodly Morning! Another day and another Mabel Lucie Attwell stamp for our special "Mabel Month of May" feature. This time Coming Up Daisies is making another appearance.


I wanted to make my card vintagey so opted for the sepia tones achieved with just a few Distress Ink pads. First of all, Mabel was stamped with Coffee Archival ink and then watercoloured using Frayed Burlap, Vintage Photo and Walnut Stain Distress Inks. This technique is really simple and very effective... all you need to do is squish your ink pad onto a non stick craft sheet and use a waterbrush or wet paintbrush to collect the ink and then paint it onto the image. I have found that if I use my heat gun to quickly zap the painted part, it allows me to add shading as the card doesn't become too saturated with water.


The flowers I have added to the card are the three sizes of Stitchels Dotty Dot flowers, stamped with Coffee Archival and inked with Vintage Photo Distress Ink and then layered up together. The sentiment was stamped also in Coffee Archival and you will see I got a little bit... exhuberant (!) with the edge distresser to the point that I tore some of the paper so had to disguise with a flower over the tear!


I hope you like this card... please feel free to use the design as a sketch... if you do it would be lovely if you popped back to let me know! Thanks for looking... TTFN

Hels x

Tuesday, 17 May 2011

For You! by Nicky Cresswell

Tis me again, back with my third sweetie of the month to make you go Awwwwww  
And who wouldn't, just look at that face!
 This time I used the 'For You' Mabel Lucie Attwell image in it's simplest form of ink to paper and colouring in. I diecut out the finished image with my nestie and mounted it onto a card, then I used a touch of lace and some chipboard letter to finish it off.
I think these images are perfect for any mum, they're cute, lovely and very nostalgic.
Sorry it's a short but sweet one from me today but am still recovering from my little op, and i'm not able to sit at my desk for very long.
Thanks for hopping by
Stay Inky


Monday, 16 May 2011

Friends Card by Alison Hall

Hello Stampers. Carrying on with our Mabel Lucie Attwell theme for May, here's a little card I made for my post this week.

I stamped 'Coming Up Daisies' with coffee archival ink, onto a piece of Tim's blue Shabby Vintage paper, rounded off the corners, then stamped some daisies from the Botanical 3 plate in 2 corners. I coloured the images with peeled paint & wild honey distress inks, using a waterbrush, then inked the edges with vintage photo DI.

I matted the image onto another piece of inked blue Shabby Vintage paper, laying a strip of inked music paper vertically between.

Finally, I coloured some ribbon, & paper daisies with wild honey distress stain, added these, then stamped the 'Friends' phrase from Botanical Plate 3. I matted my artwork onto a kraft coloured card blank.

Thanks for looking,
Alison x


Friday, 13 May 2011

BIG HUGS FOR LITTLE LAMBS

Hi all it's Kat here, AKA Kat's craft creations
I'm here today to show off another fabulous
Mabel Lucie Attwell stamp,

This one is called CAN WE KEEP HIM (too cute)
Here's my creation,

I started with cream card,
cut, scored then added patterned papers
as shown in pic below,
I then edged it with Brushed Corduroy Distress Ink


I then stamped the image with
Jet Black Archival Ink
onto a square nestie that had been edged with
Antique Linen DI,
I then coloured the image with various colours of Distress Inks


I then matted it to the largest eyelet square nestie
with foam pads,
after I coloured it with Brushed Corduroy Distress Ink
& then added it to the card.


I made the little sentiment tag from
pinking circle & classic circle nesties
coloured with
Broken China & Brushed Corduroy Distress Inks
I stamped it with the big hugs stamp, using Jet Black Archival Ink
 then added it to the card,


I added a scalloped strip
inked with Brushed Corduroy Distress Ink
to the under side of the front edge,
& added the cream corners cut from a cuttle bug die,
& glued some paper flowers & gems to finish it off.


I think this CAN WE KEEP HIM stamp
is one of my favorites,
& it was an absolute pleasure to use.

Hope you like it!
Have a crafty day,
Kat.

Wednesday, 11 May 2011

Sometimes by Sioux Jenneys

Happy Wednesday! It's a journal page from me this time using one of the Mabel Lucie Attwell images from the "Alice in Wonderland" range....certainly very different to her more famous cherubic children images :)


1. I first prepped the page in my A5 size journal with a thin coating of Claudine Hellmuth Studio gesso and stamped the "Taller Alice" in Archival black.
2. Roughly scribbled stripes of neocolour (you could used Distress Inks if you prefer) in blue, ochre and green and blended with water for a loose interpretation of sky, hills and grassy foreground....painting up to the outline of the stamped image. Also coloured a bit of thick watercolour paper the same way and stamped the scrabble letters I needed from "Scrabble and Tags" and the word woman from "Word Set Nudes" in Archival black.
3. Right......Get ready for a saga! LOL

Stamped the flower from "Flower Power" around the edge with Archival sepia and coloured with some purple and pink neocolour.

...that did not look enough...

...so I stamped the solid circle from the same plate in the centres with Archival crimson.

...that looked too bold!...

...so I stamped the outline circle from the same plate using some Adirondack paint dabber snow cap over the top.

...that still did not do the trick!!...

...Sooooooooo stamped the solid circle in Distress Ink walnut stain over the top again.

...still not quite right!!!! LOL...

...Soooooo added dots of gold using an out liner pen to the centres and at last it looked O.K.
(although I have a sneaking suspicion I just might return to it at some stage to tweak it)!!!

4. Coloured Alice with Distress Inks in spiced marmalade, scattered straw, weathered wood, and brushed corduroy using them as a watercolour (one of my favourite ways to colour in).

5. It's hard to see but I added a feint stamping of the "Punk Plaid Background" in weathered wood to the spine side of the page.

6. Attached the scrabble letters and the word woman with Claudine Hellmuth Studio multi medium matte. Hand drew the other words using a Sharpie pen and roughly blocked round them with an orange neocolour.


That made a change from a card didn't it? LOL :) See you again soon!
xoxo Artyjen

Monday, 9 May 2011

Thoughts Notebook by Alison Hall

Hello Stampers. Here's the first of my Mabel projects for this month. I used the sweet little Pen and Ink image on a little plain kraft notebook.


First I spritzed Crafty Notions Tangilicious Colour Spray onto my craft sheet, then dipped the notebook into it, saturating it with colour, & using a paintbrush to fill any bits that got missed.

Then I cut two squares of old book page to fit on the front & back of my notebook. I used Crafty Notions Raspberrilicious Colour Spray to colour these, but left some of the plain page showing. I glued these to the notebook.

I stamped the tape measure & journal from Artists No. 1 plate onto some old book page, cut them out & glued them as shown in the photo. I stamped & cut out the pen from the same plate, coloured it with watered down Tangilicious Spray, then glued it in place.

I stamped the Pen & Ink image onto a plain piece of book page, coloured it with the Colour Sprays, tore around the image, inked the edges, then glued it to the notebook.

Finally, I added some Tim Holtz Ideaology to the front of my notebook, & an inked Dream Adage ticket to the back.

Thanks for looking!
Alison xx

Saturday, 7 May 2011

Me and My Bear! by Nicky Cresswell

Hello Stampers
Happy weekend to you all
Continuing along with the Mabels this month I have used the large Ah! There you are! image
and made a mini canvas
I stamped my chosen mabel onto some pre-primed canvas using black archival ink, Then I coloured her with distress inks and a koi water brush.
To frame her I used an art part that I stamped with the Stipple background to give it a textured look.
After adding a little wooden tree I finished by stamping one of the phrases from the Travelling words plate onto a Tim Holtz tattered banners diecut.
And there you have it, A sweet little gift to give any Mabel Lucie Attwell fan.
I'll be back on the 17th with another Mabellishious project.


Wednesday, 4 May 2011

Flowers in Life's Garden by Sioux Jenneys

Hi! Hope everyone enjoyed the extra break for the big wedding ;)

It's my turn again and I'm here to share a card using another cute Mabel Lucie Attwell image :)

It's super easy.....so no long how to explanation this time!


1. Cut a decorative circle from cartridge paper and stamp the "Coming up Daisies" in Archival coffee.
Use your chosen medium to colour in.

.....mine was Copic markers just because I really need to keep practising!!! LOL

Cut a slightly larger decorative circle and edge both layers with Distress Ink scattered straw and wild honey.....I added a touch of Diamond Stickles to the wings of the butterfly for sparkle ;)
2. Cut some leaves from the Sizzix Tattered Leaves die and stamp with the "Dance Dictionary Background".
Colourise with Distress Ink bundled sage and peeled paint.

I always have a tug at my heart strings when using old book pages...
...so this way I don't feel too guilty!! LOL
Besides which book pages can be very thin for things like this.
3. Do the same with a Sizzix Elegant Flourishes diecut for the flower stem.

4. Add your sentiment of choice.
...mine was computer generated and cut using nesties.


Thanks for looking :) See you again soon!
xoxo Sioux

Tuesday, 3 May 2011

Winner of April's Challenge

Hi, it's the Boss here again with the winner of last month's challenge! We had some absolutely gorgeous entries as always, and a big thank you to everyone who joined in! Of course , there can only be one winner, ( chosen by Mr. Random.org ) and this month the prize of £15.00 worth of The Artistic Stamper stamps goes to.....
Congratulations, Sanna, and please email me so you can claim your prize :))
Don't forget we have a new challenge this month which is Ladies & Girls.
I shall look forward to seeing your wonderful creations :))
Have a great day!
Jennie

Monday, 2 May 2011

CUTE AS A BUTTON

Hi all,
Kat here, AKA Kat's craft creations
(didn't realise it would be quite so soon) lol,

Hels has asked if I would like to make a
couple (three) of projects in May
featuring the very fabulous & very cute
MABEL LUCIE ATTWELL stamps,
how could I refuse, I was only to pleased to step up, & have a play
with these cute little characters Jennie sent me, they are so adorable,

Here's my first project,
using a cute little chap called BUTTON


I decided on an easel card (my first ever)
I raided my scraps box & used all bit's & bob's
that were left overs, or bit's that weren't quite right for
previous projects, (you know we all have a box like this) lol


I started by drawing round a chipboard shape
for the card base, then covering it with patterned paper
next I took a circle cut from a nestie,
stamped the BUTTON character,
& then coloured him with DISTRESS INKS


Next I matted & layered my scraps of paper & card
after distressing the edges with Tim Holtz Paper Distresser


I stamped the words cute as a, with Jet black archival inks
& then added scraps of lace, paper flowers, gold ribbon
 & a large button from my stash.
& there you have it!

Hope you like it!
I'm back here on the 13th with my next Mabel project,
hope to see you then!
Kat x.

Sunday, 1 May 2011

May Challenge - Lovely Ladies & Gorgeous Girls

Goodly Morning Stampers and welcome to a brand new challenge for May. Many thanks for all your wonderful entries for April, the winner of this challenge will be announced on Tuesday May 3rd. The new challenge this month is "Ladies & Girls"... so we would like to see all your lovely ladies and gorgeous girly stamped images. To join in with the challenge is simple; make a piece of artwork, include the theme and some rubberstamping, pop back here to link up using the Froggy at the bottom of this post and leave us a comment to let us know you have joined in. As ever there will be candy for one randomly picked entrant - £15 worth of The Artistic Stamper stamps of your choice plus the Kling On to mount them onto. Moving on, last month we were very lucky to have the lovely and talented Kat Fullman as our Guest Designer, she pulled out all the stops and made some phenomenal pieces for the team. We loved Kat's work so much that we have asked her to stay on for this month too... and she has kindly agreed. The month of May is going to be Mabel Month here on the Creative Team blog... all the pieces you will see will be featuring the lovely vintage images from the pen of Mabel Lucie Attwell. These stamps evoke a byegone era and have proved to be very popular with young and old alike.

The team has been busy making samples for you to see:

Hels


This card features Hugs To Share and was coloured in using a waterbrush and Distress Inksin the following colours: Forest Moss, Wild Honey, Rusty Hinge, Tea Dye & Brushed Corduroy and the edges were blended with Antique Linen.

Minxy
I created a card using 'Nature's Little Helper' coloured with copic markers in colours matching the basic grey papers I used. I used the mini scrabble tiles from the 'Scrabble and Tags' plate to make it the perfect card for any mum. {this one went to mine}

Sioux


I created a quick and easy card using the very cute "Walkies" stamp, colouring the image with Copic markers.

Alison


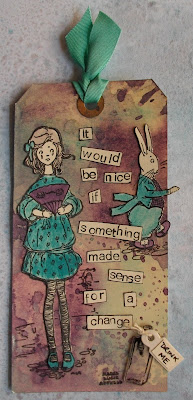
This tag features Tall Alice and the Small White Rabbit, coloured in with a waterbrush and distress inks. Inks used are brushed corduroy, milled lavender, broken china, & tumbled glass. The Pyrex Bottle was stamped on frosted shrink plastic & shrunk. Alphabet stamps from the Scrabble & Tags plate were used for the phrase.

Thanks for looking... have a great month everyone... TTFN

Hels x