Friday 29 April 2016

Dancer Tag by Gemma

 Hello Everyone

I wanted to share this fun tag with you today, using Distress ink and embossing powders.


I blended three different distress inks over a piece of card and then stamped over the top with the same colours using calligraphy mat 4. As I was heat embossing on this, I had to make sure it was completely dry. Once it was, I stamped and heat embossed a circle from the decay journalling  stamp plate.  I then stamped a dancer above that and heat embossed two Flourish Ornate 1 flourishes behind her (every time I look at the new flourish ornate stamps, I see wings).


 On a tag from my stash I blended the same distress inks that I used before, this time sprinkling water on top, so it reacted to the ink. I then stamped over that using calligraphy mat 4, I only re- inked the stamped every few times as I wanted some of the text to be lighter in colour.


I then ripped the card into bits and glued them onto the tag.


On the opposite side of the tag I stamped the swirl/circle from the decay set twice. On kraft card I stamped one of the dancers and heat embossed her with white embossing powder. Once I had cut her out I stamped the same calligraphy mat I had used on the background inside the image and glued her to the tag.


To finish I cut the words you are important from book paper which I glued into place and added some ribbon to the top.


Everyone's comments and challenge participation is greatly appreciated.
Thank you for reading
Gemma (inkykittty)

Tuesday 26 April 2016

"Journey with Dragonfly" by Shilpa

Hello Everyone,

I am sharing with you a creation with Artistic stamper Dragonfly stamp and Swirl stamps.


As we are celebrating all things distress this month here at Artistic stamper, I've used distress inks and stains to bring the colors on my page.


I started the background with stamping Dragonfly and flourishes with Jet Black Archival ink. Next I applied fossilized amber and wild honey distress stains on the surface, spritzed water to spread the color and heat set it with heat tool. With honeycomb stencil and Walnut stain distress ink, I created texture. Further I stamped text with Calligraphy Mat 3


Dragonfly is die cut from Sizzix Tim Holtz design.


Hope you liked my creation and got inspired,
You have 4 more days to join our "All things distress" challenge this month.
Thanks so much for stopping by.

Sunday 24 April 2016

Franswar says Journal, believe, grow - Distress Page by Debs

Hi Everyone

Hope you are all enjoying this months challenge, I certainly am!


I had great fun with this page, believe it or not i have only used two colours plus black and white!

I started with a book page and added Ground Espresso Distress Ink to the whole page

Then I added some of the new PaperArtsy Infusions, these are quite simply little pots of magic!! They work a bit like Color Burst or Brushos, however the more water and powder you add the browner the colour gets as they have walnut stain pigment in them.  The above photo shows just two corners with a bit on each corner

Here is the page after i had finished playing, as you can see i have yellows, orange, pink as well red and Brown  I used Sunset Beach, basically you sprinkle them onto the page add a spritz of water and voila!

I added some to the back of a piece of Tim Holtz Tissue by putting some infusions on my craft mat, spritzing with water and then pulling the paper through the colour 

I wanted a lot of texture so i made sure that when i adhered both the tissue and the sheet of paper that there were lots of wrinkles in it, which for me is quite hard as i found myself smoothing them out and then trying to pull the wrinkles back!

I also did the same thing to a piece of Jennies wonder printed material ribbon

The original piece next to a piece coloured with infusions 

On another book page covered with Ground Espresson Distress Ink I Stamped Neil Walkers Franswar and coloured him in using the infusions, the Distress Ink and a water brush again added it to my craft mat and lifting the colour with my brush and adding it

The I added some white pen around the stamped image and around the piece of paper with the stamped image and then stamped Two shapes from the Urban Decay set in black Archival and again edged with white pen

Added some gears around Franswar in Picket Fence Distress Ink


I stamped some words from the Journaling Words 4 Set onto a scrap piece of Distressed Ink Paper

And added some white pen to highlight the words and around the edge of the paper.

Looking forward to seeing more of your creations and don't forget you have two chances of winning a prize if you enter on the blog and the Facebook page.

Happy crafting Debs


Friday 22 April 2016

Kate Crane inspired projects By Dee

Hi everyone I hope you are all well and joining in with us with this 
months challenge all things distress.
I was lucky enough to help Kate out recently when she was doing
 a class.


As she worked I listened and very unusual for me remembered
 what she said and the steps that she takes to create
 her amazing pieces.
One thing I have noticed about her art is how relaxed it is how 
you just immerse yourself in it.
For mine I used Fresco Finish Acrylics white and black pens.
For the small book I used shades of blue beige and plum
The bunny boy I used green's blues and yellows.
Artistic stamper stamps used were Mini Backgrounds #1, Sequin Waste open,

Kate Crane is going to
 be doing a workshop at The Artistic Stamper on Saturday
25th June & Sunday 26th June there are still a few place available if you would like to go.

That's it for today folks hope you enjoyed this post I can't recommend Kate's workshop
enough if you get a chance go.


Tuesday 19 April 2016

Fabric book by Titbelsoeur

Hello everyone !
This month is all about distressing !
And my fabric book page is made of distressed stuff, such as old bed sheet, old dresses...

To make this page, I have used my gelli plate to make ghost prints of butterflies from Butterflies & Birds on to the piece of sheet :


and I have sewn the printed butterfly  :

on to pieces of old dresses, and then to the printed page :


Thanks so much for stopping by,
your comments are very much appreciated, 
here, on my blog, or on the Artistic Stamper's Facebook page.
Do not forget to participate in our 

MONTHLY CHALLENGE
April Challenge-All Things Distress

 to win some fabulous Artistic Stamper stamps.

Titbelsoeur

Saturday 16 April 2016

Cog note book by Gemma


Hello Everyone

I have a little note book to share with you today. 


The cover was made from a paracetamol box. I removed the top, bottom and one of the side panels, before wrapping the card with part of a brown file. Before gluing the file to the box I places a piece of ribbon between the layers, so the book could be closed once it was finished.                                              


The whole book was completed using Distress Ink and Distress embossing powders.  I started by stamping over the whole book with calligraphy mat 11 and then in places with square wire.


I then stamped out and heat embossed a clock face and a few cogs from the Tick Tock stamp plate. I dragged my finger through the embossing powder on a couple of the cogs before the embossing powder had completely cooled down and hardened. I then stamped the same calligraphy mat over the clock face and then the Punk Plaid and Hatched background stamps on a few scraps of paper.


Once I had edged everything with a little black ink I arranged them on the cover before gluing them into place. To finish I added a few gems and a boarder around the edge to frame everything.


This months challenge is Distress. There is still plenty of time to join in, both here and on the new facebook page. We really love looking at all your entries and reading your comments. 

Thank you for reading
Gemma (inkykitty)

Wednesday 13 April 2016

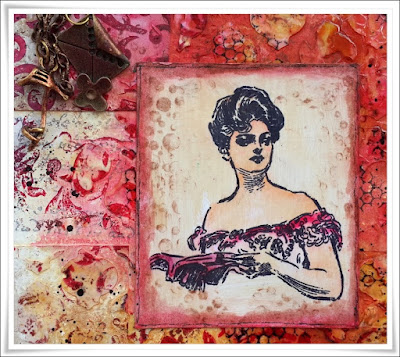
Textured Art Journal page - by Shilpa

Hello Everyone,
Shilpa here,

Today, I've a journal page to share with you!


I've created this mixed media textured journal page with Artistic stamper Gibson girls stamp.


To create this background, first I attached few old pages to the surface, and applied gesso on it with palette knife. Next layer was with stencil and modelling paste.
When it dried completely, I used acrylic paints in pink, orange ad red to create more layers.


I did some texture stamping with Artistic stamper background stamps and archival inks.


I added few feminine metal charms at the corner for interest.


Artistic stamper Gibson girl stamps are my favourite!!

Thanks so much for stopping by, hope you are inspired !!


Products used from Artistic stamper:
Stamps- Gibson Girl
Background stamps - Swirl background, Mini Backgrounds#1
Prima Modeling paste
Archival Ink - Jet black,Red gerenium

Sunday 10 April 2016

Distress Birthday Card by Debs

Hi Everyone

Hope you are all enjoying this months challenge, I know I am.


I started this card believe it or not with a piece of gold card - the gold card i used wasn't quite mirri board, but that works equally well with this technique

Emboss - i used a Tim Holtz embossing folder but any will do.  Then the fun starts

Cover with dark paint as i had used a gold background i opted for Ground Espresso Distress Paint.  If i had used Silver Mirri board i would have used black paint or black gesso.  Work the paint into all of the grooves with your finger

When you are happy with the coverage get a piece of kitchen roll and wipe the paint off - yes really!!

Once you have wiped the paint off this is what you are left with

Here is a piece of the original card next to the painted and embossed piece as you can see its completely changed the colour and texture of the card, i promise it really was the same piece.

I used two more pieces one i just wiped over with the Ground Espresso Paint but guess what I forgot to take the photo of that one!!  This one i wiped the paint on and then with a piece of scrunched up kitchen roll dabbed it into the paint and got this lovely stippled texture.

I distressed all of the edges with a distress tool and inked up with Ground Espresso Distress ink  I also painted a couple of pieces of white card with Shabby Shutters Distress Paint and stamped one piece with the Phineas Pinchbeck Stamp and Happy Birthday from the Grungy Greatings plate twice onto another and again edged the same way. 

Then mounted all of the layers together with foam tape stuck to a cream card again edged with Distress Ink.

Looking forward to seeing your creations on here and on Facebook and don't forget to let me know what you think by leaving a comment.
Happy Creating 
Debs x