Showing posts with label Terra. Show all posts

Saturday, 26 March 2011

The sun has got his hat on...

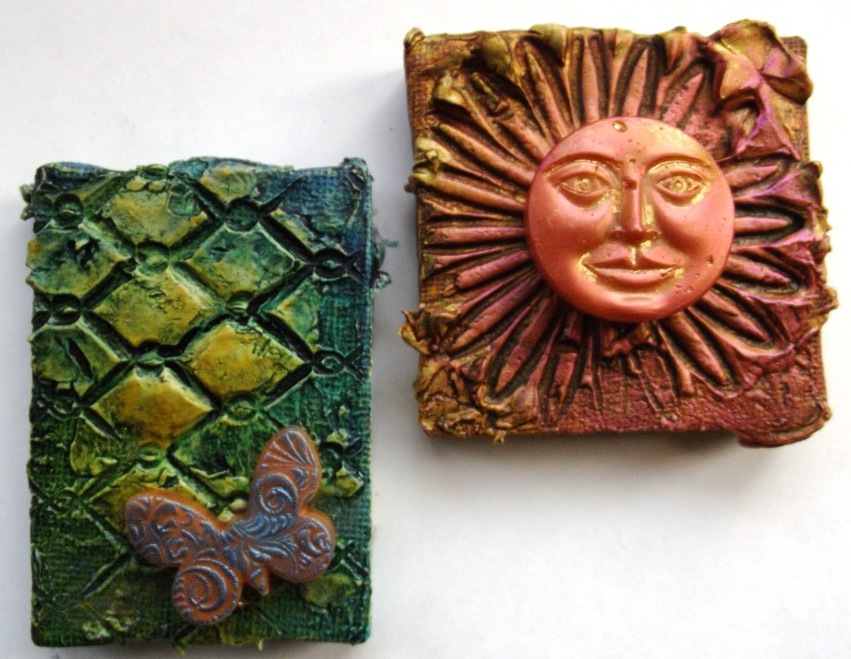
Spring has arrived, and with it the days are getting longer, which for me is a big bonus, as I can make art later ( don't you hate making it by artificial light?), and I can feel the warmth of the sun this week on my face, making me feel so much happier! Today I made 2 little mini canvases, which I covered in Viva Decor Terra paint. I stamped into the Terra with a wet stamp (this is from Flower Fever). Just make sure that you wash your stamp thoroughly after using it, as dried Terra will not come off! The blue/green Canvas is the chicken wire background, and works so well, as it gives a really deep surface to paint on.

Spray the whole canvas with Adirondack Color Wash in various shades, and Perfect Pearl mists, and then add some new Crafty Notions Gleam. This is a smooth cream which glides on effortlessly, and gives a polish to your artwork :))

Finally I made uteed moulds from the meltpot. The large round face (I think he resembles a sun or moon face) is a new mould also by Crafty Notions, as is the mini butterfly on the blue canvas. Finally I added a bit of gleam with my finger to the uteed moulds.
Spring is definitely here!
Have a Creative Day
Jennie

Sunday, 2 January 2011

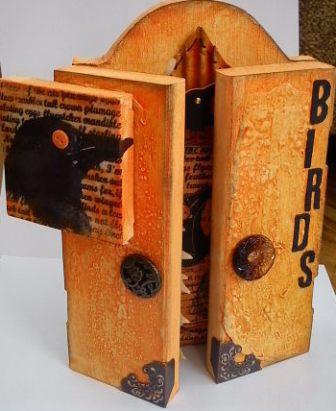
Bird Triptych By Tracy Evans

Happy New Year to you all, hope you all had a fabulous Christmas break.  It is my first time as a Guest Artist here at The Artistic Stamper Creative Team Blog and I am thrilled to have been invited.  I would like to take this opportunity to thank Hels and Jennie for the chance to show my creativity over here.

For my first piece I decided I would decorate a TRIPTYCH as this gives me more space to be creative and they are great fun to alter.

1. Paint the entire piece with Gesso and allow to dry.  Add Terra Sahara to the front and back only and again allow to dry.  Once completely dry, apply acrylic paint in orange, with highlights of yellow or yellow pastel, either will work well for this piece.   I love the wonderful texture the Terra adds to your artwork and when heated you achieve a wonderful bubble effect.  The inside of the triptych has not had any Terra added just acrylic paint.
2. Take a mini canvas and paint with acrylic paints as before and set aside to dry.  Using the Airmail Bird Complete stamp, ink up with StazOn black and stamp onto white tissue paper, tear around the image and adhere this piece to the mini canvas.  Add a small button to complete the mini canvas.
3. Add Tim's Accoutrements as handles to the triptych along with Corners to the bottom edges. To complete the front I have added BIRDS text using Tim's Chip Block Alphabet Die.

I have kept to the theme of BIRDS for the inside of my triptych too.

1. The left hand side of my triptych has had Tattered Leaves added which have been cut from card stock coloured with the same acrylic paints as the triptych.  Two of the leaves have been stamped with the Distressed Background stamp and before the leaves were adhered to this panel I added the Sequin Waste background. To complete this side panel I added two mini birds.
2. Colour a piece of card or watercolour paper with acrylic paints and once dry stamp the text from the Airmail Bird Collage Elements stamp on top of the coloured card and cut into a panel sized piece to create your bird house.  Machine stitch around the edges  Stamp the bird and postage stamp onto coloured card, cut out, machine stitch around the bird, add a button for the eye and add all the pieces to your house.  To complete, add an Idea-ology Philosophy Tag and add the completed piece to the centre panel of the triptych.
3. For my roof, I added some corrugated packaging that came with a Christmas present.  I cut it into a roof shape, painted with acrylic paint and hand stitched around the edge with black thread.  My bird has been stamped onto shrink plastic and shrunk using a heat tool and added to the roof.  A small gem has been added for the eye.
This is the last panel of the triptych which has had the caged bird added from the Birds Of A Feather sheet.  I have also added the Sequin Waste background as with the first inside panel.  To complete I have added Sing, bird, sing, from the Birdsong Elements sheet and leaves from Tim's Idea-ology Foliage.

Until the next time, have a fabulous week, Tracy Evans x x

Saturday, 27 November 2010

Bling & Baubles By Hels Sheridan

Oooh, I loooove Christmas, all the preparations, the decorations and the fact that I can add as much bling to artwork and get away with it LOL For this piece I have used the brand new Steampunk Bauble stamps - aren't they just F A B!!!


I started with some Gold Nuggest TSS metal - you can any colour you want to to match in with your festive colour theme, which was popped onto black card with Humungo Tape. I stamped the baubles with Black StaZon, giving it a quick zap with a heat gun to set the ink. Next I used a teflon tipped refining tool (TSS) and added little indents all around the cogs inside the baubles and then used a scootchy tool to make a nice edge for each one. These were then covered with Black Dabber, which was wiped off with paper towel whilst still wet - this just ages the metal nicely and the paint sits in the bits you have refined.


The base of the canvas was covered with Terra, which was stamped into using background stamps, heat dried to make it warty and then painted with Traditional Tan, A Dash of Red and Sable Brown Claudine Hellmuth paints. Once these were all dried, I used some Perfect Pearl mists - Heirloom Gold and Forever Red, spritzing and heating to dry them. These added a load of bling which doesn't really show in the pics. Finally, I used my favourite applicator tool (my index finger LOL) and popped some Inka Gold onto the bobbles on the canvas to highlight the contours. I added Idea-ology Ball Chain for the baubles to hang from and a Memo Pin and Charm Clip for the sentiment. Thanks for looking! TTFN

Hels x

Monday, 8 November 2010

Do you believe? by Jennie

Every month, we have a challenge set by one of the Team, and this month the subject is "Something Hidden " set by Tina. I had lots of ideas for it, but came up with this idea while prepping a workshop for Christmas cards. The wooden angels are great blank canvases, and I used Terra which I smooched all over it and stamped into with a wet stamp. I used the music background, and then immediately washed the stamp clean. If you don't your stamp will harden and be ruined!


Then when it was dry, I sprayed lots of Ranger Perfect Pearl Mists over it. I love the little wire halo in the top! The card was a folded piece which I had from a set and the angel hid quite nicely in it. I covered the card in old music paper from our Vintage papers sets. I was very lucky as the song was "Believe"! Do you believe in Angels? Finally I distress inked it and added a Idea-ology Seasonal sticker and some dabbers too! A gorgeous piece of Idea-ology trimming also sprayed with Mists just finished it off.

If you feel like making something hidden then please join in our challenge and be in with a chance to win £15.00 worth of stamps.
Happy Creating!
Jennie

Tuesday, 14 September 2010

A Box Of Wishes... By Hels Sheridan

Morning Peeps... I have been getting very messy with Viva Terra and Ferro, Claudine Hellmuth Studio Paint... some of the bestest background stamps in the world *said in a Jeremy Clarkson voice LOL*...ever! Oh and some other bits and bobs... UTEE, collage, Rock Candy, found bits from my stash... tis all here in this little recessed frame box... *BTW, if the words are blue it means that these are linky's to the website where you can buy the stash :O))*


I love these shadow boxes and have altered several so far but this one was extra special as it was for my pal Lori in America... we did an art exchange and I wanted to make something a bit special... instead she got this ROFL.. only joking... she has received it now and I know she loves it... that is a bonus for a start. Anyways... I started by coating the box frame with Claudine Hellmuth Studio Gesso - just a thin layer applied with Cut & Dry foam does the trick. Once dried, I used a spatula and popped a layer of Viva Terra Sahara on in patches... I wetted background stamps (list to follow of ones used) using a Rub It, Scrub It pad... then stamped into the Terra. I then used a heat gun to dry the Terra... this makes it bubble and go warty... love this stuff! Next I used some Ferro, applying this with a spatula and using the background stamps and Rub It, Scrub It again.. the good thing about this pad is that it cleans off the texture paste from your stamps too... *and - little tip... inky fingers? Pop a smidge of handwash onto the pad, wet it, rub fingertips on it... removes the inky bits.. well, most of them LOL* Anyways... I had left blank patches on the frame on purpose... because once I had painted the whole lot with Claudine's Traditional Tan paint, allowed it to dry etc, then added some Sable Brown, then a bit of Charcoal Black to add definition, I splodged a very generous layer of Rock Candy Crackle onto the plain bits. Once this had crackled, I used my very expensive applicator tool (otherwise known as my finger LOL) to add some Viva Inka Gold... in gold colour... this stuff... has to be one of the bestest products ever... I have used it delicately (or as delicately as you will get from me) to apply smudges of colour... but you can also emboss card in a Texture Fade (or suchlike) and then apply it over the top so the embossed raised bits get coloured... cool huh?


The inside of the box had had the sides painted with Trad Tan... and I added a little piece of paper from the Lost & Found stack (out of stock at the mo but back in soon) and then covered a mini canvas with an old bookpage and added colour to this. The little L is from my stash, as is the little Monopoly doggy... he came from a travel set I got in a pound shop... for... erm... a pound ROFL I heated up some UTEE in my Melt Pot, a lashing of clear and two little puddles of gold... then once it was melted, I inked the coggy stamp with clear embossing ink, poured the UTEE over it in a swirly motion, this means that the UTEE has like an agate look to it... I let this cool and then broke the UTEE into bits and added some gold and black to it to define the cogs. The little heart was made using a mould I had made with Mold n Pour... the other little hearts were made by pouring UTEE in a swirly motion again onto a craft sheet and then popping cookie cutters into the still molten UTEE. Finally, the little embellie in the recess... is a clock stamped onto Gold Nugget TSS Metal... scootched around the edges and I have a cookie cutter which is almost the right size... so I popped a bit of clear emb. ink around the rim to act as a release, set this over the metal piece, then poured the UTEE into the cookie cutter... not too much otherwise it would be too thick... *bit like me LOL* To embellish, I added Idea-ololgy - the Ornate Plate has an Adage Ticket in it, which was then filled with Rock Candy Cracklepaint.


So there you go... how I made it... do you like it? Oh and yes, the list of background stamps... I have to say... the Cogs and Sequin Waste are my faves but .. then I love the Punk Plaid... and the Dotty one is a must have too! Thanks for looking... have a goodly day... TTFN

Hels x

Sunday, 1 August 2010

Proudly Presenting...

... the brand new Artistic Stamper Creative Team Blog. AND... the new Monthly Challenge, which for August has been chosen by Minxy. I am so excited... we have been working really hard recently to bring you brand new innovative stamp designs - which will be available from The Artistic Stamper to buy today.


The monthly challenge is open to everyone and one lucky randomly picked winner will win some Candy! The theme for August is Something Old, Something New. To join in is easy-peasy... first of all, become a follower of this blog... and then all you need to do is make a piece of art incorporating the theme, once you have blogged it (or if you haven't got a blog you can link to the place you are showing it; flickr/Photobucket etc) then pop back here, leave us a comment and add your link to the linky gadget at the end of the post. There is a special extra too... if you use any Artistic Stamper stamps on your entry then you will be entered in to the draw twice. The prize for this month is £15 worth of stamps of your choice from The Artistic Stamper new range of stamps... along with the Kling On to mount them onto.


For my entry I used a fabby box frame, painted it with Traditional Tan (yes, even over here I am still addicted to the stuff LOL) I used Viva Terra applied in patches which was stamped into using the new Punk Plaid stamp and the old Sequin Waste stamp *see what I did there, new and old ;O))* I then painted some Sable Brown Studio range paint over the whole piece, removing some of it with a babywipe so it left patches of the Traditional Tan showing through. I used some Viva Ferro, which I also stamped with the Punk Plaid stamp and then heat dried it all.


The places on the frame that were then not textured had a generous dollop of Rock Candy Cracklepaint applied... once this was dried I used some gold Dabber to add colour to the textured parts, added some black paint with a piece of Cut & Dry foam... this just emphasised the bobbles and pits on the texture... and finally smooshed some Inka Gold over the whole lot to make it more...erm... golden!


The centre was filled with a piece of paper from the Vintage Shabby stack, I added a mini canvas which had had the Terra treatment... and the Cog stamp pressed into it. This again was heat dried... if you heat dry Terra you get a lovely warty kind of texture to the piece. I used one of the clocks and one of the cogs from the Tick Tock plate, stamping onto metal and then popping a cookie cutter over the top and pouring in melted clear UTEE. I also used the Melt Pot to make some little hearts, adding Gold UTEE in blobs to the clear UTEE and then pouring it in a swirly manner onto the craft sheet... then popping the heart shaped cookie cutters into it. **do you see the little iron on top of the ART??? This is my really OLD part... cos it is... any old iron... ROFL... ah, just me then!!**


Finally, I added a few bits of ephemera - old watch faces etc and Idea-ology and some little Letterpress letters from my own hoard. I hope you like this piece and can't wait to see what you come up with... remember, the challenge is open for a whole month, the more times you enter, the more times you will be in with a chance of winning the candy... don't forget to click to follow this blog too...and... I would really appreciate your comments...what do you think of the new blog? What do you think of the layout etc of it and... do you like it!? :O)) TTFN

Hels x