Showing posts with label Melt Pot. Show all posts

Tuesday, 2 July 2013

Create, Love, Joy. by Mark Gould

Good morning all and what an honour it is to be here as A Guest Designer for the Month of July amoung such talented artists.For those of you who do not know me I am Mark from Speshink
 To get the ball rolling I have A 9''x 9'' canvas, I knew I wanted to create a canvas and knew a few of the elements I wanted to include but was not sure what the finished project would look like. I don't know about you but most of the time I have a good idea of how things will look before I start out, this time round I just went with the flow.
 I started by stamping with black archival ink using the big ledger style stamp from the Numerical Plate A5 by Katy Fox straight onto the canvas,then I used some Decoart Gel Stain in Maple and painted that over the top in a random fashion and wiped it back, this is a translucent stain so the stamp shows through, the rest of the canvas was painted with Decoart acrylic paints, I used three shades of green and worked them into each other and over the edges of  the maple stain to form my base coat.
Again from the Numerical Plate Set I used the larger numbers and stamped the canvas with some embossing ink and covered with some Frantage embossing powder in an antique white and was really surprised at how well it worked.
 The next couple of stamps are from Neil Walkers range, Kiki and Franswar
 This is where the fun started, I broke out the melt pot and wax. Kiki was stamped onto some of the Tim Holtz Idea-ology tissue wrap terminology paper  again with archival ink and Franswar was stamped on to plain white tissue paper, both were positioned and covered with wax, the wax was sitting a little heavy and the paper could still be seen so it was given a blast with the heat gun, doing this gave the wax a chance to seep under and through the papers making them translucent and really brining out the stamped images.
 The words are from the Journaling Words II Set
and have been given the same treatment as Kiki and Franswar, I used archival again but Inspire was stamped with Coffee to tie in with the Gel Stain.
 More wax was added and pulled into place whilst being re heated with the heat gun to frame the characters. I highlighted the raised areas with some Treasure Gold in Topaz.
 You can just see the ledger style stamp and the tissue paper text through the Franswar image here.
 Whilst the melt pot was out I thought I would try out a new silicon mold with some black Wow embossing powder. As you can see the mold is an alphabet mold and the letters come out like scrabble tiles with the letter being raised.
After the powder had cooled I popped them out and used some of the Treasure Gold to hi light the letters and also a little around the edges, I am really pleased with how they came out, they have an old painted cast iron feel about them. I made enough for the words Joy and Love, they seemed to fit quite well with the other sentiments on the canvas.
In the final pic you can see how the letters are raised above the canvas. I used some pinflare to attach them.
 Thanks for stopping by, I will be back latter in the month with something new. xx


Wednesday, 24 April 2013

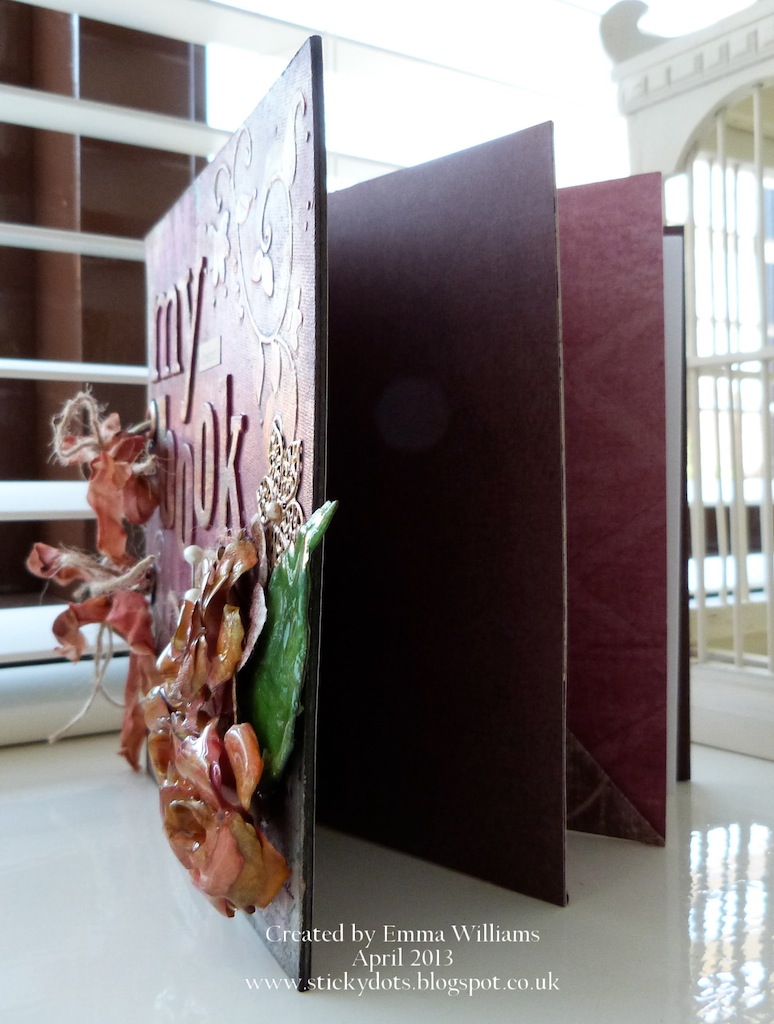
My Book of Dreams by Emma


Hi everyone, Emma here and it's already time for me to share my second little creation of the month and today, I'm sharing a mini book that I made...
To begin with, I cut some chipboard to the size that I wanted my book to be and then, using the Tim Holtz Word Play die, I cut out my letters from more of the chipboard and stuck each of them onto the cover. Next, I applied some Grunge Paste through a Crafter's Workshop stencil onto two of the corners and once the paste was dry, I used a combination of Claudine Hellmuth paints and Adirondack Paint Dabbers (Wild PlumCharcoal Black and Traditional Tan) and started randomly applying the colours to my cover. When the paint was dry, I then applied some white acrylic paint through the Mini Harlequin Crafter's Workshop template, dried off this layer of paint and then added another coat of the Wild Plum, using a dry brush all over the top. Once I was happy with the colours, I then added Metallic Gold Adirondack Paint Dabber and some gilded wax, over the raised areas of the cover to make them pop.
To complete my cover, I stamped random areas of it using black Archival Ink and the Ink Blot Background stamp and the Mini Calligraphic 18 stamp and added one of Tim's Chit Chat stickers, to finish the title of my mini book.

Next, I made my dimensional flowers and leaves, using the Tim Holtz Tattered Florals and the Tattered Leaves Die. I covered each individual petal with Fired Brick and Tarnished Brass Distress Stain, dried them with a quick blast of the heat gun and then made my blooms. Once the flowers were made, I added a touch of gold gilded wax over the top before popping them into UTEE, melted in the Melt Pot and enamelling them.
I added the cluster of enamelled flowers to the corner of my book, together with some metal embellishments from my stash, which I coloured using Distress Paints. I added a few pearls and some decorative pins to the arrangement.
I created the inside of the book by using old 12 x 12" papers, that I made into pages and pockets.
I used the Imagine and Creative stamps to stamp the words onto cream card, blended with Old Paper Distress Ink and added these to my flower arrangement.
I punched two holes through all the pages and the front and back cover of my book and added some book rings to hold them all together. Finally, I dyed some cream seam binding with a combination of Fired Brick Distress Paint and Tarnished Brass Distress Stain, dried it with the heat gun and then tied it around each of the book rings, together with some twine.
So, that's it from me for today and as always, thank you for popping by and visiting and I really hope you like what I've created ~ I can't wait to read all your comments.

Don't forget if you want to join in with this month's TEXTURE challenge, then just pop over HERE and you can see all the details of how to enter and good luck if you do!!

See you all again very soon,
Emma x

Friday, 2 March 2012

Wax doesn't have to hurt by Sue West

Hi everyone.  I'm really excited to be guest designer this month at the Artistic Stamper Creative Team, and to be able to share some of the fun I've had using just a few of the great stamps that Jennie produces. For my first piece I have used the Airmail Bird Collage Elements stamps. I just love that raven. 
Guess what. I made a collage.
I love any excuse to get painty, inky, gluey and dig out my meltpot and beeswax.


Here's the supply list for my collage.
Airmail Bird Collage Elements stamps
6 x 6 deep edged canvas
Ranger Studio Multi-Medium (matte)
Vintage maps and sheet music and postage stamp
White and manilla cardstock
Ranger Archival Ink  - Jet Black, Cobalt, Vermillion
Ranger Distress Ink - Vintage Photo
Acrylic paint ( I used Golden Fluid Acrylics but Adirondack Paint Dabbers would work really well)
MeltPot
Clear UTEE
Natural Beeswax
Designer Metal (gold leaf)
Ranger Distress Embossing Powder - Fired Brick
Vintage pen nib
Crown

To get started collage the vintage papers onto your canvas using multi medium and when dry use your paints sparingly to highlight interesting bits of the background and the if it all seems a bit bright scrape some creamy coloured paint over the entire surface with an old credit card. This only needs a tiny amount of paint. ( Claudine Hellmuth Traditional Tan acrylic would be perfect for this. I have also painted the edges of the canvas dark brown. It's best to do this now as if you get wax runs over the edges the paint never really adheres properly. I have pulled the brown paint just over on to the front of the canvas as I like the vintage look this gives.
Using Archival Ink for all your stamping (so it doesn't run). Stamp the postmark onto tissue and the raven and the words onto thin white cardstock or paper.
I've used Vintage Photo Distress Ink to colour the edges of the bird words and also the air mail element.
Now it's time to get out your Meltpot. First I made the UTEE heart by dissolving Fired Brick embossing powder in some UTEE and the pouring into a tiny cookie cutter. I don't worry about little bubbles as I think it just makes it look more vintage.  Dab the pen nib with black acrylic paint to age it.


Next melt your beeswax and having decided where you want your various collage elements to go apply the wax with a natural bristle brush and use your heat gun to keep it liquid if you need to get rid of brush marks. ( Personally I quite like to leave little dribbles and runs of wax as it all adds to the texture, and I just love the smell of that hot beeswax). I decided not to completely cover the script with wax and left the edges curled up  and got a semi-translucent look where the wax was in contact with the paper, again just adding extra texture.
The pen nib, heart and crown (cut in half) all embed into the wax with no problems.

Finally (and completely optional) I applied a sparing coat of multi-medium one edge at a time  and dabbed on gold leaf, which only adheres in some places and looks really old, especially if you then seal it with some more multi -medium that you thin down slightly with  brown paint and some water to make a wash. This gives a lovely grungy look.

If you've never tried beeswax collage have a go. It's great fun. And when you've finished your art and the wax has really solidified just buff, buff, buff with a soft cloth and you will get the most amazing sheen on your work.

Thanks for looking and see you soon.
Sue x

Wednesday, 12 January 2011

Melt Pot Mad! by Tina Barnett

Hi Gang!


Now for a change to my card making I thought I would share with you some of my Melt Pot Madness!

I love to use Background stamps and embellishments together with my melt pot.

This is a script stamp by The Artistic Stamper.

I have used a Ranger frame, placed on the stamp and poured in the melted UTEE , so you get a beautiful piece of art to use on your cards. For the second piece I placed I clock embellishment in the center before I added the UTEE , . Both times I have removed the frame so that it can be used again. Make sure you use Versamark ink on the stamp so it will release more easy.
My next background is the Baroque background design by The Artistic Stamper
I have used different embellishments in the center, a round sentiment disc with a key, a crown and lastly a little black heart. I have left the black heart piece in the frame as I will make it in to a bracelet or choker necklace.
Next I used the Regency Background, available from The Artistic Stamper.
I have used a clock embellishment this time, you can see that the clock is partly under the UTEE , but this just makes it more interesting! I love how the UTEE , takes on the shape of the stamp and the metal embellishments. So much fun!!
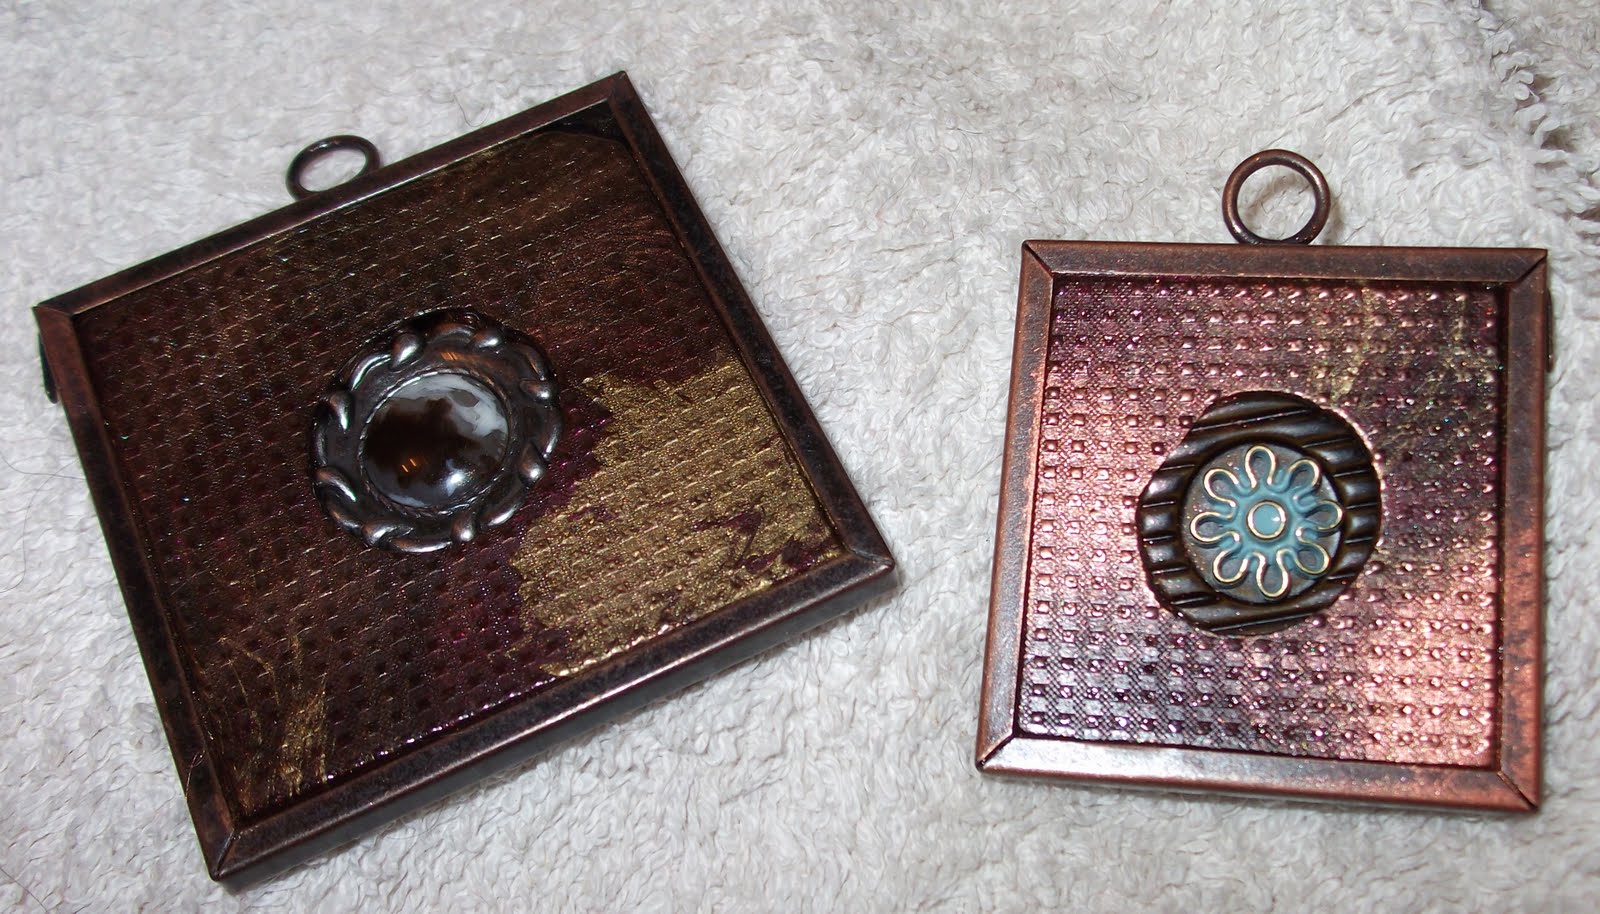
Next up is The Artistic Stampers gingham type background. It's like a tiny grid design.
I have made two pieces of jewellery this time, using Tim Holtz button embellishments. I have to say I LOVE them!! As with the others I have brushed the finish piece with Mica Powders. I love the look, but if you wanted to you could bling them up more adding more embellishments such as a little butterfly or flower.
Now, the last piece is different to the others as I have taken a Mabel Lucie Attwell stamp, also available from The Artistic Stamper.
I have chosen part of the stamp and using the same method as before poured over the UTEE , . Once the piece sets you get a negative image of the stamp, I used some Metallic paint to colour the raised parts of the image. I will make a grungy card with this image to include this piece of art work some time in the future.
I hope you have enjoyed looking. The main thing to remember is to just have a play! The best thing is that if you don't like what you make you just melt it down again!

Once you start I bet you get as addicted as me!

Check out the The Artistic Stamper online store for details of the stamps and all your melt pot needs!

Have fun!!!!! See you soon.

Tina xx

Tuesday, 14 September 2010

A Box Of Wishes... By Hels Sheridan

Morning Peeps... I have been getting very messy with Viva Terra and Ferro, Claudine Hellmuth Studio Paint... some of the bestest background stamps in the world *said in a Jeremy Clarkson voice LOL*...ever! Oh and some other bits and bobs... UTEE, collage, Rock Candy, found bits from my stash... tis all here in this little recessed frame box... *BTW, if the words are blue it means that these are linky's to the website where you can buy the stash :O))*


I love these shadow boxes and have altered several so far but this one was extra special as it was for my pal Lori in America... we did an art exchange and I wanted to make something a bit special... instead she got this ROFL.. only joking... she has received it now and I know she loves it... that is a bonus for a start. Anyways... I started by coating the box frame with Claudine Hellmuth Studio Gesso - just a thin layer applied with Cut & Dry foam does the trick. Once dried, I used a spatula and popped a layer of Viva Terra Sahara on in patches... I wetted background stamps (list to follow of ones used) using a Rub It, Scrub It pad... then stamped into the Terra. I then used a heat gun to dry the Terra... this makes it bubble and go warty... love this stuff! Next I used some Ferro, applying this with a spatula and using the background stamps and Rub It, Scrub It again.. the good thing about this pad is that it cleans off the texture paste from your stamps too... *and - little tip... inky fingers? Pop a smidge of handwash onto the pad, wet it, rub fingertips on it... removes the inky bits.. well, most of them LOL* Anyways... I had left blank patches on the frame on purpose... because once I had painted the whole lot with Claudine's Traditional Tan paint, allowed it to dry etc, then added some Sable Brown, then a bit of Charcoal Black to add definition, I splodged a very generous layer of Rock Candy Crackle onto the plain bits. Once this had crackled, I used my very expensive applicator tool (otherwise known as my finger LOL) to add some Viva Inka Gold... in gold colour... this stuff... has to be one of the bestest products ever... I have used it delicately (or as delicately as you will get from me) to apply smudges of colour... but you can also emboss card in a Texture Fade (or suchlike) and then apply it over the top so the embossed raised bits get coloured... cool huh?


The inside of the box had had the sides painted with Trad Tan... and I added a little piece of paper from the Lost & Found stack (out of stock at the mo but back in soon) and then covered a mini canvas with an old bookpage and added colour to this. The little L is from my stash, as is the little Monopoly doggy... he came from a travel set I got in a pound shop... for... erm... a pound ROFL I heated up some UTEE in my Melt Pot, a lashing of clear and two little puddles of gold... then once it was melted, I inked the coggy stamp with clear embossing ink, poured the UTEE over it in a swirly motion, this means that the UTEE has like an agate look to it... I let this cool and then broke the UTEE into bits and added some gold and black to it to define the cogs. The little heart was made using a mould I had made with Mold n Pour... the other little hearts were made by pouring UTEE in a swirly motion again onto a craft sheet and then popping cookie cutters into the still molten UTEE. Finally, the little embellie in the recess... is a clock stamped onto Gold Nugget TSS Metal... scootched around the edges and I have a cookie cutter which is almost the right size... so I popped a bit of clear emb. ink around the rim to act as a release, set this over the metal piece, then poured the UTEE into the cookie cutter... not too much otherwise it would be too thick... *bit like me LOL* To embellish, I added Idea-ololgy - the Ornate Plate has an Adage Ticket in it, which was then filled with Rock Candy Cracklepaint.


So there you go... how I made it... do you like it? Oh and yes, the list of background stamps... I have to say... the Cogs and Sequin Waste are my faves but .. then I love the Punk Plaid... and the Dotty one is a must have too! Thanks for looking... have a goodly day... TTFN

Hels x