Sunday 28 July 2013

A Shabby Box by Mark Gould

Thanks for stopping by, Mark here with my last post as July's Guest Designer, I want to say a great big thank you to Jennie, Emma and the rest of the full time DT, it has been great fun working along side you this month.
 My last piece is a little wooden chest that started life as a plain pine box.
 I love to alter 3d items and Shabby/Vintage is a look I really like to play around with.
 I knew straight of the bat that I wanted to use the Katy Fox Numerical Plate, there are so many great stamps on this set I know I will be using them for a long time.
 This box had been kicking about for a while and I was not happy with what I had done so I started over, I gave it a coat of gesso and sanded it back to smooth out the texture of the wood grain a little.
I base coated the box with Decoarts Americana Blue Mist, When dry I stamped with coffee archival ink several of the numbers over lapping the top and bottom section of the chest.
The coffee works really well for the shabby look, black can be a little to stark for images.
The white numbers have been created using Frantage embossing powder, I love the little flecks of gold and a more antique looking white.
 To add more of an aged look I used Decoart Traditions Quin Gold as a wash and after a little bot of drying time swipped the colour back with a wet wipe to bring some of the blue mist back and to still allow you to see the coffee coloured stamps although now nicely faded.
The edges of the box need some work so they were treated with some black archival ink applied with some cut and dry foam.


The chest sat like this for a while, I quite liked it but it was still lacking something, I decided it needed more age so grabbed the two step crackle from Decoart and covered the chest. When it had done what it does I rubbed some dark brown acrylic paint into the cracks and again after a little drying I used a wet wipe to clear it from the surface and to leave the brown paint in the cracks.
The inside of the box was given a coat of a light tan acrylic paint and then a coat of weathered wood, when the weathered wood was touch dry I applied a top coat of white, the weathered wood acts straight away and you get the lovely peeled paint look, the sizes of the cracks vary depending on how thick it is applied.

Finally, the hinges and catch were aged with a little alcohol ink.


Thank you all so much for stopping by and making me feel welcome, I hope you have enjoyed my 3 little posts this month, Again a great big thank you to Jennie and the rest of the Artistic Stamper team it has been a blast and an honour.
Ill see you all in blog land xxx


Friday 26 July 2013

Just a Little Note

Hello Artistic Stamper fans, this is Astrid here with my second project for July.

This time I decided to alter a little notebook:
This started life as a cheap little Kraft covered notebook I purchased at my local supermarket.
I started by giving it some texture with the help of a couple of stencils from my stash. When dry I covered it with 3 colours of Distress Paint, Antique Linen, Weathered Wood and Frayed Burlap, blending them together with my most sophisticated craft tool, - damp kitchen roll.... When dry I stamped the Calligraphic Mat 12 in Weathered Wood Distress Paint. When stamping with paint, make sure you clean your stamp straight away!. Next I stamped one of the images from the Garden Plate 1 in Dove Grey Stazon Ink on a piece of smooth card and cut it out. I blended Antique Linen, Weathered Wood and Frayed Burlap Distress Ink over and around it and then painted with a little Weathered Wood and my refillable water brush around the main image to bring it out a bit more,


As I was in a blingy mood I also added a little bit of light blue Stickles to the little flowers and the wings.
Next I mounted this on a piece of corrugated card coloured with the same colours of Distress Paint.
I highlighted all the raised bits with some gilding wax and finally embellished with a  home made rose spritst with various sprays, some die-cut leaves and as this is after all a note book one of the Tim Holtz Pen-Nibs

That's it. Hope you like this and got a bit of inspiration and thank you for visiting!

Wednesday 24 July 2013

A token gesture...

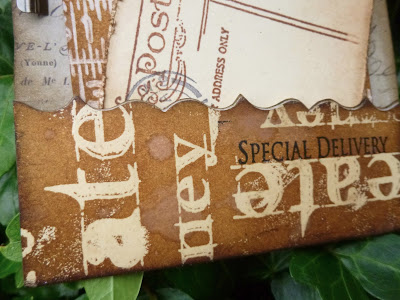
Hello all, it's Alison (butterfly) here, to share a little gift wallet, which could be used to insert a gift token or some money as a present.  Here's one side:


And the other:

I started by clear embossing some of the Journalling Words II onto a jumbo tag, and then inked with lots of Distress Inks to create a leathery depth of colour.  I did some watery spritzing and flicking to add extra texture to the background.


I folded the bottom of the tag to create a pocket, and cut it using the Brackets On the Edge die for a fancier look.


I added some stamping using Katy Fox's Carte Postale set, and also created a couple of bits of postal ephemera using the same set, which I clipped on using an Idea-ology hinge clip.


The inside is lined with paper from one of the Tim Holtz paper stashes - forgive me, I've forgotten which now, and I'm not at home to check.  I'm sure one of you will be able to identify it!


And I created two internal tags on which you could write a greeting or clip the token/money to.


The first is simply stamped with the Carte Postale stamps, inked and distressed for an aged look.


The second got the same inky treatment as the outside of the wallet, and then I stamped the fabulous rulers from the Tim Holtz Artful Tools set using Distress Paint.


A couple of Idea-ology mini-clips are there to help out with adding the money/token.


And, of course, no tag (even a gift wallet) would be complete without its topping.  So there's some Distress Stain dyed seam binding to tone in with the tag colours, and tied with twine.

Thanks so much for stopping by.  You've still got time to play along with our Ladies Day challenge and be in with a chance at the prize draw.  Hope to see you there!

Ingredients:
Artistic Stamper stamps: Katy Fox's Carte PostaleJournalling Words II
Stampers Anonymous stamps: Artful Tools
Distress Inks: Vintage Photo, Tea-Dye, Gathered Twigs, Walnut Stain
Distress Stains: Vintage Photo, Antique Linen
Tim Holtz Paper Stash - Lost and Found? Crowded Attic?
Idea-ology - Hinge Clips, Mini Paper Clips

Monday 22 July 2013

Ladies album part 1 by Titbelsoeur

Salut les patouilleuses, c'est Titbelsoeur qui vous parle aujourd'hui !

I have been wanting to make fabric books for a long long time... And a friend of mine launched the challenge last month, which was a great opportunity for me to have a try, finally !

I made it with 3 pieces of jeans and 3 pieces of an old sheet. I have randomly sewed small pieces of fabric and lace on each "page", except on the insides of the front and back cover that I am showing you today :
On the front one, I have stamped the whole   A Stitch in Time plate with purple archival ink :


And on the back one, I have stamped   The Open Road 1 :


My next post will be about the inside pages, but I can't help but show you the cover, giving a quick preview of what the inside pages are made of :


I first stamped the Gibson Girl, masked it and stamped some  A Stitch in Time over it.


I had real fun making this fabric album for you, and I hope you like this first glimpse,

see you on the 8th of August for the 2nd part ! 


Thanks for stopping by, I am like always looking forward to reading your comments !


A tout bientôt !


Saturday 20 July 2013

Inky Bookmark by Alison (Craftytrog)

Hello Stampers! Thought I'd make myself a bookmark for all the holiday reading I'm going to do...I just need to book a holiday now! Lol!


Here's how I made my bookmark...

I scribbled some Distress Stains on my craft mat (salty ocean, ripe persimmon & tarnished brass). Spritzed with a little water, then laid an A5 piece of white card in it. I dried it with my heat gun, then dipped the card again, to pick up some more ink, dried it again, until I had a background I liked.

I cut my bookmark (approx. 20 x 7 cm), then inked the edges with salty ocean Distress Ink.

I stamped the leafy vine from the Nature Is Art plate, using salty ocean DI, then the Round The World balloon with Archival Black ink.


I stamped the balloon & basket, & the phrase from the Travelling Words plate onto some left over background, cut them out, inked the edges with salty ocean DI, & glued them to the bookmark.

I matted the bookmark on black card, laminated it, then to finish, I added a black eyelet & some matching fibres to the top.

Hope you like my bookmark,
thanks for reading (no pun intended!)
Alison xxx

Thursday 18 July 2013

Be an Individual: By Zuzu


I am a bit unsure what to call this project. its just a thingy made of wood lol.
It is deeply inspired by Alison (Butterfly) Bomber and some tags she did in June and my friend Paula(who sent me some bits of wood to play with and makes lots of fabulous creations from blocks of wood).

I started by staining the bit of 'white-ish' pine coloured wood with some watered down brown paint to make it look like an old bit of teak or oak or something.
next I painted on some white studio gesso (the main bit of inspiration from Alison)...
when it had dried I stamped  one of Tim Holtz' "way with words" stamps on to the gesso using jet  black stazon.i then covered the front with a layer of clear rock candy crackle paint.


While it dried, I took a piece of white card and a "wet wipe" and used the wipe to dab on some distress ink. I used mostly 'Broken China'  and a touch of 'vintage photo'.  when it  had dried i stamped the little boy from the "childhood dreams" sheet on to it as well as the words IMAGINE (journalling words #1) and EXPLORE (journalling words 3) Journalling words can be found HERE.
Once the crackle paint had dried I painted some brown paint over it and then wiped it all off with a baby wipe. some of the paint stays behind in the crackle and highlights them.
The rest was all just cutting out and sticking on. I added the crackle glaze to my cut out card arrow and treated it the same as the main block, with paint and a baby wipe.
The cogs are from an old clock from an antique place in edinburgh. I have also used some ideaology findings... (the clock key on the left and one of the corners on the top). the little crown above the boys head is from HERE (scroll down a bit). and the "feet" are just two stained wooden spools from  some packs of assorted wooden spools from HERE.

Zuzu x

Tuesday 16 July 2013

Explore by Sioux Jenneys

Hello everyone! I'm here to share an ATC for a change :)


1. Stamp the the very dapper man from Mens plate 001 in Versafine ink and then mask.

3. Stamp the #1 image from numerical plate in Archival crimson and then mask this.

4. Stamp the graph background in Distress mustard seed and then remove both of the masks.

6. Stamp the crown from crowning glory in Versamark and heat emboss with black powder.

7. Age the edges with some Distress vintage photo and add a trio of small brads as an accent in the bottom corner.

Whilst sorting out some stuff I found an unused rubber stamp of the dapper gentleman... ...(one of my favourite images).


So.....if you would like the chance to win the stamp and indeed the ATC to go along with it... ...leave me a comment here and I will announce the winner on my blog on August 1st!!!


Yikes!!! August? Where is time rushing too? LOL
See you again soon!
xoxo Sioux

Sunday 14 July 2013

Inspire by Mark Gould


Morning all, Hope you are all enjoying the fantastic weather we have been having recently.
I'm back (Mark) with my second Guest DT piece and I have another canvas for you. This is a small 5x7 inch flat large post card sized canvas and was pre gesso'ed.
The back ground was inspired by a post by Andy Skinner on the acrylic drip technique, I started by wetting the canvas a little and applying my colours, I used Deco art Traditons acrylic translucent paints, once applied I sprayed with water to get the colours to run together and bleed in.Once dry I sealed it with some glue n seal.

It was then time to stamp, I used black archival ink and one of my fave stamps, the Mail Art Me stamp by Donna, I masked the bottom section off as I only wanted to use the image of the girl.
 I also use the word 'inspire' from the Journaling Words 2 set, the Hearts are also from the same set.
I then used a Stencil from The Crafters Workshop and applied some Dream Weaver paste that I mixed with some acrylic paint to colour it.
The edges were swiped with black archival ink.

 Sorry for the slightly blurry pic :(
I coloured it with a grey blue acrylic paint, when it was dry I gave a very light rub with some Treasure Gold in Topaz and then a very light swipe with some White Acrylic paint, I used my fingers for this.
It was given another coat of glue n seal and then I went to town with Decoarts 2 Step Crackle medium.
Once the two step had dried I rubbed in some black acrylic paint and wiped the excess off with a baby wipe.
Thanks for stopping by, Ill be back towards the end of the month with my last post. 


Saturday 13 July 2013

All My Favourite Things

Hello everyone, Astrid here with my first project for July.
There is nothing I like quite so much as playing with Distress Inks and stamps and sometimes you need a quick and easy project that can be a little bring-along gift, and this is one of those.
I also LOVE creating tags, as those of you who know me will have realized by now....
My project today is a tag and holder made from another tag.
I started with a Size 10 tag, scored it 3" from the bottom and folded it up to form a pocket. Using my Inkblending tools, I coloured it with 3 colours of Distress Inks, Antique Linen, Fired Brick and finally some Gathered Twigs around the edges. I also added some bits of Tim Holtz Tissue Tape. I then stamped a sentiment from the Tim Holtz Way with Words set in Jet Black Archival Ink and highlighted the words with a white pen. Finally I  stamped two flowers from the.Botanical Set in Black Archival on to smooth white card, cut them out, coloured them a bit with some of the Distress Inks and then added them for decoration. I glued the pocket shut and then added some faux white stitches with a white pen around the edges.


The actual tag was made with a Size 8 tag. I cut about one inch from the bottom and coloured it with Distress Inks in Antique Linen and Gathered Twigs. I added some more Tissue Tape and added some background stamping with the Speckle background stamp and one of the stamps from the Katie Fox Encyclopaedia Botanica set in Gathered Twigs. I then stamped a large flower from the Botanical Set twice on smooth white card with Black Archival, cut them out and coloured them with Fired Brick Distress Ink and a bit of Adirondack Ink in Cranberry. I layered them one slightly on top of the other to form my vocal image.  Another little flower from the Botanical Set and a butterfly from the Katie Fox Encyclopaedia Botanica set finished  it all off.


Hope you like this little project, thank you for visiting like always and see you next time!


Thursday 11 July 2013

Running Like Clockwork by Emma


Hello everyone!! Well, it looks as if summer has finally arrived in the UK and July seems to be disappearing quicker than any month so far this year and I can't believe it's already time for me to share my first post of the month...

...and here it is, my clockwork canvas and as always, there's lots of pics to show all the detail and I really hope you like my canvas!
To begin with I used a 5" square box canvas and I added PaperArtsy Grunge Paste around the edges to give a stippled, vintage effect to the piece. I covered the front and sides of the canvas using Distress Paints in Antique Linen, Frayed Burlap, Weathered Wood, Metallic Antiqued Bronze and a smidge of Black Soot, which I knocked back with some Picket Fence.
I then stamped the left and right hand sides of my box canvas with black Archival Ink, using the using the cogs border stamp from the Borders A6 #2 stamp plate and then added more Distress Paint to build up the colour. On the top edge of the canvas, I used the cog stamp from the Tick Tock A5 stamp plate.
Next, I stamped random areas on the front of the canvas using the Calligraphic Mat 11. Once this was done, I started to create a smaller canvas to mount onto the larger box one, so...I used some of Claudine Hellmuth's sticky back canvas and covered a small rectangle of chipboard. I then applied Distress Paint over the top of the canvas and added Walnut Stain Distress Ink around the edges, which I frayed slightly. I then stamped Phineas Pinchbeck onto the small canvas and it gave me a distressed faded look, that I loved. I added a rub on from Tim's Elements Remnants Rubs and popped a small screw brad into the corner.
The next part was to create the cogs using Tim's Gadget Gears die from Sizzix. I stuck sticky back aluminium onto chipboard and then ran it through the die cutting machine before applying Alcohol Inks over the surface to give a coppery metallic look to the cogs.

I adhered the cogs to my background using Matte Medium before then layering my Phineas Pinchbeck canvas over the top.

Next, I added some Idea-ology Mini Gears onto my canvas, clustering them together with my chipboard cogs and some Sprocket Gears, attaching Spinners into the centres.
I then added a Muse Token which I hung from a Ring Fastener.
 On the top of the box canvas, I used a Clock Key.
Finally, to complete my piece, I filled one of the Corked Vials with old watch parts and then added a Chit Chat sticker onto the bottle.
  
So, that's it from me for this today and I hope I've inspired you with what I've created, I can't wait to read all your comments. Don't forget that we have our "Ladies Day" challenge running at the moment and we would love you all to join in. For details of the challenge, just click HERE!

See you very soon and hope you all have a great day!
Bye for now...Emma x