Showing posts with label Tim Holtz Papers. Show all posts

Tuesday, 9 July 2013

Dream...dream...dream.. by Alison (Craftytrog)

Hello Stampers! Craftytrog here again, and I've got a funky card to share with you. I seem to be in a funky phase right now! Lol!
So, here's how it was made...

From the Tim Holtz Lost & Found Stack, take a 6 x 6 piece of floral paper.
Apply black paint through Andy Skinner's Hippy Chick stencil. Bump the stencil slightly to the left, then apply white paint over the top of the girls.
With the stencil in place, stamp some text (Calligraphy Mat 15), then apply a light layer of Citrus paint dabber over that, using a circular motion. I used a stiff stipple brush for this. You can still see the text showing through the paint.
Stamp the flowers from Greetings & Words 1, then add colour with purple paint.
Use a black paint pen to outline the girls.
Randomly stamp script on the background, around the girls, then sponge black paint around the edges.
Stamp the phrases from Discover Your Inner Self, Be Creative, and Greetings & Words 1, onto cream paper. Sponge Broken China Distress Ink over the words, cut them out, then glue in place with glossy accents.
Finish off by attaching the artwork to a 6 x 6 card blank.

Hope you like my funky card,
thanks for looking,
Alison xxx

Monday, 24 December 2012

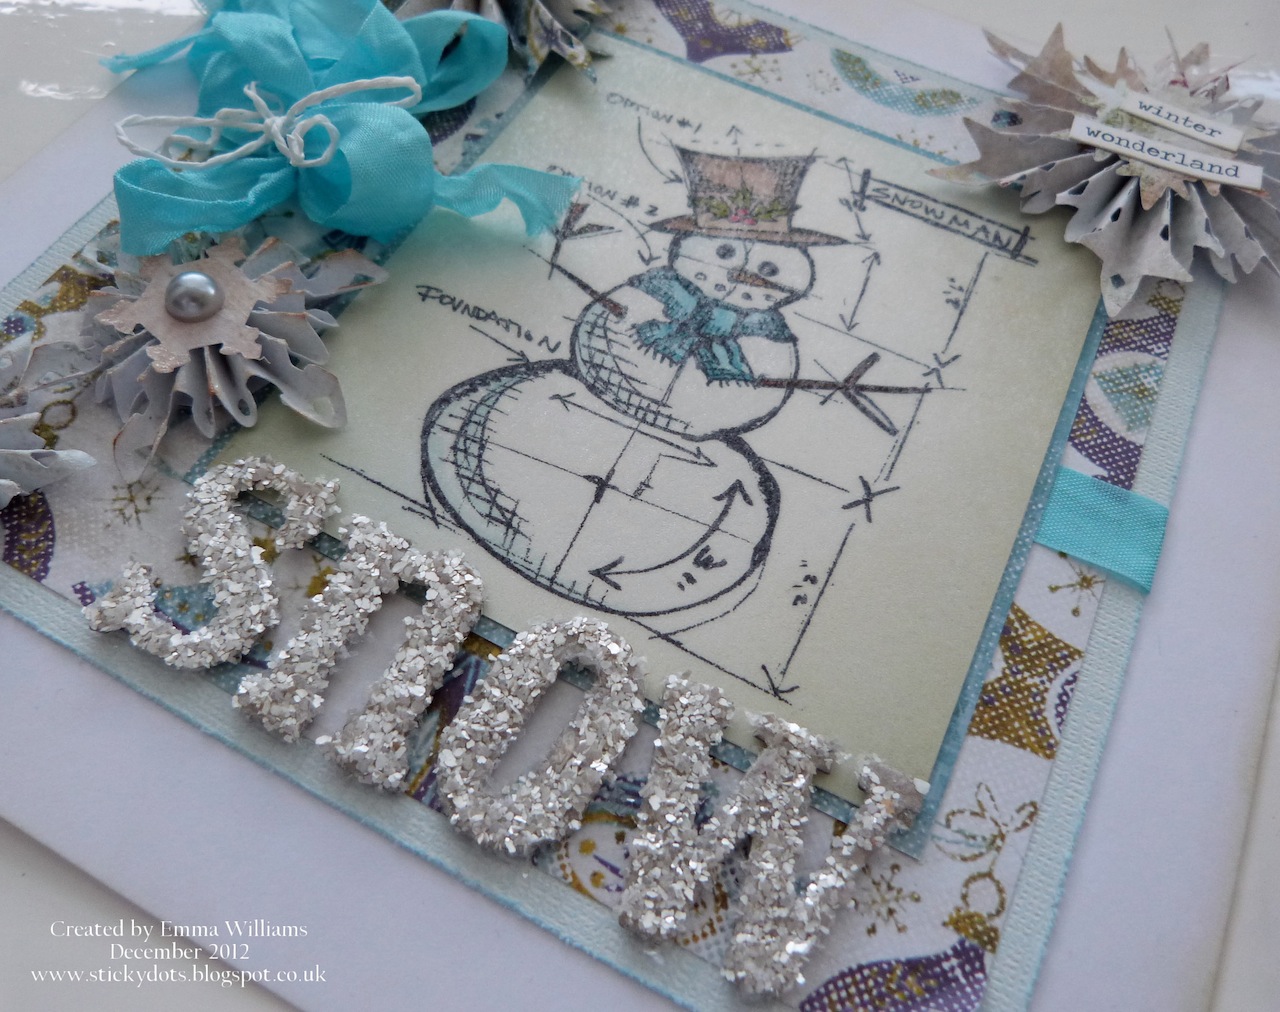
Winter Wonderland...by Emma


Hi everyone, it's Emma here and I'm sharing my final post of this year and I just wanted to wish you all a very happy Christmas with this special card...
To begin with, I used an 8" square card blank and then covered the front, with a piece of pale blue card, leaving a border of the white card base showing all around. I then matted a piece of the patterned paper from Tim's Seasonal Paper Stash over the top. I added a piece of seam binding across the front of the card and attached a bow to the strip of ribbon, together with some paper string, also tied into a bow.
Next, I stamped the image of the snowman onto a piece of white card and painted it using a combination of Distress Markers and Distress Inks, which I'd applied to my craft matt and then lightly misted with water to give a watercolour paint. I then blended the edges of the card with Old Paper DI. I added a piece of the Frosted Film over the top and matted the completed image onto a further piece of the pale blue card and attached it, next to my bow on the front of my covered card base.
I used a piece of chipboard to die cut the word "Snow" using the WordPlay die and then added Glossy Accents over the top before covering each letter with the Crushed Glass Glitter. Once the letters are dry, I added these to my card.

I then used some of the papers in the pad, to die cut various sized Snowflake Rosettes and gave each of the rosettes a good coating of Rock Candy Cracklepaint. Once the paint was completely dry, I attached the completed rosettes onto my card front, adding small cabouchon pearls to three of the snowflakes and then Chit Chat stickers onto the fourth.

Finally, I completed the card with some Candi in the four corners.
...and here's a list of what I used to create my card:
Sizzix/Tim Holtz Alterations Die ~ WordPlay
Silver Crushed Glass Glitter ~ from my stash

Seam Binding from my stash

So, that's about it from me for today, and for this year...I can't thank everyone enough for all your love and support that you have shown to me, and to the whole team throughout 2012!
We really do appreciate all your comments and your visits!!!

All that's left for me to say is...
MERRY CHRISTMAS EVERYONE AND HAPPY NEW YEAR!
 See you in 2013...
Love Emma xx

Tuesday, 11 December 2012

A Joyful Christmas by Emma


Hi everyone, Emma here! Today, I'm sharing a very special Christmas card that I made and as always, I hope you like it...
To begin with I covered the front of my card with a piece of the paper from the Holidays Past Paper Stash, matted over a piece of red card. I aged the edges of the paper, to give a vintage look to the card. I stamped the image of Santa and coloured him using Distress Marker pens. I added a piece of the Frosted Film over the top of the image before putting it behind my die cut frame, which I'd stamped with the Marble Background stamp and then blended the cream cardstock with Old Paper and Frayed Burlap DI. I then matted the completed artwork onto a piece of green card.
Next, I die cut all my pieces to make up the Tattered Poinsettia, the Holly leaves and the Tattered Pinecone branches. I blended the Poinsettia petals with Victorian Velvet Distress Ink and the leaves, etc with Peeled Paint and Shabby Shutters. I then added some Rock Candy Crackle Paint over the top of all the pieces. Once they were dry I assembled the Poinsettia and added a pearl to the centre of the bloom.
Next, I arranged and attached my artwork, Tattered Poinsettia and all the die cut leaves to the front of my card.
I threaded some Seam Binding from my stash, which I aged using different neutral shades of DI, through one of the Idea-ology Hinge Clips and attached one of the Locket Keys and some twine onto it.
I finally stamped the "A Joyful Christmas" message onto a piece of Manila Cardstock and carefully cut it out before attaching it to the front of my card.
So, if you still haven't made that really special Christmas card...I hope I've given you a little bit of inspiration with this project and HERE'S THE LIST OF WHAT I USED TO MAKE THIS CARD:
Sizzix/Tim Holtz Alterations Die ~ Holly Branch
Sizzix/Tim Holtz Alterations Die ~ Vintage Cabinet

Thank you for taking the time at this busy period to stop by and have a look at my little creation, I can't wait to read all your comments.
See you soon...Emma x

Tuesday, 30 October 2012

Happy Halloween by Jennie

Hi!
I love being able to join my wonderful team here on the blog, and even if time has run away again with me this month, I managed to get time to make a Halloween ATC for you. This is so simple to make, takes a few minutes, and can be adapted for any occasion.
I use some of Tim's Kraft Resist Halloween paper, and added distress inks to it to make the skull pop off the page. I stamped Happy Halloween and a spiders web from one of Tim's Stamper's Anonymous stamp sets in Black Archival ( one of my staples of stamping!) and then added orange and brown distress inks , and cut it out.


The pumpkin was made using a honeycomb paper , which I die cut from the Alterations mini pumpkin, and then cut in half, and fanned out.


You will often find me in the baking department of shops, looking for silicone moulds so that I use them with UTEE, which is what I have done with the skull. I just used up what UTEE I had left in my melting pot, and luckily it was the perfect colour. The bat was another find in the seasonal department of a well known supermarket! Add all the elements together, and glue with a hot glue gun.


Have a very Spooky Halloween, and if you are in our direction on Wednesday night, we will be tricking and of course treating you to a late night shopping. we are open until 9pm.

Have a very creative day
Hugs
Jennie

Tuesday, 13 December 2011

Festive Feeling... Giveaway Time!

Goodly Morning Stampfans! Tis that time of the month again when I do my taggy giveaway... this month the tag has been inspired by lots of different techniques shown by Tim Holtz during his 12 Tags of Christmas bonanza this year. Did you know that Jennie is feeling in a very generous festive mood and not only is she giving away two free limited edition stamps with every single order... she has also set up a special discount of a mahoosive 20% on any orders for the stash used in the 12 Tags... to see all the deets, please CLICK HERE. The offer is only open for a limited time... til 18th December so time to grab yourself a nice Christmas pressie bargain! On with this months tag for giving away. To be in with a chance of winning it is a doddle... simply leave me a comment here and tell my what your favourite Tim tag was this year... the winner will be chosen at random and announced here on the blog on January 3rd 2012. I had lots of fun making this tag because I included all my favourite stashly supplies. The base of the tag was coloured with Antique Linen Distress Stain. I spritzed it with water and then dipped the tag into a smoosh of stain (liking that description!) on the craft sheet... using Frayed Burlap (this has to be one of my faves for vintage, nostalgic Christmas projects)


Anyways... I dried the tag with a heat tool and then did some "Ghost Stamping" with the crackle background from the Joyful Song stamp set. This is a really fab technique and so easy... simply pop your stamp onto your craft sheet face up, ink with your Distress Ink and then pick it up in your hands and kind of roll it over your tag... this will mean that there's no start or finish to the image, instead it just fades out... no harsh edges! I dried this with a heat tool and then roughed up the edges with a Paper Distresser and blended Vintage Photo Distress Ink around the edges. I used a variety of green Alcohol Inks to colourize a piece of Kraft Glassine paper, scrumpled it, dragged Vintage Photo DI over the top of the scrumples and then dried it. I used the Holly Branch Alterations Die to cut five leaves out and then used the Tattered Pinecone Die to cut out three shapes from brown cardstock... I then assembled them into the pinecones and added Picket Fence Stickles to the edges of the bracks. The little holly berries are Baubles, coloured in a zippy bag with Red Pepper Alcohol Ink and tied with wire and some vintage lace - these are FAB ideas from Tim... and all the deets for the 12 Tags are on his blog. I used a piece of Lost & Found music paper to cut a Tattered Banner and popped this into the pinecone/holly leaf assembly and then set about making the sentiment... which is another easy but cute way of stamping; using Distress Embossing Ink for stamping the sentiment onto Kraft card and then embossing with Ranger Black Embossing Powder and cutting around the sentiment and edging with Vintage Photo DI.


Cor... this is a long winded explanation for one tag... nearly done! The Idea-ology Christmas Adornment charm was painted with a selection of Adirondack Dabbers... using a teensy Claudine Hellmuth Studio brush to apply the paints... then drying with a heat gun, sanding gently and then squishing it into the Distress Embossing Ink and embossing with Clear Embossing Powder... worn of warning... don't try to pick it up straight after you have heated the powders... it is metal... and that means it is hot... ouch!!! Just sayin ;o)) I repeated the "enamelling" process so the bells are really covered with a good thick layer of powders... punched a hole in the top using the Idea-ology Screw Punch and popping onto a little Jump Ring and Mini Safety Pin. Once the whole tag was assembled, I gave it is a really fine spritz with Heirloom Gold Perfect Pearls Mists.


You will see that there's a border of snowflakes and the odd snowflake dotted around the tag... I made these using more Alterations dies to cut Kraft Glassine that I had coloured with SnowCap Alcohol Ink... I have done a quick Tutorial over on my own blog so you can see how I did this... all the deets are HERE. Well, that's all from me for now... thanks for looking!!! TTFN

Hels x

Monday, 12 September 2011

It's September Giveaway Time...

Goodly Morning Stampers! Here I am again with my monthly giveaway, which this month is... a Christmas tag! I have been getting sparkley and festive with some of those brand new Tim Holtz Collection Christmas stamps that have just arrived at Artistic Headquarters. To be in with a chance of winning the tag, all you need to do is leave me a comment here... and answer this very simple question... do you... make your own Christmas cards... and if you do... when do you start making them? Me? I am the worlds laziest crafter and for the past three years I have been doing the "panic-it's-December-1st-and-I-haven't-made-a-single-card-yet" thing... so this year I am ahead of the game... I have my inky mitts on the new Tim Holtz stamps...and... even better.. if it could get better... the new Christmas IDEA-OLOGY!!!


So... here's how I made the tag... and below will be a list of ingredients with links to the places on the website that they are... so you can hop over and grab some goodies :O))

First of all the tag was made using the Tag Alterations die... cutting plain white cardstock and some of the gorgeous Seasonal Paper Stash... sticking them together and then using a very washy coat of Traditional Tan to dull the pattern down a bit. Next I smooshed Distress Stains onto my craft sheet, spritzed with water, dipped the tag into the inks and then dried with a heat tool.


I made sure the tag was totally dry... then used embossing ink to stamp the greeting... gold embossing powder to emboss and then used the same for stamping and embossing the heavenly crackle background... The Rosettes were cut from more of the Seasonal Stash... and then dabbed with embossing ink... lightly embossed with more gold powder and then the crowning glory... the brand new Christmas Muse Token. I made a little postcard from more of the papers and then coated this with Rock Candy Stickles... a line of bling finished the tag as well as some Seam Binding that I dyed with more Distress Stains. As promised... here are the ingredients:

Tim Holtz Collection: Christmas Memories CMS118 (sentiment), Joyful Song CMS 119 (Crackle background)
Seasonal Paper Stash
Idea-ology - Christmas Muse Tokens, Memo Pin, Mini Safety Pin, Jump Ring
Tim Holtz Alterations: Rosette, Mini Rosettes, Tag DiesLinkDistress Stains: Stormy Sky, Fired Brick
Embossing Ink
Rock Candy Stickles
Ranger Jet Black Archival Ink
Seam Binding


So... there you have it :O)) The winner of the tag will be chosen at random and announced on October 3rd 2011.... please leave me a comment and tell me about your Xmas card making habits... I would love to hear all about it! Thanks for looking...TTFN

Hels x

Tuesday, 12 July 2011

It's Giveaway Time Again!

Goodly Morning... time for my monthly giveaway again. This month the giveaway is this ATC that I have made plus a pack of Idea-ology Adage Tickets. To be in with a chance to win is simples... leave a comment for me here and you will be entered into the random drawer from which a winner will be announced on August 3rd. To be in with two chances of winning... hop on over to my blog, leave me a comment on and you will be entered twice :O))


So, the ATC base is cut using the ATC Alterations die and mountboard. The mountboard was covered with Crowded Attic papers and lightly inked with Vintage Photo Distress Ink. I added a splash of colour onto the base by smooshing my blending tool for Aged Mahogany onto the craft sheet and adding a spritz of water - this is a more subtle way of doing a Wrinkle Free Distress technique.


I made some ickle roses using the medium sized Flower Power stamp, edging them with more Vintage Photo and then some Aged Mahogany DI. The Seam Binding behind the flowers was dampened and then I rubbed more Aged Mahog onto the craft sheet and dipped the binding into it. I then dried with a heat gun and cut them to fit behind the flowers. The Adage Ticket was coloured with more Aged Mahogany and splashed with water to make little bleached droplets. Finally I cut out a couple of moths from the Crowded Attic paper and coloured them and popped them onto the butterfly on the paper with their wings up.


All of the goodies I used on this ATC are available from The Artistic Stamper. Thanks for looking! TTFN

Hels x

Tuesday, 26 April 2011

Crowning Glory... By Hels Sheridan

Goodly Morning! When I was demo-ing at Ally Pally earlier this month I was faffing with the new Distress Stains, seeing how many different ways I could use them and I made this tag. I used Broken China and Wild Honey Distress Stains, smooshing them onto a craft sheet and then spritzing with water, dipping the tag into the inkyness and then drying and dipping again until I had the look I liked.


Next I used Wild Honey Stains, dabbing directly onto a script stamp, this gives a really fab "watercolour technique" look but as there's no water to dilute the ink, the stamping is really vivid. I used black Archival ink to stamp the crowns, from Crowning Glory, in a line down the side of the tag and then I dried the stamping and applied a thin layer of beeswax over the top of the tag, sealing all the ink in.


I made a little paper rose using Crowded Attic paper and the medium size Flower Power flower... dipping each layer of the rose into melted Beeswax - a nice twist on Faux Porcelain flowers. The messgae mat was created in the same way as the tag base and I used one of the new Travel sentiment stamps , again stamping with black Archival ink. Finally, I used the Broken China and Wild Honey Stains and coloured some trim for the ribbon at the top of the tag. Quick and simples and an effective background just using two of the new Stains. Thanks for looking... TTFN!

Hels x

Thursday, 7 April 2011

Fishy Takeaway! by Nicky Cresswell

Good day fellow stampers.. 
I thought that instead of cards or tags i'd get a bit more technical today..
So i've made some gift boxes.
And the great thing is all you need is 1 sheet of paper and no glue!
Oh and a template which you can find HERE
***
 All you need to do is print and cut out your template..
Also punch out the 2 black dots as these are where your wire will attach.
Lay it over some nice paper, you should use a good quality paper/card stock, 
for example Tim's paper stacks work great
I have chosen to give mine an aquatic feel using stamps for the Seaside #1 plate.
I stamped directly onto the paper after scoring all the lines but before folding.
 I also stamped and cut out elements and stuck them on with foam tape to give dimention.
 Then its as easy as folding it up. 
If you use a double sided paper you have a nice inside too. You may also notice here i have added a little bit of  reinforcement to the opening flaps to stop accidental tearing when opening and closing.
The only thing left to do now is attach the wire.
To do this you will need to gather the 2 flaps inside the box at either end and using the already punched out hole as a guide go through these 2 flaps, I used my big bite for this but you could use a pokey tool.
And there you have it, the perfect little treat box for him or her!
{Oh if your wondering how i got the boat wheel without the people in, I just masked the inner part of stamp b4 inking it, then remove the mask and hay presto, no captain and his mate!}
If you give this a try i'd love to see your creations, so be sure to leave a comment x
Until then Stay Inky

Wednesday, 6 April 2011

ATC Giveaway Time Again...

Morning Folks... tis time for my monthly ATC giveaway again... this month I have been focussing on those deeeelicious Crowded Attic papers again ... this time combining them with some lovely Distressy goodies too. To be in with a chance of winning this ATC, all you need to do is leave a comment for me here... the winner will be chosen at random and announced on Tuesday 12th April '11. And... if you leave a comment for me over on my blog, you will be entered twice! Simples (said in the Meerkat voice again lol)


The base of the ATC is mountboard so it is nice and sturdy. I layered an ATC size piece from the Crowded Attic stack and sanded the edges. I then loaded Rock Candy Cracklepaint over the top and set aside to dry. Whilst the drying was going on, I made a little 3d paper rose... there is a "how to" on my own blog HERE on how to do the flowers. So, the layers of the roses were spritzed with Heirloom Gold Perfect Pearls Mists... which are my fave mists to use... they are really subtle but give a lovely sparkle to whatever they touch. The rose was made using the medium flower on the Flower Power set.


The little ticket was cut using Tim Holtz Ticket Alterations die and then coloured with Antique Linen and Vintage Photo Distress Stains.. spritzed with Heirloom Gold too... and then popped into an Idea-ology Memo Pin. The ickle butterflies are from the Papillon Set and were stamped onto Duralar and then cut out... zapped with the heatgun and curled... and then whilst still hot, spritzed with more Heirloom Gold... this gives a lovely shimmer to them.


Finally, the flower Trim at the bottom is from Idea-ology Trims set ... a few cut to length and dabbed with Antique Linen Distress Stains... then lightly dabbed with Vintage Photo Distress Stains. The ATC base was dry now, so I spritzed this with... yep, you guessed... more Heirloom Gold... and then bobbed a bit of Vintage Photo Distress Ink around the edges... ta dah! That is all finished. Thanks for looking... have a goodly day! TTFN

Hels x

Saturday, 19 March 2011

And... The Winner Is...

...goodly morning! Last week I made an ATC using the new Crowded Attic papers and Flower Power stamp set... and today is the day to pick the winner of this ATC. As ever I have used Mr Random.org to pick the number for me... and yes, I still cannot for the life of me figure out how to get the picture of it onto here... maybe one day I will get a bit computer savvy LOL


So... on my own blog I had 25 comments and here we had 33 comments, adding those together and using the numbers 1 - 58 to chose one... the Random.org spat out ... NUMBER 43 which just so happens to tally with a comment from....

JUDE

Thanks everyone for all your lovely comments and messages... I will be back later in the week with another little giveaway so do check back :O)) Thanks for looking... have a FAB weekend...

Hels x

Thursday, 10 March 2011

Crowded Roses ATC Giveaway... By Hels Sheridan

Goodly Morning! Have you seen the new Crowded Attic papers yet? Wow, they are most delish indeedily and I am a lucky lass and managed to bag myself a stack the other day. I have a bit of the thing about butterflies and one of the favourite pages in the stack is the butterflies and moths page... which, hurrah and thrice, is also in the 6 x 6 version and... the little 2" square snips.. which are perfect to make medium sized roses using the Flower Power Set medium stamp.


I have made an ATC using all papers from the new stack, the ATC sized snips are fab for popping over some mountboard - I stuck it down using Claudine Hellmuth Multi Medium and then edged the piece with Vintage Photo Distress Ink. I then used Antique Linen Distress Stain and splodged some dabs onto the ATC and quickly dried it with my HeatBuddy. I gave the whole piece a generous coat of Rock Candy Cracklepaint and set aside to dry and set to making the roses. Once the petal layers were cut out, I edged these with more Vintage Photo so there weren't any white cut lines left.


The sentiment is stamped onto more paper from the stack and edged with more Vintage Photo - the sentiment is from Tim's new collection of Stuff to Say stamps... the little moth was coloured with a waterbrush picking up Worn Lipstick Distress Ink. Finally, to make it blinging-tastic, I spritzed the whole lot with Pearl Perfect Pearls Mists. If you would like to own this ATC, please just leave me a comment here and I will add all the names to a hat and a winner will be chosen at random on Saturday 19th March... this ATC will also feature on my own blog too, so if you leave me a comment there too, you will be entered twice :O))

Thanks for looking... have a goodly day! TTFN

Hels x

Wednesday, 2 March 2011

Mabel Lucie Loves Springtime

I'm Gerrie Johnnic, more commonly known as The Queen of Grunge and I'm honored to be the Guest Artist this month at The Artistic Stamper. For my first piece this month, I thought that Mabel Lucie should come out and play in the Spring has Sprung challenge right here.


....and all those showers will surely bring Spring flowers! I paper pieced her yellow slicker and umbrella with a piece from my stash, and popped her up on cardstock that I colored with Distress Inks, making the clouds. The rest were colored with pencils and markers that I found atop my messy workspace. The flowers are a die. The background blue is a piece of Tim's paper, put thru one of his embossing folders and I used the Cuttlebug highlight tech on it. I'll see you again soon with a new post. hugz....

Sunday, 9 January 2011

Beauty by Alison Hall

Hello everyone! I was so thrilled to be invited onto this wonderful team of Artistic Stampers!

Here is my first piece of artwork, a card featuring that lovely lady from the Collage Art 1 stamp plate.


1. Stamp the lady onto a piece of beige patterned paper from Tim Holtz's Vintage Shabby stack, using brown ink. Ink the edges with vintage photo distress ink, then rough them up with the distress tool. Ink the edges with walnut stain DI.
2. Emboss a rectangle of white card with the Tim Holtz Regal texture fade. I inked one side of the texture fade with vintage photo DI, before embossing. Ink the embossed card all over with more vintage photo DI, edge with walnut stain, then rub vintage photo distress stickles all over it.


3. Cut a 6"x6" piece of blue paper from the vintage shabby stack, ink the edges with vintage photo & walnut stain DI, then attach it to a square card blank.

4. Attach the embossed card, then layer the image on top. Punch three circles of blue patterned paper, scrunch them and ink them with vintage photo DI, then attach them to your card with pearl brads.


5. Finally, stamp the word Beauty from the Nudes plate onto the bottom right hand corner of your card.

I hope you understood all that! Thanks for looking!
Alison xx

Monday, 20 December 2010

Hels Tag of Christmas - #3

Goodly Morning... as promised, I am back with Hels' Tags of Christmas Tag #3 to giveaway... another one totally inspired by all those amazing ones by the Duke of Distress... oh and while I think about tags... did you know that Jennie is running a Tag Withdrawal competition??? Deets are all HERE and the linky-thingy is in the sidebar :O))


On with my tag and how I made it... it is up for grabs to one randomly chosen comment :O)) The winner will be announced on Thursday 30th December 2010. Anyways, how I made this... firstly, I smooshed Frayed Burlap DI onto the craft sheet and spritzed with Heirloom Gold Perfect Pearl Mists and dipped the tag into the inkyness, drying with a heatgun and re-dipping until I had the look I wanted. Next, I added a few drops of Fired Brick Re-Inker to a Mini Mister of water and lightly spritzed the tag. I popped a generous layer of Fired Brick Cracklepaint and allowed this to dry. Once dried, I stamped the music score in Walnut Stain DI and wiped off the excess from the Cracklepainted bit. (this is a nice look as the smudged DI goes into the crackles making it look a bit... erm... like me... old that is ROFL) I made a paper rosette using the Seasonal Paper Stash and the Rosette Alterations Die and popped an Idea-ology Crown into the centre. Behind the rosette is some mini tinsel from my own stash and... some dyed elasticated Idea-ology Trim - this was coloured with the Fired Brick Re-Inker mix and then dried on a radiator... drying with a heat gunmakes it shrivel up!!!


Along the bottom of the tag I added some of the flowery Trim, which had been coloured with the Fired Brick Re-Inker mist I had made. I popped a bit of tinsel behind this for a bit of extra bling. Next I made a little postcard using a Seasonal Sticker, mounted onto mountboard, sanded, edged with Walnut Stain and then stuck into a Memo Pin. The Facet at the top of the tag was stuck onto some Seasonal Stash paper using Glossy Accents and then fastened with a Jump Ring. Finally, I used some White UTEE on Grungeboard numbers, heating it til it bubbled and then adding smidges of Black Dabber to age it.


So, would you like to own this tag??? I hope you like it and... I just need to take this opportunity to say a HUGE thank you to everyone who has joined in with the monthly Challenge this month - WOWZERS we have had a seriously huge amount of entries so if I haven't got around to yours yet, please bear with, I am on my way LOL Thanks for looking and have a grand day! TTFN

Hels x

Wednesday, 8 December 2010

Tag 7 1/2 by Jennie

The phenomenon that sweeps the stamping world early this month has grabbed hold of some of us again, and certainly has done me....lol what am I talking about? If you haven't been there, then you must visit Mr Holtz's 12 tags of Christmas! Now some of his tags are mind blowing exercises in lots of techniques, and complicated things to make!
So, I took some of the elements and techniques that has used so far to make a simple ten minute tag ( hence the title , as today is Tag 8!) for you to copy if you wish. I love simple, the simpler the better! So with this in mind, I use the Merry Christmas Artistic Stamper stamp, and inked it up using cut n dry felt. Stamp your stamp using black archival ink onto the material part of the felt pad, and using distress ink re-inkers colour up the inked stamp. Then place your stamp back onto the pad ink, and stamp in colour!  Keep the felt in a plastic bag, and it should last for ages. If you haven't felt then just ink your stamp using distress inks. I clear embossed the words.
I have to say I cheated here and used the same felt that I used when making his tag no 2!! and it had kept its colour perfectly!
I then inked the tag using Forest Moss , Crushed Olive ( love that name!) and edged it in Barn Red ( my favourite of all the colours!)
You can ink up over the clear embossing with no fear of the embossed image being discoloured.
I stamped the cones from Tim's Winter Sketchbook using the same method.
Add lots of Idea-ology baubles, and a facet. I glued a tiny picture from the Seasonal pad to the back of it with Glossy Accents. I added a few pearls on the bottom too.
There you go a ten minute tag perfect for your presents!

Happy Tagging
Jennie