Showing posts with label Background Stamps. Show all posts

Tuesday, 21 April 2020

Flowers in the Night. by Jane

Hydrangeas are just the most beautiful flowers are they not!! especially the deep pink and the deep blue kind. I have no room in my garden for a hydrangea bush, so I  have a couple in pots, but alas they don't fare too well in them. We are still on with the "In the garden" challenge, so you still have time to enter this month.


To make the hydrangeas and the sentiment really pop on the dark background I embossed them with white embossing powder.
Artistic stamper products used;
Hope you will join in the fun.


Thursday, 4 July 2019

CURVES by Jane

I think circles are probably every crafters favourite shape, I know they are mine!!. I have a gazillion different stamps and stencils that are relating to circles in some way or another, I just cannot resist them. So I was happy when these gorgeous new midi background stamps designed by Tracy Scott landed on my mat, they are available from the 8th of July.


To make this card, I did a colourful background using another Tracy Scott stamp..BACKGROUND #6     then stamped over it using one of Tracys new midi stamps. I made a mask by stamping and cutting out one of the statues from the ARCHITECTURE 3 stamp set, placed it on my background and blacked out the rest, then stamped over the black with the same midi stamp set and white gesso. The word "curves" is also taken from the architecture stamp set. 
I am really looking forward to seeing your art in this months "Celebrating Women" challenge.


Tuesday, 29 May 2018

Mini Notebook by Gemma Hynes

I have a sweet little 4x4 notebook to share with you all today, There is something I really enjoy about the process of making books of any kind. The mix between the precise measurements of the book construction and the messy relaxed decoration that comes after. 


 Steps


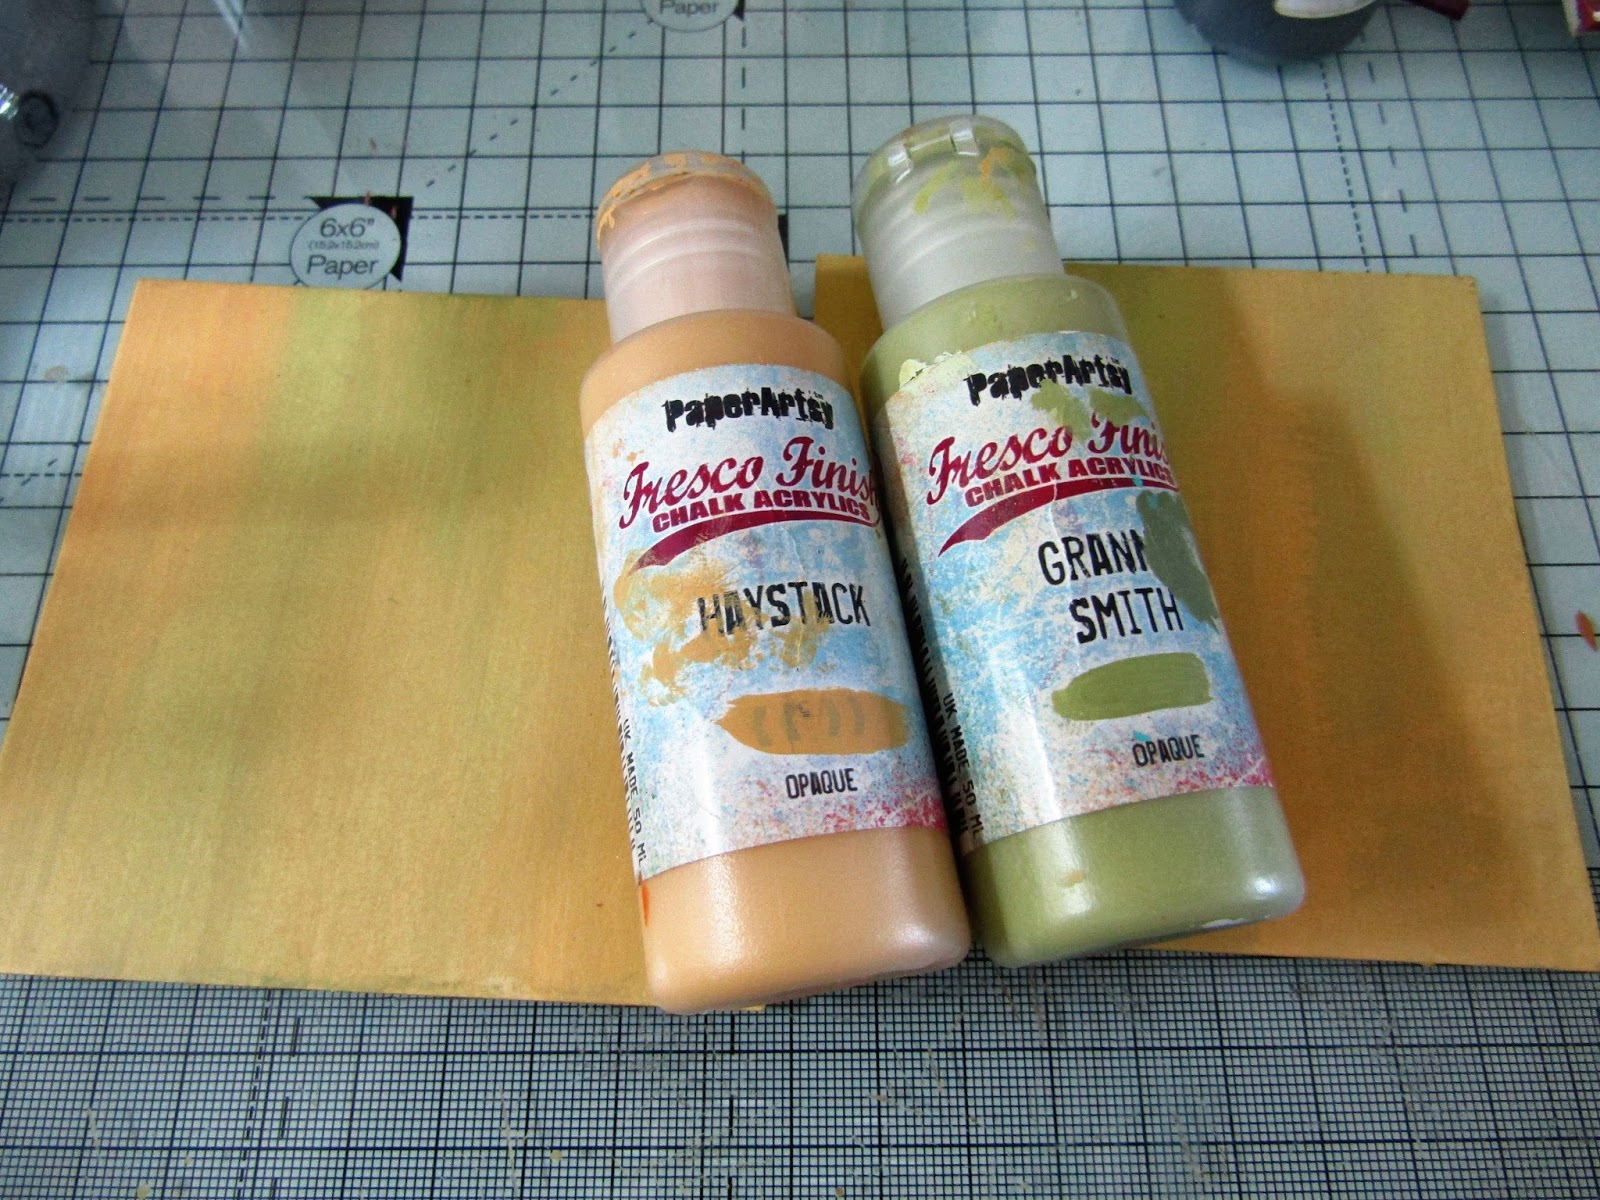
I brushed layers of Haystack and Granny Smith PaperArtsy paints over 4x4 bits of board that are the covers of my book. When layering I made sure the paints were still wet so the colors would blend easily together.


Over the top, I stamped a calligraphy mat with caramel paint, When I stamp I try to roll the stamp from one side to the other so I get an incomplete print. 


Over that, I stamped the honeycomb background stamp with Slate paint, still rolling not pressing the whole stamp down for an incomplete print. 


I painted a little chipboard bird from my stash blue and stamped the word Hugs from the greeting stamps set in black Archival Ink. 


I also painted two little hearts from my stash in red before stamping over the top with the Chicken Wire background stamp.  When everything was dry I wrapped some string around the covers and glued the hearts into place. 


I then painted some white duct tape blue and used that to bind the covers together before gluing the bird to the front cover. To finish the book off I added some elastic for a closure and attached the pages to the inside.

xx Gemma xx


Wednesday, 28 February 2018

Neil Walker Butterfly Tag by Gemma

It's the end of February already the mornings are starting to get nice and bright here, which always makes me feel better and we have a new challenge starting on the blog soon I am looking forward to seeing all the entries. 

I have a tag to share with you all today created using Distress Inks, a mask, and stamps from The Artistic Stamper.  


 Steps


1- Apply a thick layer of gel medium through a stencil on one corner of the tag, this will take a while to dry.
2- Apply a thinner scrapping of gel medium through the same mask in a small area on the opposite corner of the tag.


3- Spread three colours of Distress ink onto a glass mat, spritz with water and push the tag into the ink, dry between layers, 
4- Use a brush to help apply ink over the thick gel medium and continue layering until happy with the result.
5- Using a wet wipe or damp cloth remove the ink from the gel medium.


6- Using one of the inks from the first layer apply more ink through the same mask in two or three areas.
7- Stamp over the top of the tag with one or two different background stamps for added interest.


8- Stamp a focal image in the bottom corner and the top of the tag using archival ink. I have used a butterfly stamp designed by Neil Walker, ensure the image is overhanging the tag. 
9- Wipe off any ink from the gel medium.


xx Gemma xx


Saturday, 16 December 2017

Star Cards by Gemma

 I decided to make my own Christmas cards again this year, but instead of making the odd one for a specific person and decided to make a batch of cards so I could also donate some to my son's school fair. 

These were easy to replicate and work through systematically and I just changed colours when I got too bored.


After I cut cardstock down to fit my card blanks, I used a repositionable spray to hold in place stars I cut by hand, these acted as a mask and were removed at the end. Over the top, I sponged different shades of green paint.


I then stamped over the top with orange and white paint using background stamps.


The last layer before removing the stars was to stamp using a calligraphy mat and brown ink.


To finish I doodled around the start and the card with a black pen.


Thank you for popping by

Gemma

Sunday, 29 October 2017

Kiki Cards by Gemma


I love a messy grungy card and I have one to share with you all today.


I cut a piece of cardstock to fit the front of my card blank and sprayed the cardstock with Chopped Pesto, Ground Coffee and Lemon Zest, I sprayed water over the top and allowed them to blend together. While the inks were still wet I pushed a dot stamp and mask into the ink for extra interest.


I stamped Kiki onto a piece of card that I sprayed with Lemon zest and a little Pesto that was left on my mat. I layered this up on the background with paper scraps and washi tape. To finish my card I stamped the sentiment 'best wishes' in one corner and then doodled over Kiki and the other corners with a black pen.

Thanks for reading
Gemma xx


Saturday, 16 September 2017

Butterfly Flutterby Card by Gemma

I have a 8x8 thank you card to share with you all today. A little bit of inspiration for this months challenge 'A little bit of colour', I have used a limited colour pallet and embraced my white space (a little). There is still time to join in the challenge this month for your chance to win. 


I cut a piece of card to fit my card blank and stamped one of the wonderful butterflies from the butterflies stamp plate in the upper right corner using a Candied Apple Distress Oxide pad. I then sprayed the ink with water and stood the card up so the ink would drip down the card. 


After drying the ink, I stamped randomly over the whole card with the same stamp and Abandoned Coral Distress Oxide. After spraying the ink with water and allowing it to drip, I dabbed away some of the ink as I wanted these butterflies to be incomplete and the fade into the background. After drying I deciced to add very small amounts of yellow ink in places.


Using bits of scrap card my mask areas off I stamped the plaid background stamp using Vintage Photo Distress Oxide over the top.


Once all my ink was dry I added some washi take and stamped the words thank you. I painted the letters with a white paint pen, which I outlined with a black pen. Then it was time to doodle on and around the butterfly with black and white pens.


Thanks for stopping by

Gemma

Wednesday, 16 August 2017

Journal Bookmark by Gemma

Today I have a bookmark I made for my art journal, I will be doodling away, stop for some reason and then spend an age looking for the page I am working on. The bookmark is almost the full length of my largest journal so if I remember to use it, I should spend less time looking for a page and more time playing. 


I marked the length and shape of the bookmark using the wavy edge of an acrylic block. The base of the bookmark is the side of a cereal box. Once cut out, cover in a layer of tissue paper and gesso.


Blend red, orange and purple acrylics over the top, and dry completely. 


Spread some white acrylic paint over a craft mat, press your stamp into the paint and then stamp onto the card. This should give you a nice uneven image with lots of texture.


 Spread some pink and yellow paint on your mat, I mixed both of my colours with white so they were a little more opaque and stood out against the background. Then stamp the two largest circles from the set over the top. 


To finish I punched several holes in the top of the bookmark and threaded different ribbons through them and plaited them together.

Thank you for reading
Gemma


Saturday, 29 July 2017

Love, Live, Laugh by Gemma

 I have another quick card to share with you today, I only used a black piece of card, white ink, and paint along with some of my Artistic Stamper stamps and stencils


Step by Step

- Cut a piece of black card to fit the front of a card blank
- Stamp around the edges with white ink and a background stamp. I have used the mini square wire stamp.
-Blend a little ink around the edges of the card.
- Mix a little white paint with water and splatter paint over the top


- Sponge white paint through the words love, live, and laugh from the 6x6 work mask. Opps! I meant to use the word life from the same mask but got a bit carried away.


- Stamp one of  Neil Walkers Birdz on the bottom in white paint extending the legs to the base of the card.
- Doodle some flowers in random places with a white paint pen, also go over the stamped and stenciled images as needed.


Thanks for reading
Gemma

Tuesday, 16 May 2017

Wet Wipe Flower Card by Gemma


Hello Everyone

For my post today I have a card I made using used wet wets that I dried out and stamped over.


I glued the wet wipe to a piece of card, that I had already cut to fit the card blank and trimmed off the edges. Then I stamped the words dream, imagine and creative from the framed words set.


I then stamped around the edges with distress ink and the mini honeycomb stamp, before adding extra colour to the edges with distress ink. 


On two or three other dried wet wipes I stamped out Lesley's Ivy and one of the extra stamps that come's with the solid floral background. I cut them out and glued them to the card front.
.


Thank you for stopping by
Gemma

Tuesday, 25 April 2017

Accordian Book by Debs

 Hi everyone


Here is an accordion book that i started a few weeks ago, using Kraft Card and Distress Oxides.
this is the back, i tried to keep each page on this side orange and yellow in some way

this is the front which i tried to keep red and pink

 I used a mix of papers and Kraft card adding stencilling and stamping with the Oxides

I gave myself a theme - one side is Butterflies and Dragon Flies. 
Using loads of different stamps and masks

 I have six pages on each side

 I had fun mixing the stamps up and creating backgrounds using some of the new mini background stamps, they are great to use for smaller projects like this
 Even the papers were stamped with background stamps

I do like the effect that Distress Oxide have on Kraft, you get great colour

As you may have guessed i do like a nice phrase or quote

Stamps used were a selection from Backgrounds
a selection from Florals and leaves
And assorted quotes from Words and Sayings

Take Care and Happy Crafting
Debs