Showing posts with label Altered Art. Show all posts

Wednesday, 7 September 2016

Mushrooms again, by Titbelsoeur

Hello Happy Crafters !
Titbelsoeur today showing you my last project : mushrooms in a globe...
which is a stewed fruit jar I have put upside down
filled with small wood bits and dead leaves
and watercolored mushrooms 


Birch barks are very useful to frame and hide the cap
and very easy to glue.

I hope you all like my mushrooms !
Thank you so much for stopping by,
your comments are very much appreciated, 
here, on my blog, or on the Artistic Stamper's Facebook page

Do not forget to participe in our
MONTHLY CHALLENGE

August Creative Challenge- Anything Goes

 to win some fabulous Artistic Stamper stamps !

Titbelsoeur

Tuesday, 24 March 2015

With a Light Flourish!

Hello everyone, Alison (butterfly) here, this time with a candle lantern.  Take one old jam jar, some alcohol inks, gilding flakes and the fabulous new Artistic Stamper Flourish Background stamp, and here's what you get.


Let me take you through some of the steps it took to get here...


I started by applying various blue/green alcohol inks to the exterior of the jar... The new colours Mermaid and Botanical are in there, as well as Meadow, Stream and Denim.


I just kept dabbing until I was happy with the effect - I love it on the inside too!  This would be a good place to stop if you just want a really simple way to light your summer garden evenings.


I debated doing some powder embossing with the flourish stamp, but in the end decided it was way too long since I'd played with the gilding flakes I bought way back when I started this whole crafting hoo-ha.  No idea any longer what colour mix this is - and I may even have mixed in various colourways together in my little plastic box.


As you can see, I didn't quite get a clean stamping with the Flitterglu on most of the sides of the jar (wouldn't want to attempt this on a round jar, by the way!), but I actually don't mind that, on two counts.  One: it means you get a really distressed look, like the lantern has been around the block a few times, and has some history...


Two: it means you get a proper look at the alcohol ink patterns in lots of places, which are attractive in themselves.


Again it was pretty cool from the inside...


... but since the flakes were multi-coloured, I found it a bit hard to tell what was going on with only the very translucent alcohol inks underneath.  It was too translucent... I think you can see what I mean here.


So I decided it needed an internal coat of colour too - South Pacific Fresco paint, painted onto the inside of the jar - just to give a slightly stronger background for the flourishes to show against.


I dyed some seam binding with Rusty Hinge Distress Ink and wound some gold and beige satin ribbons together with it to create the finishing touch at the top.


It's a bit wild and extravagant, but I thought it suited the rococo style of the candle lantern itself.


As usual, it's been difficult to capture a photograph of how it looks with the candlelight illuminating it from within, but I hope this gives you a slight idea of the glow.


Thanks so much for stopping by today.  You've still got about a week to come and play in our Spring is Coming challenge here at The Artistic Stamper.  You have to include some stamping, but you don't have to use Artistic Stamper stamps for that... although if you do, you automatically get a double-entry to the prize draw.  Hope to see you there!

Ingredients used:
Artistic Stamper stamps - Flourish Background
Alcohol Inks - Mermaid, Botanical, Stream, Meadow, Denim
Seam Binding
Distress Inks - Rusty Hinge
Gilding Flakes - probably a mixture of various colours
From my stash - Jam Jar, Satin Ribbon (but there are plenty of options here too)

Monday, 14 October 2013

Urgent! by france papillon

Hi all!
I thought i wouldn't be much of a guest, if i didn't play along with the current challenge, 
which is to alter something.

This little bag contained my hubby's latest Christmas gift 
(yep, that's how long i've had it around to do something with it).
And this is what i turned it into:


First i applied a layer of gesso over it and cut out fitting pieces of cardboard out of an empty packaging. These pieces of cardboard were used to reinforce the little bag so that it would keep a nice shape once glued inside. To make them look less 'packaging like', i applied Vintage Photo Distress Ink on the edges.
I made a drawer to put inside the bag: i cut the pieces out of the backcover of a watercolor paper block (which is 2mm cardboard).
I simply glued them together...
...and reinforced the structure with gommed kraft. I dressed up the inside with kraft cardstock.
I added some stamping using the Ephemera stamp set using Vintage Photo Distress Ink and Black Jet Archival Ink.
When i came back to my studio the next morning, i had a bit of a surprise: the gesso and the layer of paint i applied on the bag didn't adhere to it. Only thing left to do was to peel it off... and search for a solution: i needed color that would stick to this non poreous paper bag...
 Adirondack Alcohol ink!!! That did the trick!
I blended Cloudy Blue, Sailboat Blue, Eggplant, Ginger, Latte and Caramel.
I stamped some of the Ephemera and the Air Mail stamp set onto a BoBunny paper scrap (12"Midnight Frost Crystals) and on a strip of kraft cardstock with Vintage Photo Distress Ink and Black Jet Archival Ink. 
 And guess what: it's the perfect fit for atc's! 

Your turn now, go! Go alter something! 

xx
france

Sunday, 7 April 2013

Air Mail box: By Zuzu

 
I decided to alter one of the oblong boxes on the theme of "air mail". I like the colour combination of the nice blue and red you get with airmail and the "postage" theme is a popular one.
I coloured the box in a pale sky blue colour wash and let it dry thoroughly before stamping on it. once it had dried I stamped various elements from the airmail "ephemera" sheet, using black, blue and red inkpads. the red and black are both Stazon inks. I added some "ink blots" using the ink blot background stamp too.


I used some of the fab airmail washi tape "washi tape narita"  around the top of the box (I glued it on as its quite low tack.) I also glued on some random bits of scrap metal, mostly from an old disassembled typewriter, and I used some salvage stickers to add interest.

To compliment it (and to give me something to put inside) I distressed some tim holtz journalling tickets, by using the paper distresser on the edges, gently blended some vintage photo ink around the edges and then stamped more Ephemera themed stamps on them.

Wednesday, 9 January 2013

Butterfly Frame by Alison

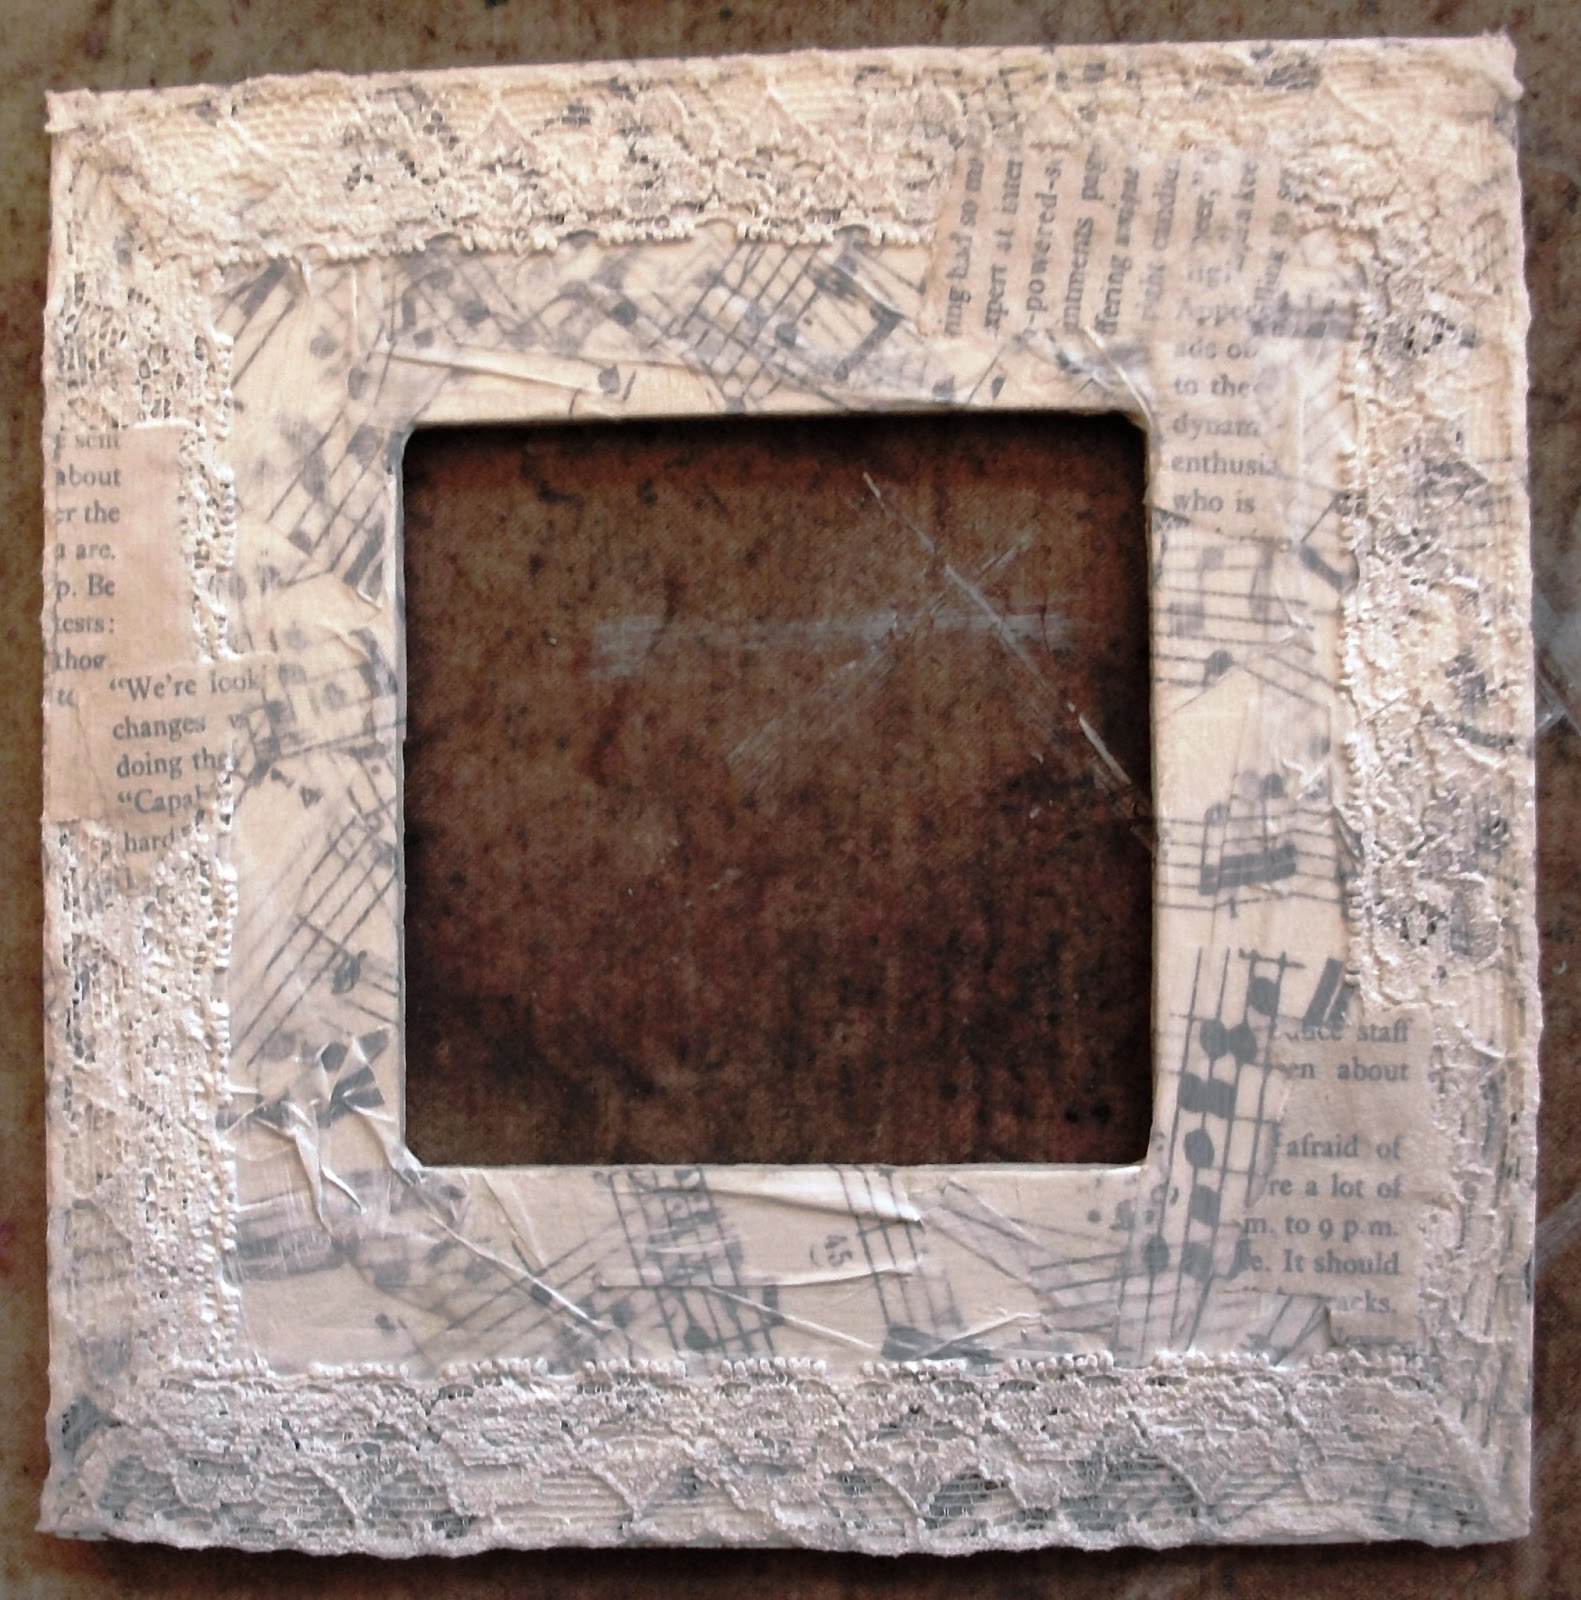
Hello Stampers! I hope you've all had a crafty start to the new year. I have a decorated wooden frame (160mm x160mm) to share with you today.
I started by using Studio Matt Medium to glue small pieces of Composer Tissue Wrap to the frame, adding creases for texture. Next, I used the Matt Medium to glue lace around the edges. I also glued on a few bits of torn book text.
When the glue was dry, I brushed a thin layer of Studio Gesso all over, to bring everything together.
I highlighted the texture on the frame with Cobalt Blue and orange Viva Inka Gold.
I smeared a little Gesso onto a metal corner and a butterfly charm, then highlighted with the blue Viva Gold. I also used the Viva Gold on the edges of 2 small metal filigree leaves. I shaped the leaves, and glued them & the butterfly charm to the top right of the frame, using Matt Medium. I glued the metal corner to the opposite corner.
For the background in the centre of the frame, I used the Caught in Crystal technique. Here's how it's done...
1. Take a sheet of acetate, & dribble Glossy Accents all over it. As this is quite messy, it's best to do this on a non-stick craft sheet.
2. Drip  different colours of Alcohol Inks all over the Glossy Accents. I used meadow, stream & butterscotch. At this point, you can also add glitter, guilding flakes, micro beads, or fibres.
3. Take a large piece of white tissue paper, and lay it over the coloured glue, scrunching it to add creases, then leave to dry completely.
I cut my Caught in Crystal piece to fit in the frame. Next, I stamped the butterfly from the Insects & Butterflies 1 Plate onto book page, and cut it out. I bent the wings slightly, and attached the body of the butterfly to the background, using glossy accents. I attached an Ideaology Game Spinner for the body.
To finish, I stamped the Butterfly Words on the edge of some book paper, cut it out in two parts, then glued the pieces to the frame.
Thanks for looking,
Alison xxx

Sunday, 9 December 2012

Joyful Tea-light Holder by Alison

Hello Stampers! Today, I have a decorated wooden tea-light holder to share with you.


I started off by giving the tea-light holder a couple of coats of Claudine Hellmuth Studio black gesso
Once this was dry, I stamped the Snowflakes on all four sides & the top, with Versamark ink, then embossed with silver embossing enamel. I did it one side at a time.

I stamped the sentiment from the Stamper's Anonymous Joyful Song plate, then cut out just the word 'Joyful', to fit behind an Ideaology Ornate Plate. I coloured the image with Vintage Photo Distress Ink, glued it behind the frame, then applied a layer of Glossy Accents on the top. I set this aside to dry.


I used red line tape to stick the end of some white & silver ribbon to the front of the holder, wrapped the ribbon around, the secured the other end with more tape. I glued the Joyful frame on top of the ribbon joins, then used two small screws to secure it to the holder.

I finished off by sticking clear gems to the centres of the snowflakes.

Thanks for looking,
Alison xxx

Friday, 9 November 2012

Angelic Art Doll by Alison

Hello Stampers!
I made an art doll for my very first post as a CT member, nearly 2 years ago, & as they are great fun to make, I thought it was time I made another :)
I started by painting a piece of corrugated card with silver paint dabber, for the base.
For the face, I stamped Girl With a Flower in Her Hair onto white card, coloured her with antique linen distress ink, then cut her out. I added a festive foliage poinsettia to her hair, with a crystal brad. I used wired tinsel for her halo, & attached it behind with sticky tape.
I painted the die-cut wings with pearl paint dabber, & added some platinum stickles to the lower edges.
For the dress, I used running stitch to attach some pretty organza to some white cotton. I pulled the thread to create a gather, then sewed the angel's head on through the sticky tape on the back.
I die cut a Sizzix snowflake, using music paper, attached a Christmas muse token with a long fastener, & attached the snowflake to the dress.
I added some beaded trim to the bottom edge of the base,some eyelets & chain to the top, then glued on the wings, & attached the angel, using silicone glue.
I hope this inspires you to make your own art doll,
thanks for looking, & for all the lovely comments you leave, which are greatly appreciated,
Alison xxx

Wednesday, 19 September 2012

Altered Notebook by Alison

Hello Stampers!
Today I have a little 10x10cm altered notebook to share with you.
I started by painting the cover with Studio black gesso
I used a craft knife to cut an aperture out of a piece of 10x9cm card, then covered it with sticky back aluminium. I cut through the middle of the aperture, corner to corner, then folded back the excess aluminium.
I used various Ten Second Studio tools to add a design to the frame, then covered it with black acrylic paint. I wiped it off fairly quickly, to leave just black paint in the recesses, & give it an aged look.
Next, I cut a piece of card to fit inside the aperture, then sprayed it with pink bubblegum & squeezed orange Dylusion spray. I sponged picked raspberry distress ink through a Dylusion stencil, then layered the card & frame on the front of the notebook.

I stamped the Art Dictionary Words on some white card, inked it with pumice stone distress ink, cut it into pieces as shown, & glued the pieces to the notebook cover. 
I spritzed some of the pink bubblegum spray into the air above the notebook, so that some landed on the words with a nice speckled effect.
To finish, I used the sprays to colour some seam binding, then attached a couple of metal beads & tied it around the book. I'm using one end as a bookmark.
I thought this little book would be perfect to take to craft shows, to write notes in, as I watch demonstrations.
Thanks for looking,
Alison xxx 

Monday, 9 July 2012

Textured Frame by Alison

Hello Stampers! I've got a little textured frame to share with you today.


I used a little wooden frame, The Artistic Stamper has similar ones HERE. I started by applying Studio gesso all over the frame, as this helps the texture paste stick to it. I applied Viva Ferro through the Dylusion Diamond of a Border stencil, using a palette knife. 

Once this was dry, I painted over the whole frame. I used Cloudy Blue Paint Dabber, with a little London Blue Dylusion Ink Spray mixed in. Once the paint was dry, I lightly sponged Expresso Paint Dabber over the raised pattern, and on the edges of the frame. I was going for a distressed look, so I didn't worry too much about the paint going where it shouldn't, and I love how it picked up some of the rough wood texture too.


I stamped one of the Nudes onto glossy card, using Jet Black Archival Ink, then coloured her with Vintage Photo and Walnut Stain Distress Ink. I cut the image to fit inside the frame.

I dabbed a little Cloudy Blue Paint onto a button from Tim's Fanciful Accroutrements, cut the back loop off with my Tim Holtz Scissors, then attached it to the bottom of the frame. I punched a couple of leaves from green Co'oredinations paper, sanded them carefully with a Sanding Grip, then tucked them behind the button.

To finish, I coloured some white ribbon with Antique Linen Distress Stain, then threaded it through the 'Love' Ideaology Key, tied a bow, & added it to the top right of my frame.

Thanks for looking,
Alison xox 

Friday, 6 July 2012

Little travel case: By Zuzu


Hi, Zuzu here again
This weeks project is a little suitcase; they come in a set of two, and I have used the smallest one for this project.

I started by carefully taking off all the straps etc. using a craft knife to assist; this makes it easier to colour it if you are using an ink pad or something. I am a messy worker so it seemed the best plan. I inked up the straps separately. I wanted the case to look old and as if it had been in someone's attic for a while. You know the kind... they get paint splattered on them every time you decorate, so end up stuffed in the attic full of "interesting things you cant throw away but cant really use".  So to get that look, I splatted it with white acrylic paint (from a paint dabber). But I dont cope well with white lol. its too new and clean, so I distressed it down a bit with some brown ink.

Now I reassembled the case, before decorating, using PVA glue.
To make the labels, I used distress inks on crumpled paper, a nice, easy and popular Tim Holtz technique, and stamped out my 'Travelling words', (also in distress ink). I used 'Broken China' and 'Fired Brick'.I added some ribbon and charms to the back.


And of course to make it authentic I filled it with "stuff", including two large distressed maps, made using the Europe map background and more distress inks (broken china, fired brick and vintage photo.)

You can get a nice selection of vintage looking bits from The artistic stamper, including optical lenses similar to the one I have used and the large clock charm is also stocked. I have also used one of the little corked vials from the Idea-ology range. 

See you in a couple of weeks with a new project.
Z x

Sunday, 17 June 2012

Nothing but a pack of cards (and a little book box): By Zuzu

I got one of the little Book box sets from "The Artistic Stamper" Shop... its a pack of two, one slightly smaller than the other so they fit inside each other. I used the slightly bigger one for this project. I used a mini pack of cards (out of a christmas cracker) to expand on the tumbling cards theme of the stamp.

Firstly I used gesso in the whole book. then i sanded it lightly to just add a hint of a distressed age look.

I stained the edges with inks  and then stamped on the Alice stamp in black ink.  I coloured in the image. This close up shows the slight distressing in the gesso.

On the back I simply distressed a couple of playing card images from my stash and glued them in place with some metal charms (carrying on the Alice theme).

The inside: I used a text stamp straight to the inside front cover. I sort of sat on the fence a bit before deciding as I knew it would be tricky and wouldnt stamp cleanly, but as almost everything i make has a distressed shabby look, i decided it would be appropriate. on the main inside section though, I coloured some paper with distress inks and then stamped the same text stamp out.. I cut it out and glued it into place.
Then I started to build up some Alice themed interest inside. I painted a wooden 'A' red, and stamped the text over it.  I drew a toadstool, coloured it in and cut it out and also some grass. I put glossy accents on the spots of the toadstool. I left flaps on them when cutting out so i could glue them into place in a 3D manner. As Mr caterpillar has transformed,  I stamped out the butterfly and glued him in.

On the front cover side, I glued in some metal branches and flowers... then painted them red (as in the story). I had a bit of a notion that maybe the queen of hearts had a bit of a thing for the white rabbit ... (my mind isnt always rational)... So I painted a wooden heart red, then stamped the white rabbit on to it. I coloured him in with paints. I also painted in some random blanket stiches around the edge of the heart in black.
Lastly, I glued on the miniature playing cards around the edges and neatened it on the inside with some blue bias-binding. (I think thats what it is called)... and there you have it.. a "curious keepsake".


Supplies Used from The Artistic Stamper:

Alice stamp and white rabbit stamp HERE (scroll down a wee bitty)
Butterfly stamp HERE
Distress inks (I used broken china and fired brick) HERE
Little book boxes HERE