Showing posts with label Tim Holtz Stamps. Show all posts

Tuesday, 11 December 2012

A Joyful Christmas by Emma


Hi everyone, Emma here! Today, I'm sharing a very special Christmas card that I made and as always, I hope you like it...
To begin with I covered the front of my card with a piece of the paper from the Holidays Past Paper Stash, matted over a piece of red card. I aged the edges of the paper, to give a vintage look to the card. I stamped the image of Santa and coloured him using Distress Marker pens. I added a piece of the Frosted Film over the top of the image before putting it behind my die cut frame, which I'd stamped with the Marble Background stamp and then blended the cream cardstock with Old Paper and Frayed Burlap DI. I then matted the completed artwork onto a piece of green card.
Next, I die cut all my pieces to make up the Tattered Poinsettia, the Holly leaves and the Tattered Pinecone branches. I blended the Poinsettia petals with Victorian Velvet Distress Ink and the leaves, etc with Peeled Paint and Shabby Shutters. I then added some Rock Candy Crackle Paint over the top of all the pieces. Once they were dry I assembled the Poinsettia and added a pearl to the centre of the bloom.
Next, I arranged and attached my artwork, Tattered Poinsettia and all the die cut leaves to the front of my card.
I threaded some Seam Binding from my stash, which I aged using different neutral shades of DI, through one of the Idea-ology Hinge Clips and attached one of the Locket Keys and some twine onto it.
I finally stamped the "A Joyful Christmas" message onto a piece of Manila Cardstock and carefully cut it out before attaching it to the front of my card.
So, if you still haven't made that really special Christmas card...I hope I've given you a little bit of inspiration with this project and HERE'S THE LIST OF WHAT I USED TO MAKE THIS CARD:
Sizzix/Tim Holtz Alterations Die ~ Holly Branch
Sizzix/Tim Holtz Alterations Die ~ Vintage Cabinet

Thank you for taking the time at this busy period to stop by and have a look at my little creation, I can't wait to read all your comments.
See you soon...Emma x

Sunday, 11 November 2012

Ho! Ho! Ho! ...by Emma


Hello everyone! Hope you are all well and had a wonderful weekend, so far!

It's time for me to share my latest creation with you all and as always, I hope you like it...
...and here's how I made it!

To begin with, I created the frame using Tim Holtz Sizzix dies that I have in my stash. I then stamped the image of Santa onto a piece of cream card, die cut to size to match the larger frame. I blended the card with Old Paper DI and then blended the edges with Vintage Photo before I coloured the image using Distress Markers as watercolour paints to give a soft, vintage look to the piece. I then attached the finished piece to my frame.
Next, I die cut the lamp post and holly leaves from chipboard and painted it with an Adirondack Paint Dabber, leaving the surface stippled to give a texture to the paint. I painted the holly leaves and berries and allowed them all to dry before adding a piece of acetate behind the lantern part of the lamp post, coloured with Alcohol Ink. Once all my pieces were completely dry, I attached them to the main frame.
I then die cut the Tattered Pine Cone pieces from card, blended the cones with Gathered Twigs and the leaf fronds with Iced Spruce before shaping them to make dimensional cones. I added my completed cones, twigs and punched holly leaves to my frame, together with some vintage ribbon from my stash.
Using black Archival Ink, I stamped the Merry Christmas ticket from Tim's, Odd and Ends stamp set, onto a piece of card blended with Old Paper DI and I also stamped the Calligraphy stamp using the same colours. I added the ticket to my frame and then rolled up the stamped Calligraphy piece of paper to make a scroll. I then attached this, together with a pen nib to my artwork. Finally, I added accents of Rock Candy dry glitter to the cones, leaves and lamp post.
Adirondack Paint Dabbers

So, I really hope you liked my first piece for this month!!
I'll be back later in the month with my second creation but until then...thank you for taking the time to visit and I'll look forward to reading all your comments!
See you soon...Emma x


Tuesday, 30 October 2012

Happy Halloween by Jennie

Hi!
I love being able to join my wonderful team here on the blog, and even if time has run away again with me this month, I managed to get time to make a Halloween ATC for you. This is so simple to make, takes a few minutes, and can be adapted for any occasion.
I use some of Tim's Kraft Resist Halloween paper, and added distress inks to it to make the skull pop off the page. I stamped Happy Halloween and a spiders web from one of Tim's Stamper's Anonymous stamp sets in Black Archival ( one of my staples of stamping!) and then added orange and brown distress inks , and cut it out.


The pumpkin was made using a honeycomb paper , which I die cut from the Alterations mini pumpkin, and then cut in half, and fanned out.


You will often find me in the baking department of shops, looking for silicone moulds so that I use them with UTEE, which is what I have done with the skull. I just used up what UTEE I had left in my melting pot, and luckily it was the perfect colour. The bat was another find in the seasonal department of a well known supermarket! Add all the elements together, and glue with a hot glue gun.


Have a very Spooky Halloween, and if you are in our direction on Wednesday night, we will be tricking and of course treating you to a late night shopping. we are open until 9pm.

Have a very creative day
Hugs
Jennie

Wednesday, 24 October 2012

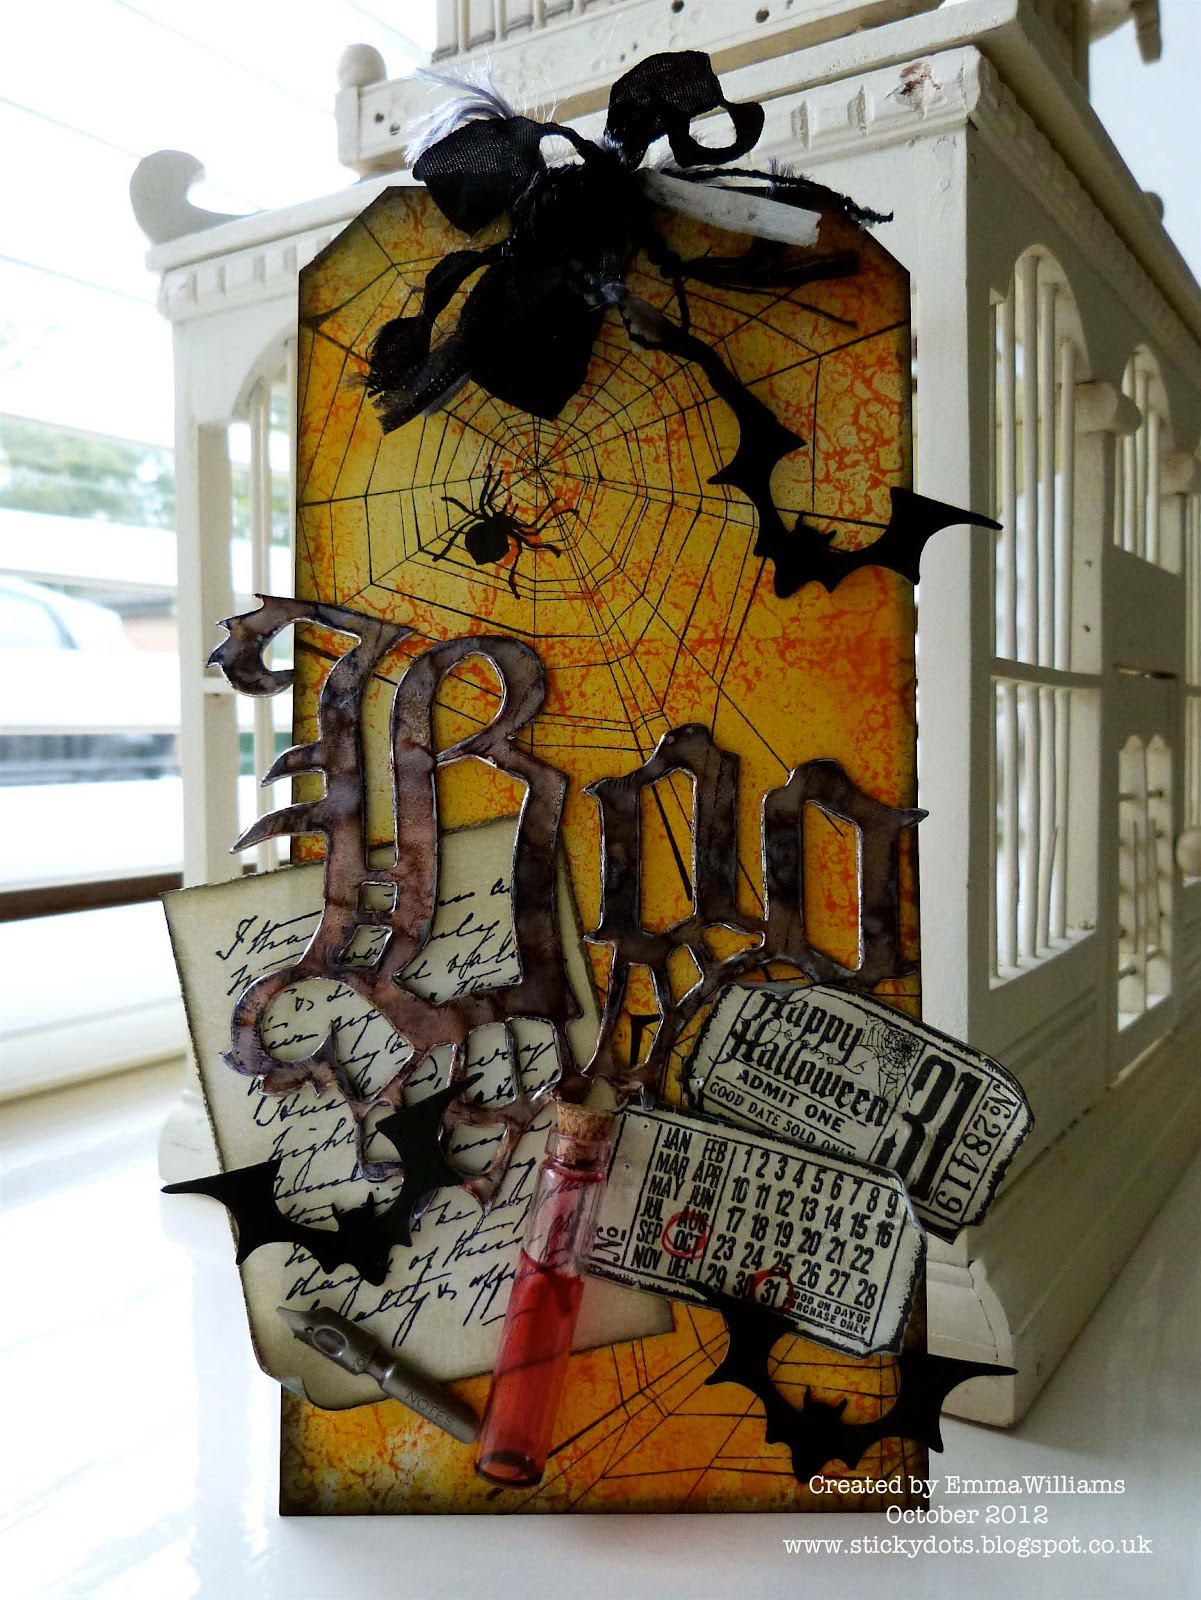
BOO!! ...by Emma


Hi everyone, it's Emma here and I'm back with my final share of October. I'm one of those people who really loves Halloween and I thought I'd make the most of my much loved Halloween Tim Holtz dies and make another tag using them...as always, I hope you like it! 
To begin with, I took one of the larger sized tags and covered it in Spiced Marmalade and Mustard Seed Distress Stain. I blended Black Soot around the edges before stamping the entire tag, using the Marbled Background stamp inked with Spiced Marmalade DI. I then used the gorgeous Spider's Web  and spider stamps from Tim's Halloween Cutout set and stamped the web and the spider directly onto my tag.
Next I covered a piece of chipboard with a self adhesive metal sheet and then die cut the BOO using the Gothic Boo die from Sizzix. I applied Hazelnut and Eggplant Alcohol ink over the top of the metal and attached this to my tag.
I inked up a piece of white paper, with Old Paper DI and then stamped the tickets and the Calligraphic stamp onto the paper and cut them to size, distressing the edges with the distressing tool and some Black Soot DI. I added these to my tag, together with one of Tim's Pen Nibs and a Corked Vial, which I dropped a few drops of Alcohol Ink into.
I die cut some of the bats from Grungepaper, using the Movers and Shapers Mini Bat and Skull die and painted them with Black Adirondack ink. I added the bats to my tag, together with some black vintage ribbon and fibres from my stash.
If you're inspired to make a tag of your own, then here's a list of what I used:


Thank you for stopping by to take a look at my tag and I can't wait to read all your comments!
That's it from me for now but I'll see you all again, soon!
Emma x

Thursday, 11 October 2012

Happy Halloween by Emma


Hi everyone! Once again, time has flown by and it's already that time of the month for me to share my first piece with you all and I really hope you like it!
Here's how I created the piece...

Firstly, I used Tim's faux metal riveted technique that he used for his September tag, in the 12 tags of 2012 series and covered a Manila tag. I then covered the tag with Hazelnut, Eggplant and Gold Mixative Alcohol Inks before sanding the surface.

Next, I used the Tim Holtz Gadget Gears Alteration Die to die cut some chipboard which I then painted with the gold Adirondack Paint Dabber. Once the paint was dry, I applied the black paint dabber over the top and then, gently wiped away some of the paint. I then die cut the '31' from the Gothic Boo die and applied black paint over the numerals, before brushing the edges with gold paint.
Next, I blended a piece of white card with Old Paper Distress Ink, added Black Soot around the edges and distressed the paper slightly. I then stamped the image of Phineas Pinchbeck onto the card and I also stamped the Happy Halloween Ticket from Tim's Odds and Ends Stamp set.
I added all the die cut and stamped elements onto my tag, together with the a piece of the Film Strip Ribbon, attached with the Tiny Attacher and some Sprocket Gears, with the Game Spinners attached to the centre.
Finally, I added Glossy Accents onto the clock on the stamped image and threaded seam binding through the top of the tag and tied it into a bow.
Here's a list of what I used:

Thank you for stopping by to take a look at my little tag and I can't wait to read all your comments!
That's it from me for now but I'll see you all again, soon!
Emma x

Tuesday, 12 June 2012

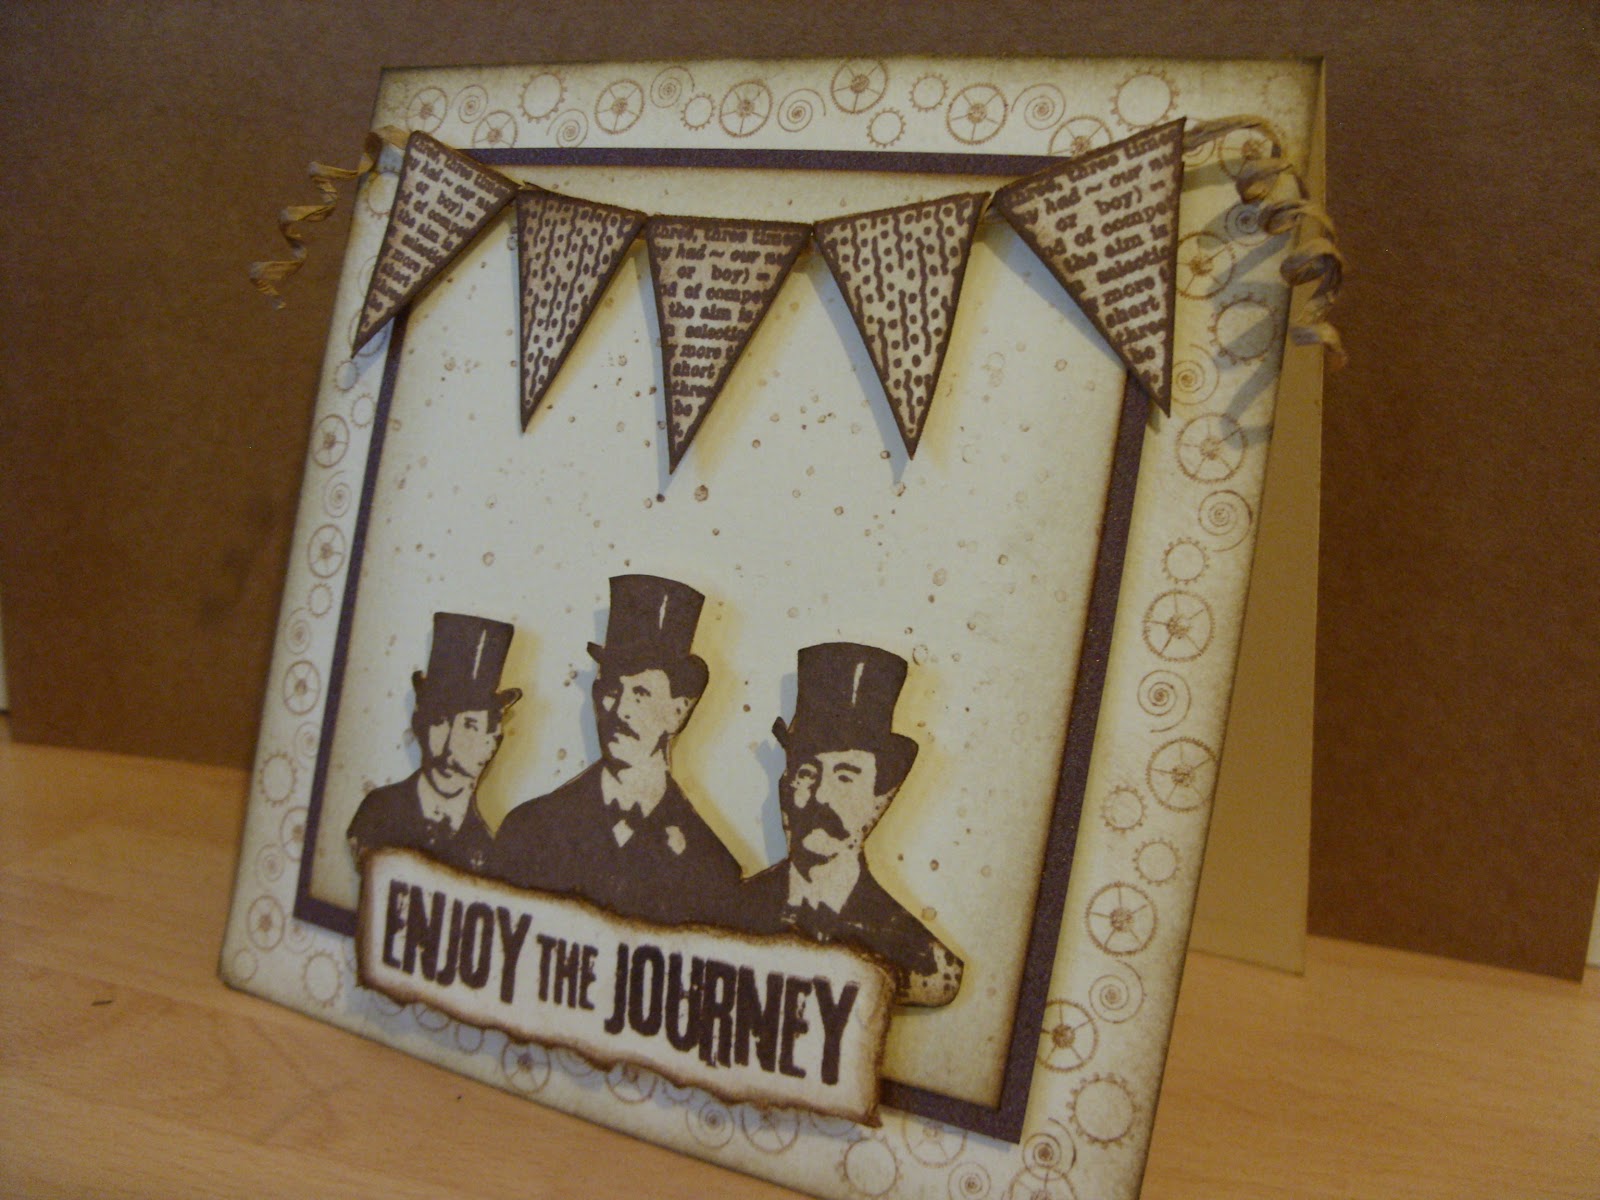
VINTAGE BUNTING By Kat

Hi all, Kat here,
I'm here today with a monochrome card with a vintage feel.
I started with a 5x5 inch card
& blended Vintage Photo Distress Inks round the edge
I then stamped the cog border off the borders A6#2 stamp plate,
once onto scrap paper then onto the card to give it a lighter colour.
I then Matt & layered brown & cream card,
& blended Vintage Photo Distress Inks round the edge
& stamped the Stipple background stamp onto it.
I then stamped the focal images onto scrap card
which are Tim Holtz with Coffee archival ink cut them out
& stuck them in place with foam pads,
I used 2 of the flag designs off the Bunting plate again stamped with 
I attached the little flags to a covered wire & bent it into shape
with the ade of a pencil end, then stuck it to the card as shown.

Hope you like it!
thanks for reading my post,
Kat x.

Sunday, 18 March 2012

Learn To Pause by Alison

Hello Stampers. I've a little card to share with you for my second post of the month.


I don't know about you, but I'm loving the Crafter's Workshop Templates at the moment. I started the background for this card the other day. I'd spritzed a turquoise background for another card, then turned my template over, onto another piece of card, thus creating a reverse image. I then added some Crafty Notions Tangilicious accents through a circle template.

I inked the background with Vintage Photo Distress Ink, then stamped a script background, using the same ink. I distressed the edges with a Tonic Paper Distresser, then inked them with the Vintage Photo ink.

Next, I stamped competition winner Laura Liddell's fab Sneakers, onto my background. I stamped them again, onto white card, using Black Versafine ink, then clear embossed them. I inked them with Vintage Photo, then cut them out & glued them to my background.

I stamped the phrase from Tim Holtz's Just Thoughts plate, onto white card, cut the individual words out, inked them with Vintage Photo, then glued them in place. Finally, I added my artwork to a square kraft card blank.

Thanks for looking,
Alison xox

Sunday, 26 February 2012

I'M NOT BOSSY JOURNAL PAGE by Kat

Hi all,
I would like to share with you all today
the first page of an art journal I am going to
put together myself,
it's going to be an interactive book that has
pockets, flaps & pull downs,
each page is going to be different.
(well that's what's in my mind, whether it will work is another thing) LOL

so I am happy to present to you page 1,
this page has a side tag pocket to pull out.


I thought I would post this a little differently
to see if it ends up with less writing than my normal posts,
I hope you don't mind.
I am going to list all the things I used
then show the pictures on how I made the background.

I used :-
1 A4 piece of card cut into 2 A5 pieces,
Manila tag size 8,
 distress stains Bundled Sage, Tumbled Glass,
Scattered Straw & Antique Linen,
Distress Ink Vintage Photo,
Wild Honey & Tumbled Glass,
Stamps I used are,
archival inks Sepia & jet black
Collage sheets to make up the figure etc.,
the phrase is printed out on the computer
a bind it all machine, & scraps of card
scrap of ribbon.

here's the background pictures.


smooshed stains onto a craft sheet
then dragged the card through them then dried with a heat tool


added the distress inks


splatted the stain to make the splats,


sprayed water through a stencil


then blotted it off with kitchen roll


finally I added the stamps

I stamped the birds then glued everything in place

hope you like it!
If anyone has any two part phrases, quotes or
jokes etc that would fit this style of journaling
please leave me a comment, 
I would love to read them,
you never know they may just make it into the book (LOL)

have a creative day,
Kat x.

Thursday, 16 February 2012

BUTTERFLY PUBLICITY TAG by Kat

Hi all, Kat Here,
it feels like it's been ages since I made a tag,
so that's what I have to share with you today,
I have also had a little play with my distress stains.
so here is my creation.

I started with a size 8 manilla tag
I took took the distress stains
Picket Fence, Vintage Photo & Brushed Corduroy,
smooshed them on my craft sheet & dragged the tag through the ink
then dried it with a heat tool,
I then repeated this with the ink that was left 
& dried the tag again,
I then took the vintage photo stain,
 banged it on to the tag to make cool splats
(a trick that Hel's showed me) cool ha!
then dried the tag again.


I then blended round the edge with
Vintage Photo & Walnut Stain Distress Ink
& stamped the butterflies off the Papillon plate Tim Holtz.


I then stamped the butterflies on some scrap card &
coloured them in with pro markers,
cut them out & attached them over the top,
to give some dimension.


I made a little torn edge sign with THIS
fab saying & attached it to the tag with a memo pin
& to finish I stapled some brown ribbon along the side edge.


hope you like it!

just quickly,
 can I say a big thank you to every one
that leaves me such lovely comments on
the things I post here,
I am always  excited to read them
& they are so appreciated. 

hope to see you next time,
Kat x.

Saturday, 28 January 2012

Only Love...

Hello Everyone,
Thanks for calling by...Sarah here with my final piece of the month. Golly, almost February already! I've had a fabulous time being Guest Designer and thought I'd end with a bit of good old-fashioned vintage shabbiness!
I cut a large tag by hand from the Retro Grunge Stash and swiped it with Vintage Photo Distress Stain to add more depth of colour. I stamped it with a few Papillon butterflies and script before machine-stitching and distressing the edges .
This Gibson Gal is really great and I stamped her onto a French book page that I had white-washed with Gesso. I aged the edges, layered her onto a scrap of design paper which I'd also stamped before adding more random stitching and Distress Inks. I created the flowers by stamping the rose from Flower Power onto manilla card that I had swooshed with Distress Stains and water. I stamped them lightly with a script, gave them a light crumpling and roughed up the edges with an emery board for the shabby look. I dropped a gold bead into the centre for a little sparkle.
I layered up my sullen gal with some lace, adding a gold washer, butterfly and vintage buttons to the tag top. Then I had to sit and think about the words! I love using my vintage typewriter to add a sentiment and I went for these 'oh so very true' words from Oscar Wilde.
And there you go - a little womanly melancholy on a tag! I hope you like her...I could make another one with "Will I ever do my housework?" on it!!! So with that said, I am going to dig out my dusters and have a Cinderella moment (before the ball that is...)
I just want to say a huge thank you to Jennie, Hels, Emma and all the team for their support and this fabulous opportunity to share a little inky passion with you all. Have a great weekend...stay inspired, creative and full of Mojo!
See you around...Sarah.

Tuesday, 13 December 2011

Festive Feeling... Giveaway Time!

Goodly Morning Stampfans! Tis that time of the month again when I do my taggy giveaway... this month the tag has been inspired by lots of different techniques shown by Tim Holtz during his 12 Tags of Christmas bonanza this year. Did you know that Jennie is feeling in a very generous festive mood and not only is she giving away two free limited edition stamps with every single order... she has also set up a special discount of a mahoosive 20% on any orders for the stash used in the 12 Tags... to see all the deets, please CLICK HERE. The offer is only open for a limited time... til 18th December so time to grab yourself a nice Christmas pressie bargain! On with this months tag for giving away. To be in with a chance of winning it is a doddle... simply leave me a comment here and tell my what your favourite Tim tag was this year... the winner will be chosen at random and announced here on the blog on January 3rd 2012. I had lots of fun making this tag because I included all my favourite stashly supplies. The base of the tag was coloured with Antique Linen Distress Stain. I spritzed it with water and then dipped the tag into a smoosh of stain (liking that description!) on the craft sheet... using Frayed Burlap (this has to be one of my faves for vintage, nostalgic Christmas projects)


Anyways... I dried the tag with a heat tool and then did some "Ghost Stamping" with the crackle background from the Joyful Song stamp set. This is a really fab technique and so easy... simply pop your stamp onto your craft sheet face up, ink with your Distress Ink and then pick it up in your hands and kind of roll it over your tag... this will mean that there's no start or finish to the image, instead it just fades out... no harsh edges! I dried this with a heat tool and then roughed up the edges with a Paper Distresser and blended Vintage Photo Distress Ink around the edges. I used a variety of green Alcohol Inks to colourize a piece of Kraft Glassine paper, scrumpled it, dragged Vintage Photo DI over the top of the scrumples and then dried it. I used the Holly Branch Alterations Die to cut five leaves out and then used the Tattered Pinecone Die to cut out three shapes from brown cardstock... I then assembled them into the pinecones and added Picket Fence Stickles to the edges of the bracks. The little holly berries are Baubles, coloured in a zippy bag with Red Pepper Alcohol Ink and tied with wire and some vintage lace - these are FAB ideas from Tim... and all the deets for the 12 Tags are on his blog. I used a piece of Lost & Found music paper to cut a Tattered Banner and popped this into the pinecone/holly leaf assembly and then set about making the sentiment... which is another easy but cute way of stamping; using Distress Embossing Ink for stamping the sentiment onto Kraft card and then embossing with Ranger Black Embossing Powder and cutting around the sentiment and edging with Vintage Photo DI.


Cor... this is a long winded explanation for one tag... nearly done! The Idea-ology Christmas Adornment charm was painted with a selection of Adirondack Dabbers... using a teensy Claudine Hellmuth Studio brush to apply the paints... then drying with a heat gun, sanding gently and then squishing it into the Distress Embossing Ink and embossing with Clear Embossing Powder... worn of warning... don't try to pick it up straight after you have heated the powders... it is metal... and that means it is hot... ouch!!! Just sayin ;o)) I repeated the "enamelling" process so the bells are really covered with a good thick layer of powders... punched a hole in the top using the Idea-ology Screw Punch and popping onto a little Jump Ring and Mini Safety Pin. Once the whole tag was assembled, I gave it is a really fine spritz with Heirloom Gold Perfect Pearls Mists.


You will see that there's a border of snowflakes and the odd snowflake dotted around the tag... I made these using more Alterations dies to cut Kraft Glassine that I had coloured with SnowCap Alcohol Ink... I have done a quick Tutorial over on my own blog so you can see how I did this... all the deets are HERE. Well, that's all from me for now... thanks for looking!!! TTFN

Hels x