Sunday 29 November 2015

Note Book By Gemma

Hi Everyone

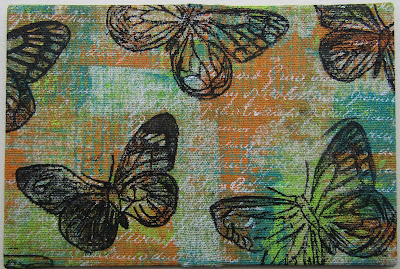
 I covered a plain mini note book (7.5x10.5 CM), with fabric that I painted using stamps and Dylusions paints.

I used a sheet of adhesive backed fabric and scraped Dylusions, squeezed orange, fresh lime and vibrant turquoise paint  over the top in places using a card. I really tried to scrub and push the paint into the weave, so you could still see the weave through the paint.


Then using all the same colours of paint I stamped the square wire stamp, stamping both vertically and horizontally.

I then stamped over the top with calligraphy mat 11 using white dylusion paint.


I then stamped over the top, two different butterflies from the butterflies #2 plate, some of them did not stamp completely so I sketched over them with a black paint pen.


I cut the pages from the note book with a craft knife. Then recovered the cover by removing the backing from the self adhesive fabric, smoothed it in place on the front and then tucking it around  the sides, before I re-glued  the pages in place.


Thank you for reading
Gemma (InkyKitty)

Thursday 26 November 2015

Oriental Elephant by Shilpa

Hello Everyone,

I've created small mixed media banner with Artistic stamper Oriental stamps


Our theme of this month's challenge is fabric


I've used Burlap and lace material in the background. I used various Distress paints to bring on the colours. I've stamped Chinese script with Chinese text background stamp and Orange Blossom Archival ink.


Oriental Elephant is stamped with Jet black archival ink and coloured with Watercolor markers. For more visual interest I added few Tim Holtz Ideology embellishments.

Hope you liked and got inspired with my project. There are still 4 more days, you can join us for our 'Fabric Challenge' this month.

Thanks so much for stopping by.

Products used from Artistic Stamper:


Tuesday 24 November 2015

Watercolour pencil fun by Debs

Hi All

Before we launch into Christmas, here is something a little different (i hope)  this piece was done with nothing other than an Archival Ink Pad, and some water colour pencils, water and a paint brush.
For the substrate i went really simple have a peek and let me know what you think


Here is the step out

first i took a piece of card (we all have a piece or two hanging around)

a piece of Tim Holtz tissue paper


and stuck the tissue to the card with  multi medium


Next i took the butterfly plate#2 and using three different sized butterflies stamped with Watering Can Archival (i wanted to keep the image light)


Taking some watercolour pencils a paint brush and some water i brushed water directly onto the image then taking some paint directly from the pencil with the wet brush and painted the butterflies I used two colours per butterfly and blended them together

Added a  large bee from the new Honeycomb and bees plate

Masked the bee with a post it

 and stamped over the top with the honeycomb stamp using the same grey Archival Ink

Then i drew round each honeycomb with a yellow pencil and then went over with the paint brush

and then went over with the wet paint brush


Using the words stencil I took a brown pencil and drew round some random letters
then added some water with a wet brush

I also took a brown  round the edge and pulled the colour across with a wet brush.  I also added the smaller bee to the top corner as well as adding some more honeycomb around the edge 

using the leaf stencil and a green pencil i added some leaves around the piece and also went around the edge of each butterfly with one of the colours used 

on a smaller piece of card i added some more tissue paper and again using the word stencil i used Hickory smoke Distress Ink make sure you heat set it and try not to get water on it


 I went around the edge with the brown pencil and pulled colour across and around the words

then went around the edge of the words with a black pencil then stick onto the main piece

 and around colour around the edge of card first in the brown and then in black again a touch of water

 I also added a bit of black again using the pencil to edges


Well I hope you have enjoyed my latest project.  Do let us know what you think we do read all of your comments and all are greatly appreciated.  Don't forget you still have to time to enter this months challenge.

Thanks for checking in Debs

Sunday 22 November 2015

Merry Christmas by Dee

Hi everyone sorry for the break in my posts but I have been away 
visiting my brother in Malaysia and going to Penang so 
a very lovely break for me.
I hope you are all well and got all your Christmas preparations well
underway now. For this board I used an embossing folder
and distress inks.
For the baubles I used fimo clay and pushed the Round Twisted Bauble
Long Twisted Bauble into the clay then heat in an oven. 
I coloured some card with distress inks then put into an inked up
 embossing folder & then put through my machine.
Gold embossing powder was then applied and heat set.
The base card was again coloured with distress inks and 
spritzed with water.
I edged the whole piece with gold embossing. I stamped the merry Christmas 
stamp onto distressed card and stuck it on.
I finished off with gems and snowflakes from my stash.

PRODUCTS USED
  1. Artistic Stamper stamps used were  long twisted bauble stamp, round twisted bauble stamp & Christmas Greetings # 1 the merry Christmas stamp.
  2. Distress inks in the following colours, Mermaid lagoon, Peacock feathers, Chipped Sapphire,Dusty concord. Seedless preserves Vintage photo & Walnut Stain..
  3. Gold Embossing powder, Versa mark, Archival Ink jet black.

Thursday 19 November 2015

Fabric, always... by Titbelsoeur

Hello happy sewers !
Have you already participated in our monthly challenge ? 
If you haven't yet, here is another fabric art journal page to make you want to !
Here is my page, always on the same model as the others :


Fabric, lace, ribbon.... and stamps, of course ! 
Special Deliveries  from Debbie Cotton, and rule and sentiment come from A Stitch in Time  you will find in Dressmaking


Thanks so much for stopping by,
your comments are very much appreciated, 
here, on my blog, or on the Artistic Stamper's Facebook page.
I hope that my fabric page did inspire you and that
you will participate in our monthly challenge
 to win some fabulous Artistic Stamper stamps.


Titbelsoeur

Monday 16 November 2015

Tag Box by Gemma


Hi All

I love making tags and also use them to mop up extra ink and paint, as a result I have lots of tags laying around getting lost or (and I say this very quietly) put in the bin. So my make for this post is a box I constructed from bits of 12x12 chip board sheets left over from other projects. Once the base box was constructed I painted it all with black acrylic.


I put the box aside to dry and cut panels from white card to fit the sides of the box, which I decorated with Dylusions paints. I scrapped fresh lime over all the card pieces, as a base. Then applying the paint to the stamp with a piece of foam,  I stamped the Lace stamp in vibrant turquoise, and the Honeycomb stamp (which is a new stamp, and awesome by the way) in squeezed orange, rolling the stamps so it only stamped in places.


 Over this I stamped Calligraphy Mat 4 using black marble, scrapping paint around the edges as I went. I did this on all the panels, and glued them to the box once they were dry. I also attached a hinges and clasp fastening .


 To decorate the box I stamped out a few of the Bees ( this stamp comes with the honeycomb background stamp) using black archival ink. I then rubbed a small amount of yellow paint over the top and coloured them in using Pitt pens before cutting them out.


 I then grouped together some different flowers, some were paper flowers from my stash, which I sprayed with a blue pigment mixture, Squeezed orange dylusions spray and and tarnished brass distress spray. Others were made from wax, brown and book paper which were stamp on using distress inks, the Grid Background and Calligraphy Mat 2.


As I was trying to use all all my chip board scrap I made some dividers for inside the box, decorating them in the same way I decorate the box, just swapping the fresh lime and vibrant turquoise paints around.


Once I had all my flowers, Bees and some extra embellishments from my stash together, I arranged them on the top and front of the box glueing them in place with my glue gun.


Thank you for reading
Gemma (InkyKitty)

Friday 13 November 2015

Follow your Heart Journal page by Shilpa

Hello Everyone,
Shilpa here,

I love to create journal pages with my favourite Artistic Stamper Stamps..its very relaxing !

(Click on image to get bigger image view)

here are steps I followed,
1. Adhered book and graph pages on my journal page.
2. Applied base coat of white gesso.
3. Applied Dylusion paints - Lemon Zest and Vibrant turquoise randomly on the surface with babywipe.
4. I used square from Decay stamp set  to print squares at the left.
5. I also stamped small Numerical at the corners of pages, that stamp image is from Katy Leitch designed Numerical plate stamp set.
6. Next I stamped Flower vase with Blossom small size stamp on another watercolour paper and coloured it with markers and Dylusion paint.
7.I also stamped small flowers directly on page and coloured them.
8. Lastly, I added the sentiment.

 Hope you liked my journal page and got inspired to try these fabulous stamps from Artistic stamper.

Thanks so much for stopping by.


Products Used from Artistic stamper: