Friday 30 March 2012

***CREATIVE TEAM CALLOUT***

We are looking for you!
 Have you got the stamping bug? Have you got creative tendencies that are not being fulfilled? Have you got time? We are looking for you to join us on our travels around the wonderful world of The Artistic Stamper!
You will have the opportunity to create gorgeous artwork and showcase it amongst our talented Creative Design Team.  If you are that person, then contact us by email, and show us your ART!
The Creative Team call out ends on April 30th, and we will contact you after that date.
So....
 We are looking forward to finding you!
Jennie, Emma, Alison, Sioux and Kat
xxx

Wednesday 28 March 2012

Getting Messy by Sue West

I can't believe how quickly March has whizzed by, and that it's time for my third and final post as guest designer here at the Artistic Stamper Creative Team, and I am going to let you peek into some of my art journal pages.

For me one of the joys of keeping an art journal (actually I should own up to having four on the go) is that they allow me to play around with supplies that I am not always quite sure what to do with, or how they will work together.  At the moment I'm using a big sketch book, an old hardback book that I'm slowly altering and a couple of Moleskin journals for specific projects.

The first pages are from my big sketch book, and I've found that if the pages are a bit thin Mod Podge them together, and I nearly always gesso my pages, it makes the paper you are working on a lot more forgiving.
The background for this page is acrylic paint that is swiped on with a baby wipe (much easier than washing brushes). I have used the Swirls Splats and Dots stamp, and Journaling Words #1 to create my bubbly images, using Adirondack Inks in Pool and Lettuce. and the gold circles are a Gold Acrylic paint dabber, the words are stamped in black Archival Ink.  The Adirondack ink takes an age to dry on the acrylic, and takes on a slightly faded and textured quality, using a heat gun will help a bit in the drying process, but don't get the acrylic and gesso too hot or it will start to bubble up randomly.  The collage image is from my stash, and the wings are made from Tim Holtz tissue paper, that has been edged with some of that gold paint dabber.

For the second page I used Neocolour II water-soluble wax pastels (they look like wax crayons) which I scribbled over the page and then magically turned into a watercoloured background with a wet paintbrush. This time I've used acrylic paint to stamp the Splats and Swirls, and the words are from that same Journalling Words #1 set again stamped with Archival Ink.
Have some fun making paint splats using slightly watered down acrylic paint. The more random the better, though make sure you cover up the surrounding area, because if you're anything like me the splats won't just go on the page.

Finally here's a page from a travel themed journal that I'm making in a Moleskine notebook.  This picture reminded me of my Grandma when she used to go off on holiday with her pals in the 1960's. I'm not sure if she ever ate moules et frites or drank wine, but who knows? This page has been sprayed with Adirondack Colour Wash, which has run down the page ( and been mopped up at the bottom with kitchen towel) before using Archival Ink in Aquamarine and Black for all stamping. I've used the Travel Words and Labels  stamps on this page.

I really like having little bits sticking out of my journal and tags that I can write things under. Actually I just love journaling, and if things don't work out I can just cover them up with something else.  Have fun!

And thank you to Jennie and team for having me...
Sue x

Sunday 25 March 2012

Wishes by Alison

Hello Stampers! Today I have a grungy hanging piece to share with you.


I took a piece of corrugated card, tore most of the top layer off, then painted it with gesso. When this had dried, I sprayed it with stream Adirondak color wash. I dried this with my heat gun, then spritzed with heirloom gold perfect pearls mist.

Next I cut a rectangle of burlap, frayed the edges, then sprayed with expresso color wash & gold perfect pearls. I dried this with my heat gun, then glued it to the corrugated card.

For the main image & butterflies, I coloured a piece of glossy card with alcohol inks. I used aqua, cloudy blue, willow, citrus, pool, sailboat blue, & a dot of silver mixative.

I used the Sizzix ornamental die to cut my centre piece, stamped the Tim Holtz phrase using jet black Archival ink, then edged it with a gold krylon pen. I used long fasteners to attach it to the burlap.

I stamped & gold embossed the butterflies from the Insects & Butterflies plate, then cut them out. I added Ideaology game spinners as their bodies with long fasteners.

Finally, I attached a length of link chain to the top, with brads.

Thanks for looking,
Alison xox

Saturday 24 March 2012

Blog Candy & a little competition!

Hi,
This is just a very random, spur of the moment blogpost from the Boss! Over on my blog I have a giveaway of one of our new sets of stamps, and one of my tags!

Borders A6 #2

To win these, post a comment here and on my blog for double bubble, and if you fancy being a detective too for the day, join in our mini competition to find the mistake on one of our new sets of stamps! All the details and a clue are on my blog....
And a  little heads up to watch this space for exciting new coming your way next weekend... :))))
Have a very creative and sunny weekend
Hugs
Jennie

Thursday 22 March 2012

Love Life by Sioux Jenneys

I'm here to share a card with you today :)


1. Cut some plain white card into a 4 inch square, another 4 and two eighth inch square and lastly another 4 and five eighth inch square......ink the edges of the largest one with Distress Ink faded jeans 

2. Place your selected word stamps together on an acrylic block....I chose a mixture from Journaling Words and Creative Art Thoughts....and randomly tap different colours of Distress Ink over them all...

(I used Distress Ink faded jeans, worn lipstick and aged mahogany on mine)

....then liberally spritz with water and stamp onto the card.
It never fails to impress me how cool this effect is ;) 

3. Colourise the edges with Distress Ink vintage photo and gradually work it into the centre.

4. Stamp one of the swirls from Swirls, Splats and Dots A4 size in Distress Ink vintage photo all around the edges using first and second impressions.

5. Layer the stamped focal square onto the larger white square and then onto the last blue mat and attach to the card front.


See you again soon!
xoxo Sioux

Tuesday 20 March 2012

Nature's Little Helper by Emma

Hello everyone!

It's already time for me to share my second post of the month and I decided to make a little hanging plaque to celebrate Spring arriving, using one of the gorgeous Mabel Lucie Attwell stamps as my focus point.
Here's how I made it ~

To begin with I stamped the Mabel Lucie Attwell image, Nature's Little Helper onto watercolour paper and coloured it using Distress Marker Pens (which incidentally are just the best pens I have ever owned ~ I love them!!). I scribbled some colour from the pens onto my craft mat and then hand painted the image using a waterbrush. Next, using Tim Holtz's Cabinet Die from Sizzix, I die cut a piece of chipboard and adhered my finished artwork onto this.
I then took a piece of corrugated cardboard from an old box and once again, used the Cabinet Die, together with the Movers and Shapers Mini Cabinet Die inside, I die cut the cardboard to make a frame. I used the Gold Metallic Paint Dabber over the frame, brushed some Vintage Photo DI over the edges for an aged look and then covered it with Rock Candy Crackle Paint. Once it was dry, I added the frame to my artwork. 
Next, I stamped six of the smallest of the flower shapes from the Flower Power Stamp Plate onto Grungepaper, blended Seedless Preserves DI over them and then shaped the petals into two 3D flower blooms. 
I used the Mini Tattered Leaves die to die cut leaves from a sheet of clear Clearly For Art and blended lettuce Alcohol Ink over the top, before moulding them into shape. I then added the finished elements to my frame, together with a decorative pin.
With the Movers and Shapers, Mini Butterflies die, I cut two butterflies from some more of the Grungepaper, blended Ripe Persimmon and Seedless Preserves DI over the shapes and adhered them to my frame. I inked up the "Creative" stamp with black Archival ink, stamped it onto a piece of card, blended Antique Linen DI over the top and cut it into a banner shape before adding this to the finished artwork.

Finally, I punched a hole in the top of the frame and added some twine, tied into a loop so it will hang.
So, that's about it from me for today...I hope you feel inspired to get inky and start creating. Don't forget that we would love to see your creations in our TRAVEL challenge ~ you have until the end of March to submit your entries.

See you again very soon!
Bye for now.
Emma x

Sunday 18 March 2012

Learn To Pause by Alison

Hello Stampers. I've a little card to share with you for my second post of the month.


I don't know about you, but I'm loving the Crafter's Workshop Templates at the moment. I started the background for this card the other day. I'd spritzed a turquoise background for another card, then turned my template over, onto another piece of card, thus creating a reverse image. I then added some Crafty Notions Tangilicious accents through a circle template.

I inked the background with Vintage Photo Distress Ink, then stamped a script background, using the same ink. I distressed the edges with a Tonic Paper Distresser, then inked them with the Vintage Photo ink.

Next, I stamped competition winner Laura Liddell's fab Sneakers, onto my background. I stamped them again, onto white card, using Black Versafine ink, then clear embossed them. I inked them with Vintage Photo, then cut them out & glued them to my background.

I stamped the phrase from Tim Holtz's Just Thoughts plate, onto white card, cut the individual words out, inked them with Vintage Photo, then glued them in place. Finally, I added my artwork to a square kraft card blank.

Thanks for looking,
Alison xox

Friday 16 March 2012

JOURNEY PLAQUE By Kat

Hi all,
Kat here, with a rather Quick project & post for you,
I don't know were the time is going lately,
one minute it's January, the next it's mid March,
the days have gotten away from me again LOL

Here is my project, I hope you like it!
As you can see it's quite a quick little project,

I used a little wooden frame as my base,
I covered it with Tissue Tape
over it, & stamped the tiny diamonds over the top
in Coffee archival ink then smudged it in
a bit with my finger to fade it into the background.

On a scrap of card cut to the size of the aperture,
& blended the same colours all over
I then stamped the wording in jet black archival ink
which is a Tim Holtz stamp,
I stamped the men the same way &
cut them out from a scrap piece of card
blended the same DI's & stuck them down with foam pads,
I added silver screw top brads to finish.
Hope you like it!
I'll be back with another project
at the end of the month,
I'm off now to frantically try to find
the days that have gone missing LOL.
Kat x.

Wednesday 14 March 2012

Spring Means Butterflies by Sue West

Hello once again.

Time for my second spot this month as guest designer.  With spring in the air I have used the Insects and Butterflies No.1 stamp, which has just got some lovely finely detailed images to use. In fact, I like this stamp so much I have made both a small picture and a notebook.

First of all the picture.
First I stamped a butterfly onto some paper from my stash using Coffee Archival Ink. Next I glued some Clearly for Art to the top of a small  Wendy Vecchi Artpart frame before covering with some more paper which I've sanded and inked with Vintage Photo Distress Ink to give it a shabby look.  Next I attached a mini bookplate to the base of the frame, and slipped in a Latin butterfly name cut from the Tim Holtz Crowded Attic Paperstack.  Then, before gluing the frame to the base I popped in a few sparkly bits and a couple of tiny charms, and made a double loop of twine to hang the finished project.

While I had this stamp set out I also made a small note book as a gift for a friend.
For this I've recycled some packaging from Amazon to make the covers. I cut two postcard size pieces of card for the front and back covers and then cut an aperture in the front cover. Both bits of card are covered with paper, and then I've used a contrasting paper to stamp some more of those lovely butterflies and insects on, again using coffee Archival Ink, and used this paper to line both the front and back covers. 

On the outer part of the front cover I've used the A5 Swirls Splats and Dots stamp, again stamped in coffee Archival Ink. The tiny grass hoppers are embossed in a coppery colour, and the edges of the covers are inked with Vintage Photo Distress Ink.

The inside pages are made from watercolour paper aged with Antique Linen Distress Stain and stamped with more insect images and swirls, splats and dots.
I've used a Bind-it-All to finish off my notebook, but it would work just as well with punched holes and some pretty ribbon to bind it together.  Final finishing touches are some twine tied and curled around the binding rings and some bits of Idea-ology.

Sue x

Monday 12 March 2012

Dance Plaque by Sioux Jenneys

Hello everyone! It's my turn again and I'm here to share an art plaque that I have been playing with :)


1. The base is piece of sticky back cork attached to some grey board and cut with the Mover and Shaper die.

2. The hanging banner bit is cut with the Regal Crest die using grey board which was then coloured with Distress Ink wild honey and over stamped with the Mini Polka Dot background in Distress Ink vintage photo.

3. I stamped and heat embossed the Inspiration jar image onto a matching chipboard shape with copper powder and coloured the lid with Distress Ink black soot and the jar itself with wild honey.

(I find it easier to line up if I lay my stamp on the table face up and apply the chipboard to it)

4. I then stamped the watch from the Watches Set with Archival coffee onto a chipboard shape and applied glossy accents to the watch dial.

5. I then cut one of the tags from Tiny Tags and Tabs using Claudine Helmuth sticky back canvas that had been coloured with a spray of ink and attached to some grey board and stamped the sentiment from the Dance plate in black Archival.

I do like all the different textures.


6.The dancer from the Dance plate was stamped onto some grunge board using black Archival and cut out.

7. I cut some letters from the word die using a piece of cardboard packaging but I forgot to turn it the other way up and was left with some of the printing on the letters but decided I liked the effect and kept it that way and added some colour using Distress Ink aged mahogany and brushed corduroy before applying some glossy accents.

8. Everything was assembled using either glossy accents or silicone glue and an adage ticket was fixed to a memo pin to finish off.


Ooh! Making that made me happy :) See you again soon!
xoxo Sioux

Saturday 10 March 2012

Admit One by Emma

Hello everyone!

I can't believe how fast March is flying by...this year is going so quickly and it's already that time of the month for me to share my latest creation with you all...I hope you like it!
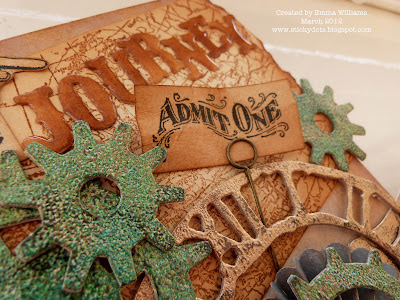
I began by making a box from plain white cardboard, which I covered in Antique Linen and Vintage Photo Distress Stains. Next, I used the Gadget Gears and Weathered Clock Alterations Dies and die cut pieces of chipboard which I then covered in Versamark. I embossed the clock with a gold embossing powder and the gears with, Peeled Paint, Distress Embossing Powder, mixed with a little of the gold powder. To tone down the brightness, I rubbed a black Stazon ink pad over the top of the embossed chipboard pieces.
Next, I inked up the Europe Stamp with Vintage Photo DI and stamped onto a piece of card, which I'd already blended with Antique Linen and Brushed Corduroy DI. I then stamped the "Voyage" wording from the Travelling Words stamp plate and the hand and the "Admit One" ticket from the Tim Holtz Steampunk stamp set onto some more of the cardstock and cut them out.
I made a rosette from some paper in my stash, using the Decorative Strip Rosette and then, together with my embossed die cut clock and one of the gadget gears, I layered each piece to build up my clockface, on the front of the box. I attached the hands of the clock, using a brad from my stash and adhered them in the centre, making sure that they can move around freely.
I arranged the pieces that I had stamped earlier and stuck them onto the box, together with the embossed gadget gears.

Finally, I die cut the "Journey" wording using a Tim Holtz Alterations die, covered them with Glossy Accents and then added them to the front of my box.
So, that's about it from me and thanks for stopping by to take a look!
Don't forget that we have still have our TRAVEL Challenge running throughout March on the blog and we would love you to join in and to see all your fabulous creations.

See you again soon and I hope you have a lovely day, full of creativity.
Emma x

Thursday 8 March 2012

Rustic Bloom by Alison

Hello Stampers! I have a Spring-inspired card to share with you today. Although, since I made it, the weather has turned wintery again! Lol!


I used brush pens to colour the floral image from Botanical Plate 2, then stamped it onto a book page. I tore around the image roughly, then inked the edge with an orange pen.

I inked the leaves with a green pen, then stamped them on the edge of a square kraft card. I added the floral image, stamped 'bloom', wrapped some string around the card, & finally attached a bee charm.

I hope you like my little rustic card, thanks for looking!
Alison xox

Tuesday 6 March 2012

IT'S NOT WHAT YOU WEAR journal page by Kat

Hi all,
I thought I would share another page with you
from my A5 journal,
so straight into it,
here it is.


Here's the list of things I used :-
Distress Inks Brushed Corduroy, Iced Spruce & Victorian Velvet,
StampsLarge Sequin Waste Closed, Speckle, Calligraphic Mat 11, Backgrounds
Swirls, Splats and Dots A5
archival ink Jet Black
further round the edge (Dylusions stamp set)
Alphabet stamps, collage sheets & googled images,
a white posta paint pen.

to start I blended the Distress inks over the page,
then stamped with the same colours,
I then stamped the border stamp top & bottom of the page
with jet black archival ink, then coloured the dots with a paint pen,
next I put together the art doll & doggies with various
collage sheets & images off the net, then glued them to the page,
I stamped the words out onto scrap paper,
cut them out & glued them to the page.
& lastly I drew the leads to the dogs.


That's it,
Hope you like it!

See you next time,
Kat x.

Monday 5 March 2012

Butterfly Art by Sioux Jenneys

Heavens above it's March already!

So here I am with a little inky card to share:)


1. I stamped the butterfly from Insects and Butterflies 1 in Distress Ink aged mahogany onto a piece of square card and coloured it with a touch of Distress Ink vintage photo and masked it.

2. Stamped the Europe Map background in Versamark and heat embossed with copper powder.

3. Lining up a straight edge of paper against the map edge I coloured the map with Distress Inks in faded jeans and shabby shutters using an ink blending tool.

4. Remove the straight edge and leaving the butterfly mask in place stamp the word "Art" from Creative Art Thoughts in Versafine black.

5. Age the edges all around using an ink blending tool and Distress Ink vintage photo before stamping a couple of flourishes from Swirls, Splats and Dots A5 size in the same ink in the top corner. 

6. Cut a piece of white card 4mm larger than your stamped piece as a mat and another one 4mm larger again and colour this one with the ink blending tool again using Distress Ink black soot.


I have not added a sentiment as yet but left room under the image stack...

...this is going in my stash for when just the right occasion comes along :) 

See you again soon!
xoxo Sioux

Sunday 4 March 2012

Winner of the February Challenge

Hi, it's the Boss back again this month with the winner of last month's Hearts challenge. Wow!we had some absolutely gorgeous entries, and I loved them all. Thank you for joining in.
Of course, we have to have a winner, and Mr Random.org chose no 70 who is


with this wonderful creation.


Stacy, please email me, so we can arrange to get your prize to you :)
Don't forget to join in this month's challenge which is TRAVEL
We always look forward  to seeing your art.
Have a very creative day
Jennie

Friday 2 March 2012

Wax doesn't have to hurt by Sue West

Hi everyone.  I'm really excited to be guest designer this month at the Artistic Stamper Creative Team, and to be able to share some of the fun I've had using just a few of the great stamps that Jennie produces. For my first piece I have used the Airmail Bird Collage Elements stamps. I just love that raven. 
Guess what. I made a collage.
I love any excuse to get painty, inky, gluey and dig out my meltpot and beeswax.


Here's the supply list for my collage.
Airmail Bird Collage Elements stamps
6 x 6 deep edged canvas
Ranger Studio Multi-Medium (matte)
Vintage maps and sheet music and postage stamp
White and manilla cardstock
Ranger Archival Ink  - Jet Black, Cobalt, Vermillion
Ranger Distress Ink - Vintage Photo
Acrylic paint ( I used Golden Fluid Acrylics but Adirondack Paint Dabbers would work really well)
MeltPot
Clear UTEE
Natural Beeswax
Designer Metal (gold leaf)
Ranger Distress Embossing Powder - Fired Brick
Vintage pen nib
Crown

To get started collage the vintage papers onto your canvas using multi medium and when dry use your paints sparingly to highlight interesting bits of the background and the if it all seems a bit bright scrape some creamy coloured paint over the entire surface with an old credit card. This only needs a tiny amount of paint. ( Claudine Hellmuth Traditional Tan acrylic would be perfect for this. I have also painted the edges of the canvas dark brown. It's best to do this now as if you get wax runs over the edges the paint never really adheres properly. I have pulled the brown paint just over on to the front of the canvas as I like the vintage look this gives.
Using Archival Ink for all your stamping (so it doesn't run). Stamp the postmark onto tissue and the raven and the words onto thin white cardstock or paper.
I've used Vintage Photo Distress Ink to colour the edges of the bird words and also the air mail element.
Now it's time to get out your Meltpot. First I made the UTEE heart by dissolving Fired Brick embossing powder in some UTEE and the pouring into a tiny cookie cutter. I don't worry about little bubbles as I think it just makes it look more vintage.  Dab the pen nib with black acrylic paint to age it.


Next melt your beeswax and having decided where you want your various collage elements to go apply the wax with a natural bristle brush and use your heat gun to keep it liquid if you need to get rid of brush marks. ( Personally I quite like to leave little dribbles and runs of wax as it all adds to the texture, and I just love the smell of that hot beeswax). I decided not to completely cover the script with wax and left the edges curled up  and got a semi-translucent look where the wax was in contact with the paper, again just adding extra texture.
The pen nib, heart and crown (cut in half) all embed into the wax with no problems.

Finally (and completely optional) I applied a sparing coat of multi-medium one edge at a time  and dabbed on gold leaf, which only adheres in some places and looks really old, especially if you then seal it with some more multi -medium that you thin down slightly with  brown paint and some water to make a wash. This gives a lovely grungy look.

If you've never tried beeswax collage have a go. It's great fun. And when you've finished your art and the wax has really solidified just buff, buff, buff with a soft cloth and you will get the most amazing sheen on your work.

Thanks for looking and see you soon.
Sue x

Thursday 1 March 2012

March Challenge ~ TRAVEL

Hi everyone and welcome to a brand new challenge for March!


Thank you for all your fabulous entries to last month's challenge. The lucky winner will be announced in the next few days, so make sure you check back to see who it is.

This month we are welcoming the very talented Sue West as our Guest Designer and we are all really looking forward to seeing the wonderful artwork and creativity that she will be bringing to the team.

The new challenge for this month is all about TRAVEL and to join in with this challenge is simple; make a piece of artwork, include the theme and some rubberstamping, pop back here to link up using the Froggy at the bottom of this post, so that we can see what you've made and then, leave us a comment to let us know you have joined in. As ever there will be candy for one randomly picked entrant - £15 worth of The Artistic Stamper stamps of your choice plus the Kling On to mount them onto. And... if you use Artistic Stamper stamps on your entry, you will be entered twice into the draw! 

Before you start creating, just take a look at our Creative Team's stunning creations for this month's challenge.


Sioux used the cycling image from the "Open Road" plate, the graph paper background and the sentiment to make a CAS card.


Alison stamped the Journey sentiment in a rainbow of Distress Ink colours, stamped the Mini from the Cars Plate in black, then coloured it with distress inks. She stamped the Europe Background onto Kraft Glassine paper, crumpled it, then rolled it up to make a map, adding string & a philosophy tag.


Kat has uses for her tag, distress stains Tattered Rose, Frayed Burlap & Tea Dye, Distress Inks Antique Linen & Vintage Photo, all the images are stamped with archival ink Coffee, & the stamps she has used are all Tim Holtz with the exception of the Small Cogs & Stipple background Kat has added a piece of torn map & a couple of memo pins & finished off with some string through the hole of her tag.


For my challenge piece, I used a Manila tag and dragged Weathered Wood and Antique Linen Distress Stains over it and then heat dried it. Next, I inked up the Eiffel Tower, Tim Holtz stamp from my stash and stamping directly onto the tag. I made up two blooms from Grungepaper, blended with Tumbled Glass DI, using the Flower Power Stamp Plate and also stamped and coloured some leaves from the same stamp sheet. I added a quote from the Traveling Words Stamp sheet and attached it to my tag with a Idea-ology Hinge Clip. Finally I added some vintage ribbon, dyed with Weathered Wood Distress Stain.

We're really looking forward to seeing your interpretation of our theme and all your wonderful creations in the challenge this month and please, don't forget to add a comment when you post your entry.

That's about it from me for now...thank you for looking.
Hope you all have a happy and very creative month.
Emma x