Showing posts with label Guest Designer. Show all posts

Sunday, 13 September 2020

A Few Stitches by Christine Bedford


Hi everyone, Chris here, I have one more make for this month's 'A Stitch In Time’ theme at The Artistic Stamper.  

 I am staying with flowers - this time Debs Smith's Big Flowers and Quotes set. 

I used to do a lot of Needle Felting a few years ago, now it is a once in a while activity, but when I saw this big flower I just had to use it.

I started by stamping it onto a square of hessian like fabric.

I had to enlist hubby's help for some of my photos 

Next came the start of my Mug Rug - Using a variety of different greens

If you have ever done needle felting you will know it's best to keep your fingers out of the way!

Once I had everything ready I stamped the flower again so that I could see where to sew the stamens

I used a gold thread which was quite difficult to sew but worth it for the shimmery effect!

I considered blanket stitching the edges but must admit to like this fluffy finish!


Here is my Mug Rug all ready for use later!

It has been a pleasure to be here at The Artistic Stamper and to practice my stitching once again.

 Thanks for looking, Chris

Wednesday, 28 May 2014

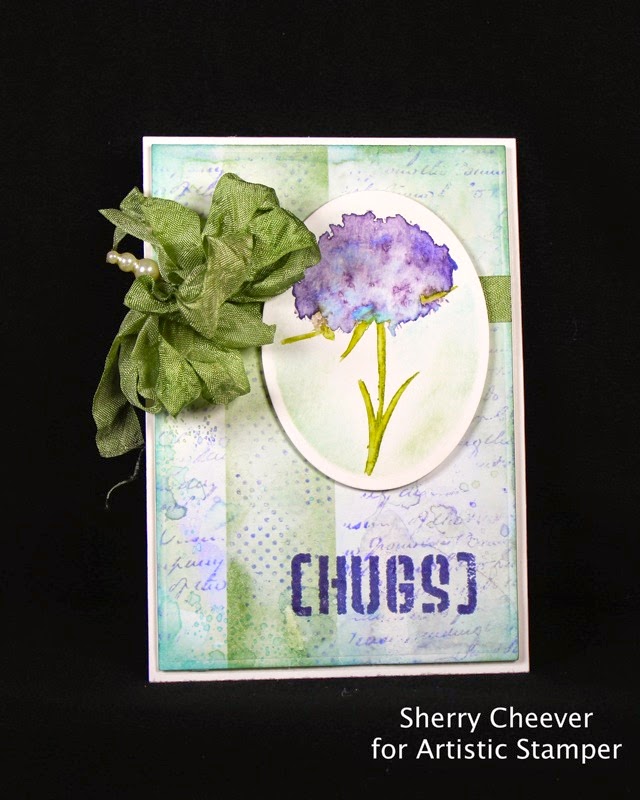
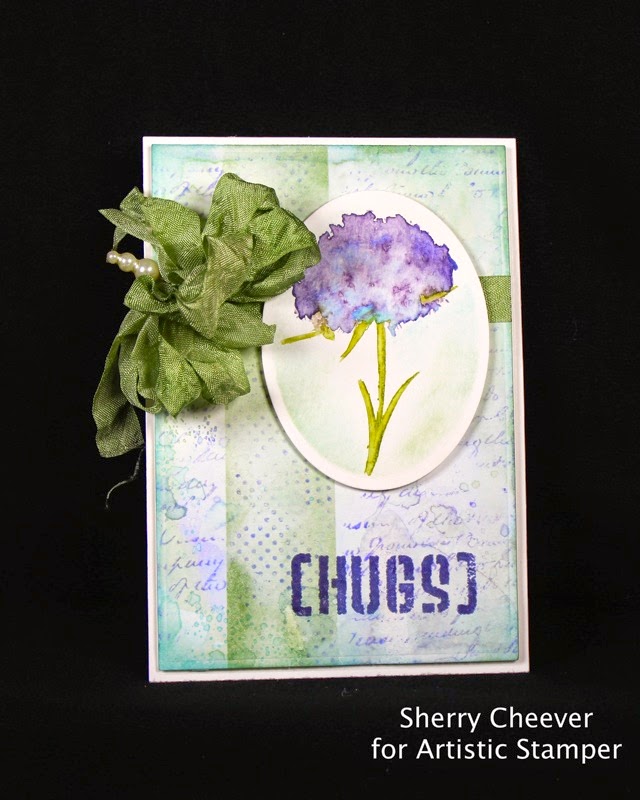
Hugs by Guest Designer, Sherry Cheever!

Hello!  Sherry Cheever here again with my final post as Guest Designer.  First, I want to say how much I’ve enjoyed being here with you and in particular want to thank Jennie for asking me to be a guest designer!  It’s been a blast!

My project today is a stampy one.  I’ve recently felt the need to get back to my stamping roots and wanted to finish up here with a project that included mostly stamps.

HugsCard

The first step for me in assembling this card, was the flower image.  Actually, I had a different vision when I started and once I stamped the flower I couldn’t make myself do it.  I liked it so well, that I couldn’t mess it up and decided to die cut the image with an oval die template.

HugsCardCloseUP

The flower is one of the images from Botanical Plate 1.  The image was colored with Peeled Paint and Dusty Concord Distress Markers, misted with water and then stamped on watercolor paper.  Using a water brush, the ink was colored in and touches of blue were added to the flower with Tumbled Glass.  While the image was still in the die template, the edges were sponged with Bundled Sage and Tumbled Glass Distress Inks.

The background for the card was made with the Wrinkle-Free Distress Technique and water color paper.  Colors used for the background were Bundled Sage, Shaded Lilac and Tumbled Glass Distress Inks.

Once the background was dry, painters tape was used to mask off a line down the page.

Hugs Card Step1

Using the tiny dots from Mini Backgrounds 1, the image was stamped down the center with Shaded Lilac.   While the tape was still in place, Bundled Sage was sponge over the stamped area.

Hugs Card Step3

The stamped line was then masked with painters tape

Hugs Card Step4

and the Calligraphic Mat 11 was stamped over the remaining background with Shaded Lilac.

Hugs Card Step5

“[Hugs]” from Grungy Greetings 1 was stamped at the bottom of the page in Hydrangea Archival Ink.  (my daughter jokingly said it looked like chug . . . if so, tip one back for for this BAD girl!)

HugsCard

Bundled Sage was used to dye the seam binding ribbon, which was attached to the background layer before it was affixed with foam tape to the card base.  The image was then mounted on the front with foam tape for more dimension.

Thanks for stopping by and joining me!

SHERRY SIGNATURE


Wednesday, 14 May 2014

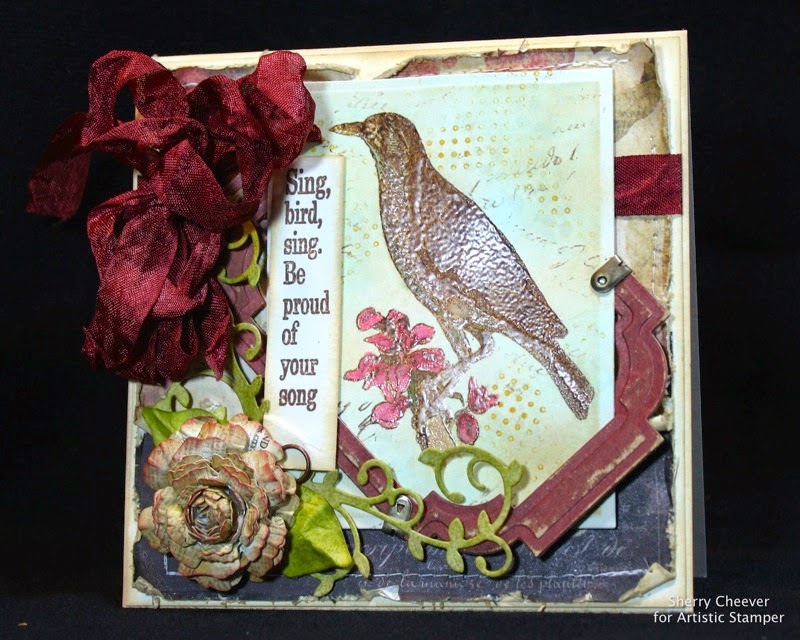
Birdsong - Be Proud of Your Song by Sherry Cheever!

Good morning!  Sherry Cheever here with you again and I have a 5.5 square card using Birdsong Elements to share with you today!

SingBirdSing

The bird image was stamped in Gathered Twigs Distress Ink and embossed with Clear Super Fine Embossing Powder.  The image was then watercolored using Distress Markers in Barn Door, Fired Brick, Aged Mahogany, Peeled Paint, Tumbled Glass, Scattered Straw and Frayed Burlap.  After water coloring, the image was detailed with an embossing marker and embossed again in clear embossing powder.

SingBirdSingCloseUP

After embossing the image a second time, the background was airbrushed with alcohol markers then over-stamped with Mini Backgrounds #1 and Calligraphic Mat 11 using Dandelion and Tree Branch Ranger Archival Inks and Snow Cap Pigment Ink.  The image was die cut/embossed with a rectangle die template and while the paper was still in the die, was sponged with Tumbled Glass and Antique Linen Distress Ink.

A frame was made for the image using designer paper that was glued to chipboard and then die cut/embossed with a labels die template.

The sentiment was stamped in Archival Ink and mounted behind the flower with an Idea-ology Fastenings Memo Pin.

SingBirdSingFlower

The flower, leaves and vines were die cut from coordinating designer papers with a blossoms and foliage die templates.  The leaves were colored with Peeled Paint Distress Ink and the edges of the flower were sponged with Antique Linen and Fired Brick Distress Ink.

The ribbon is seam binding dyed with Distress Ink.  I found it in my stash, thought it matched the card, but I don’t remember what color it was dyed with.  If I had to take a guess, I would say Aged Mahogany.

SingBirdSing2

The designer paper used for the background was distressed using Tonic scissors, sponged with Antique Linen and sewn to a cream colored base, which was then attached to a cream colored card.

That’s all for today; thanks for stopping by and joining me!!

SHERRY SIGNATURE

Sunday, 4 May 2014

Guest Designer - Sherry Cheever

Good morning!  Sherry Cheever here today and I can’t begin to tell you how excited I was when Jennie asked me to be the May Guest Designer.  I have followed the Artistic Stamper’s Creative Team for years and love all their work.  I’m thrilled to be here for the month!

My first project for the month is a frame that I have altered using Graphic 45’s Botanical Tea Collection and Botanical 3 A5.

Frame C1

I started with a plain wood frame purchased for $1 from a local craft store, which was painted with linen acrylic paint.  The page Birds of a Feather from the Botanical Tea Collection was glued to the frame using Ranger Glue ’n Seal.

Frame 1

The excess paper was sanded away using my favorite sanding tool, a cheap nail file from a discount store.

Frame 2

After the paper had been completely removed, an antiquing solution using white acrylic paint and an antiquing medium was applied to the sides of the frame and the paper.

Frame Antiquing

After antiquing, the sanded edges of the paper were sponged with Antique Linen Distress Ink.

Frame 3

Flowers were die cut from the Sweet Chamomille and Herbal Infusion pages.  The edges of the rose were sponged with Stormy Sky Distress Ink and then shaped with a stylus.

Frame Rose

The sentiment from  Botanical 3 A5 was stamped on cream card stock with Ranger Archival Ink Cornflower Blue.  The flowers were assembled and glued to the top of the frame.

Frame Sentiment CloseUP

The sentiment was mounted on another piece of coordinating paper and raised within the frame opening with foam mounting tape.

Frame C2 Angle

That’s all for me today.  Thanks for stopping by and joining me!

SHERRY SIGNATURE

Sunday, 2 March 2014

Phineas Pinchbeck Steampunk Shrine with Linda Cain

Hi, Linda Cain here for a fun time on the Artistic Stamper's Blog with a little tutorial using a Steampunk Shrine Kit. I was really thrilled when Jennie asked me to be a Guest Designer. So let's get started!

 
I LOVE the Fresco Chalk Paints from PaperArtsy, so that's what I use here. 
 
 
These kits are from Masonite and so I lay the pieces out and base coat with Stone paint. The great part is you can paint and stamp on a flat surface, then glue it together! Pretty cool!

 
The next layer is with Pumpkin Soup, Tango, Autumn Fire and Blood Orange. Just a touch of Brown Shed is tapped here and there.

 
I used Mermaid, Bora Bora, Beach Hut and Inky Pool on the other sides that will become the outside surfaces. I added a bit of Guacamole on the edges. Don't be too picky as your backgrounds are going to be covered up with LOTS of STAMPS! 
 
Now comes my favorite part! I get really excited when I see how awesome the Jet Black Archival Ink shows up on the colorful backgrounds!!! The tiny gears from the Borders fill in the spots, and Numbers go on the sides.
  
I'm all about Numbers...they just do something for me.
 
 
 I flipped the pieces over and stamped the outside pieces. I absolutely LOVE this Sequin Waste stamp with Goose Grease! Another Border stamp fills in the edges around the Winged Wheel.
  
Using small stamps from the Numerical Plate on the propeller and a 45 in the gear will add some interest. The Calligraphic Map is stamped on the top piece of the Shrine and white pen marks are added for more contrast.
 
 
After you glue this together with a small amount of glue, you can see how cool the stamping is on the back.
 
I added a Screw Eye to the side and 3 Gears hanging with Jump rings.
 
 
I glued vintage labels to 2 Apothecary Bottles with Glue-n-Seal.  A Label Clip fit perfectly on the front, and the Clock Key looks good in the middle of the gear stamp. I used a Dremmel to drill the hole for the key.
 
 
White pen marks along the edges make the colors pop.
 
So, that's it for me for today. I'll be back again later in the month with another project using these wonderful stamps from
The Artistic Stamper!
 
Your Friend in ART,
Linda
 
 
Artistic Stamper stamps:
Numerical Plate A5 - Katy Fox
 
Other Products:
Crafter's Pick The Ultimate White Glue 

Sunday, 2 February 2014

Whispering Woods by Laura Bomber

Hi everyone!

I am so thrilled and very proud to be invited to be Guest Designer here at The Artistic Stamper - Thank you so much, it is a huge honour! I spent ages trying to decide what to make and several times the projects evolved, but that is all part of the creative journey and definitely a major part of the fun!
 
My first creation I am bringing you today started out as just some packaging - plain corrugated cardboard. I now save every piece of cardboard intending to turn it into something. Torn cardboard packaging might be a very humble beginning - but it can turn into a very beautiful creation.

 I wanted to create a very earthy, grungy creation and started by tearing the corrugated cardboard and leaving some of the edges looking very torn and ragged.

 I dry brushed Gesso all over the cardboard and then began to just randomly spray Adirondack Colour wash over it using the Butterscotch and Espresso colours. After drying the spray I began to dab the cardboard with Walnut Stain Distress ink.

The Adirondack spray gave a lovely textured effect and the result was very much looking like rotted wood - sounds disgusting- doesn't it? - but it was a really lovely organic looking canvas - which is just what I wanted.

Here you can see the wonderful speckled effect created by the ink sprays
The base of the hanging was randomly stamped with the Calligraphic mat in Potting Soil Archival ink
 
I made three panels as decoration for the hanging .One was stamped with butterflies using Coffee Archival ink. The images were then masked before being stamped with a script stamp. I blended some Distress inks over the stamped image - Brushed Corduroy, Walnut Stain and Vintage Photo. I then dabbed some embossing ink over the panel, covered it with UTEE and melted it to resemble glass.
After a second layer of UTEE I put it in the freezer for about 5 minutes. After this it was much easier to bend and snap. I then dabbed it with some Walnut Stain Distress ink to highlight the cracks.
 This panel was wrapped in twine which was then tied into a bow

The other two panels were covered in Gesso and then dabbed with Distress inks like the base.

Waxed Kraft paper was ripped into strips and used on the panels
The butterfly quote was stamped with Coffee Archival ink and edged with Walnut Stain Distress ink. I purposely caught the edges of the stamp with the archival ink to give a more vivid edged effect.
The Tim Holtz Bookplate was used with a chitchat sticker attached to a piece of card covered in Gathered Twigs Distress Ink
This panel was covered with a calligraphic script in Potting Soil Archival ink

This panel was stamped with one of the Insect and Butterflies stamps in Potting Soil Archival ink and the calligraphic stamp was used around this image.
Burlap sheets and trimmings were used to decorate the hanging, along with crochet lace that had been dabbed with Vintage Photo Distress ink
 
Several paper flowers were soaked with watered down Distress Stain in Frayed Burlap and Vintage Photo.
Tim Holtz Hinge fasteners were used at the top of the panel and twine was tied around then so that it could be hung up.

 
Thank you so much for being here to see my first guest design creation - I loved making this and I do hope you like it! I'll be back later this month to share with you some more creations - I do hope you will come back to see them.

Happy Crafting!
Laura xxxx

Artistic Stamper stamps:
Calligraphic Mat 6
Butterfly words
Insects and Butterflies No.1

Other items used:
Distress Stains - Frayed Burlap and Vintage Photo
Distress Inks - Gathered Twigs, Vintage Photo, Brushed Corduroy and Walnut Stain
Adirondack Colour Wash - Butterscotch and Espresso
Archival Inks - Coffee and Potting Soil
Claudine Hellmuth Studio - Gesso
Tim Holtz - Hinge fasteners