Tuesday 21 July 2020

T.T.F.N by jane

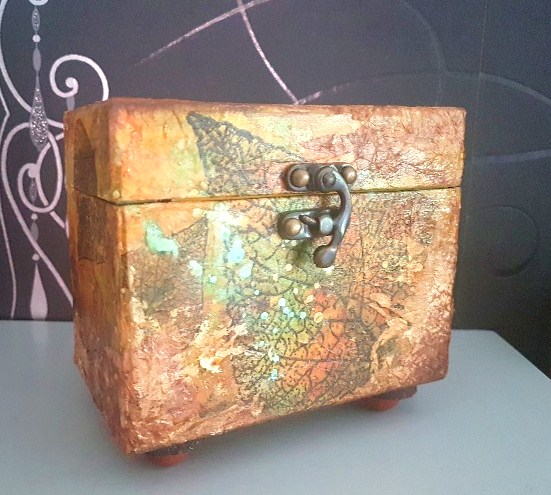
For my final project, not just for this months challenge, but for my term on The Artistic Stamper Team, I have chosen to do something similar to a project I made that was featured in The Craft Stamper magazine a while back. This starts off life as an Eileen Hull treasure box, and after a few distressing techniques and some stamping with the SKELETON LEAVES stamp set, a couple of half beads for feet, I have made myself a little box to fill with whatever I choose.


If I had to choose my favourite make from all the ones I have done while being on the team I would have to say it is this card, that I actually framed and is sitting on my lovely table surrounded by lots of photos of my two gorgeous grandsons.


So all that is left now is to say a huge thank you to Jennie for having me on her team, I have thoroughly enjoyed it and loved seeing all your fabulous creations. Keeeeep Crafting, and I will see you all round social media and blogland. Ta Ta for now.


Sunday 19 July 2020

Where my home is now, AJ page by Tibelsoeur

Hello everyone,
This is an art journal page I have made during social distanciation in France, when I was shooting tutorials making my Confinart Journal. Here is the link to the related playlist : Youtube Confinart Journal
This very page was shot here Confinart Journal 6.3 showing you how I use The Artistic Stamper Tit Belsoeur Stamps
This is a very simple way to make quick and nice pages. Anyway, this is where my new home is and I am so happy to live by the seaside...


Thank you so much for visiting, I hope I have given you some inspiration to 
participate in our 

You may visit my dedicated folder : Titbelsoeur stamps @ the Artistic Stamper
Happy creating and thank you for your comments,

Titbelsoeur


Wednesday 15 July 2020

Winner of June's Creative Challenge

Hello!
One of the pleasures in my life of crafting is looking at the gorgeous creations created by other people.
A huge thank you to everyone who joined in our Creative challenge last month.
I have to choose one of the participants to join us in September on our blog.
We loved this creation by

Please contact me so we can arrange your prize.
This month's Challnege is In the Home, and can be found here
We look forward to seeing your creations
Stay safe, and keep crafting
Jennie x

Monday 13 July 2020

Ballerina Mixed Media Card by Karen Sessions

Hello Crafters, Karen here to share my final post.

I have enjoyed my time creating two projects for The Artistic Stamper's Blog.  I especially loved working the swirl background stamp (Tracy Scott Background 8) because it is so versatile.  I previously used the design to create the sky/clouds of a scene.  For this project, the swirls added texture and the sense of energy in motion that suited the dance theme.  Lastly, I cut out individual swirls to create independent embellishments in a contrasting color.  (TIP: I feel they also can resemble flowers and could easily be used as a modern rose design...but that is a future project!) 

Directions:

1.  Lightly load your brush with silver acrylic paint.  Gently swipe the brush across the black paper with vertical strokes.  Less paint is ideal for this so that the brush is nearly dry and will create faint drag marks with the bristles.  The goal is to add texture not to achieve complete coverage.

2.  Apply a thick coat of white texture paste to a small area in the lower portion of the card which will slightly overlap the silver brush strokes.


3.  Gently place an un-inked background stamp on the wet texture paint to make an impression.  Carefully, remove the stamp.  Apply more texture paint to the stamp (instead of ink) and randomly stamp the background pattern to three distinct areas slightly overlapping the silver paint.  Then set the project aside to dry and thoroughly clean the stamp before continuing.


4.  Stamp the dancer silhouette with watermark ink onto transparent acetate.  (TIP: wipe the acetate with an anti-static cloth before stamping to prevent grains of embossing powder from sticking to unwanted areas.)  Apply black embossing powder, remove the excess powder, and heat set.  Carefully, cut around the image.  Stamp the dancer's costume in a coordinating color, cut it out, and adhere it to the dancer's body.  To create the dancer's tutu, gather a small strip of tulle (1.25x8") with a needle and thread.  Apply glitter glue sparingly to the tulle for extra sparkle.


5.  Stamp two flowers with red ink onto white cardstock.  Apply red water color crayon generously color near the middle of the flower and use a waterbrush to blend the color and shade the petals leaving it darkest in the center and petal folds.  Carefully cut out the flowers and layer them with a bit of foam tape separating the two flowers.  Gently bend the petals to create a more realistic flower.   Apply liquid adhesive to the center of the flower and apply micro-beads.  Set aside to dry thoroughly.


6.  Use black ink to stamp sheet music image onto parchment.  Apply clear embossing powder, remove the excess powder, and heat set.  Use an ink blending tool to age the paper by lightly applying brown ink randomly to the edges.  Next, add more distressing by tearing the edges and inking.  Also, crumple and roll the corner to create a worn and dog-eared appearance.

7. Color the window frame by applying ink to the embellishment.  Gently, place the frame face down on the ink pad and lightly tap the surface.  To ensure thorough coverage repeat applying ink 2-3 times.  Next, apply white embossing powder, tap off the excess, and heat set.  If the texture of the embossing powder is gritty, repeat the process.  Apply another layer of ink, powder, and heat set to achieve a smoother glossy finish.

8. Select some coordinating pattern paper to become the curtain.   Adhere the window to the paper and trim away the overhanging excess.  (TIP:  I used washi tape because the patterns on washi tapes are generally smaller in scale then most pattern papers.)  Next, cut two banners from coordinating paper. 


9. Stamp the spiral background design onto acetate and heat set with red embossing powder. Carefully, cut out individual spirals and attach them to add layers to the design.  (TIP:  Use glue dots to inconspicuously attach acetate or alternatively, secure transparent embellishments by disguising the adhesive by layering one underneath or partially covered by another opaque embellishment.  aka- camouflage the adhesive through careful placement)


10.  Arrange and cluster all the elements.  Begin staging the largest elements first and then work in decreasing sizes.  When you are satisfied with the placement and layers begin to adhere them securely.   (TIP: The ballerina image is the star of the project and is prominently featured centered and mounted with foam pads.  Most of the other elements are clustered and slightly overlapping.  Finally, attach the smallest embellishments and add a random scattering of silver dome gems for the perfect finishing touch.


Tracy Scott Background 8
Dance Set A5 © Sioux Jenneys

Music Background size A6

Other Supplies:

cardstock (black, white)
transparency
ink pads (black, brown, watermark, silver, red)
embossing powder (black, clear, red)
heat gun
red gelato or watercolor crayon
silver acrylic paint / white texture paste

paint brush / ink blending tool / needle & thread

tulle / micro-beads / glitter glue
silver gems (Dew Drops - The Robin's Nest)

liquid adhesive (Best Glue Ever - ScraPerfect)