Showing posts with label Tim Holtz Alterations. Show all posts

Wednesday, 11 December 2013

Seasons Greetings by Emma


Hello everyone!

Today, is my turn to share here at The Artistic Stamper and for my piece, I've created a hanging ornament. As an alternative to the traditional Christmas colours, I thought it would be nice to have something a little bit different and because I love the look of chalkboard, that's what came to mind and here it is, my hanging chalkboard ornament ~ hope you like it!
To create this, I gave an MDF bauble two coats of Black Soot Distress Paint, allowing it to dry between coats each time. Next, and using the Seasons Greetings and Holly bough stamp from the Mini Christmas 1 stamp plate, I stamped directly onto the painted bauble with Versamark ink and applied white embossing powder over the top, then heat embossed, until it was molten and shiny.
I used a piece of chalk to create the chalkboard effect onto the black paint and then added some Snowflake Fresco Finish paint around the edges before sealing the whole bauble with a coat of Mod Podge. 
 I created my poinsettia with Tim Holtz's Tattered Poinsettia die from Sizzix and added some glass glitter into the centre. I used some die cut foliage which I coloured with Iced Spruce Distress Ink and then sprinkled with Rock Candy Distress Glitter. To complete the bauble, I added some rusty wire and distressed some seam binding, which I added with some twine to create the hanger.
So, that's it from me for today and I'll see you again later in the month.
Thank you so much for stopping by and I'm looking forward to reading your comments.
Love Emma x

Wednesday, 6 November 2013

Winter wonderland: By Zuzu

Yes, I have set free my christmas stamps. Its good to get ahead with Yuletide crafting I think. it keeps it fun and eliminates stress. this snowy winter wonderland house shaped configuration will be a pre Yuletide gift for a friend.(and fits nicely in to this months challenge theme!)


I used one of the wooden houses in the "altered art" section of the shop. I painted it inside and out with a combination of duck egg blue and cream. then i stamped some christmas images (list at the foot of the page) on to tissue paper i had pre-stained (and dried) with antique linen distress stains. i cut them out and glued them to the back of some of the compartments of the wee house. I then painted the "floors" of the compartments with white paint and added some snow-tex (fake snow texture). after that it was a case of filling in the wee compartments. making snowballs out of beads and using a lot of Tim Holz and other sizzix dies.


Supplies list:

Wooden house
Victorian Christmas #2  (2 stamps from sheet)
Victorian christmas #1   (2 stamps from sheet)
Crystal stickles

Ideaology Ice-skates, corked domes and Christmas word bands.
Ideaology Woodland, corked vials and Fractured dolls

Monday, 23 September 2013

Trick or Treat by Emma


Hello everyone...

Well, as another month flies by, it's time for me to share my second post of September and for this post, I thought I'd make a little treat holder and tag for Halloween using lots of background stamps, Distress Paints, Idea-ology and die cuts. As always, I really hope you like it...
To being with I made a large tag shape from card and covered it with scrunched up Terminology Tissue Wrap before I then added colour using Barn Door, Spiced Marmalade, Tarnished Brass and Black Soot Distress Paints.
Once all the paint was dry, I then started stamping the background using one of the borders from the Borders A6 #2 plate inked up with Wendy Vecchi's Red Geranium Archival Ink and the circles from the Swirls, Splats and Dots A6 Plate using Snowflake Fresco Finish Paint. I then added some more detail by using Dylusions Postbox Red Ink Spray and flicking it across the surface of the tag and then inked up the edges of the tag with Walnut Stain Distress Ink.

I then cut some card stock and covered this in the same colours of Distress Paint that I used on my tag, and made my little pocket, which I stamped onto using the Calligraphic Mat 12. I then used some Grungepaper and the Sizzix Movers & Shapers Mini Bat and Skull by Tim Holtz to die cut all the bats which I painted with Black Soot Distress Paint before adding onto my pocket with an Idea-ology Crossbone and the Trick or Treat banner from the Tim Holtz Simple Sayings Stamp set. Finally, I dyed some seam binding with Fired Brick, Wild Honey and Black Soot Distress Stain and added it to my tag holder.
Once this tag holder was complete, I then started work on the smaller tag to fit inside. I coloured the tag with Barn Door, Wild Honey, Tarnished Brass and Brushed Corduroy Distress Stain and dried with a heat tool before randomly stamping the surface using the Calligraphic 12 stamp inked up with black Archival Ink and the Ink Blot Background Stamp inked up with Geranium Red.
I added a rosette with the Decorative Strip die from lightweight card coloured with Distress Paints and added the silhouette die cut, covered in Black Soot Distress Glitter. Next, I used the Gothic Boo die to die cut the number 31 from chipboard, again painted it with Black Soot Distress Paint and then added Treasure Gold Gilding Wax around the edges.
To complete the tag, I added more die cut bats, Traveler Tissue Tape, an Idea-ology Adornment Regal piece and Wish Bone, a Journaling Ticket and Seasonal Chitchat Stickers and added some twine through the hole at the top.
Finally, I used a Hinge Clip, added a bit of Treasure Gold onto it, to dull down the silver and hung a Corked Vial containing Alcohol Ink via a Memo Pin which I stuck into the cork top and added a Chitchat sticker to the vial.

So, that's about it from me for this time and I hope I've inspired you with this Halloween Treat Bag and Tag set!

Have a great week and I'll see you again very soon...bye for now!
Emma x

Sunday, 23 June 2013

Let The Sun Shine by Emma


Hi everyone, and welcome to my second post in June.
Well, here in the UK, summer seems to be very stubborn at the moment and not really want to show it's sunny side, so I thought I'd bring some sunshine into our lives with this canvas. As always, I hope you like it...
To begin with, I applied some PaperArtsy Grunge Paste, onto my 7" x 5" canvas, through the Wendy Vecchi Brick Wall stencil from my stash. This paste dries so quickly, it's perfect for impatient people like me but just to be sure, I gave it a blast with the heat gun. I then covered the entire canvas with Wild Honey, Barn Door and Vintage Photo Distress Paints. Blending them together with a spritz of water and then a blast of heat to dry them. I then added a touch of gilding wax from my stash to highlight the brick work, which you can see just poking through from under the flowers, in these pics.

Once, I was happy with the colour, I then started stamping onto the canvas, firstly with black Archival Ink, using the Sequin Waste Open Size A5 Stamp, then I used white acrylic paint to stamp the Dots Background and the circles from the Swirls, Splats and Dots A5 stamp.

I stamped the bee from the Insects and Butterflies plate and also the quote from Katy Fox's Encyclopaedia Botanica plate onto tissue paper and then applied these to the canvas with Claudine Hellmuth's Multi Matte Medium.

To complete the background of my canvas, I used Black Soot Distress Paint around the edges.

Now for the huge flowers, and I created these using Tim Holtz's Tattered Florals die and coloured them with Dylusions Pure Sunshine and Squeezed Orange Ink Sprays. I then used Walnut Stain Distress Ink on the edges of the flowers.
I added my flowers to the canvas, together with some die cut leaves and some seam binding that I dyed using Antique Linen Distress Stain.
I added some wire coils through the centres of buttons and popped those into the middles of my flowers and a few more coils sticking out from the flowers.
Finally, I added some metal embellishments from my stash to complete the canvas.
So, that's it from me for today and I hope I did manage to bring just a little bit of sunshine into your day with my bright canvas.

I'll see you all again very soon but until then, thank you so much for visiting today and I can't wait to read all your comments. Don't forget you still have some time to enter our monthly challenge, Makes for Men and we'd love to see your creations.
Hope you all have a wonderful crafty week ahead...
Emma x

Saturday, 11 May 2013

Life Moments by Emma


Hi everyone...hope you are all ok and had a fantastic week and now, looking forward to a relaxing weekend!! Today, is my turn to share my "Tag in a Bag" and I've taken lots of photos for you to see all the detail that has gone into this piece!! So, enjoy and as always, I really hope you like what I've created...
To begin with, I created my bag using the Tim Holtz Alterations, In The Bag die from my stash and I used Manila cardstock, to die cut my basic shape. I decorated the die cut bag, whilst flat and not made up, and covered the surface with Weathered Wood, Brushed Pewter, Salty Ocean and Antique Linen Distress Paint.

Next, I used the large stamp from Katy Fox's Numerical Plate and stamped directly onto the painted surface of my bag. I blended Walnut Stain DI around the edges and then used Snowcap Adirondack Paint Dabber and added streaks of white paint onto the bag and a small bottle top to create the circles. I then made up my dimensional bag.
To decorate the front, I used white paper flowers, which I sprayed with Perfect Copper Perfect Pearls Mists. I heat dried the flowers before adding wired stamens to the centres and then attaching them to the front of my bag.
I used the Sizzix Movers and Shapers Mini Moustache and Finger die to die cut chipboard which I then painted using Adirondack Paint Dabbers. I added these, together with a stamped message from the Tim Holtz Simple Sayings Stamp Set, attaching it to the front with the Tiny Attacher.

To create the tag, I used a Manila Size 8 tag which I had to trim down slightly so that it would fit into the bag. Once again, I covered the surface of the tag with the same coloured Distress Paints that I had previously used on the bag. 
I built up the background of my tag, using some of the smaller stamps from the Katy Fox Numerical plate and added small amounts of torn tissue tape.
 Next, I covered chipboard in sticky back aluminium and I used the Sizzix/Tim Holtz Fleur di Lis and Eiffel Tower Bigz die, to die cut just the tower. I then embossed the tower with the Eiffel Tower and French Script Texture Fade. I applied Alcohol inks to the surface of the tower and then added some Brushed Pewter Metallic Distress Paint over the top.
I attached the embossed tower to my tag and added a strip of Film Ribbon down the side, together with some Idea-ology Mini Gears and a Game Spinner.
As final touches to complete my tag, I added a Idea-ology Muse Token, attached to the side with a Swivel Clasp on a Hinge Clip. Finally, I coloured some cream seam binding with Distress Paints and Distress Stains and threaded this through the hole in my tag and tied it into a bow.
So, that's it from me for today and I hope this has inspired you to create some ideas of your own!!
Thank you so much for stopping by to take a look and I can't wait to read all your comments. Also don't forget that we have a fab new challenge this month and it's all about WORDS. So, if you would like to join in, we would love to see your creations.

Have a fabulous weekend and see you soon.
Emma x

Wednesday, 24 April 2013

My Book of Dreams by Emma


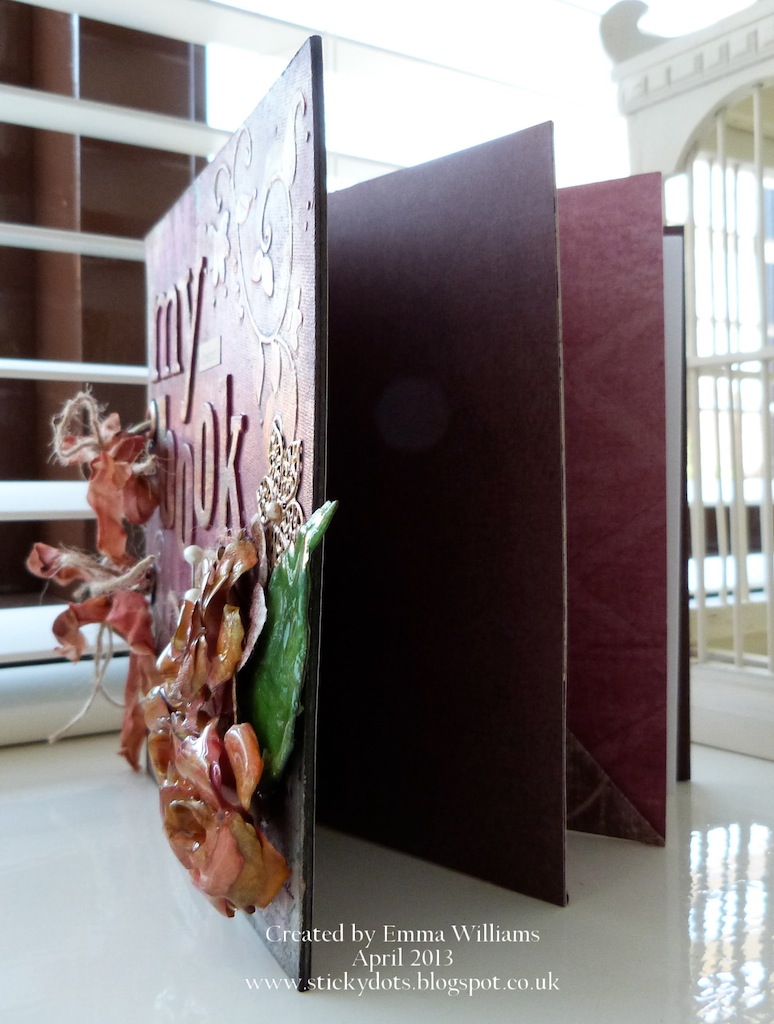
Hi everyone, Emma here and it's already time for me to share my second little creation of the month and today, I'm sharing a mini book that I made...
To begin with, I cut some chipboard to the size that I wanted my book to be and then, using the Tim Holtz Word Play die, I cut out my letters from more of the chipboard and stuck each of them onto the cover. Next, I applied some Grunge Paste through a Crafter's Workshop stencil onto two of the corners and once the paste was dry, I used a combination of Claudine Hellmuth paints and Adirondack Paint Dabbers (Wild PlumCharcoal Black and Traditional Tan) and started randomly applying the colours to my cover. When the paint was dry, I then applied some white acrylic paint through the Mini Harlequin Crafter's Workshop template, dried off this layer of paint and then added another coat of the Wild Plum, using a dry brush all over the top. Once I was happy with the colours, I then added Metallic Gold Adirondack Paint Dabber and some gilded wax, over the raised areas of the cover to make them pop.
To complete my cover, I stamped random areas of it using black Archival Ink and the Ink Blot Background stamp and the Mini Calligraphic 18 stamp and added one of Tim's Chit Chat stickers, to finish the title of my mini book.

Next, I made my dimensional flowers and leaves, using the Tim Holtz Tattered Florals and the Tattered Leaves Die. I covered each individual petal with Fired Brick and Tarnished Brass Distress Stain, dried them with a quick blast of the heat gun and then made my blooms. Once the flowers were made, I added a touch of gold gilded wax over the top before popping them into UTEE, melted in the Melt Pot and enamelling them.
I added the cluster of enamelled flowers to the corner of my book, together with some metal embellishments from my stash, which I coloured using Distress Paints. I added a few pearls and some decorative pins to the arrangement.
I created the inside of the book by using old 12 x 12" papers, that I made into pages and pockets.
I used the Imagine and Creative stamps to stamp the words onto cream card, blended with Old Paper Distress Ink and added these to my flower arrangement.
I punched two holes through all the pages and the front and back cover of my book and added some book rings to hold them all together. Finally, I dyed some cream seam binding with a combination of Fired Brick Distress Paint and Tarnished Brass Distress Stain, dried it with the heat gun and then tied it around each of the book rings, together with some twine.
So, that's it from me for today and as always, thank you for popping by and visiting and I really hope you like what I've created ~ I can't wait to read all your comments.

Don't forget if you want to join in with this month's TEXTURE challenge, then just pop over HERE and you can see all the details of how to enter and good luck if you do!!

See you all again very soon,
Emma x

Thursday, 11 April 2013

Mechanical Bird by Emma


Hi everyone...
For my first post and project in April, I decided to bring a bit of brightness and colour into our lives ~ I think we all need it after this long, drab winter and I've created a tag using the Mechanical Bird stamp by Neil Walker. I hope you like it...
To begin with I've used a Size 8 Manila tag and applied Picked Raspberry, Salty Ocean and Spiced Marmalade Distress Paints over the surface. I misted the tag with water to blend the paints and then dried it with my heat tool. I added some circles using the paint from the Snow Cap Adirondack Paint dabber and applying it with the lid of the bottle and then stuck some small strips of Tissue Tape onto my tag.
Next, I stamped out the Mechanical Bird image onto the tag and used a white pen, to add colour to the birds legs. I then stamped out the bird, two more times onto white card and then coloured the image using the same colour in the Distress Ink Pads, as I'd previously used on my background and used Mowed Lawn onto the leaves. I cut out each layer of the bird but each time, cutting away part of the image to give me my decoupage pieces, which I layered on to the base image on my tag. I used the white pen to add some highlights to the image and added Glossy Accents to the eye and down the wing.

I matted my tag onto a piece of Kraft card, leaving a narrow border around the edge before, then mounting my tag onto a larger piece of black card, matted onto a backing of pearlescent off-white card. I attached the two layers together using the Tiny Attacher. Using the white pen, I drew a line around the edge of the black card.
Next, I used Tim's Tattered Florals die from Sizzix to make three small dimensional blooms, which I coloured using Dylusions Ink Sprays in Vibrant Turquoise and Bubblegum Pink. I then spritzed each of the flowers with Heirloom Gold Perfect Pearls Mists before adding them to my tag.
I added my flowers to my mounted tag, together with some white flowers, from my craft stash, which I sprayed in the same colours and then die cut some twigs from chipboard, painted them brown and added these to the flower arrangement. I used one of the Idea-ology Memo Pins to attach my Adage Ticket and finally, I dyed some cream seam binding, using Distress Paint in the same colours as before and threaded it through the hole in my tag. 
So, I really hope you've been inspired by my tag today and thank you so much for stopping by to take a look ~ I can't wait to read all your comments!! See you all again very soon...
Emma xx