Showing posts with label Crafty Notions. Show all posts

Tuesday, 20 August 2013

Metallic Floral Cuff by Alison (Craftytrog)

Hello Stampers!
For my second August post, I have some wearable art to share with you.
 I began by cutting an 8.5 x 2.5 inch strip of Grungepaper.
I embossed it with a Tim Holtz Sizzix embossing folder, to add some texture. 
Then, I painted both sides with black Studio Gesso, & once this was dry, I applied some coppery Guilding Wax to it. I added some green gold highlights, dried it with a heat tool, & buffed it with a soft cloth.
I cut 2 strips of Studio Sticky Back Canvas, one 8.5 x 1.5 inches, & one 8.5 x 0.625 inches. I spritzed the thinner strip with Cut Grass Dylusion Spray, & the wider strip with Vibrant Turquoise Dylusion Spray. On the wider strip, I placed the Andy Skinner Rollerball stencil over the top, & spritzed with water, to take out some of the colour, & leave a dotty pattern. I used Studio Black Gesso to stamp the Chevron Element onto the narrow green canvas strip.
I glued the canvas strips to the Grungepaper base with Glossy Accents, for extra stick.
I used various Guilding Waxes to colour some large eyelets & some Ideaology Foliage.
I punched some holes with a Cropadile, & added the eyelets. I attached the Foliage with turquoise pearl brads, then added an Ideaology Hitch Fastening to one end of the cuff.
I added some rather suspect hand-stitching around the hole at the other end of the cuff, so don't look too closely! Lol! 
I hope you like my arty cuff! I don't know about you, but I do love to make art that I can wear :o)
Thanks for looking,
Alison xxx

Saturday, 20 October 2012

A Christmas Wish by Alison

Hello Stampers!
I expect many of you have started making Christmas cards, as the Season is fast approaching. Here's one I've made, using one of my favourite techniques, stamping into ultra thick enamel.
I started by die-cutting the Sizzix snowflake border. I kept the waste, to go at the top of my card, and the snowflake border to go at the bottom. Then I inked both pieces with versamark embossing ink, & embossed 3 layers of Sapphire Jewel Enamels. Whilst the third layer was still molten, I stamped the Snowflakes into one side of each piece. The Snowflakes didn't cover the whole pieces, so after carefully reheating the other sides with my heat gun, I stamped some more snowflakes.
To make my background, I inked a square of white card, using tumbled glass & vintage photo Distress Ink. I stamped the Script from Calligraphic Mat 15 with vintage photo DI and the Snowflakes with broken china DI. Then I carefully positioned and stamped the greeting from the Christmas Greetings 1 plate, using jet black Archival Ink. I inked the edges of my background with more vintage photo DI.
Next, I die-cut 2 Sizzix Baubles from white card. I used the 'Wish' mover & shaker die on one of the pieces, then triple embossed this with Fire Opal Jewel Enamels. Whilst the third layer was still molten, I stamped the Script into it, using black Archival Ink.
For the background to the bauble, I inked lightly with vintage photo DI. I actually used just the ink that was left on the blending pad, from the main background. Then I stamped the Snowflakes with broken china DI. I glued the background bauble behind the embossed one, then tied a gold ribbon bow around the top.
To finish, I inked the edges of a square white card blank, then assembled my card as shown.
Here's a closer shot of the lovely shiny, stamped embossing. Can you see why I love this technique?!
Thanks for looking,
Happy Stamping!
Alison xxx

Saturday, 29 September 2012

Creative Inspiration by Jennie

Once a month, I pop by and try to give you a tutorial or show you a piece of my art that I have created in the past month. This month, I thought you might like to see what I did at The Big Stamp & Scrapbooking Show at the weekend. I am very lucky as I get to play with lots of products, and this time, we had some of the gorgeous gilding leaf from Crafty Notions. I do have some of this in stock in the shop, and we will be having the bigger pots in next month. I used it through The Crafter’s Workshop templates, and sponged a very small amount of the Crafty Notions glue with a piece of cut n dry on top of the mask. You only need to use a very very little of the glue to adhere the leaf. It goes a long way! I also used it with some of the Journaling word stamps. Sponge a minute amount of glue onto the stamps, and stamp normally. add lots of gilding metal to the stamps image, and rub away until the excess is gone, and you left with a gilded image. I used the normal size #8 manila tags, and beside it you can see the humungous size #12 tag!  All of it was done on top of Dylusions sprays, and added extras are lots of our background stamps!


tag detail 2

All the links for the products are at the end of the post :)
I will be at Port Sunlight today demonstrating the same technique if you are there. Do come and say hello.
Have a creative day
Hugs
Jennie

Sunday, 18 March 2012

Learn To Pause by Alison

Hello Stampers. I've a little card to share with you for my second post of the month.


I don't know about you, but I'm loving the Crafter's Workshop Templates at the moment. I started the background for this card the other day. I'd spritzed a turquoise background for another card, then turned my template over, onto another piece of card, thus creating a reverse image. I then added some Crafty Notions Tangilicious accents through a circle template.

I inked the background with Vintage Photo Distress Ink, then stamped a script background, using the same ink. I distressed the edges with a Tonic Paper Distresser, then inked them with the Vintage Photo ink.

Next, I stamped competition winner Laura Liddell's fab Sneakers, onto my background. I stamped them again, onto white card, using Black Versafine ink, then clear embossed them. I inked them with Vintage Photo, then cut them out & glued them to my background.

I stamped the phrase from Tim Holtz's Just Thoughts plate, onto white card, cut the individual words out, inked them with Vintage Photo, then glued them in place. Finally, I added my artwork to a square kraft card blank.

Thanks for looking,
Alison xox

Saturday, 26 March 2011

The sun has got his hat on...

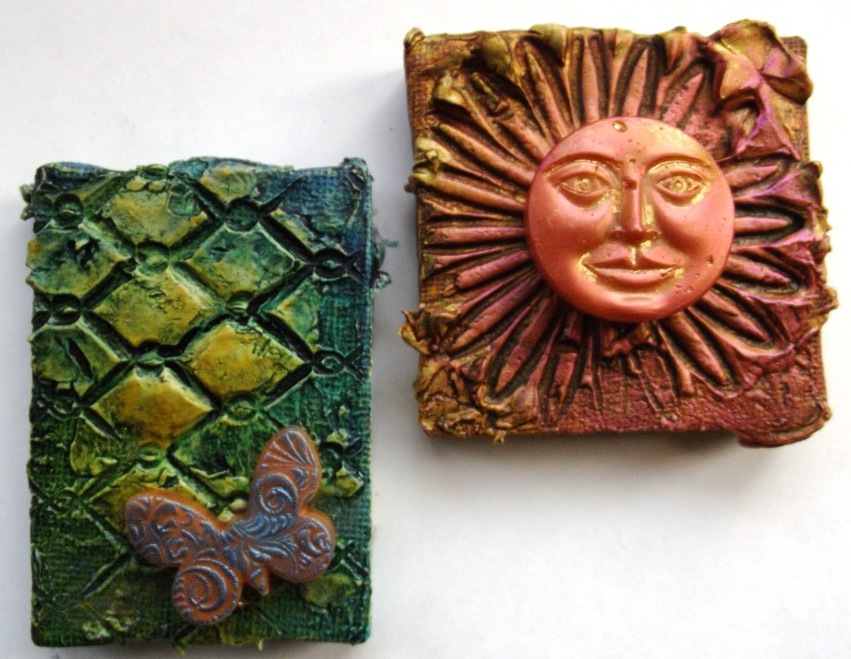
Spring has arrived, and with it the days are getting longer, which for me is a big bonus, as I can make art later ( don't you hate making it by artificial light?), and I can feel the warmth of the sun this week on my face, making me feel so much happier! Today I made 2 little mini canvases, which I covered in Viva Decor Terra paint. I stamped into the Terra with a wet stamp (this is from Flower Fever). Just make sure that you wash your stamp thoroughly after using it, as dried Terra will not come off! The blue/green Canvas is the chicken wire background, and works so well, as it gives a really deep surface to paint on.

Spray the whole canvas with Adirondack Color Wash in various shades, and Perfect Pearl mists, and then add some new Crafty Notions Gleam. This is a smooth cream which glides on effortlessly, and gives a polish to your artwork :))

Finally I made uteed moulds from the meltpot. The large round face (I think he resembles a sun or moon face) is a new mould also by Crafty Notions, as is the mini butterfly on the blue canvas. Finally I added a bit of gleam with my finger to the uteed moulds.
Spring is definitely here!
Have a Creative Day
Jennie

Saturday, 4 September 2010

'Create Blooming Art!' Wall Hanging by Lucy Edmondson

Hello, me again!

The Artistic Stamper has these very sturdy little frames in stock, which are ideal for wall hangings. They have a shallow indent in the middle which is perfect for either tiny dominoes or Stampbord pieces. I thought it would be fun to combine it with these very versatile Floral Blooms stamps, which are brand new but which I think I will be reaching for many times!


INGREDIENTS

Floral Blooms Stamp set
Collage Frame 10 x 10 cm
Black Archival Ink
Crafty Notions Mica Spray
Tim Holtz Distress Crackle Paint in Picket Fence
White Inkssentials Pen
Tiny Dominoes
Florist Wire or Thin Ribbon
Permanent Marker Pens
Button
Idea-ology Flower Embellishment
Big Bite or Dremmel
Brilliance Ink Pads or Similar
Strong adhesive tape


INSTRUCTIONS

1. Paint the frame with the Crackle Paint, and when dry spray with Crafty Notions Sprays.

2. Arrange the dominoes so they form a square that fits the centre of the frame, turn over and attach together with the red line tape but don't remove the backing just yet.

3. Turn the dominoes over and sponge with a suitable ink that dries on glossy surfaces, such as Brilliance, and heat set.


4. Stamp the flowers and leaves as shown, overlapping the dominoes. Use the white pen in the centre of the tiny flowers and add some colour with the permanent pens. Add a button to the centre of the largest flower. Remove the backing from the tape and stick in place.

5. Stamp the tiny flowers around the edge of the frame, adding some white pen and permanent marker pen. Stamp the words 'Create Blooming Art' on the bottom edge.

6. Use a Big Bite (thank you very much to my friend Jack for the loan!) to make two hanging holes in the top of the frame and thread with florist wire. To finish, add a metal flower taken from a Primark necklace, which was a wonderful idea of Minxy's!

Thank you for looking!

Lucy