Hello!
Today 2013 is passing and I can smell 2014! LOL But first I must thank my team for being there when it mattered, and for creating fabulous and innovative projects for us all every month. Without them this blog would be very unhappy!
A BIG heartfelt THANK YOU from me xxx
I must also say goodbye to Sioux, Zuzu (Louise) and Emma, whose creations have graced these pages for several years , and who have always amazed me with their abilities to produce fantastic artwork with little more than a few rubber stamps!
Sioux for her tenacity and hard work , even when she was at her lowest. Sioux , you never once let me down! thank you! You will be sorely missed xxx
Louise , you will be missed for your creativeness , even though you always claimed to not be a rubber stamper...I beg to differ strongly! I will treasure having had you on the team xxx
Finally a HUGE thank you to Emma, whose managerial abilities to keep all the girls in check! lol and make sure that all the posts are on the blog at the right time, and all the unseen backroom work that she has done will be sorely missed! Of course it goes without saying that Emma's artwork has been precise and gorgeous, and has graced these pages with its innovativeness! Thank you for being there for me! I will miss you more than I can say xxx
I set you a challenge just before Christmas to show us and everyone else your highlight of 2013. Thank you to everyone who joined in at this very busy time of the year. What marvellous creations you made, and I loved them all! I used Mr Random.org to pick a winner ( I certainly couldn't choose!) and he came up with number 3!
with this gorgeous creation
Congratulations, and please email me , so we can arrange your prize.
May 2014 bring you all you wish for , and may it be happy and healthy!
See you in 2014!
{hugs}
Jennie
Showing posts with label Emma Williams. Show all posts
Tuesday, 31 December 2013
Friday, 20 December 2013
My top three and a sad goodbye...by Emma
Hi everyone...
As you know, here at The Artistic Stamper, the team are all choosing their three favourite pieces of this year and today, is my turn!! So without further ado, here are my top three and I hope you enjoy them as much as I enjoyed making them...
My first project is my Christmas matchbox. At this special time of year, I adore everything vintage and I wanted to create a special keepsake that would encapsulate that feel and to also be something that someone would treasure forever.
My second project back in June, is a canvas that I created in the summer and again, I wanted to capture the feel of everything summery and I really loved making this bright piece with the huge bold flowers and the little bee flying away.
For my third project, I chose a tag that I made for Valentine's Day, click here to see the original post, and this has a special place in my heart because I was lucky enough to be chosen as one of Tim Holtz's Blogworthy links with this piece and anyone who knows me, knows how much that meant to me. I was over the moon and really thrilled.
So, those are my three favourite projects of this year and now....comes the hard part!!
As you all know we are very sadly going to be losing two of our wonderful team members at the end of month but today, I'm announcing that I will also leaving The Artistic Stamper at the end of December and moving onto pastures new. Don't worry, I will still be very, VERY active in this world of craft and I will still be around on Facebook, Twitter and on my own blog but I'm just starting a new adventure.
I've been with this amazing team for two and a half years and been CT co-ordinator for two years and it's been a very hard decision to make but I want to thank the whole team for making my job such a pleasure to do and I couldn't have asked for a better or more talented team to work with. I also want to say a very BIG thank you to Jennie. You put your faith in me to run this blog for you and I've loved every single minute and had the most wonderful time working alongside you!! Good luck Jennie with everything for the future...you deserve all the happiness and success life can bring you!!!!
So, as my last post here, and with a tear in my eye as I'm writing this, I just wanted to say...
MERRY CHRISTMAS TO YOU ALL
...and I hope you have a very happy and wonderful 2014!!
See you all in blogland and thank you for all your support!
Love Emma xx
Wednesday, 11 December 2013
Seasons Greetings by Emma
Hello everyone!
Today, is my turn to share here at The Artistic Stamper and for my piece, I've created a hanging ornament. As an alternative to the traditional Christmas colours, I thought it would be nice to have something a little bit different and because I love the look of chalkboard, that's what came to mind and here it is, my hanging chalkboard ornament ~ hope you like it!
To create this, I gave an MDF bauble two coats of Black Soot Distress Paint, allowing it to dry between coats each time. Next, and using the Seasons Greetings and Holly bough stamp from the Mini Christmas 1 stamp plate, I stamped directly onto the painted bauble with Versamark ink and applied white embossing powder over the top, then heat embossed, until it was molten and shiny.
I used a piece of chalk to create the chalkboard effect onto the black paint and then added some Snowflake Fresco Finish paint around the edges before sealing the whole bauble with a coat of Mod Podge.
I created my poinsettia with Tim Holtz's Tattered Poinsettia die from Sizzix and added some glass glitter into the centre. I used some die cut foliage which I coloured with Iced Spruce Distress Ink and then sprinkled with Rock Candy Distress Glitter. To complete the bauble, I added some rusty wire and distressed some seam binding, which I added with some twine to create the hanger.
So, that's it from me for today and I'll see you again later in the month.
Thank you so much for stopping by and I'm looking forward to reading your comments.
Love Emma x
Saturday, 23 November 2013
Christmas Surprise by Emma
Hi everyone...
Hope you've all had a great week and looking forward to the weekend. Well, if you're looking for inspiration for your Christmas cards or gifts, then I hope that I can inspire you with the piece I'm sharing today ~ my little altered matchbox, with a big surprise when you open it up! As always, I hope you love it...
To begin with I made my own matchbox from kraft card, measuring approx 7 x 11.5cm in size. I then cut pieces of cream card to fit the outside of the box, inked them with Old Paper DI and stamped each piece with the Music Background stamp. I distressed the edges of the paper with Walnut Stain DI before attaching them to the outside of my box. I then added a Idea-Ology Hitch Fastener on the front of the drawer, to enable you to pull the box out of the cover easily.
I then cut more cream card to fit the base and the sides of the box and again inked them with Old Paper DI before stamping the Santa image from the Mini Christmas 1 stamp set onto the base card.
I coloured the image with Distress Marker Pens and then inked up the Snowflake stamp with Tumbled Glass DI and stamped the flakes onto all my pieces of card before attaching them to the inside.
I then raided my own stash of dies and used the Festive Greenery and the Tattered Pine Cone die from Tim Holtz for Sizzix to die cut card and coloured each individual die cut with Distress Inks, adding highlights of Rock Candy Distress Dry Glitter to each piece. I then added these to decorate the inside of my box, together with a small Bottle Brush tree and some fake snow before finishing the inside with a couple of Tim Holtz Chit Chat stickers.
To decorate the outside of my matchbox, I used the Tattered Poinsettia die from Tim Holtz, again from my stash and made a large bloom from cream card, inked around the edges with Distress Ink and spritzed with Biscotti Perfect Pearls Mists.
I attached the flower to my box and added die cut holly leaves, inked with Iced Spruce Distress Ink and rusty wire coils, smeared some Rock Candy Distress Stickles over the top of the leaves and then die cut the number 25, painted it with PaperArtsy Snowflake Fresco Finish paint and covered the numerals with Rock Candy Distress Glitter.
So, that's it from me for today...thank you so much for stopping by and I'll look forward to reading your comments! Don't forget we still have our Christmas challenge running until the end of the month, so if you would like to enter, with a chance to be the lucky winner, then just click HERE for all the details.
See you again soon...Emma x
Monday, 11 November 2013
100% Handmade by Emma
Hello everyone...
Hope you've all had a great weekend and looking forward to the week ahead. Today, I'm sharing the first of my posts for November and as always, I hope you're inspired by what I've created by using corrugated card, recycled from an old cardboard box.
To make this piece, I used a piece of corrugated card, which I tore off the side of a box and cut to size. I tore away some of the paper layer over the card to reveal the corrugations but left a good section of the inner portion which I painted with Black Soot Distress Paint. I then added a layer of PaperArtsy Crackle Glaze and once the glaze was dry, I painted over the top with Snowflake Fresco Finish paint and watch the crackles develop.
To create the tag, I applied Broken China, Brushed Corduroy and Antique Linen Distress Stain onto my craft mat and spritzed it with water before swooshing the tag through the ink, to pick up the colour. I then used a smaller piece of Manila card and picked up any excess ink that was left on my mat. Next, I flicked water droplets onto both pieces of card and blotted the excess with a paper towel before drying with a heat gun. Finally, I applied Brushed Corduroy Distress Ink onto the inked tag, through the Stars Layering Stencil from Tim Holtz.
I used more of the Fresco Finish Snowflake paint and scraped small amounts over the surface of the tag and then stamped with it using the splashes from the Katy Fox Messy Art stamp set. I then inked up the definition stamp from the Encyclopaedia Botanica stamp set and stamped random areas of the tag with black Archival Ink. Finally, I aged and inked the edges with Walnut Stain Distress Ink.
On the smaller piece of inked card, I stamped the butterfly and beetle from the Encyclopaedia Botanica set, top and bottom and mounted this with foam pads, onto my tag. I then, stamped the 100% Handmade from the Handstamped set, onto another piece of inked card and attached this in the centre of my images.
I used some Distress Stains to dye the white seam binding and threaded this onto my tag, together with some twine. I attached and stapled some Film Strip Ribbon into place and added an Idea-ology Hinge Clip, which I coloured with Distress Paints to give a rusty, tarnished look. I then attached the tag onto the centre of my painted corrugated card and place a Idea-ology Pen Nib below the tag, again covering it with Distress Paint to give it a tarnished appearance.
So, that's it from me for today and I hope you love this piece, as much as I loved making it! Don't forget that we have our Christmas challenge running at the moment and we would love you to join in. For more details, click HERE.
Thank you for stopping by and have a wonderful week, full of creativity!
Emma x
Friday, 11 October 2013
Autumnal Gatherings by Emma
Hello everyone...
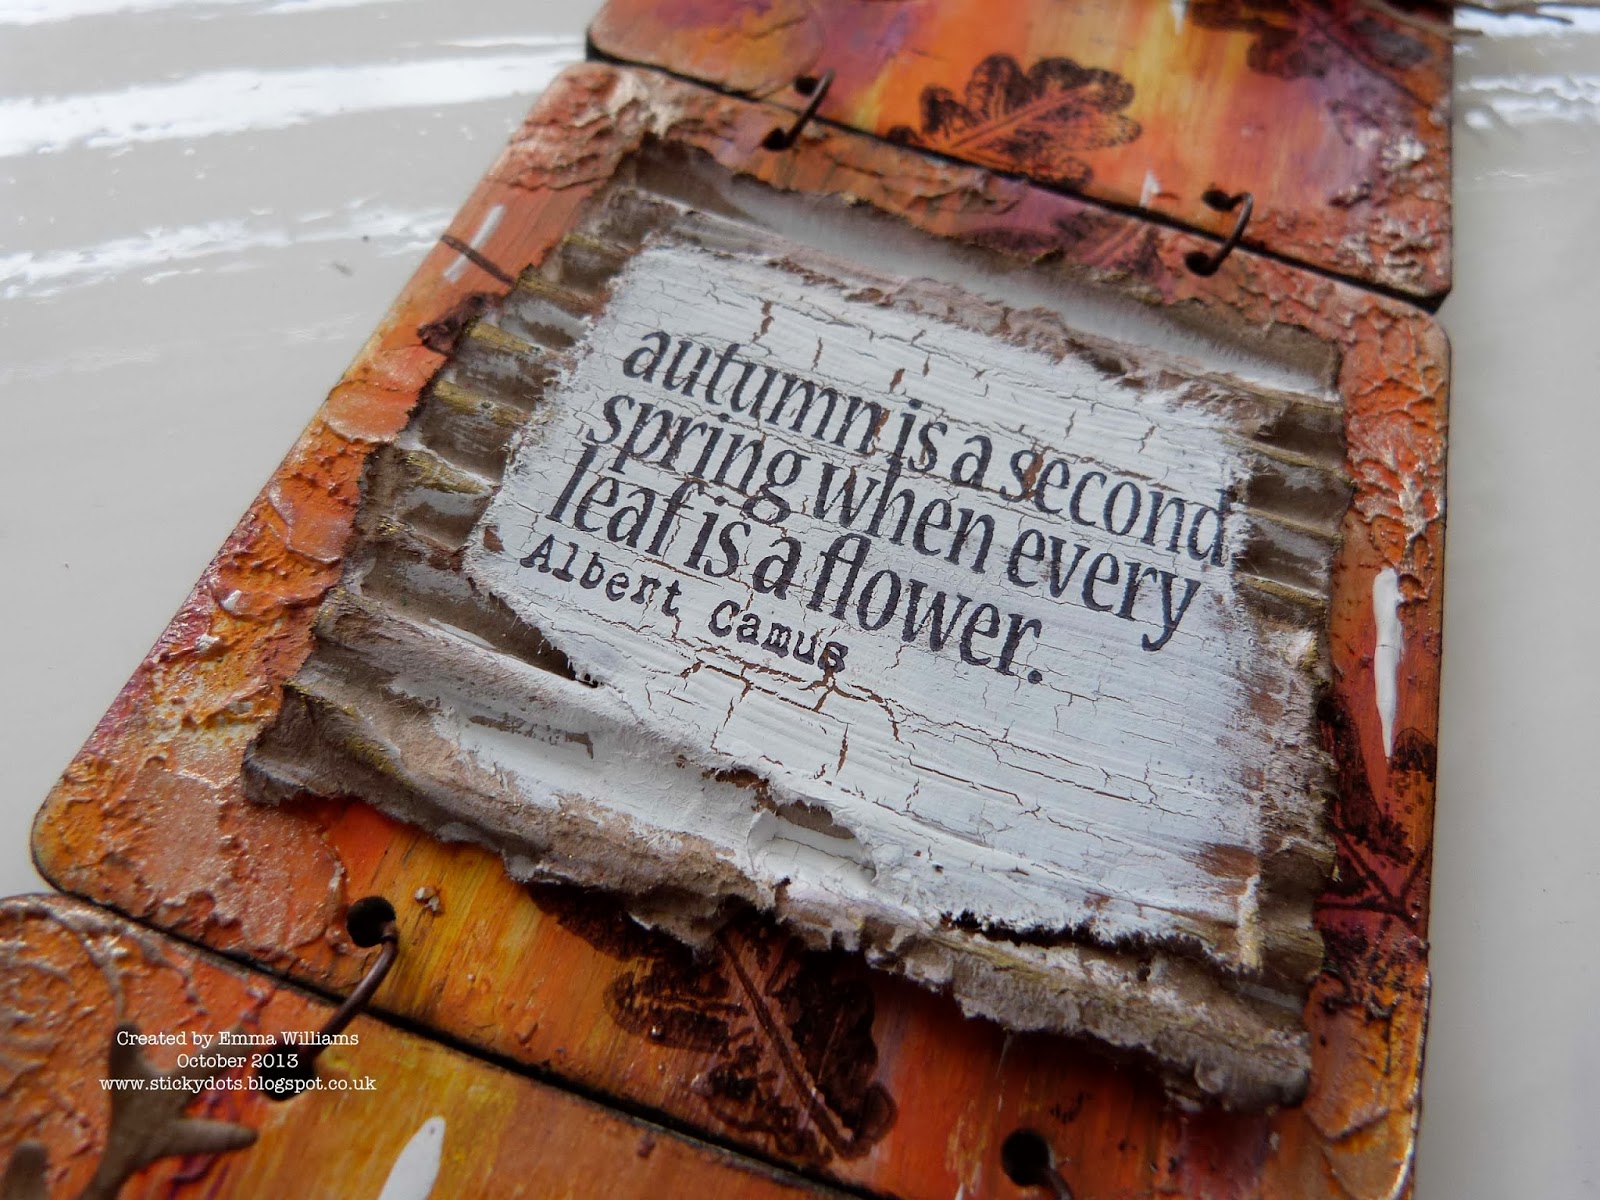
Hope you're all had a fabulous week and that you're looking forward to the weekend. Today, is my turn to share my latest creation with you all and I decided to make an autumnal wallhanging by using and recycling some old coasters that were in need of a makeover!
As always, I hope you love what I've made...
To begin with I applied a good covering of Gesso to all three coasters and allowed them to dry. I then used one of the fab new Artistic Stamper masks, Large Dot and applied GrungePaste through the mask onto my 1st and 3rd coasters. I also added some Grungepaste around the edges of all three coasters and stippled it to give a rough texture.
Once the paste was dry, I painted all the coasters with a mix of Spiced Marmalade, Barn Door, Mustard Seed and Gathered Twigs Distress Paints, blending the paints together until I was happy with the colour. I then added some splashes of white paint and touches of Treasure Gold around the edge to highlight the raised areas where I had added the paste.
I randomly stamped leaves over the painted coasters using stamps from Katy Fox's Leaves stamp plate using Wendy Vecchi's Potting Soil Archival Ink and also used my favourite all time stamp, the Calligraphy 12 plate to stamp areas of the painted coasters.
The message was also from the Katy Fox Leaves stamp plate and stamped in black Archival onto a piece of torn cardboard packaging which I also tore around the edges to show the corrugation and painted with Roast Coffee Fresco Finish Paint. I then added a thin layer Fresco Crackle paint and then a covering of Snowflake over the top to reveal the crackle. I then added small amounts of Treasure Gold around the edges.
I added some Remnant Rubs Words onto the raised circles that I created with the masks....
...and then made small arrangements of foliage using the Autumn Gatherings die by Tim Holtz from my own crafty stash, die cutting them from kraft card and colouring each individual piece with Distress Inks in various autumnal shades.
Finally, I attached all three coasters using Idea-ology Jump Rings and added a bamboo stick, which I threaded through the top jump rings. I then platted some thick twine and tied it onto the bamboo stick.
So, that's it from me for today and thank you so much for stopping by to say hello and for leaving all your lovely comments...I can't wait to read them!
Hope you all have a lovely, creative weekend and see you soon!
Emma x
Monday, 23 September 2013
Trick or Treat by Emma
Hello everyone...
Well, as another month flies by, it's time for me to share my second post of September and for this post, I thought I'd make a little treat holder and tag for Halloween using lots of background stamps, Distress Paints, Idea-ology and die cuts. As always, I really hope you like it...
To being with I made a large tag shape from card and covered it with scrunched up Terminology Tissue Wrap before I then added colour using Barn Door, Spiced Marmalade, Tarnished Brass and Black Soot Distress Paints.
Once all the paint was dry, I then started stamping the background using one of the borders from the Borders A6 #2 plate inked up with Wendy Vecchi's Red Geranium Archival Ink and the circles from the Swirls, Splats and Dots A6 Plate using Snowflake Fresco Finish Paint. I then added some more detail by using Dylusions Postbox Red Ink Spray and flicking it across the surface of the tag and then inked up the edges of the tag with Walnut Stain Distress Ink.
I then cut some card stock and covered this in the same colours of Distress Paint that I used on my tag, and made my little pocket, which I stamped onto using the Calligraphic Mat 12. I then used some Grungepaper and the Sizzix Movers & Shapers Mini Bat and Skull by Tim Holtz to die cut all the bats which I painted with Black Soot Distress Paint before adding onto my pocket with an Idea-ology Crossbone and the Trick or Treat banner from the Tim Holtz Simple Sayings Stamp set. Finally, I dyed some seam binding with Fired Brick, Wild Honey and Black Soot Distress Stain and added it to my tag holder.
Once this tag holder was complete, I then started work on the smaller tag to fit inside. I coloured the tag with Barn Door, Wild Honey, Tarnished Brass and Brushed Corduroy Distress Stain and dried with a heat tool before randomly stamping the surface using the Calligraphic 12 stamp inked up with black Archival Ink and the Ink Blot Background Stamp inked up with Geranium Red.
I added a rosette with the Decorative Strip die from lightweight card coloured with Distress Paints and added the silhouette die cut, covered in Black Soot Distress Glitter. Next, I used the Gothic Boo die to die cut the number 31 from chipboard, again painted it with Black Soot Distress Paint and then added Treasure Gold Gilding Wax around the edges.
To complete the tag, I added more die cut bats, Traveler Tissue Tape, an Idea-ology Adornment Regal piece and Wish Bone, a Journaling Ticket and Seasonal Chitchat Stickers and added some twine through the hole at the top.
Finally, I used a Hinge Clip, added a bit of Treasure Gold onto it, to dull down the silver and hung a Corked Vial containing Alcohol Ink via a Memo Pin which I stuck into the cork top and added a Chitchat sticker to the vial.
So, that's about it from me for this time and I hope I've inspired you with this Halloween Treat Bag and Tag set!
Have a great week and I'll see you again very soon...bye for now!
Emma x
Wednesday, 11 September 2013
Voyage by Emma
Hi everyone...
It's that time of the month again for me to share my latest post with you all and today, I decided to make a travel journal book cover. As always, I really hope you love what I've made!
To begin with I recycled some old cardboard packaging to form the cover of my travel journal, which I primed with gesso before painting it with Distress Paints. I always think it's a shame to cover up the background because I loved the look of all the colours of Distress Paint blending together but it had to be done as I don't think a painted background would've been of much interest!!!
Once the background was dry, I set about making my tags, which I swished through some Brushed Corduroy, Stormy Sky and Spun Sugar Distress Stain that I had put on my craft mat. I then blended the edges of the tag with Walnut Stain Distress Ink and added some Tumbled Glass DI through a Crafter's Workshop Stencil. Next, I added some interest to the tags, (which again got mostly covered up) with the following stamps: the ruler from A Stitch In Time by Katy Fox, Calligraphic Mat 12, Swirls, Splats and Dots and the Ink Blot Background.
Once the tags were complete, I attached a Idea-Ology File Tab to one of the tags, which I altered with Alcohol Ink and placed a Chit Chat Sticker inside. I added hand dyed seam binding to one tag and paper string to the second before attaching both tags to the background and die cut some cogs from chipboard using the Sizzix/Tim Holtz Gadget Gears die which I painted with Distress Paints and then added around the edge of the tags.
Next, I stamped the compass from the Tim Holtz Classics 1 stamp set onto Manila card and coloured it with Distress Markers. I inked and distressed the edges of the card and added it to my cover, together with the "Voyage" wording.
I stamped the stamps from the Katy Fox Carte Postale stamp set and added these to my cover. Then blended some more manila cardstock with DI's and stamped the quote from the Traveling Words stamp set and attached it to my cover with a Hinge Clip.
I finally added some Idea-Ology Mini Gears and tied a piece of paper string around the cover to complete it.
So, that's it from me for today and don't forget you still have plenty of time to join in with our Autumn challenge and the whole team are looking forward to seeing what you make and enter. For details, just click HERE.
Thank you so much for stopping by and I'm really looking forward to reading all your comments...see you again soon!
Emma x
Subscribe to:
Posts (Atom)