Hi everyone and thanks for dropping in here. After a little break in July, I am back with my first project for August.
Somehow, this being the middle of August already with the summer definitely slowly coming to an end, I was drawn towards Autumnal colours. Always being short of storage boxes for those little bits and pieces, I decided to make an ATB using the large Eileen Hull die. This Artist Trading Block, measure 3 x 3 x 3", so is a perfect size for little embellishments etc.
I started by cutting the die for my cube twice as per instructions, out of 480 grammes black card stock. Next I made a kind of master board to cut my panels from.
I took a piece of 12 x 12 plain card and splattered it with Dylusions Inks in Melted Chocolate and Fresh Lime, spritz with water and let it drip a bit. I then over stamped with the Marbelled Background stamp in Orange Blossom Archival ink. At this point I was just playing to see what would happen. Here is a close up:
I cut my background into five 2.75 by 2.75" (7 x 7 cm) squares, to cover the sides and top of my box.
I really did make 5 lol, even though there are only 4 in the photo, but they all pretty much look the same anyway. Next I went and darkened and blended each one with Distress Inks in Scattered Straw, Vintage Photo and Walnut Stain. This was starting to look a lot more like what I was after...
At last the fun of decorating each panel could begin:
For this one I used the Calligraphic Mat 12 , stamped in Antique Linen Distress Paint, a honey comb stencil from my stash and a stamp from the Katie Leitch "Hand Stamped" set. The diecut was a gift from a friend.
This one was just stenciled with the Tim Holtz Eye Chart stencil, it's my least favourite so I decided to use it for the top as I knew it would be covered over.
The next two panels use stamps from the Katie Leitch Leaves set.
The final panel uses a stamp from the Hand Stamped set again. I also used the Chicken Wire background stamp
Time to put it all together. I decided to add a little figure to the top of my box to add as a vocal point:
This is from the Tim Holtz found relative cards, the smallest of the 3 cowboys. The rest of the lid was decorated with some bits and pieces from my stash:
For the closure of my box I used one of the little metal fasteners, altered with some Espresso Alcohol Ink.
Well, hope you like my little box, these ATBs are so much fun and make great decorative pieces as well as being useful storage boxes.
Thank you for visiting and enjoy the rest of the week!
Showing posts with label Tim Holtz. Show all posts
Wednesday, 13 August 2014
Thursday, 26 June 2014
Playing with Paperclay
Hello everyone, this is Astrid with my second June project.
It's the wedding season and I decided to make a romantic vintage piece that could work as a wedding gift, or indeed any occasion gift.
Did you know that the shop sells a fantastic collection of moulds? These seem to be ever more popular, and for my project I decided to have play with them.
Moulds can be used with all sorts of products, embossing powder, Utee, - there is even a special product made by Modge Podge, called Modge Melts.
For this project I chose to play with paper clay, as it is light, can easily be painted and works beautifully with the more delicate moulds.
These are the products I used:
Stamps:
Botanical 2 by Katie Fox (now Leitch)
Leaves Background
Regency Background
Botanical 3
Moulds:
Floral Circle
Silicone Butterfly Trio
I also used Distress Paint in Antique Linen and Pumice Stone and Black Stazon and Coffee Archival Ink and Antique Linen, Gathered Twigs and Walnut Stain Distress Inks, Shrink Plastic, and Distress Markers.
I started by die cutting a fancy frame from Kraft card and stamped the Leaves background in Coffee Archival onto it. This was a second generation stamp impression as I wanted it fairly light and my ink pad was very juicy.
Next I cut another fancy shape out of white card and stamped the Regency Background in Antique Linen Distress Paint.
Then I painted both my frame and butterfly with the same paint
I darkened the edges a bit with Pumice Stone paint and then rubber over it with some Treasure Gold to bring out the detail of the designs.
For my vocal image I chose the largest rose from the Botanical 3 set, stamped it onto Shrink Plastic in Black Stazon and shrunk it with my heat gun and then coloured it with Distress Markers. It was now the perfect size to fit inside the little frame!
Finally I cut a banner with the new Tim Holtz banner dies and stamped the word Les Fleur from the Katie Fox Botanical set onto it with Coffee Archival.
Then I inked around the edges of my main background pieces in Gathered Twigs and Walnut Stain Distress Inks and layered them all up until I was happy with my composition:
The little embellishment at the bottom was from another mould from my stash and I hung my little hanger from some cord.
Here are some details still:
I love the detail you get when stamping onto shrink plastic, I think it makes the rose look so dimensional.
With really detailed moulds like these, I found it works best to let the paper clay dry in the mould over night. The clay shrinks just a little bit and then easily can be pushed out of the moulds.
I was really happy the Fleur sentiment fitted just perfectly on the banner.
Well, there you have it. Hope you like my banner, thank you so much for visiting today, and don't forget, there are just a few days left to join our challenge!!!
It's the wedding season and I decided to make a romantic vintage piece that could work as a wedding gift, or indeed any occasion gift.
Did you know that the shop sells a fantastic collection of moulds? These seem to be ever more popular, and for my project I decided to have play with them.
Moulds can be used with all sorts of products, embossing powder, Utee, - there is even a special product made by Modge Podge, called Modge Melts.
For this project I chose to play with paper clay, as it is light, can easily be painted and works beautifully with the more delicate moulds.
These are the products I used:
Stamps:
Botanical 2 by Katie Fox (now Leitch)
Leaves Background
Regency Background
Botanical 3
Moulds:
Floral Circle
Silicone Butterfly Trio
I also used Distress Paint in Antique Linen and Pumice Stone and Black Stazon and Coffee Archival Ink and Antique Linen, Gathered Twigs and Walnut Stain Distress Inks, Shrink Plastic, and Distress Markers.
I started by die cutting a fancy frame from Kraft card and stamped the Leaves background in Coffee Archival onto it. This was a second generation stamp impression as I wanted it fairly light and my ink pad was very juicy.
Next I cut another fancy shape out of white card and stamped the Regency Background in Antique Linen Distress Paint.
Then I painted both my frame and butterfly with the same paint
I darkened the edges a bit with Pumice Stone paint and then rubber over it with some Treasure Gold to bring out the detail of the designs.
For my vocal image I chose the largest rose from the Botanical 3 set, stamped it onto Shrink Plastic in Black Stazon and shrunk it with my heat gun and then coloured it with Distress Markers. It was now the perfect size to fit inside the little frame!
Finally I cut a banner with the new Tim Holtz banner dies and stamped the word Les Fleur from the Katie Fox Botanical set onto it with Coffee Archival.
The little embellishment at the bottom was from another mould from my stash and I hung my little hanger from some cord.
Here are some details still:
I love the detail you get when stamping onto shrink plastic, I think it makes the rose look so dimensional.
With really detailed moulds like these, I found it works best to let the paper clay dry in the mould over night. The clay shrinks just a little bit and then easily can be pushed out of the moulds.
I was really happy the Fleur sentiment fitted just perfectly on the banner.
Well, there you have it. Hope you like my banner, thank you so much for visiting today, and don't forget, there are just a few days left to join our challenge!!!
Friday, 13 June 2014
Summer Wings
Hello everyone, Astrid here to share my first project for June with you.
Summer always gets me in the mood for colour, so for my project today I decided to have a play with some of the gorgeous Dylusions Spray Inks. I made three cards as you can see and the colours I used were: Pure Sunshine, Calypso Teal, Vibrant Turquoise, London Blue and Postbox Red.
I started by cutting 3 panels from Watercolour paper, I then applied my inks with a paint brush.
For this one I used yellow and blue, I applied them with a brush and then sprayed water and dabbed a bit with some kitchen towel. When dry I inked around the panel with Distress Inks in Peacock Feather and Chipped Sapphire.
Next I did some stamping, I used the Speckle and Regency background stamps and stamped in Hydrangea Archival Ink. Next I stamped the butterflies from the Stampers Anonymous Classics 17, first straight onto my card and then on smooth stamping paper, fussy cut, coloured with Distress Inks and then glued onto the panel.
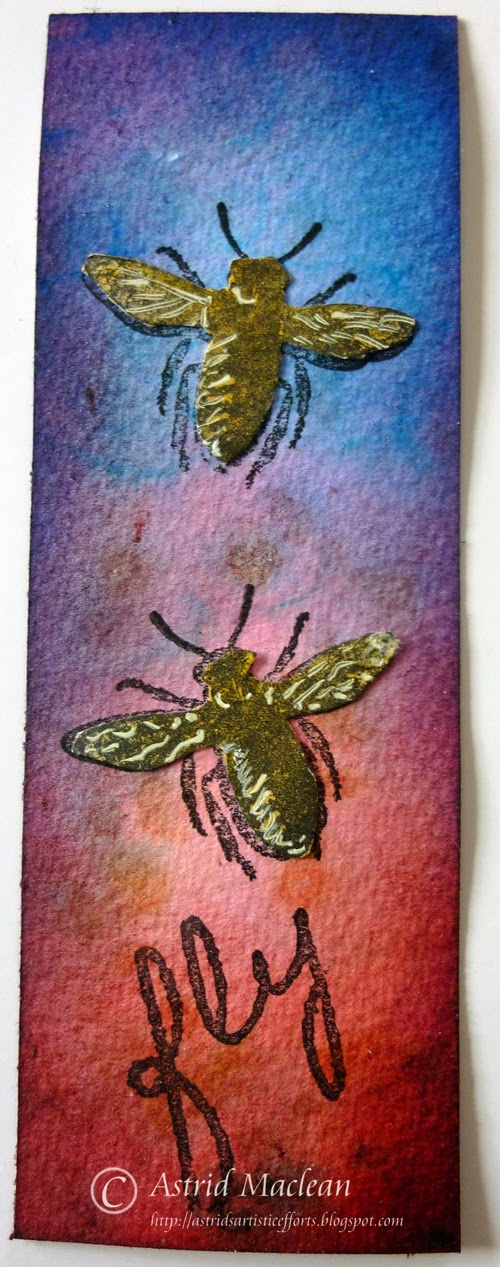
For this panel I used Postbox Red and London Blue. I then inked using Picked Raspberry, Chipped Saphire and Dusty Concord Distress Inks to deepen the colour. The bees are from the Insects and Butterflies set and I used the same technique.
The word Fly came from the new Katy Leitch Fly set.
+
Summer always gets me in the mood for colour, so for my project today I decided to have a play with some of the gorgeous Dylusions Spray Inks. I made three cards as you can see and the colours I used were: Pure Sunshine, Calypso Teal, Vibrant Turquoise, London Blue and Postbox Red.
I started by cutting 3 panels from Watercolour paper, I then applied my inks with a paint brush.
For this one I used yellow and blue, I applied them with a brush and then sprayed water and dabbed a bit with some kitchen towel. When dry I inked around the panel with Distress Inks in Peacock Feather and Chipped Sapphire.
Next I did some stamping, I used the Speckle and Regency background stamps and stamped in Hydrangea Archival Ink. Next I stamped the butterflies from the Stampers Anonymous Classics 17, first straight onto my card and then on smooth stamping paper, fussy cut, coloured with Distress Inks and then glued onto the panel.
For this panel I used Postbox Red and London Blue. I then inked using Picked Raspberry, Chipped Saphire and Dusty Concord Distress Inks to deepen the colour. The bees are from the Insects and Butterflies set and I used the same technique.
The word Fly came from the new Katy Leitch Fly set.
+
For this one I used Calypso Teal, Vibrant Turquoise and London Blue. I then inked using Salty Ocean, Peacock Feather and a bit of Chipped Sapphire DI. I used the same two background stamps again, this time in Tree Branch and Coffee Archival. The little dragonflies are from the Stampers Anonymous Classics 17 set too.
After all my inking and stamping was done I mounted each little panel first on white and then on Kraft card. The fold is at the top.
Hope you like my cards and thank you so much for visiting!
Tuesday, 13 May 2014
Mini Journal for sketching by Astrid
Hello everyone, lovely to have you drop by here! Can you believe the month of May is nearly halfway over already? With the weather turning ever warmer, I sometimes love to do little sketches outside, and needed a little journal that is easy to just pop in your bag or even a large pocket.
I found a template online on Marion Smith's site (so I can't share it but you could check it out if you are interested) and then started to think how I could decorate it with Artistic Stamper stamps. The template itself is for a little wallet type booklet to be used for recipes or similar, but I decided to make it into a little journal instead.
I copied the template onto strong card and then used some Graphics 45 French Country paper to cover the different panels.
Next I stamped one of the stamps from the Architecture 3 set in Sepia Archival ink, cut it out and adhered it to the front of my little journal together with a decorative brad.
The inside was covered with a piece of scrapbook paper from my stash. I then created a little booklet out of Ranger Water Colour Cardstock, as this is so thick I could only fit in one signature, but that is alright, it is only meant to be a little journal.
Below you can hopefully just see how I stitched it straight into the cover.
The flap, which is also the closure was further enhanced by stamping the word Artist Journal from the Classics 1 set by Tim Holtz.
For the back of the little journal I stamped two further images from the Architecture set in sepia, cut them out and adhered them to the cover.
The booklet closes with a little magnet
Once it is filled, it will be easy enough to create another one. Well, hope you like it, I am sure it would be easy to do something very similar with a # 12 manila tag.
I die cut two decorative corners for the front and coloured them with the same ink and of course I also inked around all the edges of the journal as you probably saw.
Thank you for visiting and stay inky!
I found a template online on Marion Smith's site (so I can't share it but you could check it out if you are interested) and then started to think how I could decorate it with Artistic Stamper stamps. The template itself is for a little wallet type booklet to be used for recipes or similar, but I decided to make it into a little journal instead.
I copied the template onto strong card and then used some Graphics 45 French Country paper to cover the different panels.
Next I stamped one of the stamps from the Architecture 3 set in Sepia Archival ink, cut it out and adhered it to the front of my little journal together with a decorative brad.
The inside was covered with a piece of scrapbook paper from my stash. I then created a little booklet out of Ranger Water Colour Cardstock, as this is so thick I could only fit in one signature, but that is alright, it is only meant to be a little journal.
Below you can hopefully just see how I stitched it straight into the cover.
The flap, which is also the closure was further enhanced by stamping the word Artist Journal from the Classics 1 set by Tim Holtz.
For the back of the little journal I stamped two further images from the Architecture set in sepia, cut them out and adhered them to the cover.
The booklet closes with a little magnet
Once it is filled, it will be easy enough to create another one. Well, hope you like it, I am sure it would be easy to do something very similar with a # 12 manila tag.
I die cut two decorative corners for the front and coloured them with the same ink and of course I also inked around all the edges of the journal as you probably saw.
Thank you for visiting and stay inky!
Sunday, 13 April 2014
Embrace Possibility
Hello everyone, Astrid here, happy Sunday to you all!
When this post goes live I will be at Ally Pally and hope to catch up with some of my team mates including Jennie who I have never met before! Meanwhile, here is a pocket tag I created, with a Springtime feel to it....
I started with a size 10 manila tag and created a background using Distress Paints in Picket Fence, Broken China, Salty Ocean and Bundled Sage. I then did background stamping with Archival Inks in Leafgreen and Treebranch using the Katie Fox Numerical stamps. I then inked around the edges with Coffee Archival. I also did some stenciling with Gesso using my finger through some sequin waste.
Next I added the top layer of a paper serviette to add more interest and blended it into the tag with some more of the Distress paints.
As you can see, the bottom end of the tag is quite bare because that's where the pocket will go. I created that out of another tag, and cut the edge with a Sizzix bracket die.
I added some subtle colour to the pocket with Bundled Sage Distress Paint (mainly to act as a resist to further inking that would follow and to provide some texture) I added some stamping along the bottom and deepened the colours with Distress Inks in Salty Ocean, Stormy Sky, Bundled Sage and Frayed Burlap. Next I stamped one of the flowers and a butterfly from the Katie Fox Encyclopedia Botanica plate.
Then I stamped onto two Journaling Tickets to fit inside the pocket with other stamps from the Encyclopedia set:
I will fit a small gift card behind these, so I can use the tag as a gift for someone.
Here you can see them inside the pocket. The top was finished with a decorative brad from my stash and I also added a couple of Chit Chat stickers for my sentiment. A bit of added shadow with a Black Soot Distres Marker and a water brush finished it all off.
Hope you like my tag, have a creative, inky Sunday and a good week ahead. Thank you for visiting!
When this post goes live I will be at Ally Pally and hope to catch up with some of my team mates including Jennie who I have never met before! Meanwhile, here is a pocket tag I created, with a Springtime feel to it....
I started with a size 10 manila tag and created a background using Distress Paints in Picket Fence, Broken China, Salty Ocean and Bundled Sage. I then did background stamping with Archival Inks in Leafgreen and Treebranch using the Katie Fox Numerical stamps. I then inked around the edges with Coffee Archival. I also did some stenciling with Gesso using my finger through some sequin waste.
Next I added the top layer of a paper serviette to add more interest and blended it into the tag with some more of the Distress paints.
As you can see, the bottom end of the tag is quite bare because that's where the pocket will go. I created that out of another tag, and cut the edge with a Sizzix bracket die.
I added some subtle colour to the pocket with Bundled Sage Distress Paint (mainly to act as a resist to further inking that would follow and to provide some texture) I added some stamping along the bottom and deepened the colours with Distress Inks in Salty Ocean, Stormy Sky, Bundled Sage and Frayed Burlap. Next I stamped one of the flowers and a butterfly from the Katie Fox Encyclopedia Botanica plate.
I will fit a small gift card behind these, so I can use the tag as a gift for someone.
Here you can see them inside the pocket. The top was finished with a decorative brad from my stash and I also added a couple of Chit Chat stickers for my sentiment. A bit of added shadow with a Black Soot Distres Marker and a water brush finished it all off.
Hope you like my tag, have a creative, inky Sunday and a good week ahead. Thank you for visiting!
Subscribe to:
Posts (Atom)