Showing posts with label Ranger. Show all posts

Sunday, 24 May 2015

Hello Hanging

Hi All,

Debs here with a small wall hanging. Journaling doesn't have to be in a book, it can be on any surface you want it to be, and I was perusing around The Artistic Stamper, picking up some of the new Dylusions Paints - which are just amazing, if you haven't already tried them, you really should!! When I saw this little hanging board, it jumped into my basket honest it really jumped!! Here is what happened when I quite literally had a "light bulb moment"!!!
Take one Papier Mache Hanging

Paint some gesso to cover

With a brayed lightly add Postbox Red Dylusions paint, ensuring you start at an edge makes things easier and work the brayer in all directions


Followed by Lemon Zest Yellow Dylusions

Followed by London Blue


Followed by Fresh Lime 


Using white Dylusions paint stamp using the new "Decay" stamps from The Artistic Stamper, I used my finger to apply the paint to the stamp, which worked quite well.


Then I added some random stamping with Archival Jet black, and then stamped and embossed the large light bulb stamp, added some yellow paint round the inside edge.  Added the hello stamp from the Jounaling words 4 Set. I decided to try out the new Ranger embossing dabber to make the light bulb 'shine'.  Popped some Distress paint in pewter to the bayonet.  Then added some white pen to the dotty border stamp and the New Decay spiral.

Monday, 24 March 2014

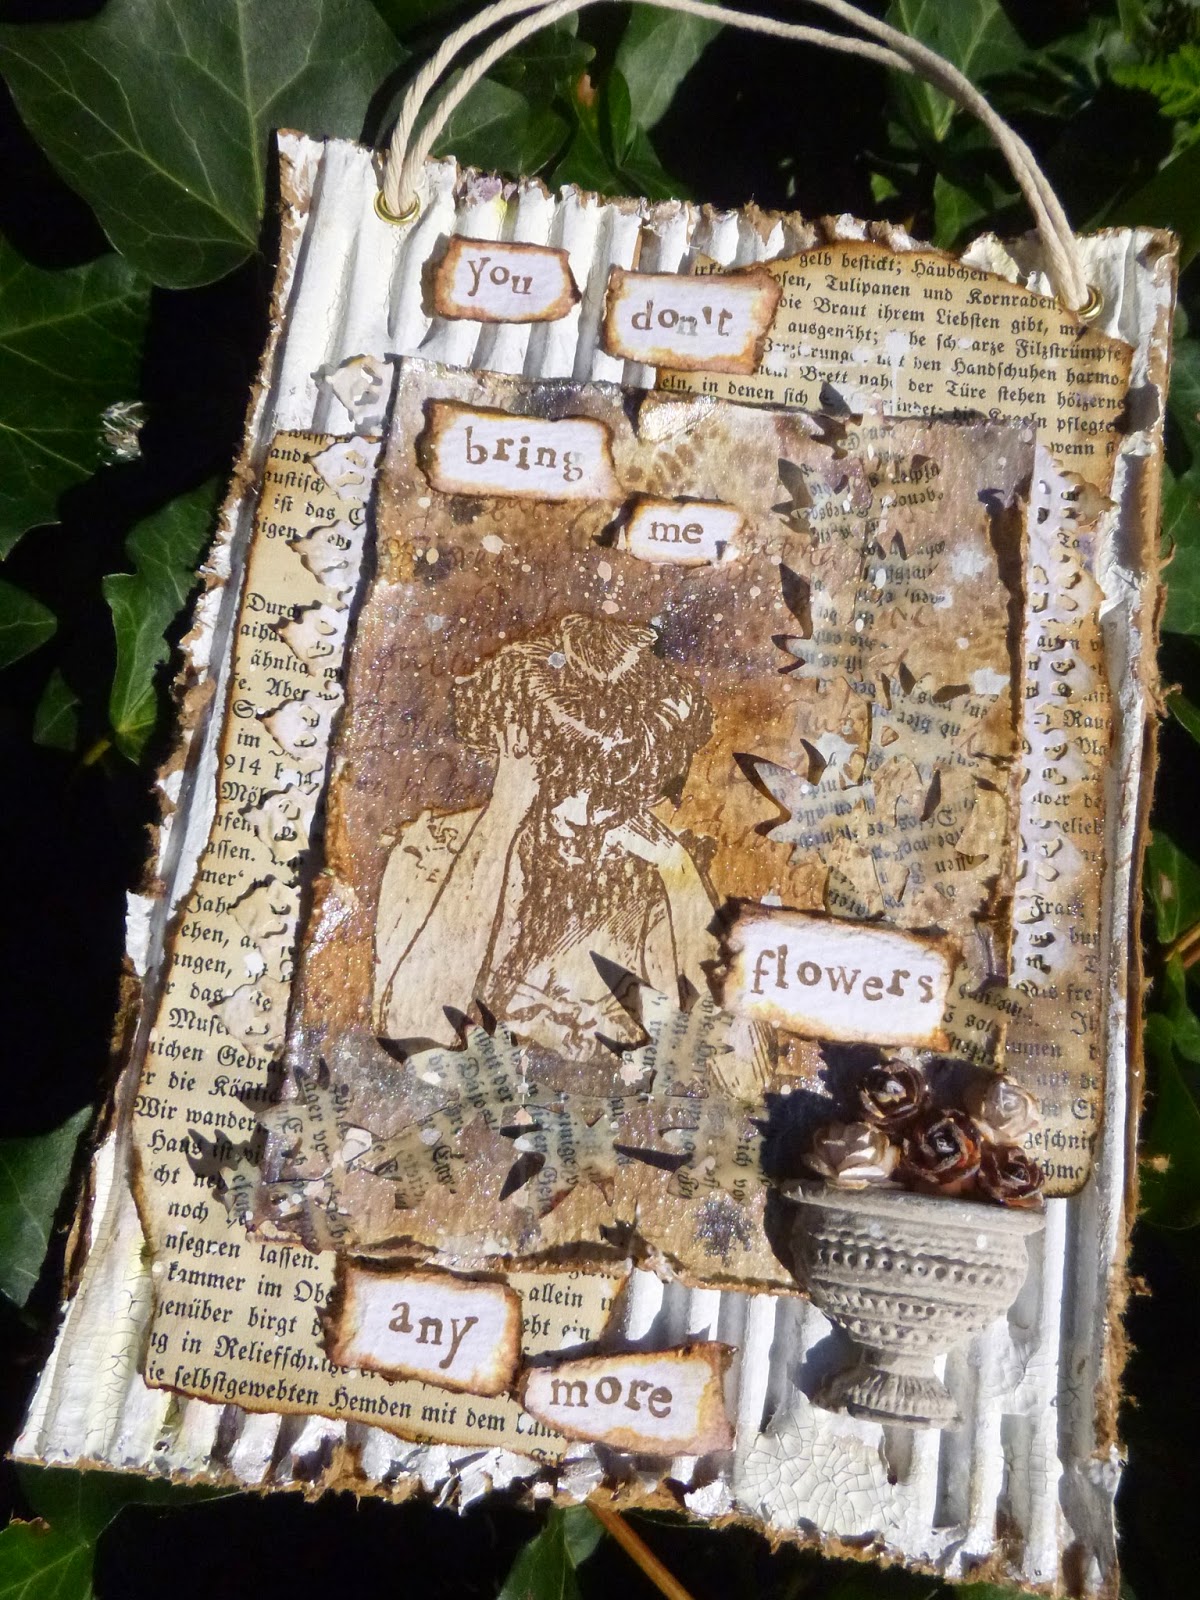
You don't bring me flowers...

Hello all, Alison (butterfly) here again, with a musically-inspired hanging for you today.  (Click on the photos for close-ups if you'd like to see more.)


This happens to me a lot... a phrase or song lyric will go round and round in my head until I'm pretty much forced to allow it to play along.  If you want to listen while you look, You Don't Bring Me Flowers is the song that invaded this creation!


I know this song was triggered by the new toy I was playing with to create the stone urn on this piece... there's something very melancholy about old stone planters in my head, and that dictated how this piece took shape.


Jennie has just added these fabulous Katy Sue Designs silicone moulds to The Artistic Stamper shelves.  There are some really lovely and intricate moulds - and I thought this little trio might have dollshouse potential as well as crafty applications.


I had meant to use some air-drying clay, but when push came to shove I wasn't patient enough to wait for it to dry, so instead I melted some beeswax in a tart tin, using my heat tool, and poured that into the moulds.


I sealed it with multi-medium, and then painted it with various colours, including the marvellous Stone Fresco.  The little mulberry paper flowers are from my stash.


Regulars will know that when I need melancholy, I usually reach for the Gibson Girls, and this woman was perfect for my purposes.


I stamped her in Potting Soil Archival onto some Distress Watercolour Cardstock, and then used a mask to allow me to ink and stamp around her.


I stencilled around her using the new Tim Holtz Doily mask, and stamped with my favourite Calligraphy Mat, but lots of the layers have almost disappeared under the final spritzing of Perfect Pearls Mist in Pearl.


Worth it for the shimmer - though it's hard to capture in a photo.


The book page ivy strands had been sitting around on my desk for ages (created for this art journal page at the beginning of February, but then that needed something darker).


Despite the layer of beeswax covering them, they're pretty fragile, so it's a miracle they've survived this long!


The watercolour panel is layered up over some distressed book pages...


... with some die-cut paper lace tucked under the edges.


Another crack at that shimmer here... with lace and book page and corrugated card and all!


The words are stamped on another piece of watercolour cardstock...


... torn...


... and inked around the edges.


And I used gesso and some Picket Fence Crackle Paint on the corrugated background to create a shabby chic look.


I rather like all the layers of distressed elements, and the masking of the main image which I think really makes her pop.


A couple of eyelets and some pale twine, and it's ready for hanging.


Thank you for stopping by.  There's still almost a week to join in with our Words and Numbers challenge - hope to see you there!

Ingredients used:
Artistic Stamper stamps: Gibson Girls #1, Calligraphy Mat #19
Katy Sue Designs Silicone Moulds - Pots and Urns
Tim Holtz Spring Greenery Decorative Strip Die
Tim Holtz Layering Stencil - Doily
Distress Watercolour Cardstock
Distress Inks - Walnut Stain, Vintage Photo
Archival Inks - Coffee, Potting Soil
Fresco Paint - Stone, Snowflake and various others
Distress Crackle Paint - Picket Fence
Gesso
Ranger Beeswax
Blending Tool
Mini Blending Tool

Friday, 2 August 2013

Songbird by Linda Ledbetter

Hi everyone! I'm Linda Ledbetter from Studio L3, and I'm so excited and honored to join The Artistic Stamper team as their guest designer for August! 

When lovely Emma invited me to browse the stamp collection and choose a few favorites for my projects this month, this exotically gorgeous lady (Donna's Songbird 2 stamp) was the first image to catch my eye. I just love her! 


I stamped our pretty Songbird onto Ranger Specialty Stamping Paper using Jet Black Archival Ink. This is my favorite ink to use when I'm going to be watercoloring with Distress Ink, as it's oil-based and won't run.

Once the image was dry, I placed dabs of Vintage Photo, Crushed Olive and Scattered Straw Distress Stain onto my Non-Stick Craft Mat, and used a Wide Tip Water Brush to randomly swipe the colors across the paper. I didn't blend the colors together, as I wanted the brush strokes to show. I love this simple technique for creating some visual texture!


Once the background was dry, I used a Fine Detail Water Brush with Distress Markers to color in the details on the image. The lady's complexion is tinted with Tattered Rose and Spun Sugar, and her eyeshadow color is Broken China. Her headband is colored with Ripe Persimmon, Worn Lipstick and Festive Berries, and I used Picket Fence to add some highlights to her hair. 


Next, I again used the Jet Black Archival Ink, this time with this awesome, bold image from the Borders A5 #2 set. To complete the front panel of the card, I edged it with Tarnished Brass Distress Paint

The background panel of the card is a deep teal page from the Ranger Distress Core'dinations Paper Stack. I again used the Tarnished Brass Distress Paint, this time with the little circles stamp from the same Borders A5 #2 set, to add a fun pattern to the paper.

Finally, I cut one of the fabric roses from a piece of Idea-ology Trimmings, dabbed it with Ripe Persimmon Distress Stain, and attached it to the lady's headband using Glossy Accents adhesive. I added a piece of scrap ribbon to complete her summery look. 

I had so much fun creating this simple card, and am in love with the images I got to play with from The Artistic Stamper! Thanks so much to Jennie, Emma and the team for welcoming me, and to you for taking the time to read my post. I'll be back later in August with another project to share. 

Have a fantastically wonderful day!
--Linda


Tuesday, 14 August 2012

Bright Ideas Notebook by Marjie Kemper

Today I'm sharing a little notebook I made with the Inspiration Lightbulb stamps.  I stamped the blank bulb twice on manila cardstock and then 'filled' one bulb with mini gears from Borders A6 and another with the Notebook background stamp.  I stamped the bases of the bulbs onto Ranger's metal foil tape and popped the bulbs up on cardboard.  
The main tag is inked with distress inks and covered with the mini gears again.  Can you tell what I used for the frame around the tag? They're the rooftops and doors from Kat's Creations Our House plate.  I couldn't stop playing with them after making my first AS piece back at the beginning of the month.   The inside is filled with a combination of blank tags and notebook tags. 
I've used heavy black cardstock to reinforce my covers and Dylusions ink sprays, distress inks, black archival ink, and distress markers for my coloring.  
I'd love it if you'd visit my blog (and please let me know you came by so I can come see yours, too.)

Hope you have a wonderful day, and find some time for creative play!

Marjie


Thursday, 2 August 2012

Kathryn Wheel Project, by Marjie Kemper

I'm very excited to be guesting here at The Artistic Stamper this month... thanks so much to Jennie and Emma for the invitation!
I chose Kat's Creations house stamps as the focus for my August calendar page.  These funky house stamps are available in several different sizes and combinations ~ I used the set called Our House A6. I stamped the houses repeatedly on manila cardstock and cut and colored them before adhering to the page. I also cut some of the stamped images apart and regrouped them so my little town would have some variety in the way the buildings are positioned.  They are all colored with Ranger Distress Markers and edged with black soot Distress Ink.

For the background, I sprayed my large watercolor paper with Dylusions Ink Sprays (lemon zest, pure sunshine, and postbox red), spritzed with water, and let all the colors run a bit.  I then stamped and stenciled using loads of Crafters' Workshop stencils (mini circle explosion, large circles, chicken wire, punchinella, mini harlequin, chevron) and Distress Inks (barn door, spiced marmalade, wild honey, mustard seed, gathered twigs and black soot).  

The background stamps are a mix of Tim Holtz's (Ultimate Grunge), this bubble border stamp, the numbers stamp from the Family Values set, and a few unmarked ones from my stash.  The banner is by Dyan Reaveley, stamped on manila and colored with her Dylusions ink sprays.  I used a square punch for my dates and wrote August spanning the width of the page. 

My date format is irregular but that's been a great part of the fun of participating in the Kathryn Wheel project... seeing how many ways one really can make a calendar page.

I'd love it if you'd visit my blog (and please let me know you came by so I can repay the visit!) You can find out more about the Kathryn Wheel Project on Kate Crane's blog.  Nearly a hundred people play along each month from all different parts of the world and all the different styles are just mind boggling. 

Hope you have a terrific day, and find some time for creative play!

Marjie

Friday, 2 March 2012

Wax doesn't have to hurt by Sue West

Hi everyone.  I'm really excited to be guest designer this month at the Artistic Stamper Creative Team, and to be able to share some of the fun I've had using just a few of the great stamps that Jennie produces. For my first piece I have used the Airmail Bird Collage Elements stamps. I just love that raven. 
Guess what. I made a collage.
I love any excuse to get painty, inky, gluey and dig out my meltpot and beeswax.


Here's the supply list for my collage.
Airmail Bird Collage Elements stamps
6 x 6 deep edged canvas
Ranger Studio Multi-Medium (matte)
Vintage maps and sheet music and postage stamp
White and manilla cardstock
Ranger Archival Ink  - Jet Black, Cobalt, Vermillion
Ranger Distress Ink - Vintage Photo
Acrylic paint ( I used Golden Fluid Acrylics but Adirondack Paint Dabbers would work really well)
MeltPot
Clear UTEE
Natural Beeswax
Designer Metal (gold leaf)
Ranger Distress Embossing Powder - Fired Brick
Vintage pen nib
Crown

To get started collage the vintage papers onto your canvas using multi medium and when dry use your paints sparingly to highlight interesting bits of the background and the if it all seems a bit bright scrape some creamy coloured paint over the entire surface with an old credit card. This only needs a tiny amount of paint. ( Claudine Hellmuth Traditional Tan acrylic would be perfect for this. I have also painted the edges of the canvas dark brown. It's best to do this now as if you get wax runs over the edges the paint never really adheres properly. I have pulled the brown paint just over on to the front of the canvas as I like the vintage look this gives.
Using Archival Ink for all your stamping (so it doesn't run). Stamp the postmark onto tissue and the raven and the words onto thin white cardstock or paper.
I've used Vintage Photo Distress Ink to colour the edges of the bird words and also the air mail element.
Now it's time to get out your Meltpot. First I made the UTEE heart by dissolving Fired Brick embossing powder in some UTEE and the pouring into a tiny cookie cutter. I don't worry about little bubbles as I think it just makes it look more vintage.  Dab the pen nib with black acrylic paint to age it.


Next melt your beeswax and having decided where you want your various collage elements to go apply the wax with a natural bristle brush and use your heat gun to keep it liquid if you need to get rid of brush marks. ( Personally I quite like to leave little dribbles and runs of wax as it all adds to the texture, and I just love the smell of that hot beeswax). I decided not to completely cover the script with wax and left the edges curled up  and got a semi-translucent look where the wax was in contact with the paper, again just adding extra texture.
The pen nib, heart and crown (cut in half) all embed into the wax with no problems.

Finally (and completely optional) I applied a sparing coat of multi-medium one edge at a time  and dabbed on gold leaf, which only adheres in some places and looks really old, especially if you then seal it with some more multi -medium that you thin down slightly with  brown paint and some water to make a wash. This gives a lovely grungy look.

If you've never tried beeswax collage have a go. It's great fun. And when you've finished your art and the wax has really solidified just buff, buff, buff with a soft cloth and you will get the most amazing sheen on your work.

Thanks for looking and see you soon.
Sue x

Tuesday, 3 January 2012

Some simple thinking and inking!


A big hello and a Very Happy New Year wish to you all! Sarah here with my first Guest spot at the Artistic Stamper! Firstly, I hope you've all had a fantastic time of celebrations, lounging, fine food and merriment! A whole new year of crafty discoveries lie ahead...but where, oh where, do we start? Well, I have enjoyed all the tinsel, glitter and glam stuff, but I thought some back to basics, old school inkiness might just be the tonic! Some days you just can't beat fine stamps, Distress Inks and tattered edges...
After all the festive tags and mass card production, it's nice spending some quality time with just a couple of free themed creations. I was drawn to the elegant and fine details of the flowers on The Botanical Plate 1. I created a stencil by drawing and cutting out three rectangles from a card scrap. I taped it lightly to my card and began gently sponging graduated shades of Distress Inks with a piece of Cut 'n' Dry Foam. I used Mustard Seed, Scattered Straw and Wild Honey working from light to dark. Sponge gently taking care not to drag or twist otherwise you'll get streaks and lines.

I gave it a quick dry with my heat gun and then I inked up my stamp in Plum Archival Ink by Ranger. It's a great colour and just a little different from the brown shades. I made sure I stamped off centre, between two blocks so the flower can be seen against both the white card and rich inky tones. I then stamped a Wendy Vecchi sentiment which seemed to fit perfectly with the daisy. See lots more Wendy words here! I distressed and inked the edges and layered it up onto some Graphic 45 design paper and a white card base.

For my second card I turned the stencil, slightly changing the colours by using Scattered Straw, Wild Honey and Rusty Hinge Distress Inks Take time to gently blend the colours. Don't be afraid to apply more ink to achieve the exact shade you want. Make sure your stencil has fairly wide sides otherwise you'll get ink around the card edge too!
This time I went for the Lilies (from the same plate) although they rather remind me of daffodils with these rich colours. I stamped them with using Ranger's Coffee Archival Ink. I also added a two lines of random machine stitching to my card base for a shabby look...see you don't have to be able to sew in a straight line at all! For extra interest, I also added some gold thread, ribbon and lace scraps, and an orphan button.

Once again all finished off with fine Wendy words. Coincidentally, these two wonderful floral stamps are also available to buy individually here. So if you're on a post Chrimbo budget, you can still play along!
Well, that's me all done...
Just a simple but effective idea to get you going and one you can adapt for use with many colours and stamps. Especially when you think of all those thank you cards you need to write, not to mention the faint whisper of Valentine's and Mothers Day! Thanks for calling by and happy crafting! Sarah.