Hi everyone!
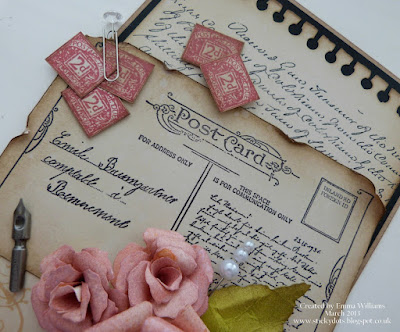
Today, I'm sharing a card with you all, using the gorgeous new Carte Postale stamp set from Katy Fox. As always, I've taken lots of pictures for you to see all the detail and I hope you like what I've made!
To begin with I created the background to my piece by using the fabulous new On The Edge Torn Notebook die from Tim Holtz and Sizzix. I can see I'm going to get plenty of use out of this one... I used a piece of cream card, which I die cut with the die, then blended the die cut paper with Old Paper DI over the surface and Frayed Burlap around the edges. I then stamped the paper using the Calligraphic Mat #11. Once that was done, using a Tim Holtz stamp from my stash, I stamped the corners of the card with a Versamark ink pad and then brushed over the top with Heirloom Gold Perfect Pearls. I matted the completed background onto some black card, followed by a piece of kraft card.
I then took a further piece of cream card, blended it with DI's and using various stamps from the Carte Postale set, I created a postcard. I then aged the edges of the postcard by ripping and curling them for a vintage look and mounted it onto my background.
To create the roses, I used Tim's Tattered Florals die and die cut enough card to make three dimensional roses in two sizes. I blended the card with Victorian Velvet DI and then spritzed them with the Gumball Perfect Pearls mist. After drying off all my die cut cardstock, I then created the 3D blooms and added these onto my card, together with a leaf, die cut using the Tattered Leaves die.
Next, I used one of the butterflies from the Insects and Butterflies #1 plate, stamped it onto white card and coloured it with Distress Markers, before adding a spritz of the Perfect Pearls mist to give it a shimmer. I then added it to my cluster of roses.
I inked up the postage stamp stamp from the Carte Postale stamp set with Vermillion Archival Ink and stamped five of these onto white card, cut each of them out and then arranged them onto my card, together with a Idea-ology Gem Clip.
Finally, I added one of Tim's Idea-ology Pen Nibs and attached a decorative pin as the finishing touch.
So, that's it from me for today and I really hope that I've inspired you with my card...
See you all again very soon...Emma x


12 comments:
This looks fantastic I love it !!!hugs Nikki
This is such a great set of stamps and I absolutely LOVE what you did with it!! Great make!!
This is lovely, Like Astrid said this is a great set of stamps. x
The composition of this piece is just lovely and the distressing and layering lends it the most beautiful vintage feel. What a wonderful way to showcase these fabulous stamps and dies. Your flower cluster with the butterfly and stick pin is gorgeous!
This is gorgeous Emma !!
What a gorgeous creation, Emma - it's absolutely lovely from top to bottom!
Alison x
what a gorgeous card !!!
Mmmmmm delish card ;) Love those flowers and everything works so well together
xoxo Sioux
Ooh I love everything about this Emma, I'm adding the stamps & notebook die to my crafty wishlist jar right now!
C xx
Hello Emma
You have designed a gorgeous card and I love your Roses.
Smiles:)
Sue
Wow... that should be on a wall somewhere! It's gorgeous!
Now that is a stunning piece Emma. Love the notebook page and the scattering of complimentary stamps and flowers over the postcard. Hugs, Jenny x
Post a Comment