Showing posts with label stazon. Show all posts

Monday, 10 August 2015

Sea Shells on the Sea Shore! By Debs

Hi All

Hope you are all getting as much sun as we are down here in Sunny Kent! When its nice and warm and sunny it makes you think of holidays and the sea and with that in mind I have created this little sea scene.


I painted the box in Distress Paint and went for Mermaid Lagoon (it seemed rude not too)


The background was cut out of a Gelli Print i had made the other day using Dylusions paints and the Swirls Stencil.  After the paints had dried I then sprayed it with pale blue Colour Bloom spray.


I then stamped the shells #1 plate onto shrink plastic with coloured stazon ink.  This meant that as they were all ready coloured i didn't need to colour any of the images as once the shrink plastic and the heat gun had done its stuff they were all a really nice colour!  I painted some multi medium in various places and the sprinkled Prima micro beads to create a sand effect! Then added in the various shells.  I also used the Simple Swirls plate to create the sea grass. Although some of the swirls are not ideal for using on shrink plastic I didn't want them to be perfect, they did actually come out better than expected.


The bubbles around the frame were stamped with one of the borders from the borders A6 stamps and the 3D bubbles were made by simply using a glue gun and leaving blobs on a mat on to harden and dry.

Well I hope you like my latest piece to get you all inspired and entering this months fab challenge Anything Goes.  Cant wait to see what you all come up with.

Stamps used


Wednesday, 24 June 2015

Not Just An Ordinary Jam Jar by Debs

Hi All

Hope you are all enjoying the sun.  I thought I would show you a stamped and decorated Jam Jar for this post


I started by pouring some Fresco Finish paint into the jam jar, i used two colours (vanilla and tangerine) and swilled it around until the inside was completely covered. With the paint that was left over after tipping out the excess.  I painted the lid and two journal pages - think I may have put a tad too much in!!

Once the jar was dry inside, I inked up The Artistic Stamper swirls stamp with Teal Stazon.  I then  rolled the jar across the stamp,  rather than stamping onto the jar, this way it eliminated any slippage.  Whilst Stazon does dry quickly I did leave it to dry properly, so that it wouldn't smudge.  When it was dry I then took The Artistic Stamper daisy stencil and wrapped it around the jar, holding it as tightly as I could, I pushed grunge paste through and left it to dry.  Whilst waiting for it to dry I stamped butterflies from the butterfly set that was recently released onto shrink plastic with teal Stazon. I stamped four different ones for the middle and then three all of the same for the lid, coloured them in, cut them out and then heated the shrink plastic with heat gun to shrink.


To get the butterflies to stick together on the lid once they were coloured and shrunk I re-heated the edges and once warmed up added glossy accents and held until they fused together.  Whilst waiting for the butterflies to fuse I painted the grunge paste daisies orange around the jar and on the lid. 
 
Close up of lid
 
Thanks for joining in the fun and don't forget there is still a few days left to show us your creations.  We really would love to see them.

Thanks for looking
Debs
notationsofacrafter-debs.blogspot.co.uk

Products used


Friday, 2 November 2012

Steampunk in October... by Joanna King

Hello! My name is Joanna (aka Asia King) from Under a Creative Spell and I am super excited to play this month with the Artistic Stamper Creative Team!

My first guest design project was inspired by Kate Crane’s monthly calendar challenge. I must admit, I haven’t been very disciplined to keep up with all the months but after seeing this amazing range of stamps, my hands were immediately itching to start crafting!

For my calendar pages I used water colour paper, which I first painted with gesso. Then all the fun began! Using purple, orange and white acrylic paints I painted the pages, smearing and overlapping the colours as I went.

Then to start building layers I randomly sponged the paints through a mask with a collage of numbers. When the paint was dry, I stamped layers of images from Large Dotty Closed Background and Punk Plaid Background and added some paint accents through sequin waste.
Using an embossing ink I stamped the 'bubbles' from the Borders A5 #2 plate and heat embossed them with Stampendous Aged Wine embossing enamel. Then, with white, black and gold paints I stamped a number of circles with plastic bottle tops and I added a few black lines with Ranger's craft scraper.
To 'frame' my page I used the tiny dots and gears from the Borders A5 #2 plate which were stamped with Pumpkin and Jet Black StazOn inks.
My calendar days were punched from scraps of patterned paper and the edges were distressed with  Spiced Marmalade and Dusty Concord distress inks. The Steampunk butterflies and the snail are from the Tick Tock Butterflies set, which I stamped onto patterned paper and coloured in with the distress inks.

To finish the page I added some black rub ons. I hope you've enjoyed reading about this project and I look really look forward to sharing my next project with you!

TTFN!

Wednesday, 26 October 2011

What can we do with our stamps?... by Tina Barnett

Hi Crafters!

It's Tina here. I thought I would try something different with my stamps. What better then a Christmas decoration!!! Yes I said it! CHRISTMAS!!!!

I have used a wonderful Christmas stamp from The Mabel Lucie Attwell range by The Artistic Stamper. She is called Holly.

I started off with a wooden heart shape and painted over it with acrylic gold paint. Next I stamped Holly using Stazon ink . I coloured the stamp with twinkle H2O's, but you could use any medium you liked.


I then stamped the back of the heart with an Artistic Stamper background stamp. I love the dots!!!


I then completed the decoration with web thread to hang it up and some gems.


I really loved doing something different. Hope you enjoyed looking!


Bye for now


Tina xx


Sunday, 2 January 2011

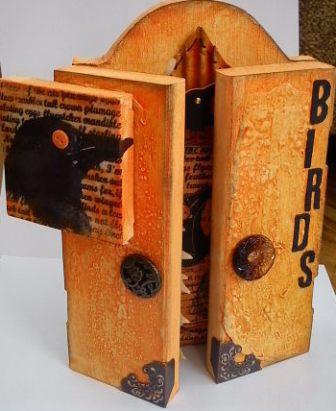
Bird Triptych By Tracy Evans

Happy New Year to you all, hope you all had a fabulous Christmas break.  It is my first time as a Guest Artist here at The Artistic Stamper Creative Team Blog and I am thrilled to have been invited.  I would like to take this opportunity to thank Hels and Jennie for the chance to show my creativity over here.

For my first piece I decided I would decorate a TRIPTYCH as this gives me more space to be creative and they are great fun to alter.

1. Paint the entire piece with Gesso and allow to dry.  Add Terra Sahara to the front and back only and again allow to dry.  Once completely dry, apply acrylic paint in orange, with highlights of yellow or yellow pastel, either will work well for this piece.   I love the wonderful texture the Terra adds to your artwork and when heated you achieve a wonderful bubble effect.  The inside of the triptych has not had any Terra added just acrylic paint.
2. Take a mini canvas and paint with acrylic paints as before and set aside to dry.  Using the Airmail Bird Complete stamp, ink up with StazOn black and stamp onto white tissue paper, tear around the image and adhere this piece to the mini canvas.  Add a small button to complete the mini canvas.
3. Add Tim's Accoutrements as handles to the triptych along with Corners to the bottom edges. To complete the front I have added BIRDS text using Tim's Chip Block Alphabet Die.

I have kept to the theme of BIRDS for the inside of my triptych too.

1. The left hand side of my triptych has had Tattered Leaves added which have been cut from card stock coloured with the same acrylic paints as the triptych.  Two of the leaves have been stamped with the Distressed Background stamp and before the leaves were adhered to this panel I added the Sequin Waste background. To complete this side panel I added two mini birds.
2. Colour a piece of card or watercolour paper with acrylic paints and once dry stamp the text from the Airmail Bird Collage Elements stamp on top of the coloured card and cut into a panel sized piece to create your bird house.  Machine stitch around the edges  Stamp the bird and postage stamp onto coloured card, cut out, machine stitch around the bird, add a button for the eye and add all the pieces to your house.  To complete, add an Idea-ology Philosophy Tag and add the completed piece to the centre panel of the triptych.
3. For my roof, I added some corrugated packaging that came with a Christmas present.  I cut it into a roof shape, painted with acrylic paint and hand stitched around the edge with black thread.  My bird has been stamped onto shrink plastic and shrunk using a heat tool and added to the roof.  A small gem has been added for the eye.
This is the last panel of the triptych which has had the caged bird added from the Birds Of A Feather sheet.  I have also added the Sequin Waste background as with the first inside panel.  To complete I have added Sing, bird, sing, from the Birdsong Elements sheet and leaves from Tim's Idea-ology Foliage.

Until the next time, have a fabulous week, Tracy Evans x x