Monday, 14 May 2012

Time Flies by Jennie Atkinson

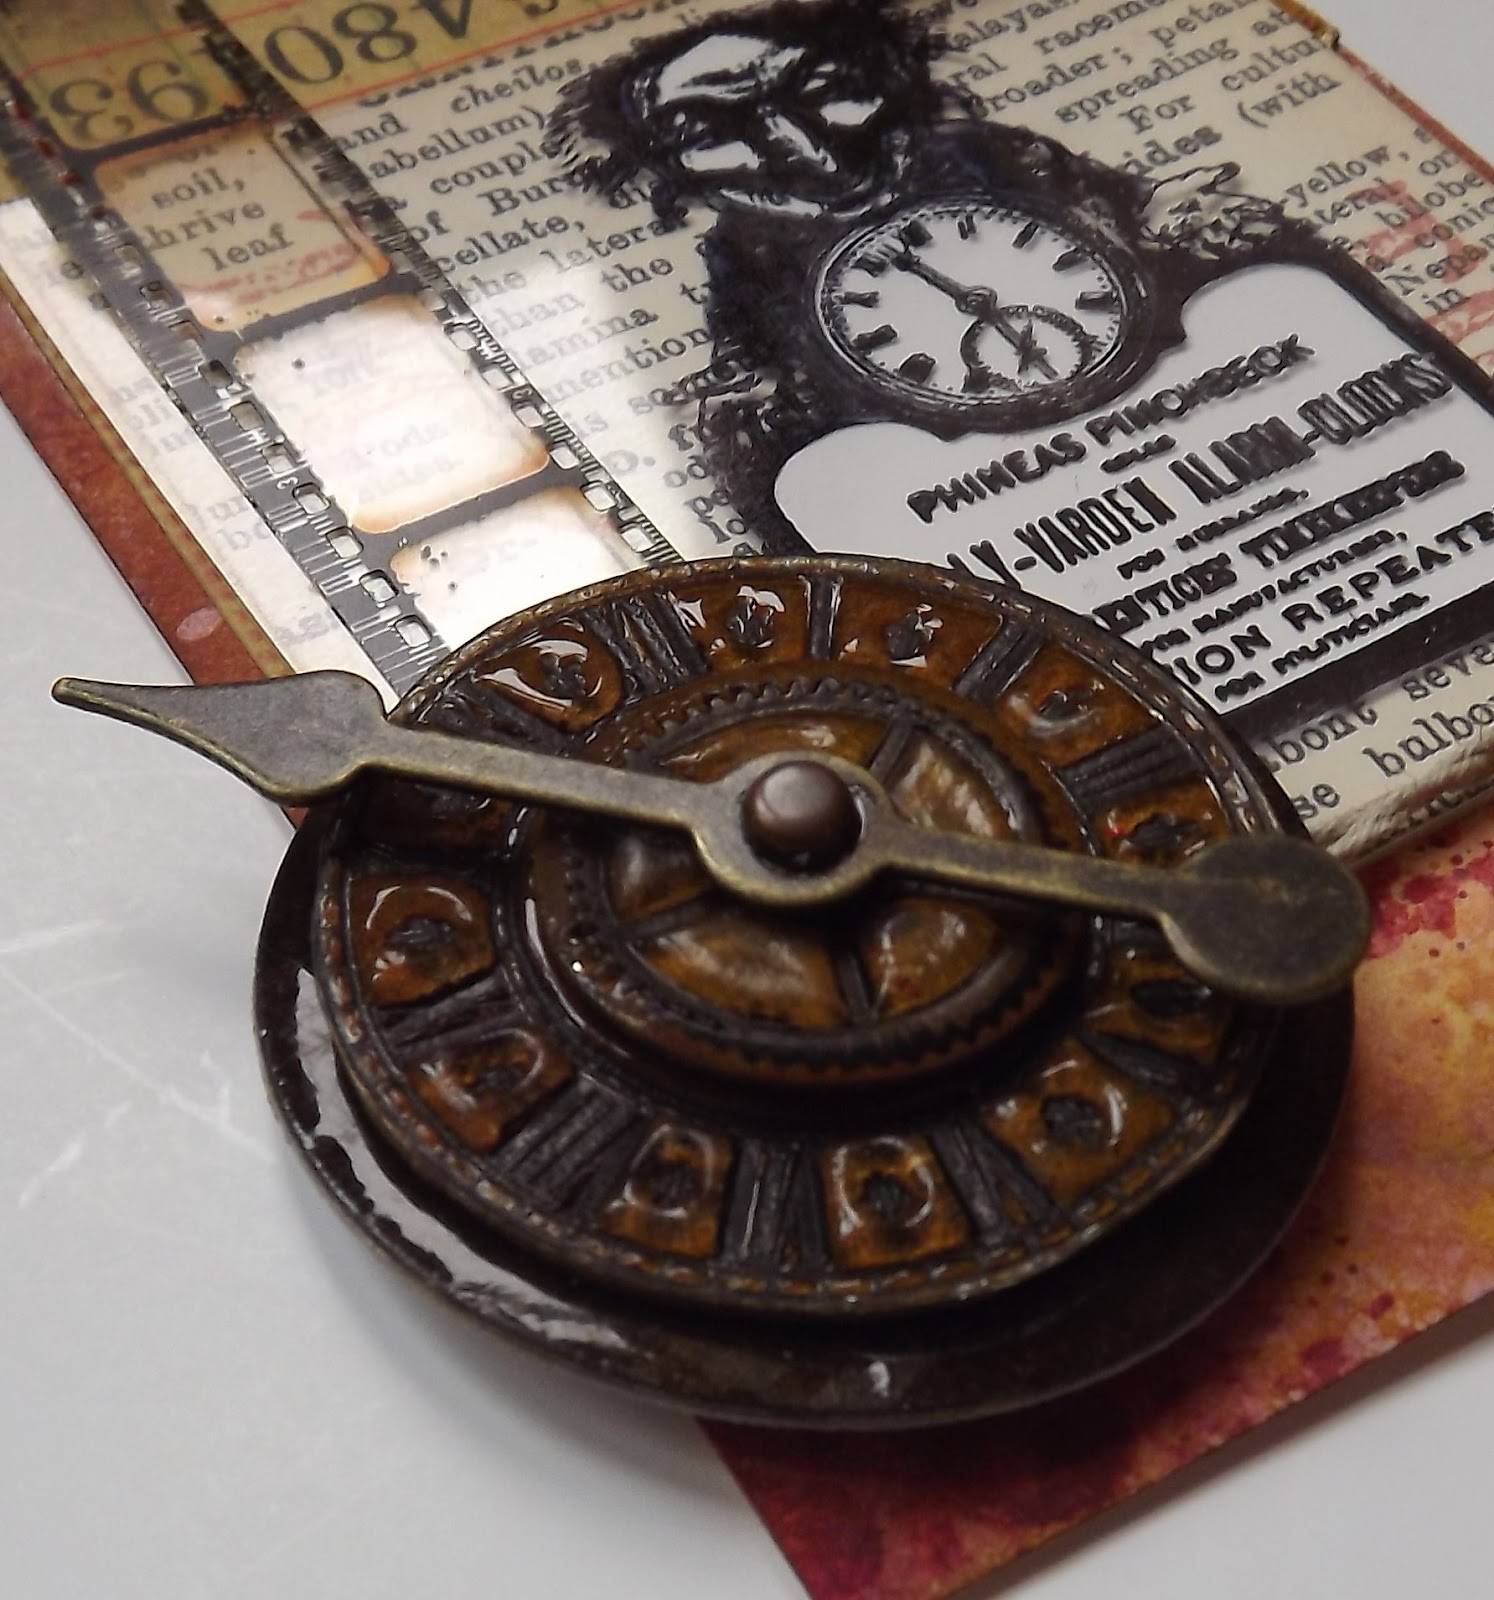
Well here I am back again with another project – this month is just flying by!  Time - we never have enough of it, but I can't get enough of time based stamps and particularly the Time Clock Plate with all the wonderful clocks, cogs and words.  So I decided to use various parts of the plate to make this “Tick Tock” tag.
For the tag I used Distress Stains Wild Honey, Fired Brick, Shabby Shutters and Picket Fence and Tim Holtz’s Marbled Distress Stains technique.  Another combination of colours I love.  Once dry I edged the tag with Vintage Photo Distress Ink and stamped the words Tick and Tock on the tag and again on some vintage paper.  I also dyed some seam binding with Fired Brick Stain.
My plans for Phineas Pinchbeck didn’t quite materialise (isn’t that moustache just fantastic!). I was unfortunately losing too much of the detail against the other papers. So I decided to stamp him with Black Archival Ink on acetate and then again on white cardstock. I cut out the cardstock image concentrating only on the head, the clock and the sign (all in one piece) and then carefully stuck the paper on to the back of the acetate, making sure the text was aligned. And he just “popped” off the tag! This is a technique I use alot for detailed stamps and it is amazing what effects you can achieve by using different colours or textures on the "behind" stamping.

We’ve obviously all been playing with our UTEE this last month – first Frankie giving us some fantastic triple embossing techniques and then Alison’s wonderful Steampunk Canvas.  I was also playing with mine!  I coloured a piece of chipboard with Wild Honey Distress Ink and using the triple embossing technique embossed three layers of UTEE.  On the final layer whilst the UTEE was still hot I inked the small clock with Black Archival Ink and stamped it into the UTEE.   Once it had cooled I was able to cut around the shape with some sharp scissors.  I created the cog and the base in the same way but kept the base smooth without any stamping. The three layers create a very sturdy embellishment.

 The large clock on the upper part of the tag was stamped on Grungepaper with Coffee Archival Ink and coloured with Wild Honey Distress Ink.  Just goes to show how versatile these clocks and cogs are.
I got quite carried away with the UTEE and made an ATC encapsulating some Tissue Tape and stamped cogs and clocks under the triple layer of UTEE. I stamped the words Tick Tock into the hot UTEE at the end using Black Archival Ink.

I had great fun creating this tag and ATC using the Time Plate.   I hope you all have a great week and find time to have some fun too.  Thank you for looking and I look forward to bringing you my last project at the end of the month.

Love Jennie

Saturday, 12 May 2012

Beside the Seaside by Sioux Jenneys

Hello everyone! It's a tag from me today :)


1. Using stamps from the new Beside the Seaside plate stamp one of the fish in Archival black and three of the shells in Archival coffee and sepia onto watercolour paper and cut out.

2. Colour the fish with the fabby new Distress markers (I used spiced marigold, chipped sapphire and  fired brick)

3. Colour over the shells in Distress Ink scattered straw using a cut and dry nib.

4. I inked the base tag using Distress Inks in scattered straw, weathered wood, faded jeans and bundled sage then did the spritz and flick effect that works so well with watery themes ;)

5. I then used the large and small wavy stamps from the Borders A5 and A6 plates to create a bit of seaweed using Distress Ink bundled sage and some air bubbles using the one of the smaller borders from the A6 plate in Archival  aquamarine

6. Stamp the sentiment from the Beside the Seaside plate in Archival black and attach the fish and shells before adding some pearls and some ribbon.


Beside the sea is a wonderful place to be :) See you again soon!
xoxo Sioux

Thursday, 10 May 2012

London's Calling by Emma


Hi everyone.

I hope that May had been good to you all, so far and isn't it going so fast? I can't believe it's already time for me to share my next post with you all and today, I thought I'd do something a little different to share with you all and here it is, my inky scrapbook layout.
The layout started life as a piece of white 12" x 12" which I spritzed with Dyan Reaveley's Dylusions Ink Sprays in Lime and Vibrant Turquoise. I then added strips of Symphony Tissue Tape onto the background before using the Harlequin Crafter's Workshop Template and inked areas of my cardstock with Tumbled Glass Distress Ink, before then adding some Gesso through the template and some splats of Shabby Shutters Distress stain, straight from the bottle.
I then used the Grid Background stamp and stamped onto the background paper with black Archival Ink. Next, I used a Manilla tag and applied some Shabby Shutters and Broken China Distress Stain onto my craft mat, before dragging the tag through it to give a good inky coverage. I then used the Circle Grid Crafter's Workshop Template and applied more Broken China Distress Ink through it. I inked up one of the stamps from the Borders A6 #2 stamp plate and stamped directly onto the tag with black Archival Ink. I then stamped London from the London stamp plate, onto the tag and added the word "calling" which I typed on the computer. I then attached the tag, together with my photo onto my spritzed background and added some twine and a Tim holtz Idea-ology piece.
I made the flower using Tim Holtz's Tattered Florals die, spritzed with some more of the Dylusions Lime Green Ink Spray and added a button in the centre. I finally stamped "Memories" from the Journaling Words II and added a Tim Holtz Muse Token and used some Alphaparts Newsprint for "2009".

Thanks for stopping by and taking a look at my scrapbook layout and I really hope you liked it!

See you all again soon and don't forget that we still have the Spots and Stripes Challenge running until the end of this month and we'd love to see your creations!!
Bye for now!
Emma x

Tuesday, 8 May 2012

Moon Woman by Alison

Hello Stampers. Today I have an art doll pendant to share with you.


Here's how I made her...

Moon Woman's body is made from a Chipboard Jar. I painted both sides with Black Acrylic Paint, then embossed the front with 3 layers of black ultra thick embossing enamel. I inked the Karantha Spiral Texture Stamp with Versamark embossing ink, then stamped into the last layer of black UTEE whilst it was still molten. I rubbed Lava Green Inka Gold onto the raised texture to highlight the design.


To make the face, I melted black UTEE in my Melt Pot, then poured it into the Karantha large Round Face Mould. Once it was set, I popped it out, then painted it with Watermelon Paint Dabber. When the paint was dry, I highlighted the design by rubbing the Lava Green Inka Gold on it. I glued the face to a large Ideaology Timepiece, then glued this to the top of the jar body.

I took 2 medium & 1 small Chipboard flowers, painted them with Watermelon Dabber, then stamped a Script Background with Black Archival Ink. I triple embossed the flowers with Clear UTEE, then stamped with the Karantha Spiral Texture stamp whilst the last layer was still molten. Again, I highlighted the texture with the Inka Gold. To make the 'wings', I cut 3 petals off the medium flowers, & glued the flowers to the back of the jar body. I layered the small flower with a Sprocket Gear & a pink gem brad, then glued it to the front of the body.


I punched 2 holes at the bottom of the body, with a Cropadile, then glued 2 large eyelets into them. I dabbed Watermelon Paint onto the Ideaology Word Sticks, rubbed most of it off, leaving the paint inside the words, then attached the 'legs' with Jump Rings.

I attached a bale to the back of Moon Woman, & added some Link Chain & a large Swivel Clasp. I coloured a Pearl Bauble with Watermelon Alcohol Ink, & attached it to the end of the chain as a finishing touch.

I hope you like my Moon Woman Art Doll, & it inspires you to make one of your own. It was great fun to make!

Thanks for looking,
Alison xox

Monday, 7 May 2012

Winner of the Challenge... and news

Hi, it's the Boss here again, a little late this month with lots of news, and the winner of last month's Creative Team challenge!
I loved all the entries for last month's challenge Ribbons and Lace , they were all such great interpretations. Thank you to everyone who joined in.
Now onto the best part... choosing a winner! Mr Random.org did his bit, and picked
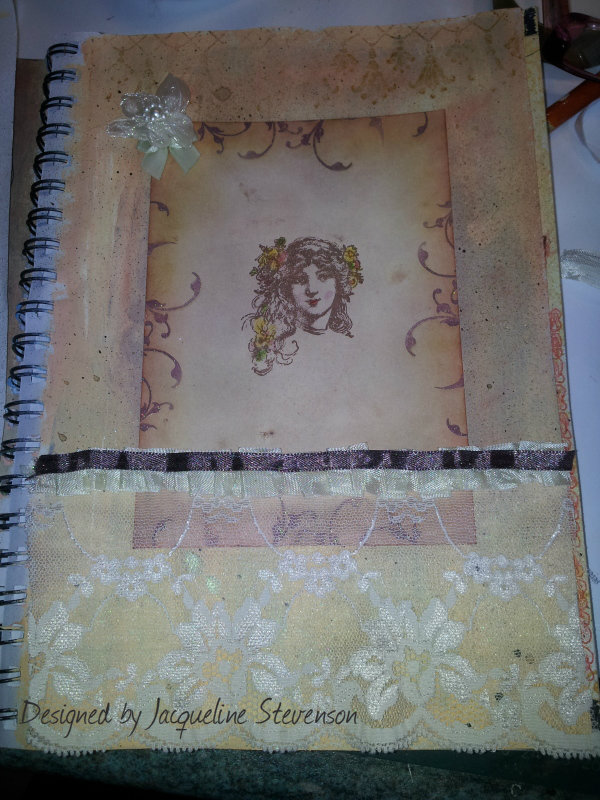
Jacqueline with this gorgeous journal page. ...

Congratulations, and please email me so you can get your prize :)
Now onto all the news for this month! We have lots!! To start, The Artistic Stamper has designed the free stamp on the front cover of Craft Stamper (June issue), and there are lots of gorgeous makes inside, some by yours truly, and some gorgeous artwork by Trish Latimer, our muse for next month!

To go with the swirls, we have a great offer for you this month - 25% discount on the Swirls, and Border stamps here. To add to these we now have great new bunting stamps from Kat, and a lovely new journaling set of words!


 Now, if you fancy getting gorgeously inky with the new Spring Distress Inks from Ranger, we have them here , with all the re-inkers to go with them:))
Keep a watch out for lots of related offers this month from The Artistic Stamper!
I think that is all from me this week, but watch this space for news of our new Creative team members.... we are making our choices this week, and will be back later this month to tell you all the news!
Don't forget our new challenge is Spots & Stripes. We love seeing what you create :))
Have a very creative and inky week
Hugs
Jennie

Sunday, 6 May 2012

VINTAGE HOUSE BY KAT

Hi all Kat here.
I'm still playing with my House stamps,
today I would like to share a little hanging frame I made
in vintage colours.
here's a list of the things I used,
& scraps of white card.

Here are some close ups


I decided to make each frame almost the same
& just position the items differently.

Hope you like it!

I'm off to cut out my new bunting set of stamps
that arrived in the post today (exciting)
they are so hot off the press, they are steaming, LOL

Just before I go,
I would like to say a big thank you
for all your support & wonderful comments,
Kat x.


Saturday, 5 May 2012

London by night by Sioux Jenneys

Hello everyone! I've made an ATC for a change today
using the lovely new London A6 stamp set :)


1. I made an inky background using Distress Ink dusty concord and rusty hinge that had been made into spray inks in a mini mister with some Perfect Pearl Mist in pearl added on top for a hint of twinkliness ;)

2. Stamped the London skyline in Archival black onto this and added the hand writing with a white pen.

3. I used the new Distress Markers in fired brick and chipped sapphire to colour the union jack flag and stamped it onto a white ATC blank then added a bit of colour on the background with dusty concord re-inker and a Cut and Dry nib.

4. The word London was stamped in Archival again onto a spare piece of the same coloured card I used for the skyline and attached to a piece of black card before being stuck down with glossy accents.

5. The skyline was then attached in the same way and some Distress walnut stain added to the edges to age a little.


London is a very magical place don't you think? :) See you again soon!
xoxo Sioux