Showing posts with label dylusions. Show all posts

Friday, 16 June 2017

Winged Heart by Gemma

 I have a small piece to share with you today, made on a  chipboard base. later I will use it as the front of a book.


I collected some bits and pieces from my stash that I felt went well together.


I coated everything with a layer of gesso and then I painted the wings, heart and board with different colours of Dylusions paint.


Once those layers were dry. I stamped onto the orange piece with the large dotty background stamp and Versa Mark ink. I then sprinkled black embossing powder over the top and melted it using a heat tool, I also heat embossed the word peace with the same black embossing powder. At the same time, I glued a small bit of dried wet wipe behind the heart.


Before glueing all the pieces together I painted the small bird, edged it with gold and stamped the word smile in the middle from Framed Words #1. I also stamped onto the wings with a calligraphy mat and paint. 


Thanks for Reading
Gemma

Saturday, 13 September 2014

I love Autumn by Astrid

Hello everyone and thanks for dropping in. It's true, I love Autumn, the colours, the smells, the crispness in the air, so today I am sharing another Autumnal project with you.
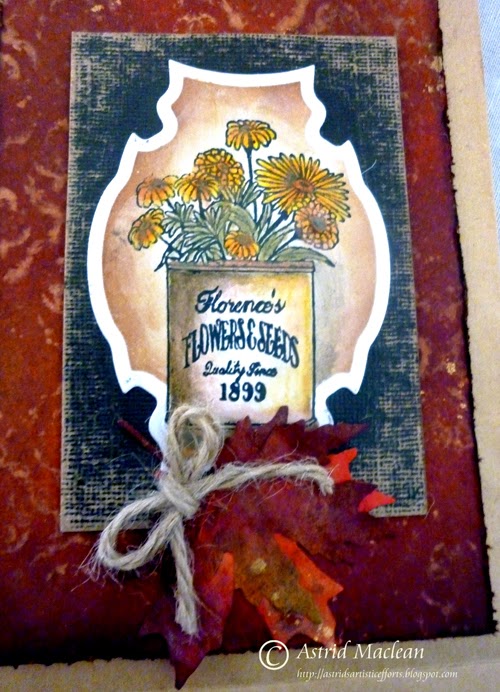
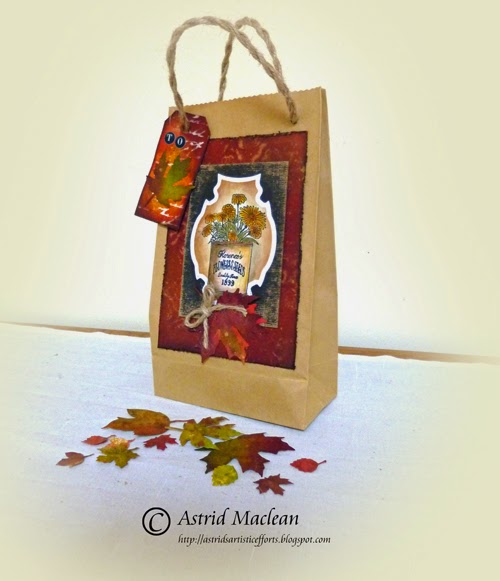
A good friend is celebrating her 70th birthday, she is a keen gardener, so I thought I'd make her this gift bag to put some seed packets in.
I used one of the new Debbie Cotton stamps for my vocal image.

I started by creating my background papers, following a technique my blog friend Ingrid Kristina shared a while back on her blog, you can find it here:

She has done a brilliant step by step, so I will not repeat it all, I slightly adapted mine, but the principle is just the same. This is what you need:
A piece of printer paper
A piece of smooth card
Background stamps (I used the regency one and calligraphic mat 18)
Household bleach
Watercolour pencils
Twinkling H2Os
A brown paper bag, some twine, some matting card (I used Kraft core)

I followed Ingrid's instructions and landed up with a piece of printer paper that looked like this:
I wanted to use it for my leaf embellishments and I just love the effect of crumpling the paper before spraying it with Dylusions, it really looks like old leaves already, here's a close up:

I added some perfect pearls in Heritage gold and some gold perfect pearls powder into the mix also.

This paper is used to create coloured impressions on the smooth card, I was a bit disappointed with the effect on mine, but that was soon solved with some inking using Distress Inks:
This is what it looked like first of all:

A bit too blotchy for my liking and too much green. 
I trimmed the best part to about 4 x 6" and then inked around it with Mustard Seed, Ripe Permission and Aged Mahogany Distress Inks. I then used the Regency background stamp to do some bleach stamping. If you want to know how, please feel free to email me, but whatever you do, stick the stamp straight into water after you have used the bleach!! This is what it looked like now:
All the rest was simple: I stamped the vocal stamp, cut it with a Spellbinder die and while still in the die inked around it. I then coloured the image with watercolour pencils and some twinkling H2Os and matted it first onto Kraftcore and then by background paper.
I cut a tag from the remaining background paper, stamped in bleach, this time with a script stamp and then embellished both the bag and the tag with leaves which I had die-cut from the original bit of copy paper. I also used Distress inks to deepen the colours on those.
Here is the tag:
And here the final project surrounded with some of the leaves.
This was a fun project to do, and of course the techniques can be used for lots of different projects too.
Thank you Ingrid Kristina for your brilliant step by step, I know I will come back to it again and again!

Thanks for visiting here today

Friday, 14 March 2014

Creating Journaling by Linda Cain

Hi everyone! Linda Cain here again! I thought I'd take you through a Journal Page today using a bunch of  The Artistic Stamper's amazing stamps....sounds like a plan!
  
 
 I start with the large Dylusions Journal.  Here we're only doing one side. 
 
 I sprayed several colors of Dylusions sprays in a random pattern. Don't be concerned if there are a few areas not covered.

 
Next I added water with a spritzer bottle to a couple of areas using the masks. Let the water sit for a few seconds, and then blot with a kitchen towel roll. The pattern will show up where the water removes the color. Thank you Dylan for this great technique!

 
This shows the page after I add more color with Distress Inks. You can see the Picked Raspberry really brightened up the one area, Ripe Persimmon in the center, and Broken China and Peacock Feathers in the blue areas. This is how I fill the page with color.

 
I sprayed water into my hands and dropped it in large drops around the page. Then I tilted the page up and let the water run around.  Let it stand a moment, and blot with a paper towel.  
 
I also used a mask and black archival ink in the lower right area of the page.  
 
I used the Harlequin, Chickenwire, and Chevron background stamps with Honey Dew and Snowflake Fresco Paints to start the layering.
 
I'd decided to use 2 stamps as a focal point with CREATING and JOURNALING. I stamped the words using black archival ink, and added more stamps to form a frame around them.
 
I laid out the Moth and Butterflies on the page to see where I wanted them.  
 
Some people may want to stop here, but I like to fill it all in. It's all a matter of choice. It's YOUR page!

The black Ultra-Fine Point pen by Sharpie is used to highlight stamped areas as well as the Extra-Fine Point White Poster Paint Pen. I added Coffee Archival Ink to the Calligraphic Mat stamp to fill in spaces.
 
The Moth and Butterflies were stamped with Versafine Imperial Purple for a bit more color. Highlights were added to them, too.

 
The ART stamp and Dragonfly were stamped with archival inks, and the Bubbles and Splat Borders were stamped with paint. 


This shows how the fine black pen is used to highlight the previouslystamped and stencilled backgrounds. The Chevron stamp is used 3 times to add borders.
 
 
The final step is to add dots to the lettering and outlines to some of the stamps, and one last Flourish Border stamp to the side as filler.
 
That's it for today. If you have any questions, I'm glad to try to answer them. There's one more posting coming from me, so watch this space. And as always, let us know what you think!
 
Your Friend in ART,
 
Linda
 
The Artistic Stamper Stamps and Masks:
Border Stamps - Borders A5#2, Swirls, Splats and Dots A4
Background Stamps -  Chicken Wire Background A6, C349 Harlequin, Calligraphic Mat 9
Chevron Stamps - Chevron Elements
Words & Sayings Stamps - Journaling Words #5, Words Set "Collage"
Butterflies and Birds - Insects and Butterflies
Masks -  Chevron, Large Dots, Splats and Swirls
Katy Fox Stamps - Numerical plate size A5
 
Other Products :
Dylusions - Dyan's "perfect" Journal, Sprays - London Blue, Calypso Teal, Pure Sunshine, Fresh Lime, Bubblegum Pink
Ranger Distress Inks - Picked Raspberry, Broken China, Ripe Persimmon, Shabby Shutters, Peacock Feathers
Sharpie  - Sharpie White extra fine poster paint pen, Black Ultra-Fine tip pen
PaperArtsy Fresco Finish Paints - Honey Dew, Snowflake
Ranger Archival Inks - Jet Black, Coffee
Versafine Ink - Imperial Purple

Friday, 10 January 2014

Always and Forever Changing!

Hello all!  Alison (butterfly) here with my first Artistic Stamper post of the New Year.  I should probably have made a resolution about trying to write shorter posts, but I didn't, sorry!  I've another photo-heavy marathon for you (and remember you can click on the photos for a closer view).


I started with one idea in my head with this one, went via a completely different possibility and ended up in an utterly unexpected destination - but one that I'm very happy with.  In fact, it may be one of my favourite makes.


I'm afraid I don't have many photos en route since most of the way along I was pretty sure I was going to bin it.  Very glad I didn't now!


I started with one of the papier mâché icons and some PaperArtsy crackle glaze, but that's long lost under some heavy gesso and loads of ColorWash sprays.  What I can tell you is a little bit of how the background shaped up once I'd gesso'd over my first idea.


I started with some text, stamping the botanical definitions from Katy Fox's Encyclopaedia Botanica plate in Potting Soil Archival (just as well I picked Archival with everything that then happened).


I stencilled Walnut Stain Distress Ink through the Harlequin stencil - it's really pale because of being over the gesso - and then clear embossed it, using only a light covering of powder.  (Again, just as well I kept it in place with the embossing - it wouldn't have lasted through the spritzing.)


At this point I had a gentle neutral affair on the way - white background, dark brown stamping, and I was still planning to stamp one of Katy's flowers directly onto the icon.  But, in my usual fashion, I had more than one thing on the go, and chance intervened at this point.


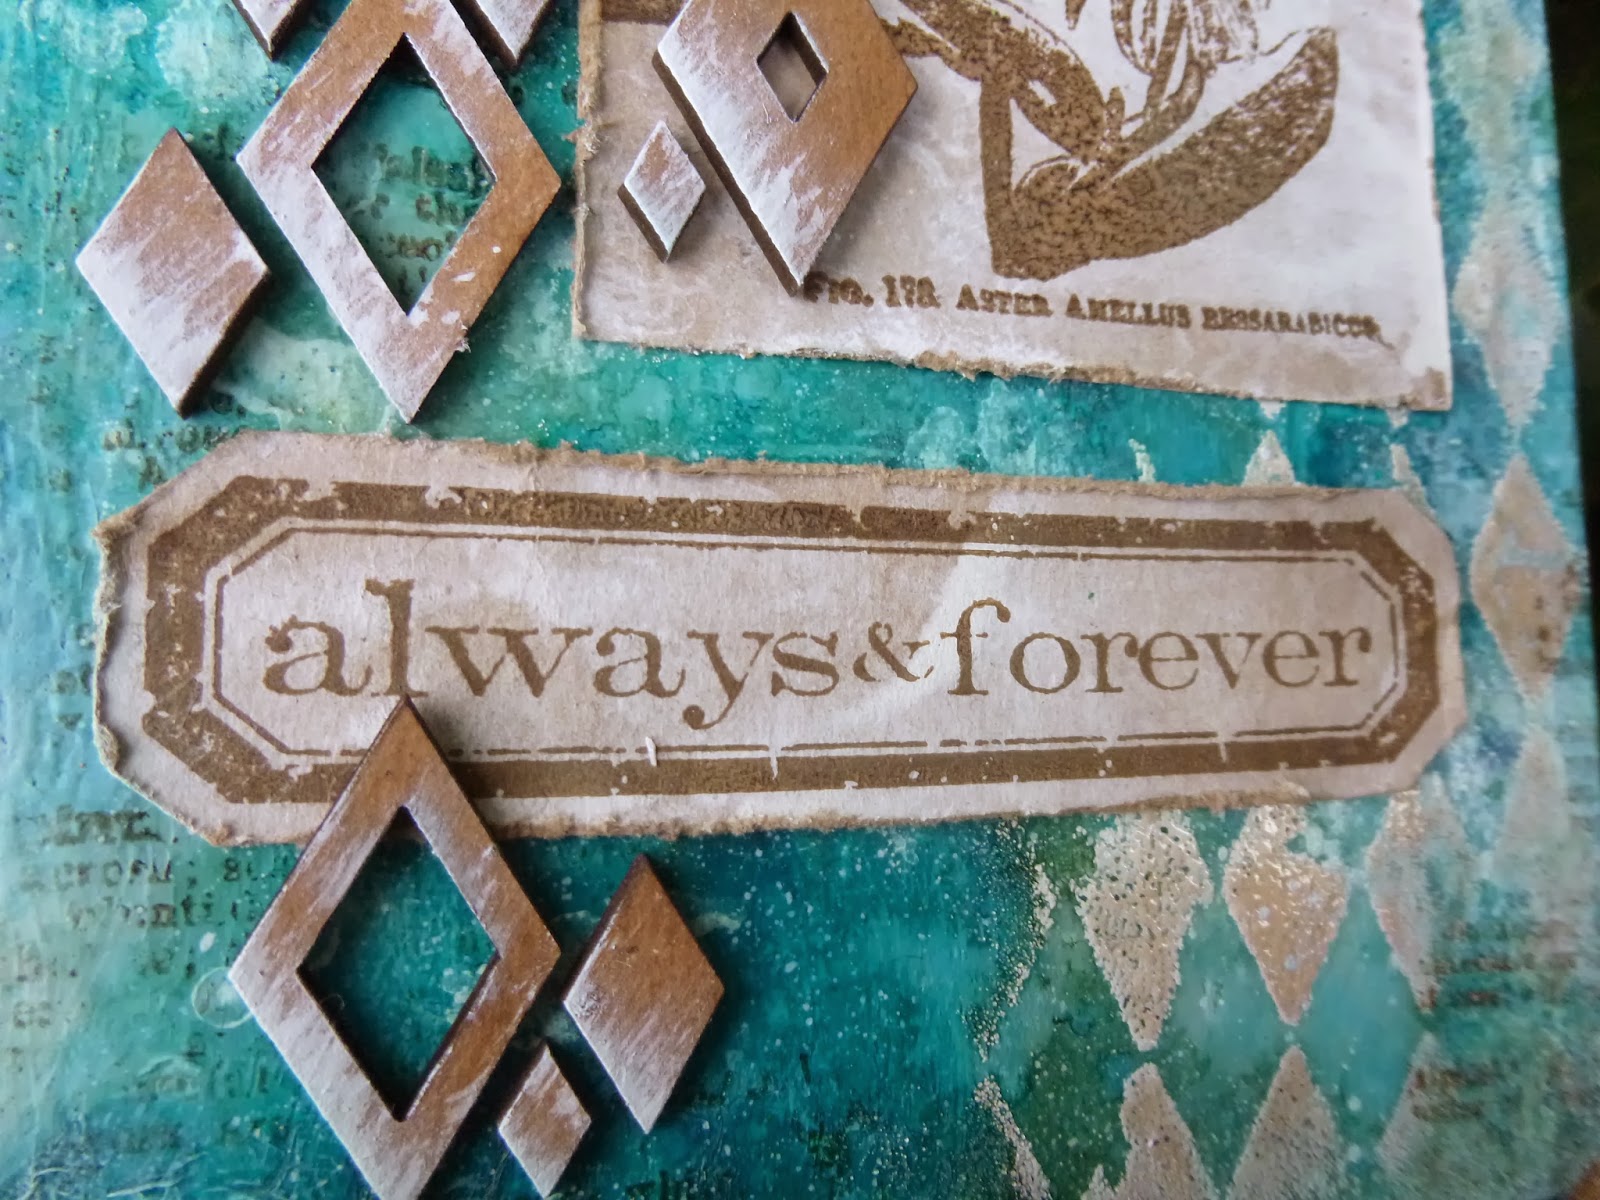
I happened to use a kraft tag to mop up some white paint from the mat, and suddenly wondered how the flower would look stamped onto that instead... the answer was "lovely"!  This particular flower is from Katy Fox's latest Botanical 2 release, and it's stamped in Potting Soil.


But then it started looking a bit bland to me.  I thought I'd like just a little hit of colour in the background... hmm!  I got out the ColorWash sprays, with their yummy earthy, natural tones, and tried them out on a nearby tag which gave me lovely spray patterns and some gentle blending and dripping.  But when I sprayed them onto the gesso, they behaved very differently and I ended up with really full on colour going on - not what I'd intended!


However, thanks to the embossed Harlequins, there was a lovely resist effect in places that toned in with the whitewashed kraft tag, so I decided to persevere.


I stamped the Artistic Stamper Messy Art blots and splashes (Katy Fox again!) in Fresco Snowflake...  I hadn't used these before and, oh, how I love them now!


I added a couple of spritzes of Dylusions White Linen too...


... and dry brushed some Snowflake around the edges of the icon too.  Obviously, all this is being carried over the edges as usual.


I stamped one of Tim Holtz's Simple Sayings in Potting Soil onto another whitewashed kraft tag and cut it out and distressed it.


And I added some Idea-ology Linen Ribbon to the top of the tag.


My final brainwave was to add some "Diamond Confetti" chipboard from the UmWow Studio, and highlight it with a dusting of Snowflake Fresco brushed up from the bottom corner.


I'm really pleased with how these drift across the piece, echoing my embossed Harlequins, and adding a touch of dimension to the composition.


So that's me for today.  Thank you so much for stopping by, and I hope you'll come along and play in The Artistic Stamper challenge this month - Love is in the Air - we'd love to see you there.

Ingredients used:
Artistic Stamper stamps: Katy Fox stamps - Encylopedia Botanica, Botanical 2, Messy Art
Tim Holtz Simple Sayings
Papier Mâché Icon - large
Adirondack ColorWash sprays - Meadow, Stream, Denim
Distress Inks - Walnut Stain
Archival Ink - Potting Soil
Gesso
Fresco Finish Paints - Snowflake
Clear Embossing Powder
From my stash: Diamond Confetti by UmWow, Idea-ology Linen Ribbon (find similar here), small kraft tags

Sunday, 31 March 2013

Dyan Reaveley is coming to teach!

I have been bursting at the seams to keep this under my hat until today!! Mal and I are absolutely delighted and honoured to have Dyan Reaveley, one of Ranger's Signature Designers, and creator of Dylusions range of products, coming to teach at The Artistic Stamper Craft Store & Art Bar!!

Dyan will be here on June 8th and 9th teaching 4 new classes for 2013. Each one is unique and you can book any one of them, or all four of them. Never journaled before? Dyan's unique talent will have you creating beautiful and fabulous pages that will set you off on that journaling road!


All of details on the classes and booking are now online, and if you have any questions, please do not hesitate to ask me.
Am I excited?  you bet!! Cannot wait! Hope to see you in June or before....
Have a very Happy Easter, and eat lots of chocolate and be creative!
Hugs
Jennie

Wednesday, 19 September 2012

Altered Notebook by Alison

Hello Stampers!
Today I have a little 10x10cm altered notebook to share with you.
I started by painting the cover with Studio black gesso
I used a craft knife to cut an aperture out of a piece of 10x9cm card, then covered it with sticky back aluminium. I cut through the middle of the aperture, corner to corner, then folded back the excess aluminium.
I used various Ten Second Studio tools to add a design to the frame, then covered it with black acrylic paint. I wiped it off fairly quickly, to leave just black paint in the recesses, & give it an aged look.
Next, I cut a piece of card to fit inside the aperture, then sprayed it with pink bubblegum & squeezed orange Dylusion spray. I sponged picked raspberry distress ink through a Dylusion stencil, then layered the card & frame on the front of the notebook.

I stamped the Art Dictionary Words on some white card, inked it with pumice stone distress ink, cut it into pieces as shown, & glued the pieces to the notebook cover. 
I spritzed some of the pink bubblegum spray into the air above the notebook, so that some landed on the words with a nice speckled effect.
To finish, I used the sprays to colour some seam binding, then attached a couple of metal beads & tied it around the book. I'm using one end as a bookmark.
I thought this little book would be perfect to take to craft shows, to write notes in, as I watch demonstrations.
Thanks for looking,
Alison xxx 

Monday, 10 September 2012

In A World Of Her Own by Emma


Hello, it's Emma here. Hope you've all had a good weekend and ready for another week full of creativity!! For my first piece of this month, I've chosen to create an inky scrapbook layout ~ I hope you like it!
To create this piece, I cut a piece of kraft card to measure 8" x 8" in size and randomly applied the Snow White Adirondack Paint Dabber to cover the central area of my card with paint. I applied black acrylic paint through a Crafter's Workshop stencil, then flicked various colours of ink over the entire piece of card and added splatters of Picket Fence Distress Stain. Next, I cut sections of white card, (this is a really good technique for all those offcuts of card that you keep and then wonder what to do with them) and added Spiced Marmalade and Fired Brick Distress Stain to two of the pieces and sprayed the third piece with Bubblegum Pink Dylusions Ink Spray.
I stamped the inked pieces of card, with three different background stamps ~ Random Dot Background,  Mini Calligraphic Mat 20 and Mini Lattice Wire. I then adhered my pieces of card to form a background to my photograph, together with some Tim Holtz Tissue Tape.
I added some Idea-ology Sprocket Gears and some Chit Chat stickers before finally completing the layout with some doodles using a white pen.
So, I hope this inspires you to create inky backgrounds for your layouts and I would love to see what you make!! This background technique is also perfect for our challenge this month ~ Splatters and Speckles, we'd love to see your work so please, come and join in!!
See you all again very soon and have a great week.
Emma x