Wednesday, 30 January 2013

Back from California & CHA

Hi!
Jennie here with a post that is full of photos, and gorgeous new products and lots of inspiring artwork! I returned from the Winter Craft & Hobby Association show in a not so warm Anaheim, California almost two weeks ago, and finally I am catching up on my lists and stuff that has to be done, but I thought I would share with you some of the fabulous stuff I saw there. The show showcases all of the major companies that you and I like (mainly USA ones, with a few UK and foreign ones too!), and one of the things I love is that it is very much a meet and greet show.. networking abounds! I also took part in a few workshops, so I could learn about new techniques and products. I am putting that to good use this weekend with a Graphic 45 workshop :) Sorry it is now sold out, but am happy to do another one if there is enough interest.
I have put in orders for lots of new goodies including Graphic 45, Ranger ( loving those distress paints!) some new products to be revealed when they arrive, Hero Arts ( a new one for us), Dylusions new sprays, and lots more... it was very expensive trip!! Here are a few photos to whet your appetite, and if you haven't seen, I have more on my blog too.
CHA

On the Advantus( idea-ology )booth
 
 
New Remnants Rubs

Distress Paints

New Idea-ology Hessian

No CHA is complete without Mr Distress!
 
Ice Resin Necklace by Susan Lenart Kazmer
 
Hope you enjoyed the very fast trip around CHA.
Have a creative day,
Hugs
Jennie

Saturday, 26 January 2013

You've Got Mail! Mail Art

Hello everyone and welcome to our blog! It's Astrid here with my second project for January.

Today I am showing you a very different project from my usual style, but I was in a fun mood and wanted to create something bright and cheerful, so I decided to create an altered envelope. And, just for some fun, - see how the address label is empty? Well if you would like your name to appear on that and receive this envie in the post, leave a comment here before January 31 and I will get my hubby to pull a name out of the hat so to speak, and that person will receive it in the post. Oh and just for those of you who are not familiar with this type of mail art, the envie is glued shut but there is nothing inside, it's the envelope itself that is the "art" lol.
Right, now for the list of stamps and products I used:
Stamps:
Postage No 1
Calligraphic mat 12
Journaling Words 3
Swirls, Splats and Dots
Kat's Creations Bunting
Crowning Glory
Birds of a Feather
Other products:
Dylusions Sprays in Bubblegum Pink, Vibrant Turquoise and Lemon Zest
Archival Ink in Jet Black
Mini Mister
I also used a white and black journaling pen from my stash, some washi tape and an ordinary office size envelope.

So, this is how I went about creating my envelope:
First I glued the envelope shut and then I sprayed the Dylusions inks in my chosen colours randomly all over the back and front and then added some water from a mini mister to blend the colours more. I added two further layers of ink and dabbed off the excess with a roll of paper towel. When I was happy with the result I left it to dry.
While it was drying I stamped the bunting, envelopes and sentiments onto white card. I cut them out and then glued them onto the front as shown.


To finish this side off I added some doodling with a black and a white pen. I also stamped the crown straight onto the envelope.

The back was created in a similar way:

I stamped the script stamp on some white card and then cut out a heart free hand. I then stamped the wings from the Crowning Glory set, cut them out and glued them on either side of the heart.

The other stamps were stamped straight onto the envelope and the whole thing was finished with a little more doodling and some washi tape.


Well, that's it, hope you enjoyed this little project, it was fun to create and don't forget, if you want to be in with a chance to receive this envie in the mail, all you need to do is leave a comment here.
Until next time and happy stamping!!

Thursday, 24 January 2013

The Queen of Hearts by Emma


Hello everyone!! I don't think anyone can help but notice that Valentine's Day will soon be upon us and today, my post is all about "Love"!! I've made a large tag, using Tim Holtz's new Blueprint stamps to celebrate February 14th and I hope you like what I've created....
To create the background to my tag, I applied Distress Stains, dried them with a heat gun before stamping directly onto the tag, with the Mini Lattice Wire Background stamp and the Calligraphic Mat 9. I then used the Crafter's Workshop Template and applied Festive Berries DI through it to create the paint lid effect.
Next, I stamped the Queen of Hearts from the Blueprint set three times, coloured each of them using Distress Marker Pens and cut out two of the card shapes from the design, leaving the third complete.
I then matted and layered the complete image onto a piece of black card and attached this, onto my tag.

I used Sizzix dies to die cut various heart shapes and painted all but one of them with Adirondack Paint Dabbers. The final heart, I used Tim's faux riveted metal technique and then applied Alcohol Ink over the top of it.
I then attached all the die cut hearts, together with the stamped cut out cards onto the tag. I then stamped the "Calendar' ticket from the Odds and Ends stamp set, circled the month and date and added this to my tag.
The letters were die cut using the Sizzix WordPlay die, painted with a black Adirondack Paint Dabber and then attached to my tag.
Finally, I added some seam binding from my stash and the arrow is die cut using the Valentine Silhouette Die and painted black.
...and here's a list of what I used to make my tag:
Tim Holtz ~ Valentine BluePrint Stamp Set
Sizzix Movers and Shapers Mini Hearts from my stash
Seam Binding from my stash

So, that's about it from me for this post and I really hope this has inspired you to have a play with the fabulous goodies that I used and I can't wait to read your comments about my little creation.

See you all again very soon...
Emma x

Tuesday, 22 January 2013

Altered jar by Titbelsoeur

Salut les patouilleuses !

Today I am happy to show you my new altered jar. I love the rounded shape of these jars and I think they are easy to alter, meaning you can, like I did here, glue a large stamped image on its front.
I have stamped this gorgeous lady on a book page, cut it out and added a light watercolor shade on it. The other items come from my recycling box (old necklace, string cut out from an old pair of jeans, lace from underwear....), just to show you how funny it can be to make old things live again !


You will find the stamp I used here : Girl with Clock


I hope you like my jar,

thanks for stopping by, 

I am looking forward to reading your comments ! 

A très bientôt !!

And if you want to read the story of this jar,
just pop over to my blog 

Sunday, 20 January 2013

Discover Your Inner Self by Alison

Hi Everyone! Get your sunglasses out, I've a colourful little card to share with you today. A bit of a contrast to all that white stuff we have here in the UK right now!
I started by spritzing a few different colours of Adirondak Color Wash Spray at the top of a square piece of white card. I spritzed with water, then held up the card so the inks all dripped down. 
I dried the ink, then spritzed some Stream Color Wash through the Crafter's Workshop Marakesh stencil. I watered down some Charcoal Black Studio paint, then used a paintbrush to flick it over the background.
I used Archival jet black Ink to stamp some text (Calligraphic Mat 12), & added some swirls (Swirls, Splats & Dots A5) to the edges. I edged the background with the Jet black Archival ink.
I stamped Salome onto white card, then used a waterbrush & Color Wash Spray to colour her in. I stamped 'Discover Your Inner Self', cut out the separate words, edged them with black, then attached them to the background, with Salome.
I finished by attaching my artwork to a square white card blank.
I hope I've brightened your day,
Thanks for looking,
Alison xxx


Wednesday, 16 January 2013

Time Postcard by Sioux Jenneys

Greetings! I'm here to share a postcard today...inspiration provided by the 60's pop art of Roy Lichtenstein :)


1. Stamped the Mini Polka Dot Background numerous times using a variety of Adirondack Pigment Inks and Adirondack Dye Inks onto white card.

2. Stamped the architectural element from Architecture 1 in Archival black over the top of the different coloured dotty backgrounds, cut out and edged with a black marker pen for definition.

3. Stamped the watch and the sentiment from Time and Keys in the same way.

4. I found a stash of postcards in a drawer the other day so decided to use one as my base and coloured it with Distress Inks in wild honey, rusty hinge and aged mahogany.

5. Stamped carpe diem from Journaling Words 3 in Archival sepia.

6. Stuck all the elements down with glossy accents.


See you again soon!
xoxo Sioux

Sunday, 13 January 2013

Happy Memories

Hello everyone, Astrid here with my first post for 2013. So let me start with wishing you all the most wonderful, happy and creative New Year!!
For my first post this month I decided to make a little tag book, that can be used to keep some happy memories of a journey or other special occasion.


These are the stamps and products I used:
Stamps:
Travelling Words
Labels
Postage No 1
Crowning Glory
Journaling Words 2
Ephemera 1
Tim Holtz Papillon
Other Products:
Distress Stains Variety of colours
Distress Inks in colours to match the stains
Claudine Hellmuth Multi Medium Matte
From my stash:
Smooth white paper
scrap book paper
Kraft Card
Dies
Flowers
Vintage Ephemera
Postage Stamps
Seam binding

The booklet is made up out of 5 different tags, each made in a very similar way:
1. Squeeze some Distress Stains onto your craft mat, include either some Picket Fence or a Metallic Stain as these are more opaque and give some "body" to your background.
2. Once you are happy add some further depth of colour by blending Distress Inks in matching colours over the stains.
3. Stamp a background stamp in a matching colour of Distress Inks. I used the Ephemera 1 stamp for each of mine.
4. Stamp some of the other label and postage stamps on white paper (I used matte photo paper), cut out and colour with distress inks.
5. Collage your cut out images, other ephemera and postage stamps onto your tags using the matte medium
Here are my 5 tags:


I kept the back of my tags quite plain, just covering them with scrapbook papers and creating a pocket here and there to keep notes and other bits and bobs picked up during travel.
One of the backs with a little pocket and journaling tag

Two further pockets made out of mini envelopes covered with paper and then coloured and stamped like the tags.

The covers were made in a very similar way.  I cut two pieces of vanilla coloured card, slightly larger than the tags, I then added some Kraft card between the stamped front and the scrapbook paper back. I used the Tim Holtz Papillon stamp as vocal image after creating my background like on the tags.
Front cover
Back Cover
 Here are some of the pages still after I bound them together:


Well, I hope you liked this project and sorry for all the many photos, but I hope you have enjoyed it and feel inspired to make something similar yourself. I love making little books like this, they are small enough to fit in a hand bag and great to keep memories of a journey!


Friday, 11 January 2013

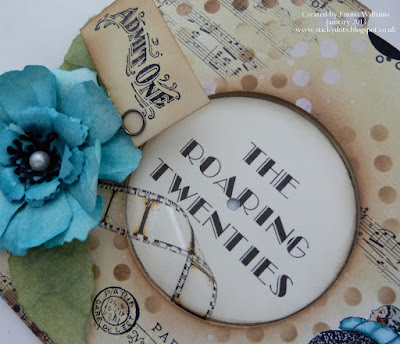
The Roaring Twenties by Emma


Hi everyone and welcome to my first piece and my first post for The Artistic Stamper in 2013!!

For this piece, I decided to create a card design with a difference and here it is, I hope you like what I've made...

To being with, I cut two separate pieces of cream card to make my sleeve and cut a circular aperture in the centre of the card, which will form the cover. I stamped the image of the Deco lady onto the corner of my cover and then masked her off by stamping the image onto a post it note, cutting around the outline and sticking the post it note over the top of the main stamped image. I then inked up the front cover using Old Paper DI. Once that was done, I then used polka dot stencil and inked through the holes with Vintage Photo DI and a Snow Cap Adirondack Paint Dabber, all the time, keeping the mask over the top of the stamped image of the lady. I used the Music Background stamp to stamp random areas of the cover and I also used one of the dotty border stamps to stamp around the edge. I dabbed randomly around the edges of the record sleeve with Versamark Ink and then added embossing powder to give an aged look.
Finally, I stamped a Tim Holtz, Paris Postmark from my stash, onto the cover and then removed the mask and coloured the Deco lady in, using Distress Marker Pens. Next, I stuck the completed cover to the plain backing to make my record sleeve.
To make the "vinyl record"...I cut out a circle of black card, using a plate as a template and then added matts and layers of card to create the centre of my vinyl and finally, I printed off the wording from the computer, adhered that to the card and punched a hole into the centre.
I used the Tim Holtz Tattered Florals die from Sizzix to create my large flower, which I inked with Tumbled Glass DI and misted with Biscotti Perfect Pearls Spray. I stuck the finished flower onto the front of my cover, together with leaves die cut using the Tattered Leaves die and blended with Bundled Sage DI.

Finally, I stamped the "Admit One" from the Tim Holtz Steampunk stamp set onto cream card, blended the edges with Old Paper and Vintage Photo DI and attached it to my flower using a Idea-ology Memo Pin and added a small amount of the Idea-ology Film Ribbon as a finishing touch.
Here's what I used to make my "Record Sleeve Card with a Difference"~

So, I really hope this has inspired you to create new card ideas and I can't wait to read all your comments, I always read and appreciate every single one of them! 
Thank you so much for taking the time to come and visit and take a look at my creation...see you all again very soon!
Emma x


Wednesday, 9 January 2013

Butterfly Frame by Alison

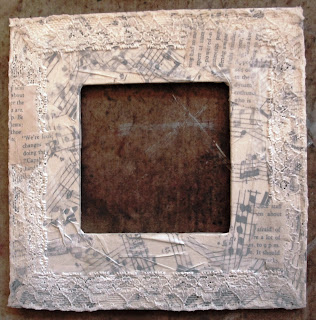
Hello Stampers! I hope you've all had a crafty start to the new year. I have a decorated wooden frame (160mm x160mm) to share with you today.
I started by using Studio Matt Medium to glue small pieces of Composer Tissue Wrap to the frame, adding creases for texture. Next, I used the Matt Medium to glue lace around the edges. I also glued on a few bits of torn book text.
When the glue was dry, I brushed a thin layer of Studio Gesso all over, to bring everything together.
I highlighted the texture on the frame with Cobalt Blue and orange Viva Inka Gold.
I smeared a little Gesso onto a metal corner and a butterfly charm, then highlighted with the blue Viva Gold. I also used the Viva Gold on the edges of 2 small metal filigree leaves. I shaped the leaves, and glued them & the butterfly charm to the top right of the frame, using Matt Medium. I glued the metal corner to the opposite corner.
For the background in the centre of the frame, I used the Caught in Crystal technique. Here's how it's done...
1. Take a sheet of acetate, & dribble Glossy Accents all over it. As this is quite messy, it's best to do this on a non-stick craft sheet.
2. Drip  different colours of Alcohol Inks all over the Glossy Accents. I used meadow, stream & butterscotch. At this point, you can also add glitter, guilding flakes, micro beads, or fibres.
3. Take a large piece of white tissue paper, and lay it over the coloured glue, scrunching it to add creases, then leave to dry completely.
I cut my Caught in Crystal piece to fit in the frame. Next, I stamped the butterfly from the Insects & Butterflies 1 Plate onto book page, and cut it out. I bent the wings slightly, and attached the body of the butterfly to the background, using glossy accents. I attached an Ideaology Game Spinner for the body.
To finish, I stamped the Butterfly Words on the edge of some book paper, cut it out in two parts, then glued the pieces to the frame.
Thanks for looking,
Alison xxx