Showing posts with label postcards. Show all posts

Saturday, 2 November 2013

Postcard wallet and gift set - Chris Dark


Hi everyone, Chris (sketching Stamper) here today and I'm delighted to be joining in with everyone as guest designer for November, so a big thank you to Jennie and Emma for the invitation.

For my first of three guest designers posts I've made a postcard wallet and postcards in a mixed media style.
Everything is made from 300gsm watercolour paper which will stand lots of  ink and paint layers. I cut everything to size using the postcard template stamp from the Carte Postale stamp set by Katy Fox.


For the backs of the postcards  I stamped all the stamps from the set in waterproof ink so that whatever ink or paint was picked up during the creation of the fronts of the postcards would stay put.

My first postcard front uses the gorgeous large flower image from the Encylopaedia Botanica stamps by Katy Fox and I've given the stamp a different look by using it as a template for a painterly style using acrylic paint and black india ink. The mixed media background is made up of several layers of paint and stamping in ink and paint to give depth and I added doodles with the black ink and a white gel pen. For all of my stamping I used combinations of the following stamps and stamp sets:

Regency, Harlequin and grid background stamps, the A5#1 Borders set, the Swirls, Splats and Dots set, the Encylopaedia Botanica set and stamps from the Carte Postale stamp set by Katy Fox.


To achieve this painterly look for the flowers I stamped in black ink over the mixed media background and then painted the image with Distress and DecoArt Americana paint making sure to go over the stamp outline. When the paint was dry I used a dip pen and black india ink to add the outlines back in. The same outlines and shading can be followed by stamping down onto scrap to use as a guide but I didn't do that on this occasion. The outlines can be omitted to give yet another look.


All the postcards were finished off with ink splats by tapping the dip pen over the card and a coat of sealer to give a slightly glossy postcard look.


 The wallet is again painted and stamped mixed media style with variations of the above listed stamps. To create the wallet I measured a postcard, allowed some room all around, multiplied by three with a few millimetres extra for the folds. After cutting to the desired width and depth I scored into thirds, cut off a portion of the card on the right side, folded in and taped down to form a pocket. I coloured some seam binding ribbon with paint and taped it to the back of the central third and tied round to close the wallet up.

I was also able to create a gift set this week for a family birthday and used the Regency Background stamp with Faber-Castell Gelato sticks direct to stamp for the varigated background paper for the card and to cover the plain white card of the die cut box. A pretty, girly effect is achieved using the same gorgeous background stamp that I used for the mixed media effects above by using a different medium and a more pastel range of colours. 


Hope you have some creative time today and I'll be back with my second project in a couple of weeks.

Chris x

Wednesday, 16 January 2013

Time Postcard by Sioux Jenneys

Greetings! I'm here to share a postcard today...inspiration provided by the 60's pop art of Roy Lichtenstein :)


1. Stamped the Mini Polka Dot Background numerous times using a variety of Adirondack Pigment Inks and Adirondack Dye Inks onto white card.

2. Stamped the architectural element from Architecture 1 in Archival black over the top of the different coloured dotty backgrounds, cut out and edged with a black marker pen for definition.

3. Stamped the watch and the sentiment from Time and Keys in the same way.

4. I found a stash of postcards in a drawer the other day so decided to use one as my base and coloured it with Distress Inks in wild honey, rusty hinge and aged mahogany.

5. Stamped carpe diem from Journaling Words 3 in Archival sepia.

6. Stuck all the elements down with glossy accents.


See you again soon!
xoxo Sioux

Friday, 4 February 2011

The Old Days by Sioux Jenneys

Hi! All you fellow inkers ;) I thought I'd share a postcard (6x4 inch) today with you :)


1. Stamp the "For Men Only" image in Versafine and use Distress Inks brushed corduroy and bundled sage as a watercolour for the trousers and shirt and cut out around the outline of the man on the front edge.
2. Stipple Adirondack Dye Inks in wild plum and butterscotch on the base card.
3. Stamp the Stampers Anonymous clowns from the big top plate in Archival sepia and colour the middle clowns hat using Distress Ink aged mahogany as a watercolour and worn lipstick for the lips.
4. Stamp the top half of the W.J. Hawker stamp from ephemera 1 plate in Archival coffee at the side of the clowns to fill in the space at the edge and the bottom half of the stamp that says Bournemouth on the bottom edge.

(don't re-ink for a subtle second impression)
5. Stamp the T!m faux staples at the bottom in worn lipstick.

6. Mask the clowns and stamp the word Cirque in Distress Ink weathered wood.
7. Stamp the letter tiles from scrabble and tags plate onto some card printed with an image of cork and cut out.

I'm giving the cork image away as a free digital download ;) Just click here.

Just hit the blue Download button when you get there and save to a folder on your computer.

It is sized at approx. 9.5cm square...a small image especially for stamping the scrabble tiles on (or any other words for that matter). You can obviously enlarge this in your own software if you desire...but not too much or the cork starts to look like crazy paving slabs!!! LOL
Have fun :)


I know the clowns freak some of you out...but it's healthy to be freaked once in a while :)

See you again soon!
xoxo Artyjen

Thursday, 7 October 2010

Leafy layers by Jennie

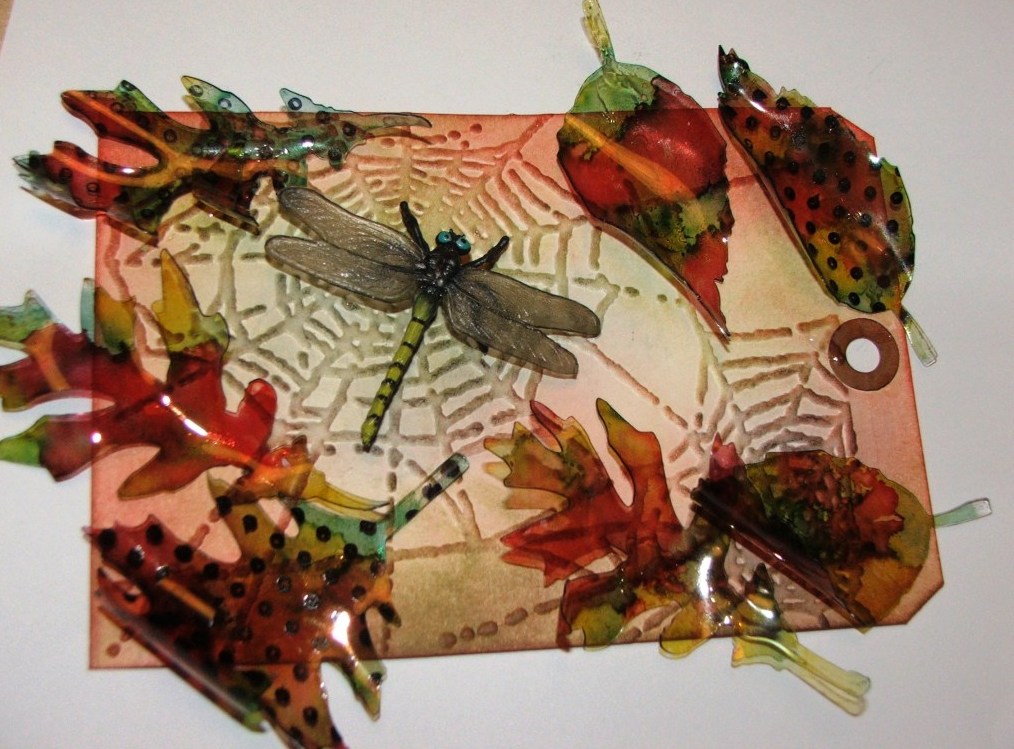
I haven't had a lot of time to experiment with the new technique first shown  by Wendy Vecchi using her Clearly for Art plastic, which will be available shortly in the shop (it sold out at Ally Pally)  However today in between getting ready for Port Sunlight show on Saturday , I die cut some Tattered leaves, and had a little play:))
I used Duralar which we sell in the shop, and has very similar properties to the Clearly for Art. You can die cut it, heat and shape it, and I also found that you can run it through the embossing folders! It works brilliantly! ( I always get ideas after I have finished making something and then run out of time!) This piece however doesn't show you this, as I tried it later after I had finished it. I promise I will do another piece next week showing this.

I alcohol inked up the leaves, and stamped them on the un-inked side with Black Archival ink, using the dotty background stamps. Then gently heat with a heat gun and mould over a glass or a pencil works brilliantly. The plastic will mould naturally when heating it, but you can manipulate it while warm.

I ran the postcard through Tim's Alterations spiders web embossing die , and coloured it with distress inks. A lovely plastic ( is it a dragonfly? ) creature from a toy shop, was used as a spider, since I still cannot find my little black ones.. come out , come out wherever you are hiding in my craft room!!! lol

I am entering this into our Layering it On challenge. Am I allowed to win?? I don't think so!! but please have go, we give away £15.00 worth of stamps every month.
I will be at Port Sunlight on Saturday demoing this technique along with metal embossing and anything else I can cram onto a tag! So please say hello if you are coming along.
Have an extremely creative day!
Jennie