Showing posts with label Deco art media paint. Show all posts

Saturday, 22 August 2015

Mystical Bird part 1 By Dee

Hi everyone! I hope you are all enjoying the summer and managed
some crafty time for yourselves. I have a two part Project
for you this time it started a while ago when I was experimenting
with trying to recreate the beautiful patinas and verdigris that
appear naturally in copper.
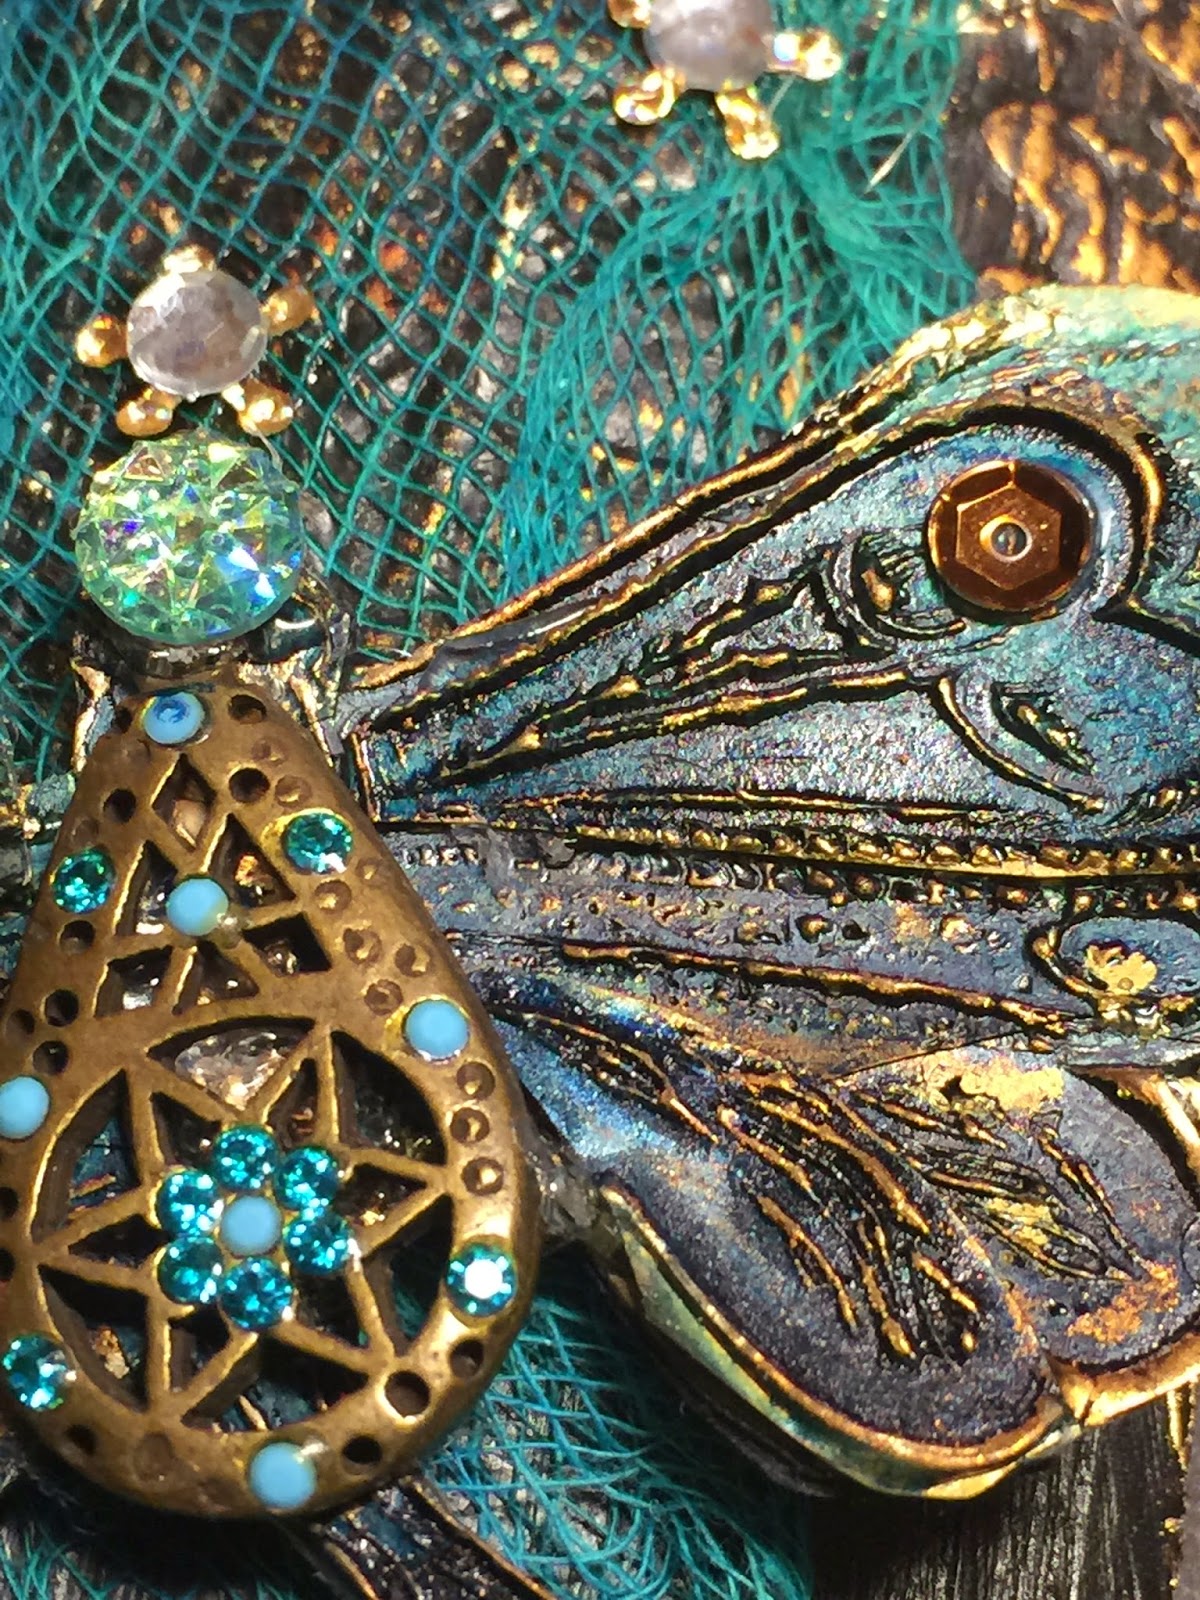
This picture shows the patina effect in more colour than 
the above photo.
As you can see below I covered 2 x board in texture sand paste.
Next I coloured the board with the Deco art Media paints.
Some Ranger crackle accents.
Deco art crackle paste round the edges.
Triple embossing using the fabulous Neil Walker Birdz stamps
& the new distress journal stamp.
Rangers alcohol inks.
The writing below was written onto a coffee stirrer and 
clear embossed.
That is it for this time I will be back soon with the second part.
Cheers Dee x

Products Used

  1. Artistic Stamper stamps used Neil Walkers Birdz Set A6 Decay Journaling Stamps #1.
  2. Deco Art Products used  Quinacridone Gold, Quinacrodine Burnt Orange, Prussian Blue Hue, Cerulean Blue, Cobalt Tourquoise Hue, Transparent Yellow Iron Oxide. Texture sand paste and crackle paste.
  3. Ranger crackle accents, Alcohol inks Terracotta,Stream, Ginger & Butterscotch.
  4. Inka Gold Gold. 

Sunday, 22 February 2015

Florishes and Butterflies


Hi everyone I have for you a picture  for my next post the background came out of a
 session playing with a brayer and using Paper Artsy Fresco Finish paints 
in shades of blue,  I watched Leandra's you tube brayered 
backgrounds and that was the result.


Instead of their waxed paper I used kitchen grease proof paper
and gradually built up the layers.


You have to be very careful not to have to much paint on the brayer and be gentle rolling 
it across make sure all the paint is off the brayer before you use a different colour. 
Start with dark colours first then and then gradually add the lighter ones.


It left a lovely mottled effect and the grease proof paper gets stronger
 with each application.


To finish the background I used Tim's Flourish stamp inked up with snowflake fresco
 finish paint then stamped randomly across the paper.


I triple embossed The Artistic Stamper butterfly off the insects & butterflies plate 
three times with gold embossing powder.


I then layered it up and highlighted areas with treasure gold after using alcohol
 inks to colour the recessed bits.


Little sequins were glued onto both wings and the body was made up with beads
 from my stash. The curly twig with berrys on I had laying around and 
two sparkly circles were glues on.


The frame was made with grunge paste through a stencil once dry painted with deco art
media paint in Cobalt Turquoise, once dry I used Deco Art Antiquing cream 
if you haven't tried this product yet you need to get some its amazing.

Products Used
  1. Fresco Finish Paint in marlin, lake wanaka, antarctic, bora bora and snowflake. 
  2. Deco Art Media Cobalt turquoise Hue, and Antiquing cream Raw Umber.
  3. Grunge paste
  4. Speciman Stencil
  5. The Artistic Stamper Insects and Butterflies plate, Tim Holtz flourishes.
  6. Gold embossing powder.
  7. Treasure gold classic.
  8. Alcohol Inks in stream, and denim.

I used beads and sequins from my stash, The very talented Jools Robinson inspired this piece by suggesting that I framed the paper I had made. So with that in mind this was where I ended up.
I would be very pleased if you let me know what you think.
Cheers Dee x

Thursday, 22 January 2015

Butterflies and Gems


Hi everyone I hope you are all good and that the new year finds you in good health!
I have loved this stamp but have never been able to do it justice but I 
think this wooden wall plaque,


might just do it justice.


I started of with putting texture paste through a memory stencil and allowing to 
dry naturally, then I covered the entire plaque with gesso.


Next I painted the entire plaque black. 


Once dry I highlighted it with Treasure gold in spanish topaz and white fire.


I triple embossed gold embossing powder on black card 
I then pressed the butterfly stamp into the molten
powder.


Once it had set I removed the stamp I had a rummage in my gem 
box and found the centre piece for my butterfly.


I took my alcohol inks in stream and denim and applied them 
to the butterflies wings.


I dyed some lint in steam Adirondack colour wash.


Some sequins from my stash and some gems to strewn across the 
stream lint.


A small piece of friendly plastic that I had from a previous project 
to finish off at the bottom. I really hope you like my plaque as 
always feel free to let me know what you think.

Cheers Dee x

Products used


Sunday, 23 November 2014

Wooden Post Christmas Wall Hanging


Hi everyone hope you are all well! I have a wooden wall hanging that 
I have made out of a wooden garden boarder post.

Sweet poppy snowflake stencil,
Wooden garden boarder post from any garden centre,
treasure gold. crackle paste,
Clear micro beads, white acrylic paint. Black pepper corns
Rag for knocking back, black fimo clay, white Gesso


I started by prepping the wooden post with white Gesso.


I used crackle paste through the snowflake stencil onto card.


Once dried I then tore up the paper and glued it onto the 
post at the top and bottom.


Next I painted the entire tag with white acrylic paint.


When the paint was dry I applied crackle paste to the top and down the 
right hand side of the post, I then placed the small glass beads
 into the wet paste.


I left the crackle paste to dry overnight. I rolled out the 
Fimo clay and spritzes the two stamps with water
 before placing into the rolled out clay.


Once I had cut out the clay I then baked it in the oven.


Now comes the best bit I gently paint around the snow flakes and the crackle paste 
with the Deco Art Cobalt blue and a touch of the quinacridone gold.
 Once this is dry I painted the crackle paste with carbon black 
then drying with my heat gun.  


Now I take my rag and dampen one end with water and start to work over the post till I am happy with the result. Out comes the treasure gold or your preferred product  to 
just highlight the areas that you want to.


I glued on the pepper corns to the centre of the snowflakes and attached 
a large brass ring from my stash, glued on the Fimo clay baubles 
that had been highlighted with treasure gold.

 I keep meaning to not have such longwinded posts and abbreviate them
 I will have to make it my new years resolution.

I hope you enjoyed my project and and hope that it inspires you to look at every day pieces 
and think how you can alter them. 
Please feel free to comment as your feed back helps to inspire me.
Cheers Dee x