Showing posts with label coredination. Show all posts

Friday, 19 August 2011

Find Delight in the Everyday things by Tina Barnett

Hi ! I am back with more Mabel Lucie Attwell stamps. This cutie is called "Ah! There you are". It's by The Artistic Stamper

I have gone Coredination mad on this card! I just love how all the colour work together.

I started with an 8inch by 8inch card stock. I added some green Coredination card to the base, I then chose 4 other colours and cut them to equal in size squares. I then used Tim Holtz Embossing folders and then distressed the card.

I added the card to the main card then used some nestibilities and cut and distressed some Coredination card stock and mounted the stamp on top.


The image is coloured using the water coloured Promarkers. I have used water colour card.
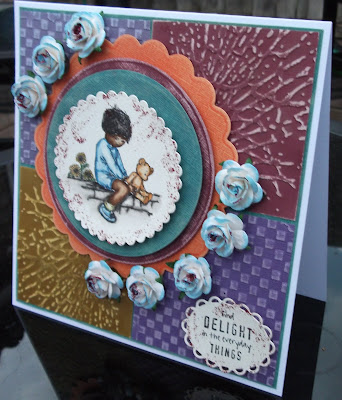

I used a Wendy V stamp for the sentiment and finished off with some flowers and distress stickles .

I LOVE the Coredinations! you have to give it a try!


Thanks for looking, until next time xxx

Hugs Tina xxxx

Thursday, 11 August 2011

Set Me Free by Sioux Jenneys

It's my turn again and today I'm sharing a tag :)

Love tags.....don't you?


1. The base tag is cut from Coredinations with the Sizzix Tag and Bookmark die and embossed with a Notebook texture folder from T!m. The high spots of the embossing were sanded and inked with a touch of Distress Ink scattered straw.

2. The Scrabble tiles were stamped in Archival coffee and attached with silicone glue for a little extra dimension.
3. Stamped the wings from Crowning Glory in Distress Ink aged mahogany and added a tough of Distress Stickle rock candy.......although it does not show up well on the photo!

4. Cut a circle from the Mini Rosettes die and letters from Typeset Alphabet die out of Coredinations and layered them on the wings with silicone glue.

5. Stamped the Dancer onto the smooth side of some Coredinations (I wanted her to be facing the opposite way when viewed from the textured side) and cut out....adding one of the separate bodice pieces that had been stamped on blue Coredinations.

6. Stamped the Inspiration Jar once onto some plastic packaging ;) and once onto some metal using Stazon black. Cut out the lid portion from the metal and added some texture using Ten Seconds Studio tools and layered both images over the dancer with some silicone glue.

Don't forget that Adirondack and Distress Coredinations are on special offer this month here.
That's good news :)


Ooh! Making that made me happy :) I'll be back !
xoxo Sioux

Monday, 8 August 2011

Bliss! By Tina Barnett

Hi Gang! I am back with you again using some more Mabel Lucie Attwell stamps. This cutie is called "Aufully Comfy". It's by The Artistic Stamper

I started my card using an 8 inch by 8 inch card (my preferred size to work with). I used a Tim Holtz distress ink to edge around the card.

then used some of my new favourite ever item! Coredinations card stock. You MUST try this!! you can do so much with it, emboss, distress, stamp etc etc I love it! Anyway..... back to the card lol!

I used the Coredinations card as a base piece by tearing the corner off and screwing it up then sanding it. I like the way it doesn't sit flat (you could make it sit flat but that's not the look I wanted).
I then used the Coredination card as layers for the stamp. Again I distressed them. The tones of the card are amazing. I used the same Distress Ink to colour my image.

The "bliss" is made using one of Tim Holtz book plates and tickets. I then filled in the opening with Crackle accents .

I finished the card of with Distress Stickles , flowers, hat pins and gems. Not forgetting a little bead also by Tim Holtz .

Well I hope you have enjoyed looking. Until next time!

Hugs

Tina xx

Sunday, 7 August 2011

A Minute Saved! by Nicky Cresswell

Hiya Stampers, Hope you're all well and dandy this fine day {she says hoping it's not raining lol}
Today I have another manly project to share in keeping with this months MAN themed Challenge
I decided on a card mainly as am having some mojo issues but I worked through it and here is the result.
I started by stamping the base card 4 times with the numbered block from the family values plate with tux black memento ink.
Then I ran some slate coloured adirondack core'dinations through my vagabond with the clock folder from the steampunk texture fades set, I lightly sanded the card & used barn door distress ink to highlight the raised sanded areas. 
I cut the paper to size then got some of the red pepper core'dinations as a backing frame, but it looked too plain so I stamped the smallest pocket watch from the time & keys plate round the edges.
I stamped the clock watching man from the men's plate onto plain white 160gms card and coloured with my copics, then mounted onto more of the red pepper clock stamped edge card.
I was about to mount the whole thing in the middle, but it just didn't look right, so I placed it half off the card and sliced the excess away, and for some reason I placed the excess piece on the card and loved the way it looked so that was a happy accident lol
To finish I stamped the next largest pocket watch from the same time and keys plate onto the back of some black TSS metal, I then used one of my basic set TSS tools to emboss the stamped watch image, turned it over, lightly sanded the areas I had raised and there you have it, one black metal watch which I finished with a bit of old chain attached to the card with a charm clip.
And that's that.
Thanks for popping by
Stay Inky

Thursday, 4 August 2011

Arch by Sioux Jenneys

Hello everyone! It's my turn again and I'm here to share a card :)


1. I cut some of the fabulous Core-dinations card stock and made an A6 size card with the textured side as the front...it is sturdy enough to do this which is great and it is on special offer this month here :)
2. I cut decorative shape out of the front and the same shape out of a lighter colour of Core-dinations.


3. Stamp the arched window from the Architecture 1 plate in Archival sepia (second stamping) onto the lighter coloured shape using the smooth side of the card stock and colour the edges with Distress Ink rusty hinge......add the word "Arch" from the same plate in Archival black.

4. Distress the card front with a sanding tool to bring out the lovely texture of the card stock.

5. Add double sided tape to the arch panel....close the card and line up the opening and the panel before sticking it to the inside.


6. Stamp the column from the Architecture 1 plate in Distress Ink walnut stain onto the smooth side of rusty hinge colour Core-dinations and cut out...distressing the edges with a paper distress tool.....attach to the front panel with dimensional pads.

7. Stamp the word "Column" from the same plate onto the smooth side of a wild honey shade of Core-dinations and distress the edges with a sanding tool.


8. Add an Ideaology muse token to the bottom corner to finish.


Oh! I added the same shaped panel in a plain colour to the back of the card so that a greeting can be added later ;)

See you again soon!
xoxo Sioux

Tuesday, 26 July 2011

Red red red .... by Tina Barnett

Hi !

It's Tina here and I am back with another Mabel Lucie Attwell stamp called "Time for bed".

I have used red distress inks to colour the image and for shading.


I started with an 8 inch by 8 inch card and used the same colour distress ink to blend in to the base card. I then over stamped with the same ink again, using the Baroque background stamp by The Artistic Stamper .
I then cut a piece of Coredinations card and over stamped with a butterfly stamp. I used the same stamp on a separate piece on card and cut out the stamps to give me two butterfly's. I added some bauble baubles to the butterflys along with some liquid pearls Using a different colour Coredinations card I used a Tim Holtz die and then distressed the pieces, adding them to the card.

I then finished off the card with some buttons.


Well that's me for now!
Take care, until next time!
Hugs
Tina xx

Wednesday, 22 June 2011

Layer it on! By Tina Barnett

Hi Gang!

It's Tina here and I am back with another new Mabel Lucie Attwell stamp called "I'm forever blowing bubbles"! The stamp is by The Artistic Stamper .

There are a few layers in the card, starting with the base card, I took an 8 by 8 inch card and inked the edges with Tim Holtz distress ink . I then stamped over the top with a Calligraphic Matt back ground stamp from The Artistic Stamper
I used watercolour card to stamp my image on and then coloured it in the same Tim Holtz distress ink .
I then got some Tim Holtz Coredination card (have you tried this yet?! You have got to, it is brilliant!) I cut out 3 different squares and popped them through a cuttlebug with some embossing folders and then sanded off to get a wonderful effect.
Next came the layering up! When layering I added some Tim Holtz tissue tape . I then added some Tickets Buttons Grunge board and some raffier. When the card was put together I added a little Distress stickles and put some Glossy Accents on to the balloon.

Well I think that's it! Hope you liked looking.

See you next time.

Hugs

Tina xx