Showing posts with label trish latimer. Show all posts

Saturday, 24 June 2017

A Girly Card - well sort of.. by Debs


Hi Everyone, I hope you are all enjoying the sun as much as i am.

With the sun, comes nice and bright cheery colours and i really made the most of them on this card.

I used some watercolour paper as my substrate and added dark and light pink, and orange paints randomly over each other until i was happy, making a few circles of paint with my fingers as i went along.  I used Amsterdam paints but any acrylic will work.

Over the top of the main body of pain i stamped the mini hexagon and dots background stamps using both pink paints
and black ink.  I also popped some paint through a couple of stencils as well, and then did the same thing over a small tag.  Before i painted the tag i added some of the wonderful washi tape that is currently in stock. I also used an old credit card with the light pink to add some marks and also  using the calligraphy mat 11 stamped with the light pink paint.

I finished off the tag by adding Trish Latimers World Girl One and used the same colours to colour her in.

I shall look forward to seeing your creations after all there is still a week left so plenty of time, if you haven't entered already!
Happy crafting
Debs
x


Thursday, 28 June 2012

Taxi for the Butterfly Ball anyone? By Trish Latimer

Hello again!
Well, this is my third and final project! I have to say a great big Thank You to Jennie and Emma for inviting me to be part of the team, albeit for such a short time! I can honestly say I've had a ball creating these pieces to share......and that is a very dodgy way of introducing my creation today..... (ball? Butterfly Ball? geddit?!!)
Anyway.....
This project started out as something completely different.....but once I could 'see' a carriage shape sort of emerging from the canvas block and spools, this is what happened! Another quirky, painty, assemblage piece.
A little step by step 'how to'......
I started off with a wooden block (Chunky ATC sized, but that was coincidence rather than design, it was the first thing that came to hand!). I then covered it with Sticky Backed Canvas . Yes, I could have just painted onto the wood, but I really like the canvas texture!
I then smeared layers of Blank Canvas (white), Pool (turquoise) and Lettuce (green) paint onto the block. Make sure to dry in between applying each colour, and continue to build up the layers until you like it!
Next, its stamping time! Using the same three paints as before, stamp Grid Background, Open Sequin Waste Background, Random Dots Background and Harlequin Background onto the block.
 Once the stamping is dry, print some shapes using the sides of credit cards and bottle tops. I've used
Raspberry and Purple Twilight for this.....
I also added a little black detail using the squiggle stamp from the Flower Maker plate....
Whilst you have the paints out, paint two 70 cm x 48cm Wooden Spools white....
Then decorate to match the canvas covered block....
Once the spools are dry, attach them to the bottom of the block using hot glue.
Now, the butterflies. Paint some scraps of card with the four bright paint colours, then stamp the Butterflies using black ink. Cut out, then adhere to the block base....
To get the 3D effect, use strips of acetate stuck to the butterflies, then adhered at different points to the base. Now, this isn't a pic I'd normally show, but it really gives you an idea of the 'workings' of the butterflies..
The acetate on the side of the block can be hidden by adding an extra butterfly over it!
The 'guardian' of my carriage is a vintage image that I've backed onto card, cut out then stuck to a little square stand. She holds a bamboo skewer sign....
I made a hole in the image, then threaded through some fine chain to look like she's holding it. The chain is simply looped over a Resin Crown glued to the top of the carriage...
So...there you have it! A suitably strange project to end my guest designer stint here!
 Thank you for having me, I've loved it!
See you all soon,
Trish xxxxxxxxxxxxxxxxx

Thursday, 14 June 2012

Careful..I bite..By Trish Latimer

Hello again!
Firstly, THANK YOU for the lovely comments left on my first post!! I'm glad my first project went down well! So, I've made another painty, quirky odd thing to share.... Here she is..
This time I've used probably my favourite surfaces, canvas. I love the texture of canvas, the fact you can build upon it to create something really 'touchy feely' as well as easy on the eye! This particular 'board' was made by adhering Sticky Backed Canvas (by Claudine Hellmuth, the white version) to chipboard. I love the sticky backed stuff as you can have a base whatever size and shape you fancy, just by covering it with the adhesive canvas. No more being limited to the sizes and shapes of ready made canvas boards or blocks! Its also really easy to die cut as well, and this is our first step......
Die cut a circle and flourish (both Sizzix) from the canvas (I've stuck it to thick card first to give it a bit more stability), and then cut and cover your chipboard with the canvas too.
Time to create the background on your canvas board. I've used Adirondack Paint Dabbers as my paint for this part, in Aqua, Cool Peri and Pool. The white is Claudine Helmuths Blank Canvas . Smear on the four colours, drying each layer before you add more. Mine looked like this.....
Next, lots of stamping! Using the four colours of paint used in the background, stamp Random Dot Background, Grid Background and Harlequin . Also, stamp the circles from the Swirls Splats and Dots plate , and the long single harlequin from the A6 Borders Plate .
Detail printing is next on the list... I've used Raspberry Paint Dabber , and Charcoal Black Claudine Hellmuth Studio paint for this. print lines and tiny circles using junk like store cards and bottle caps, and add in some tiny dot detail too....
To complete the background, also paint, stamp and edge the die cut canvas pieces (the circle also has the top of a Flourish on it, from the Swirls Splats and Dots plate....)
Adhere these to the background. I've used hot glue as it gives a 3D effect, as well as ensuring a good strong bond! The Flourish is placed along the bottom, to give my little girl somewhere to stand, and the circle as an accent in the upper right section of the piece....
I've added a digital image of a little girl, looking suitably perplexed ( Weirdly,I LOVE figures looking perplexed!)
 Again, the hot glue gives her that raised 3D look. The quote is from my stash of cut up old Mills and Boon romance novels! Glued on with gel medium....
And thats it! A painted canvas board, with that quirky randomness I love! Hopefully you like it too...
Until next time....
Love, Trish xxxxxxx


Saturday, 2 June 2012

Emily is Bored by Trish Latimer

Hi everyone! Trish Latimer here with my first of three projects this month. I am so excited to be part of the team as guest designer, and can't wait to show you some of my creations using Jennie's stamps and products! So, first up is this.......
A colourful, quirky frame! Lots of lovely messy paint, and plenty of stamps... Here is a quick step by step to give you an idea of how to create one of your own.
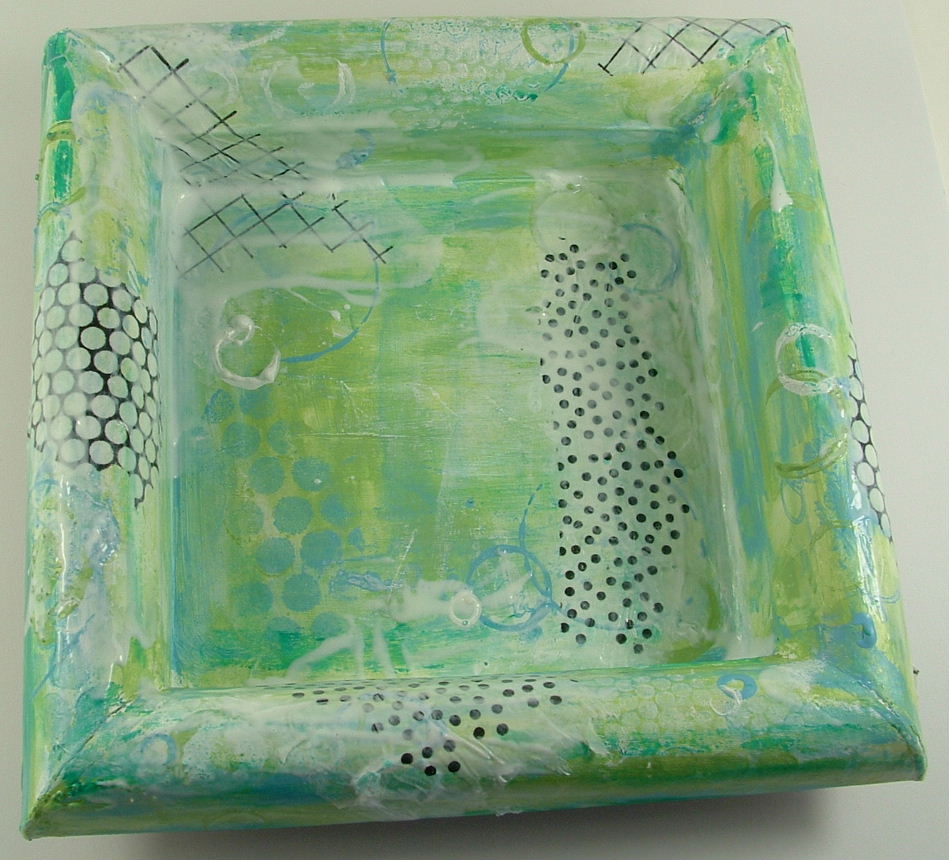
I like to work on a white base, so I've used gesso to cover a deep paper mache frame :
Of course you can leave the papier mache as it is, should you want the vintage, brown look in your piece!
Next, get the paints out! Smear the whole thing with Landscape Green and Sky Blue (by Claudine Hellmuth) and then print and stencil using bottle tops and sequin waste. I've also used a bit of Blank Canvas paint as white is a great highlight colour. Stamp using a Calligraphy Mat and elements from the Swirls Splats and Dots plate. Something like this.....
Once this base is totally dry, add in some detailed stamped images. As the frame isn't flat, and we want the stamping to go around the corners, the only way to do this is to use tissue paper. Stamp Open Sequin Waste, Random Dots and Grid Background onto white tissue using black ink, then heat to set. Tear the tissue and adhere to the base using Mod Podge wet glue. Like this...
You can clearly see all the wet glue on that pic...once the glue dries it will become clear, and the tissue transparent. The aim is for the stamping to look immaculate, even though it goes around corners! Add in some red paint (I've used Dash of Red ) , and some more details using Classic Teal . This will not only add a vibrant accent colour to your work, but will also help to 'blend in' your stamped tissue so it looks part of the piece.
Thats the background done! Using the same paint colours as before, colour some scrap card, then overstamp with Butterflies . Cut out, then adhere a coil of wire to the back using hot glue.
The hot glue gun now becomes your best friend! Attach all the coils to the base of the frame, and put a tiny piece of card (shaped like grass) at the front to hide the glue!
I've used a digital collage image as my fairy, adding in some wings from a painted butterfly as before...
Finally, I typed a quirky quote, then printed it off and stuck it on. This hopefully brings the whole thing together!
I've loved making this as my first piece for you all to share, I hope you like it too! I'll be back later in the month with more....so bye for now!
Love, Trish