Showing posts with label Architecture Plate. Show all posts

Thursday, 21 May 2020

After The Lunch by Jane

Hi all. I have started doing a journal of a collection of a few of my favourites.... verses, poems, quotes, sayings, passages from books that I like...etc. well, my absolute favourite piece of poetry is one by Wendy Cope, entitled 'After the Lunch',  the minute I read it I likened it to me and the relationship that I was in at the time!!.
 I used the fabulous window image from the ARCHITECTURE stamp set as it has a relevance to my memories of the guy.


I stamped out the whole of the poem inside the little book where the window theme flows the way through. If you are wondering how it goes......

On Waterloo Bridge where we said our goodbyes
The weather conditions bring tears to my eyes,
I wipe them away with a black woolly glove
And try not to notice Iv'e fallen in love.
On Waterloo bridge I am trying to think
This is nothing, you're high on the charm and the drink,
But the jukebox inside me is playing a song
That says something different, and when was it wrong.
On Waterloo Bridge with the wind in my hair
I am tempted to skip, you're a fool, I don't care,
The head does its best, but the heart is the boss,
I admit it before I am halfway across!!


Tuesday, 4 February 2020

A Broken Winged Bird, by Jane.

So this months challenge is "Words".. however you want to interpret that, you cannot deny that words can be very powerful, and the tone always make a difference, ask anyone who has analysed a text to death, reading it in different tones..LOL.
This card came about by just throwing stuff on a piece of card til I liked what I saw, you can just see the fabulous arched window from the architecture stamp set in the background  then I added the bird image and finally the fabulous sentiment.


Stamp supplies used:

Hope you will join in our "words" challenge

Sunday, 21 July 2019

All Woman!! by Jane

This month's challenge...."celebrating women". what a fabulous subject!!. however you interpret it, you cannot deny that the female of the species are pretty damn awesome....well... I know that I am!!! I am not claiming to be some kind of superwoman, but when I look back at what I have achieved, and pretty much on my own with not a lot of help from anybody else, (my hardest problem is asking for help!!).. I think I have done amazing...so there you are!!....I am going to celebrate the magic that is me, and all you fabulous females out there.


to create the background I have used :
for the main image I have used :
and the little word is from the


Thursday, 4 July 2019

CURVES by Jane

I think circles are probably every crafters favourite shape, I know they are mine!!. I have a gazillion different stamps and stencils that are relating to circles in some way or another, I just cannot resist them. So I was happy when these gorgeous new midi background stamps designed by Tracy Scott landed on my mat, they are available from the 8th of July.


To make this card, I did a colourful background using another Tracy Scott stamp..BACKGROUND #6     then stamped over it using one of Tracys new midi stamps. I made a mask by stamping and cutting out one of the statues from the ARCHITECTURE 3 stamp set, placed it on my background and blacked out the rest, then stamped over the black with the same midi stamp set and white gesso. The word "curves" is also taken from the architecture stamp set. 
I am really looking forward to seeing your art in this months "Celebrating Women" challenge.


Sunday, 19 May 2019

Inspiration by Titbelsoeur

Hi this is Titbelsoeur, back with a 15 mn card !
First of all, I have used a piece of plastic wrap to give some texture to a watercolour juice and meet our May creative challenge, then I have stamped Honeycomb Background and the word "Inspiration" from Journaling Words 3. On a notebook page, I have stamped the beautiful door you will find on Architecture 3, teared the page and sticked it to the background paper.

inspiration

Card or art journal page, your choice !

I hope my project gives you inspiration to participate in our 

for 3 chances to win some of these fabulous Artistic Samper stamps !
Thank you so much for stopping by.
Your comments are very much appreciated here, on my blog
Bye for now and happy creating. 
Titbelsoeur

Sunday, 21 April 2019

Hallelujah...He is risen!! by Jane

Hallelujah!!! ..and a very Happy Easter to you all. As it is Easter Sunday, obviously I have made easter cards to show you, and best of all, I made all three of them with my one mop up sheet as I was crafting, funny how sometimes these mop ups make my favourite sort of backgrounds!!, especially as I saw an etherial planet in my main one. The main feature for these three cards is the fabulous window from the ARCHITECTURE stamp set.


So....Hallelujah, He is risen!!!. I hope you all have a wonderful Easter, and take a little time out of your holiday to join us in this months "new growth" challenge.

Tuesday, 4 December 2018

Christmas Hearts by Jane

Hi All, Jane here!!...with a question, Who loves Christmas, and who is a bit of a bah humbug??.. well, I think I fall into both categories, I love Christmas day, but absolutely hate all the commercial part that starts in |September....tut!!!, I am sure a lot of us have lost the sight of the real meaning of Christmas. No lectures from me today tho, so you can relax.
I love Christmas day because that is the one day in the year when all my little hearts, well, the four people that have my heart, my two sons with their partners,and my two grandsons all come to my house, it is so lovely to have them all together, then after a full day of making dinner, playing with jack and Billy, a few Christmas games...and it is just as lovely to see them all go back home...lol.
So I think this card that I have made for this months "Christmas" themed challenge is appropriate for me.


The stamps I have used are;

Hope you can join in the fun. 

Sunday, 21 October 2018

Architecture Owl!!!

Cool eh!!!....it's not even an owl stamp!!!...it is a stamp from the ARCHITECTURE 3 plate, a stamp set full of columns, arches, doors and statues, the piece that the "owl" is sitting on is a column from the same stamp set. 


I stamped them out, coloured them, then fussy cut them, and added them to my inky background, done with the fabulous distress inks...doncha just love those inks!!!
There is still time to play in our  "Inktober" challenge. I look forward to seeing all your lovely creations.

Saturday, 21 July 2018

I called to the Lord!!

Hi there, it's Jane again here to hopefully inspire you to join in with the challenge for this month... "distress it", so however it calls to you then you can interpret it any way you like.
For my challenge piece I have used my newest purchase, Eileen Hulls Bigz passport die, it is fantastic, and I was inspired to make an inspirational book using distress inks and Artistic Stamper stamps.


This book started off as a piece of art that I had done that I wasn't too thrilled with, so I ripped up a book page, stuck it down randomly, then gave it a good gesso'ing, a few spritzes of distress inks, and then stamped the fabulous window from the ARCHITECTURE 3 stamp set, then added the text with some alphabet stamps from my stash!!. I am in the process of doing the pages for this book so if you join me tomorrow on MY BLOG I will post the finished product.
I have so enjoyed doing this "distress it" challenge, I hope you will join in too...HERE.

Wednesday, 4 April 2018

The Pigeon and the Statue!!

Hi there all you Artistic Stamper Fans!!..Well the snow has gone...hopefully never to return, and it looks like spring is finally here...well there are reassuring signs when I look out of my kitchen window and see the sure signs of my plants starting to spring to life...yaaaaay!!.
Sooooo....for my first card for this months challenge, which is "Birds and Bees", I thought I would make a card that would hopefully put a little smile to your face....


.....it made me kinda chuckle when I got the idea....or maybe I'm just a bit nuts!! lol,...anyway, when I saw the statues from the ARCHITECTURE stamp set, it reminded me of every statue you ever see....full of pigeon poop!!!...
The background was super easy, I was messing around with some watercolour paints and had plenty still left on my craft mat, so I picked it up with the polystyrene base that you get from supermarket pizzas and just dabbed it on some card..
I then stamped one of the statues, cut it out and added some white paint drips on the head and shoulders..
I then stuck it on my card, added a column which is taken from the same fabulous stamp set, then I stamped out the little birds from the FREE AS A BIRD stamp set, cut them out and added them to the statue. The quote is computer generated... I think it is very apt!!!!
I look forward to seeing all your entries in our April "Birds and Bees" challenge.


Saturday, 7 October 2017

Antique sardine can by Titbelsoeur

Hello there, how are you doing ?
Today, let's go back to the very very old times... To do so, I have stamped a statue from Architecture 3 058 A4 on Bristol paper and lightly colored it with watercolors.
The background is made with the mini Harlequin from  Mini Backgrounds # 2 size A6  and the big circle from Decay Journaling Stamps #1 Size A5 that I have stamped on a small gelli plate before printing.
In details :


Then I sticked the background to the back of a sardine can, cut out the statue and sticked it on the edge of the can to make depth, and added a few jewels from my stash.


Would you like to win these fabulous stamps ? Easy : just participate in our monthly challenge "STEAMPUNKED " for 3 chances to win !

Thank you so much for stopping by.
Your comments are very much appreciated here, on my blog

Titbelsoeur

Tuesday, 19 September 2017

Door card by Titbelsoeur

Hello everybody !
Are you looking for ideas to participate in our monthly challenge ? Here is another easy-to-make card, I have done it the same way as the other, used the same inks and the same stamp plate, but not the same door stamp ! 
Here is the how-to : just ink your mat with your Distress ink pads, spray water and press your paper on it. Then ink some mini background stamps with the same inks, stamp it  here and there, and then stamp this awesome door with black archival ink. 


And here is your beautiful card with little colour !

here are the stamps I used :


Would you like to win these fabulous stamps ? Easy : just participate in our monthly challenge "Take a little color" for 3 chances to win !

Thank you so much for stopping by.
Your comments are very much appreciated here, on my blog

Titbelsoeur


Saturday, 16 July 2016

Butterfly 3D frame by Gemma

 Hello everyone

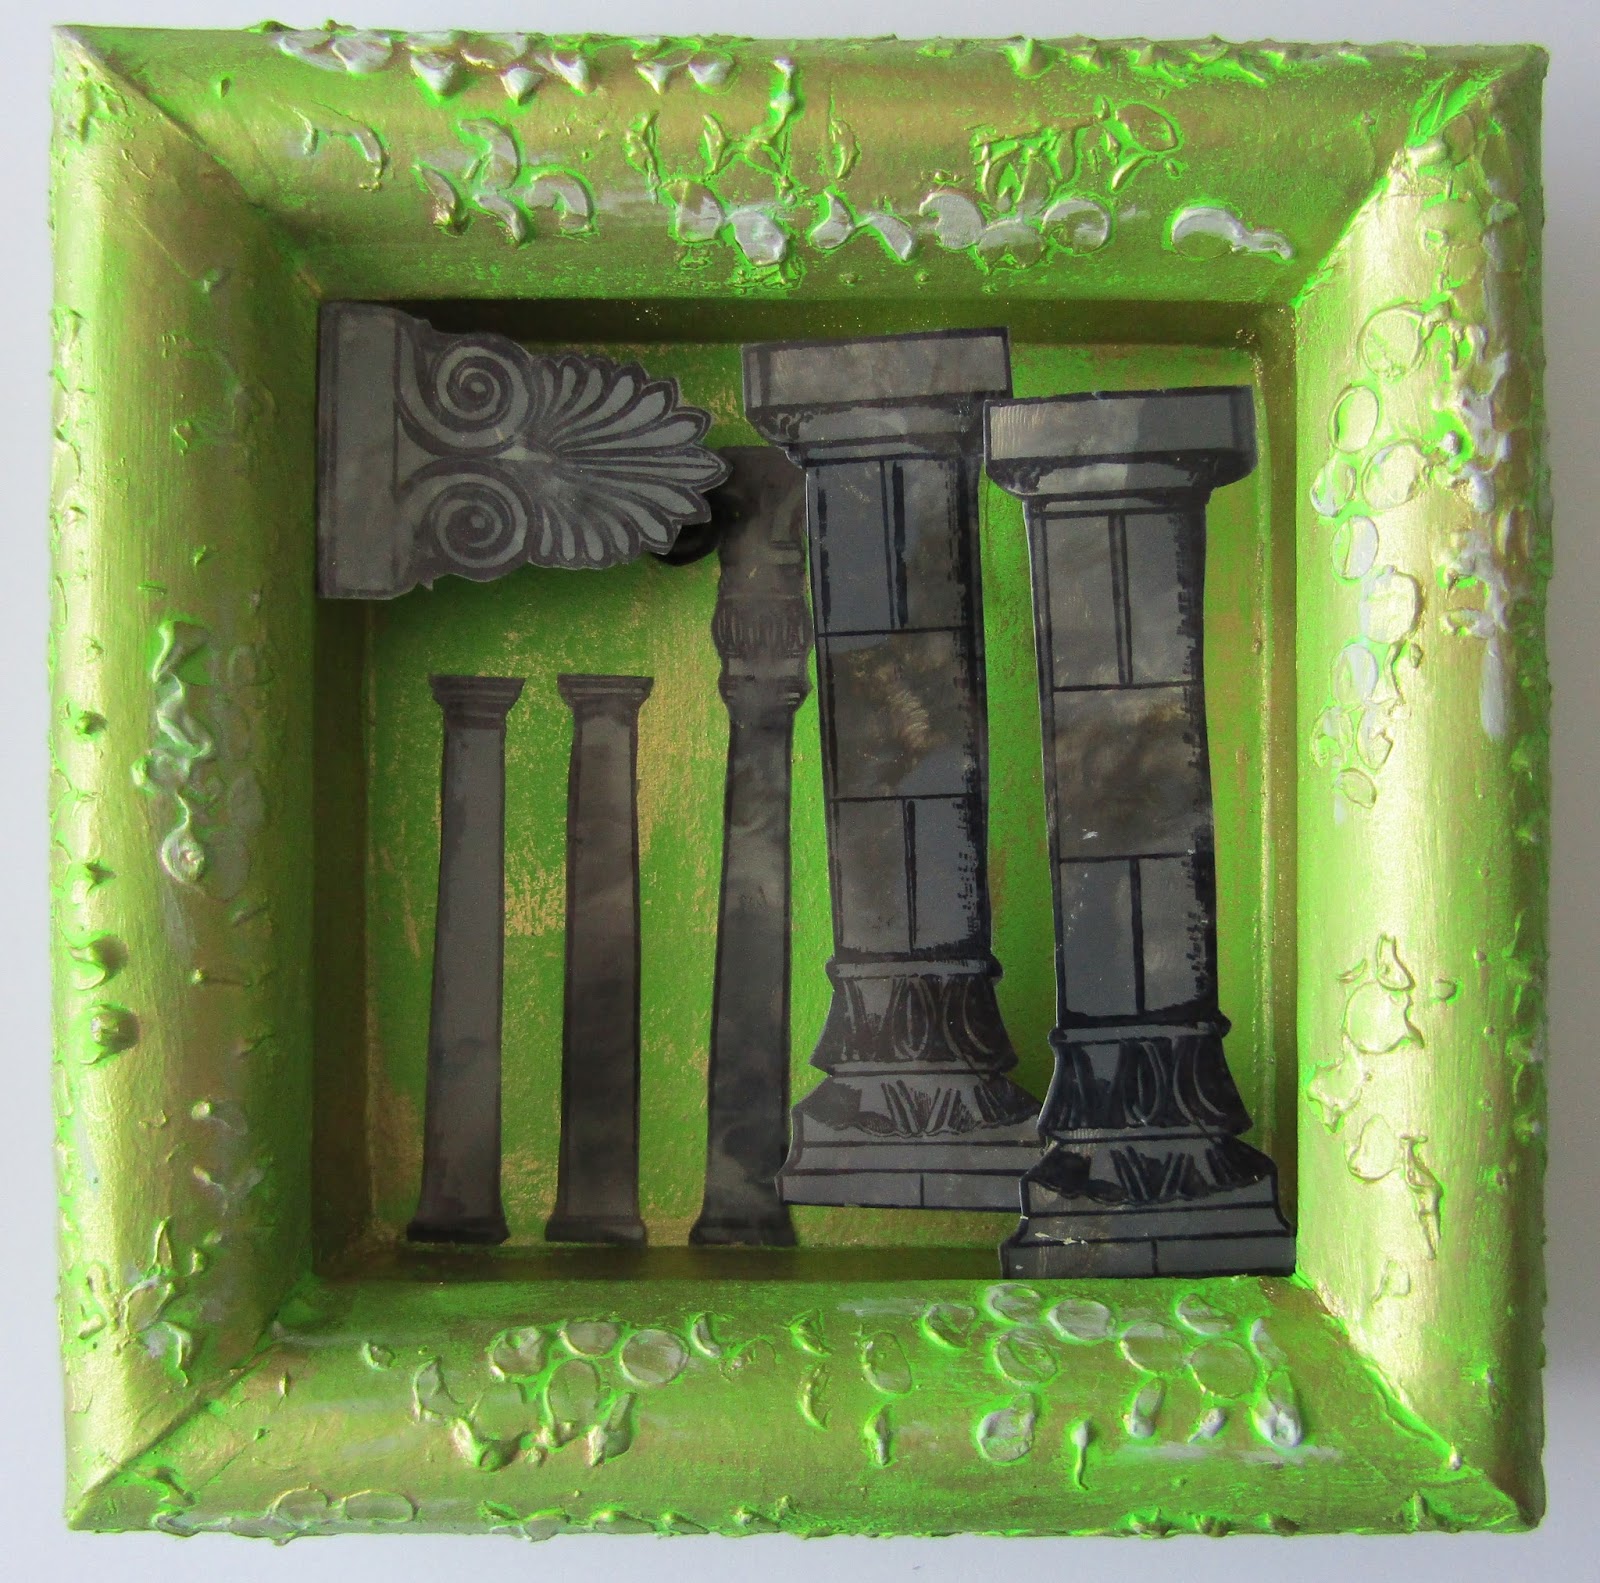
I have a bit of a butterfly theme going on this month. For this post I decorated a 3D frame that measured 20 x 20 cms.


To start I coated the frame in a white paint to prime it.  Then I put some Fresh Lime, Dylusion paint and basic florescent green acrylic on my craft mat.  I applied the different paints to the frame blending them together as I went. It took two coats to cover the frame.


Once dry I applied some grunge paste through the Random Dots mask  and some gilding wax along the inside edges of the frame, once the grunge paste was dry I also brushed gilding wax over the paste.


On sheets of acetate I stamped out butterfly's and columns from the architecture plate, and butterfly plate


Using my fingers so the paint was applied fairly thickly I applied Titan Buff and different shades of grey acrylic to the backs of the columns. When cutting the pieces out, I had to remember to leave tabs so they could be glued in place on the frame. 


On the back of the acetate sheet with the butterfly's I sprayed different ink sprays including cherry pie and lemon zest Dylusion sprays.


Gluing the pieces into the frame was very fiddly and I ended up making little stands from acetate to prop everything up.


I then added a strip of green paper along the bottom to represent grass and some die cut swirls from patterned paper.


I then stamped the same butterfly's onto card stock and coloured them in with pens, gluing the acetate butterfly's over the top. Then I just had to glue them into place on the frame.


Please take a look at this months challenge- All Things Bright and Beautiful, here on the blog and on the Facebook page. There is still plenty of time to enter for your change to win some lovely stamps.

Thank you for reading
Gemma

Sunday, 19 June 2016

Columns by Titbelsoeur

Hi there ! this is Titbelsoeur here !
Another sardine can for my collection !
A roman one, today. I used my 3x5 gelli plate to color the background and the ghost door, mixing prussian blue and burnt sienna, and I stamped the columns and statues with Cobalt Archival Ink. Here is the front statue :

AS

the door background :

AS


the front :


AS

and the back :

AS

The feet of my can are made with perfume caps :)
To make this project, I have used the door, statues, column and front of this Architecture stampset you will find on the very new and gorgeous Artistic Stamper's website :


Architecture 3 058 A4
Thanks so much for stopping by,
your comments are very much appreciated, 
here, on my blog, or on the Artistic Stamper's Facebook page

Do not forget to participe in our

MONTHLY CHALLENGE

 to win some fabulous Artistic Stamper stamps ?

Titbelsoeur

Wednesday, 22 April 2015

Gothic Arch's By Dee

Hi everyone hope you are all well and having a crafty time. I have a plaque 
for you today using the new stencils from The artistic Stamper,
and some Artistic stamper stamps.


Firstly I brayered on the fresco paint till it resembled old stone.


I then used a pallet knife to apply the grunge paste to the top left
I applied this quite thickly so it would resembled old stone 
once I had stamped into it using the circular column toppers
of the architecture plate.


I inked up the stained glass window off the architecture plate
stamped it twice with black stazon once onto the background
and once onto spare card. This was then cut out and
 stuck into the frame of the main image of the arch.


I used the Artistic Stamper lace background stamp & inked it up with stazon black ink 
This resembles peeled paint if you used the right area's. Stamp around the 
Arch window.


I put texture paste through the Artistic Stamper flourish stencil, I then
sprinkled a mix of pale blue and gold embossing powder and dried 
with a heat gun.


I used the Framelits die and glued this up the side after I had sprayed it with spiced
 marmalade and rusty hinge distress spray stains.


I wasn't keen on the colour although it did look like an old Gothic 
building I wanted it to look vibrant and highlight the swirl
texture.


I stamped the calligraphy mat 4 on distress treated paper which had
been swiped with old page and stained walnut.


I used the distress stain sprays to spray the entire piece to make it more vibrant.


I highlighted in area's with gilding wax. I applied a three
embellishments to look like old rusty bolts.


I must admit looking at it it reminds me of Rapunzel maybe the swirl is her hair
That's it for today as always let me know what you think remember look
at your stamps and see what other patterns they can create.
Cheers Dee x

Products used

  1. The following Artistic Stamper Stamps Architecture Plate, Caligraphy Mat 4 & Lace background stamp.
  2. Fresco finish paint  Chalk, Slate and Blue Oyster.
  3. Distress Stain Spray's in the following colours Rusty Hinge, spiced Marmalade & Salty Ocean.
  4. Grunge paste
  5. Texture paste
  6. Sizzix Thinlets mixed media die
  7. Embossing powders.


Tuesday, 13 May 2014

Mini Journal for sketching by Astrid

Hello everyone, lovely to have you drop by here! Can you believe the month of May is nearly halfway over already? With the weather turning ever warmer, I sometimes love to do little sketches outside, and needed a little journal that is easy to just pop in your bag or even a large pocket.
I found a template online on Marion Smith's site (so I can't share it but you could check it out if you are interested) and then started to think how I could decorate it with Artistic Stamper stamps. The template itself is for a little wallet type booklet to be used for recipes or similar, but I decided to make it into a little journal instead.
I copied the template onto strong card and then used some Graphics 45 French Country paper to cover the different panels.
Next I stamped one of the stamps from the Architecture 3 set in Sepia Archival ink, cut it out and adhered it to the front of my little journal together with a decorative brad.
The inside was covered with a piece of scrapbook paper from my stash. I then created a little booklet out of Ranger Water Colour Cardstock, as this is so thick I could only fit in one signature, but that is alright, it is only meant to be a little journal.
Below you can hopefully just see how I stitched it straight into the cover.

The flap, which is also the closure was further enhanced by stamping the word Artist Journal from the Classics 1 set by Tim Holtz.

For the back of the little journal I stamped two further images from the Architecture set in sepia, cut them out and adhered them to the cover.

The booklet closes with a little magnet
Once it is filled, it will be easy enough to create another one. Well, hope you like it, I am sure it would be easy to do something very similar with a # 12 manila tag.

 I die cut two decorative corners for the front and coloured them with the same ink and of course I also inked around all the edges of the journal as you probably saw.

Thank you for visiting and stay inky!