Saturday, 10 November 2012

A special canvas by Titbelsoeur

Salut les copines !
This is a very special canvas I want to share with you today, for 2 reasons : first it is fully made with recycled stuff, and second, this is going to be a long story... let's make it short ! One night, not well sleeping, I thought about the scrapbooking day that has no counterpart in mixed-media... so why not organizing a mixed-media day ? then I got in touch with 4 friends of mine to ask them if they wanted to share this odd journey with me, and they said YES ! So the 5 of us are currently leading a French forum named "Patouille et Récup" sponsored by The Artistic Stamper, each one of us presenting and tutoring her creation during 4 weeks (a single week-end was too short), and here is mine :

 an old bulb, colored with alcohol inks..

 some tea bags...


the structure is made from a rice box, the lady's dress with junk envelopes, buttons, cogs, beads, a perfume sample... and even a "hello George" coffee pad, that makes a very nice hat !


And, of course, a lot of Artistic Stamper stamps :
chicken wire : http://www.theartisticstamper.com/background_stamps.htm
words : http://www.theartisticstamper.com/words_and_sayings.htm
Post stamps : http://www.theartisticstamper.com/collage_stamps.htm


I hope you like my "canvas",
thanks for stopping by, 
I am looking forward to reading your comments ! 
See you again soon...

Friday, 9 November 2012

Angelic Art Doll by Alison

Hello Stampers!
I made an art doll for my very first post as a CT member, nearly 2 years ago, & as they are great fun to make, I thought it was time I made another :)
I started by painting a piece of corrugated card with silver paint dabber, for the base.
For the face, I stamped Girl With a Flower in Her Hair onto white card, coloured her with antique linen distress ink, then cut her out. I added a festive foliage poinsettia to her hair, with a crystal brad. I used wired tinsel for her halo, & attached it behind with sticky tape.
I painted the die-cut wings with pearl paint dabber, & added some platinum stickles to the lower edges.
For the dress, I used running stitch to attach some pretty organza to some white cotton. I pulled the thread to create a gather, then sewed the angel's head on through the sticky tape on the back.
I die cut a Sizzix snowflake, using music paper, attached a Christmas muse token with a long fastener, & attached the snowflake to the dress.
I added some beaded trim to the bottom edge of the base,some eyelets & chain to the top, then glued on the wings, & attached the angel, using silicone glue.
I hope this inspires you to make your own art doll,
thanks for looking, & for all the lovely comments you leave, which are greatly appreciated,
Alison xxx

Tuesday, 6 November 2012

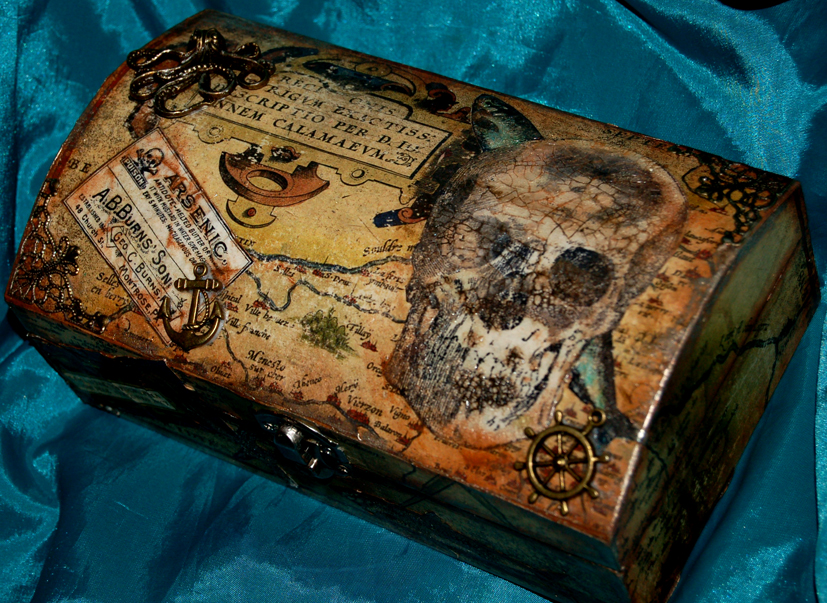
Yo-ho ho... and a bottle of rum... By Zuzu

A pirate themed altered box from me today. I am very in-love with Mr Tim's skull stamp and have been playing with it for a few days non stop.
this little wooden chest was altered by using some old looking map papers i had in my stash and inked around the edges with Vintage Photo distress ink.
I then stamped the Skull, label, fish and starfish on to some pale cream paper that i had added some antique linen ink to.


I coloured both the fish in with watercolour pencils then cut out and glued all the stamped images  in to place on the box.
Next I used the distress rock candy crackle paint (clear) over the fish, starfish and skull and left it to do its crackle thing.  once it was dry and crackled, i used a baby wipe to rub some brown paint in to the cracks and cleaned all the excess off.


I used gold gleam polish around some of the edges of the box to add to the aged, distressed look then sealed the whole box with a coat of sealer/varnish.
then i simply glued some metal embellishments into place.


Monday, 5 November 2012

On a Pedestal by Sioux Jenneys

Well it's November.....yikes it's Bonfire Night! Where has the year gone!!! LOL I'm here to share a tag today :)


1. I spritzed a tag with some Dylusions in melted chocolate, vibrant turquoise and lemon zest...then spritzed a bit of water over to help amalgamate the colours. Dried it off a bit and started to dab up some of the still wet ink for some texture. I then put a stencil/mask over and spritzed some water over it, removed the mask and blotted the water off some more.

2. I used the journaling mini words 1 as a background and stamped it in Archival coffee using a second stamping.

3. I stamped Life is a Circle in Archival black and over stamped the smaller clock face from Tick Tock plate in Archival coffee. Carpe Diem and part of another Architectural plate 1 element were stamped on the edges in Distress aged mahogany and a couple of the swirls from the Tick Tock plate were stamped in Distress vintage photo

4. I stamped the man from Mens plate 1 and the pedestal from Architectural plate 1 onto previously coloured card and cut out...attaching them with glossy accents.


5. I had used some kitchen roll to dab up the ink in step 1 so I decided to waste not want not and hand wrote the sentiment onto this using a sharpie pen (any water resistant pen will do it)...

..."She put him on a pedestal so that all could admire his beauty"...

the words were cut out and attached to the tag with Glue and Seal matte...it allows the background to show through to a certain extent ;) The word Beauty is from Nudes A4  plate. When the glue and seal was perfectly dry I added the lines with the Sharpie pen. 

6. The edges were aged with Distress aged mahogany and fibres threaded through the tag.


Hope you liked the tag today :) See you again soon....keep safe with those fireworks!
xoxo Sioux

Sunday, 4 November 2012

Announcing October's Challenge Winner

Hi, it's the Chief Stamper here again. One of my favourite things to do every month is to choose the winner of last month's challenge. Now I always pick the winner by Mr. Random.org, and so I never know who is going to win....This month, this gorgeous tag


 fell into the random pot!! Congratulations Mark, please email me so you can choose your prize :)
Thank you to everyone who joined in, there was some stunningly gorgeous work!
This month's challenge is a definite must , as it is ANYTHING GOES, and the girls  used recycling as their theme.. such innovative projects, that you must take a look, and of course, please join in... You will get a chance to win £15.00 worth of stamps plus the Kling-On to go with it. I shall look forward to seeing everyone's entries :)
Have a very creative Sunday
Hugs
Jennie

Friday, 2 November 2012

Steampunk in October... by Joanna King

Hello! My name is Joanna (aka Asia King) from Under a Creative Spell and I am super excited to play this month with the Artistic Stamper Creative Team!

My first guest design project was inspired by Kate Crane’s monthly calendar challenge. I must admit, I haven’t been very disciplined to keep up with all the months but after seeing this amazing range of stamps, my hands were immediately itching to start crafting!

For my calendar pages I used water colour paper, which I first painted with gesso. Then all the fun began! Using purple, orange and white acrylic paints I painted the pages, smearing and overlapping the colours as I went.

Then to start building layers I randomly sponged the paints through a mask with a collage of numbers. When the paint was dry, I stamped layers of images from Large Dotty Closed Background and Punk Plaid Background and added some paint accents through sequin waste.
Using an embossing ink I stamped the 'bubbles' from the Borders A5 #2 plate and heat embossed them with Stampendous Aged Wine embossing enamel. Then, with white, black and gold paints I stamped a number of circles with plastic bottle tops and I added a few black lines with Ranger's craft scraper.
To 'frame' my page I used the tiny dots and gears from the Borders A5 #2 plate which were stamped with Pumpkin and Jet Black StazOn inks.
My calendar days were punched from scraps of patterned paper and the edges were distressed with  Spiced Marmalade and Dusty Concord distress inks. The Steampunk butterflies and the snail are from the Tick Tock Butterflies set, which I stamped onto patterned paper and coloured in with the distress inks.

To finish the page I added some black rub ons. I hope you've enjoyed reading about this project and I look really look forward to sharing my next project with you!

TTFN!

Thursday, 1 November 2012

November Challenge ~ Anything Goes


Hi everyone!

Another month has flown by and it's the start of a brand new challenge ~ so, welcome to a new month at The Artistic Stamper and we really hope you'll join in!!

Firstly, we would like to say thank you to everyone for all your fabulous entries that you submitted in last month's Natural World challenge. We had so many wonderful creative pieces from you all and we will be announcing one very lucky winner in the next few days, so make sure you check back to see if it's you!!

During October, we had the pleasure of having the very talented Yvonne Fay join us as our Guest Designer and on behalf of the team, Jennie and I would like to say a big thank you to Yvonne, for all her hard work and for the stunning creations that she made and shared with us. In November, we're saying hello to the very lovely and extremely talented, Joanna King as our Guest Designer, and we're really looking forward to seeing all her gorgeous artwork, here on the blog.

The new challenge for November is ANYTHING GOES, which means you can submit any style of artwork that you choose and we're all looking forward to seeing all the wonderful and varied creations that you do submit. To join in with this challenge is simple; make a piece of artwork, making sure that you include the theme and some rubberstamping. Pop back here to link up using the Froggy at the bottom of this post, so that we can see what you've made and then, leave us a comment to let us know you have joined in with the challenge. As always, there will be candy for one randomly picked entrant - the winner will receive £15 worth of The Artistic Stamper stamps of your choice plus the Kling On to mount them onto. And don't forget....if you use Artistic Stamper stamps on your entry, you will entered into the draw, twice!!!!

If you do need any inspiration, then look no further than our Creative Team's stunning creations for this month's challenge.
This is a marmalade jar. the screwtop is covered with a compress glued with gesso and colored with Distress ink? On the jar I have tied an old necklace, and a ribbon with an altered champagne cap. And I have glued a  piece of lace and a piece of fabric I have stamped with a part of this awesome bicycle plate I showed you this summer, you will find it in the Collage & Retro section.

Like Tit, I have been re-cycling this week! I wrapped wired gold tinsel around an old plastic bangle, adding die-cut holly from the Alterations Festive Greenery strip, & some red beads. I triple embossed a chipboard frame with green EP, & stamped into it with a script background. I coloured an image from the Victorian Christmas 1 plate, placed it behind the frame, then covered the image with glossy accents. I finished off with some red ribbon & a Christmas light bulb embellishment.

I also chose to re~cycle this month and I chose to make a small gift box from my re~cycling!! I painted the bottom of my box with a pale blue acrylic paint and then used a white crackle paint over the top. For the lid I reversed the colours. I stamped a sheet of white paper, with the Music Background Stamp, inked with Aquamarine Archival Ink. I then used Tim Holtz's Mover and Shapers Mini Tattered Florals to create my dimensional blooms and dipped them in molten UTEE to enamel them. Whilst the UTEE was still hot I sprinkled glitter over the top. I then stamped a piece of white card, with the greeting from the Mini Christmas Stamp set and used Distress Inks to age and colour the card. I added my blooms and message to the box, together with a piece of vintage ribbon, dyed with Tumbled Glass Distress Stain and some miniature bottle brush Christmas trees from my own stash!

We hope you will join in with this month's challenge and we're really looking forward to seeing your interpretation of our theme and all your amazing creations and artwork. Please, don't forget to add a comment when you post your entry.

I hope you all have a happy and very creative month.
See you soon...Emma x