Showing posts with label border stamps. Show all posts

Tuesday, 7 February 2017

He[art] Journal page by Ttibelsoeur

Hello happy Journalers, how are you doing ?
It was great to use these Artistic Stamper stamps to make a new art journal page.


The page was not blank in first place : I have gathered many monoprinted pages to make a new art journal. Hence the first layer, gelliprinted with Bamboo Open Texture Mat C156 © CaroLines
The second layer was made with the new Mini background stamps and assorted Distress inks. Then I stamped Decay forms and steampunk border from Borders A5 2 on the edges with black Archival ink. Some white marks made with white acrylic paint on bottle caps, and the background was done.

Then I stamped the 2 Inspiration Jars with black Archival Ink on a separate drawing paper, already colored with Distress Ink Pads (Mustard seed, Spiced Marmalade and Broken China), I added the new Mini Heart © Neil Walker on the blank jar, highlighted some details with a white pen, cut both out and glued both on my page.

I was just missing a title 😅... easy peasy, found it in the Journaling section !

Thank you so much for stopping by,
your comments are very much appreciated, 
here, on my blog, or on the Artistic Stamper's Facebook page.
Do not forget to participate in our monthly challenge
 to win some fabulous Artistic Stamper stamps.

Titbelsoeur

Wednesday, 16 September 2015

Journal Banner Dress by Gemma


Hi All

Its all about journal pages for me at the moment, they give me a freedom and a relaxed way to play, that is not present when I am constructing a album.


I started by covering the page with Gesso. Then using an old plastic card I scrapped Fresco Finish Granny Smith and Teresa Green over the whole page.Then using what is still a favourite of mine, good old Distress inks (Shabby Shutter and Pealed Paint) , I stamped over the top with Chevron Elements and Harlequin


Then out came the Geli plate, I have been a very naughty girl and cut mine up into smaller pieces, but anyway, using more of the new limited addition Fresco Finish paints (all four colours this time). I used the Gelli plate as a stamp and applied paint in sections, layering it up with stamps from Borders #1. Once dry I stamped out the bunting stamp from the same set five times and cut them out. 


On a separate sheet of card I drew a body and added some titan buff, and tan Acrylic paint, unfortunately, faces and heads are still a work in progress, I completely messed this one up, so off it came and I stamped one out from an old Dylusions set, I glued one of the borders across the top of the page, and cut the others down more to form the dress. I then stamped and glued some words from an old stamp set.


 I could not have her floating so I drew in some grass under her feet, and cut and glued small flowers from the left over bits of paper, I also added some wings that I paint with Professor Plum and stamped on with Calligraphy mat 11. To finish off I went around everything with a black paint pen and added some white with a paint pen to areas on the dress and chevrons.

Thanks for reading
Gemma (inkykitty)

Products used from The Artistic Stamper 


Wednesday, 3 September 2014

Earl's


Hi everyone hope you are all well, and feeling crafty!
Today I bring you a picture using the new stamps
 from Debbie Cotton.


I had this collage frame I covered the base in a cream 
acrylic paint and dried.


Next I used weathered wood, frayed burlap & pumice stone 


I put the three paints on a craft mat & spritzed with water & then
 I swept the cream painted board through the paint. I dried 
it and swept it through again and the spritzed
 the board with water, then dried with
a heat gun.


I grunge board with a Tim Holtz Die and painted with the 
fresco finish stone. Then I used the same distress
paints around the edges and a bit of 
aged mahogany then I blended
 it all with my finger.


I used the crafters workshop specimen stencil and put grunge paste through it. 
Once dried I painted the frame with Fresco's Finish french toast
& dried it. I then applied crackle glaze over the flat area's
 & allowed it to dry. I painted nougat over the top
 & applied white fire treasure gold.


I stamped the Earl's automotive stamp onto tissue paper.
And coloured it with mahogany distress paint.
I carefully cut out all the images
and stuck onto the sign
and canvas.


over the rest of the canvas at the bottom I used the A6 Boarders 
stamp and the cogs of the Tick Tock plate.


I fixed the sign with jump rings and fixed to the top
left hand side. All the stamps used here today are 
for sale at the Artistic Stamper. That's it from 
me today although I will be doing an extra 
post this month. Please feel free
 to leave a comment.
Dee x


Saturday, 23 August 2014

Journey of the Butterflies by Dee

Hi everyone! I hope you are all enjoying the summer.
Today I have a tag for you.


I put grunge paste through a Tim Holtz cargo stencil to spell Fly.
Once dry I painted the tag with Fresco Finish Paints in the 
following colours Inky Pool, South Pacific,
Beach Hut, Ice blue, Hey pesto &
Guacamole. 


Once dry I stamped the flowers from Encyclopaedia Botanica down both sides
in black archival and highlighted areas with pumpkin soup and ice blue.
The newspaper print from the stamp I stamped with snowflake
down the right hand side at the bottom of the tag.


To the left hand side I stamped the squiggle line from the borders plate
 in chipped sapphire and gold embossed it. On a separate piece of card I
coloured it with distress inks in wild honey and faded jeans
I then stamped the flowers from the botanica plate,
and the butterflies from the insects and 


I triple embossed the clocks of the Tick Tock plate and cut them out.
I used a small clock face to finish this off.


Once I had cut out the butterflies and flowers and highlight areas I
 embellished the centres with sequins and beads.
Next I sprayed the butterflies with perfect pearls in Blue Patina,
Cappuccino and Heirloom gold. The wings were then
 highlighted with glossy accents.


Small beads were applied to make up the bodies of the butterflies along with


The bottom was finished off with a Tim Holtz die cut painted in gold leaf.


That's all for today I hope you have all enjoyed this project . 
Please feel free to leave me comments 
Happy stamping!
Dee x


Materials used :- 
Fresco Finish paints, Inky pool, South Pacific, Beach Hut, Ice Blue,
Hey pesto, Guacamole, pumpkin Soup, and snow flake.
Distress inks, Faded Jeans, wild honey, glossy accents.
Perfect pearls, Blue patina, Cappuccino, Heirloom Gold.

Tuesday, 15 July 2014

Masculine project with Franswar Stamp

Hello Everyone, Shilpa here today,  with masculine project.
Artistic Stamper has a very good collection of Masculine stamps and today my main character is 'Franswar' designed by Neil Walker.


And this is how I  started off


On a gesso treated white card stock, I applied Antique linen, Old paper and Scattered straw distress paints. Spritzed water to get even layer. Dried it with my heat tool and gave another layer of DP. 
Stamped randomly with Small bingo card and Coffee Archival Ink.
Next layer was with Pine needles DI and Crafters workshop Specimen stencil.

 
After this, I stamped  Franswar image stamp with Jet black Archival ink. At the edges stamped with cogs  border stamps. Artistic stamper's Watches set is wonderful set of different varieties of watch images. At the corner, in the picture , you can see the side view watch image, which is a unique stamp, I have not seen similar before.

 
This is another watch in same stamp set.
Then, I applied Antique linen, Tea dye and Pine needles DI at the edges.
Adhered wood veneer Scale at the bottom of the piece. It has colored with DI. 
The word 'believe' is from Journaling words # 4
And finally I adhered the whole panel on another pattern paper from DCVW.

Hope you liked my masculine project.
Do check Artistic stamper store for amazing stamp collection.

Thanks so much for your visit today.
 
Supplies used:
Artistic stamper Stamps:
From my stash - white card stock, Gesso, DCWV paper pad


Thursday, 11 July 2013

Running Like Clockwork by Emma


Hello everyone!! Well, it looks as if summer has finally arrived in the UK and July seems to be disappearing quicker than any month so far this year and I can't believe it's already time for me to share my first post of the month...

...and here it is, my clockwork canvas and as always, there's lots of pics to show all the detail and I really hope you like my canvas!
To begin with I used a 5" square box canvas and I added PaperArtsy Grunge Paste around the edges to give a stippled, vintage effect to the piece. I covered the front and sides of the canvas using Distress Paints in Antique Linen, Frayed Burlap, Weathered Wood, Metallic Antiqued Bronze and a smidge of Black Soot, which I knocked back with some Picket Fence.
I then stamped the left and right hand sides of my box canvas with black Archival Ink, using the using the cogs border stamp from the Borders A6 #2 stamp plate and then added more Distress Paint to build up the colour. On the top edge of the canvas, I used the cog stamp from the Tick Tock A5 stamp plate.
Next, I stamped random areas on the front of the canvas using the Calligraphic Mat 11. Once this was done, I started to create a smaller canvas to mount onto the larger box one, so...I used some of Claudine Hellmuth's sticky back canvas and covered a small rectangle of chipboard. I then applied Distress Paint over the top of the canvas and added Walnut Stain Distress Ink around the edges, which I frayed slightly. I then stamped Phineas Pinchbeck onto the small canvas and it gave me a distressed faded look, that I loved. I added a rub on from Tim's Elements Remnants Rubs and popped a small screw brad into the corner.
The next part was to create the cogs using Tim's Gadget Gears die from Sizzix. I stuck sticky back aluminium onto chipboard and then ran it through the die cutting machine before applying Alcohol Inks over the surface to give a coppery metallic look to the cogs.

I adhered the cogs to my background using Matte Medium before then layering my Phineas Pinchbeck canvas over the top.

Next, I added some Idea-ology Mini Gears onto my canvas, clustering them together with my chipboard cogs and some Sprocket Gears, attaching Spinners into the centres.
I then added a Muse Token which I hung from a Ring Fastener.
 On the top of the box canvas, I used a Clock Key.
Finally, to complete my piece, I filled one of the Corked Vials with old watch parts and then added a Chit Chat sticker onto the bottle.
  
So, that's it from me for this today and I hope I've inspired you with what I've created, I can't wait to read all your comments. Don't forget that we have our "Ladies Day" challenge running at the moment and we would love you all to join in. For details of the challenge, just click HERE!

See you very soon and hope you all have a great day!
Bye for now...Emma x

Friday, 2 November 2012

Steampunk in October... by Joanna King

Hello! My name is Joanna (aka Asia King) from Under a Creative Spell and I am super excited to play this month with the Artistic Stamper Creative Team!

My first guest design project was inspired by Kate Crane’s monthly calendar challenge. I must admit, I haven’t been very disciplined to keep up with all the months but after seeing this amazing range of stamps, my hands were immediately itching to start crafting!

For my calendar pages I used water colour paper, which I first painted with gesso. Then all the fun began! Using purple, orange and white acrylic paints I painted the pages, smearing and overlapping the colours as I went.

Then to start building layers I randomly sponged the paints through a mask with a collage of numbers. When the paint was dry, I stamped layers of images from Large Dotty Closed Background and Punk Plaid Background and added some paint accents through sequin waste.
Using an embossing ink I stamped the 'bubbles' from the Borders A5 #2 plate and heat embossed them with Stampendous Aged Wine embossing enamel. Then, with white, black and gold paints I stamped a number of circles with plastic bottle tops and I added a few black lines with Ranger's craft scraper.
To 'frame' my page I used the tiny dots and gears from the Borders A5 #2 plate which were stamped with Pumpkin and Jet Black StazOn inks.
My calendar days were punched from scraps of patterned paper and the edges were distressed with  Spiced Marmalade and Dusty Concord distress inks. The Steampunk butterflies and the snail are from the Tick Tock Butterflies set, which I stamped onto patterned paper and coloured in with the distress inks.

To finish the page I added some black rub ons. I hope you've enjoyed reading about this project and I look really look forward to sharing my next project with you!

TTFN!

Tuesday, 25 September 2012

Our house... by Titbelsoeur

Coucou me revoilou !
I'm back and back again :-)

Today I am eager to show you a little piece of artwork I have made from a scrap of packaging kraft. Following a tutorial from Pascanine on a French mixed-media forum, I have folded it and then sewed lines on it with my tiny machine.

I have colored it with alcohol inks, but it was too dark, thus I added some yellow acrylics to lighten it.
A touch of border stamps here and there, whitened with my Posca pen, and just added punched circles from my table protective paper (just have a try, the result is stunning !)
And on the bottom, a little house garland stamped on a book page and colored with watercolor !

This piece will soon become a notebook cover... who loves it ?

Read you very soon ! 

Sunday, 2 September 2012

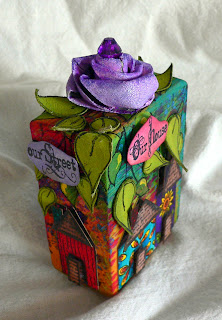
Chunky Houses by Lori!

Hi all! I was so honored to be asked to contribute to the Artistic Stamper Creative Team! There is truly so much talent here!

For my first project, I thought I would use Kat's Creations stamps..more specifically, the Our House A6 set.  Along with...Borders A6, which is in the background, hard to see, but it's there!  I chose to create a chunky ATC for my project, which is a dimensional ATC cut from a chunk of wood.  I sprayed the plain block of wood with Dylusions inks, which I love doing on bare wood, the wood grain really comes through and looks fantastic. I then stamped the houses and sentiment on white cardstock, then painted with the Dylusions inks! When I glued the houses on the wood, I used some foam behind the roofs and doors, to give them some more dimension. How about some pictures?
I did cut out some leaves from grungepaper and glued them on, after painting with a Citrus Paint Dabber.


Here's a little different angle, showing more of the top:
I painted some plain wooden plugs with the Watermelon Paint Dabber for the "feet" or base, to raise it up a bit.
I just love using the bright colors with the Our House stamp set, the stamps were meant for color!
Thank you for stopping by today, I hope I've inspired you to make some "chunky ATC's"!

Tuesday, 10 July 2012

Fly Away by Emma

Hello everyone...Emma here and I'm back with my first piece of July. For this piece I decided to make a mini canvas and I hope you like it!!!
Here's a list of products I used:
And this is what I did:
First of all I covered a mini canvas with Adirondack Paint Dabbers. I then applied Snow Cap paint to the dots stamp and randomly stamped onto the canvas. Next, I overstamped the dots with black Archival Ink and the circle stamp. I then added more Snow Cap paint through the Letter Jumble Stencil over areas of the canvas. I also stamped the edges of the canvas using one of the stamps from the Borders #2 stamp plate.
I used the Raspberry Paint dabber to cover some Grungepaper before stamping the outline of the butterfly onto it. I then carefully cut round the outline and added them to my canvas with a Game Spinner in the centre of their bodies.
I finally added the Chit Chat Stickers and a Curio Knob to my canvas!

So, that's it from me for this time and I'm really looking forward to reading all your comments!! Thank you so much for taking the time to have a look at my little creative piece and don't forget that we still have our Circles challenge running until the end of the month and we'd love you to join us...

See you all again soon and bye for now!
Emma x