Showing posts with label Flourish Background. Show all posts

Wednesday, 4 May 2016

Crystal Encrusted Flourish Chest by Dee

Hi everyone Dee here with a encrusted chest that 
I have made out of various techniques.
I started with putting modelling paste in the middle and 
corners of the box.
Once a skin had formed on the modelling paste I used the 
flourish from the ornate 2 plate to stamp
into the paste.
I used silver sequins from my stash to embed in the modelling
 paste.
Next I covered it all with white gesso followed by 
crackle paint on the lid sides.
Deco arts prussian blue hue was painted on in washes
till happy with the result.
A mix of silver, pewter, white & turquoise embossing powders 
was used to add extra interest.
White embossing powder was sprinkled over to add 
to the contesting colours.
I triple embossed the flourish into melted embossing
 powder.
A close up.
Another showing micro beads that I applied around the 
corner and the base of the box.
Thats all for today thank you for popping by.
Cheers Dee x
Products Used
  1. Artistic Stamper Stamps used were the Flourish BackgroundFlourish Ornate 2
  2. Deco Art Prussian Blue Hue.
  3. Modelling paste
  4. Crackle paint
  5. Embossing powders 


Friday, 24 April 2015

Butterfly's Farewell

Hello all, Alison (butterfly) here, and I'm very sad to say it's my last official posting as part of the Artistic Stamper team.  As many of you will know, life's been getting busier, and "something's gotta give"!

I've had an amazing time creating with the Artistic Stamper stamps (and the stencils too) over the last two years, and I'm so grateful to Jennie for her generosity and good humoured leadership, and for the chance to work with her fantastic designs.  (My textured tags last time didn't use the words "With Thanks" by accident!)  It's been a real privilege and pleasure to play alongside such a wonderful team of creative designers too, both past and present.

So, this final post is a chance to revisit some favourite projects created over the last two years.  You'll notice some of my go-to stamps occurring more than once - the Katy Leitch flowers, the fabulous Journalling Words, the Gibson Girls, and of course my much-loved background staples - the Calligraphy Plates, the Mini Polka Dots - as well as many others.  I hope you'll enjoy the little trip down Memory Lane...  (You can of course click on the links if you need to see more!)

Some of the birds get to fly free, but will the woman ever break out of her cage? Pay a visit to see the tiny cracked hearts and the background layers.

One of my favourite layered backgrounds, stamping and embossing and paint and ink, behind the Encyclopedia Botanica flowers.

The new Flourish Background, a despondent Gibson Girl and an unusual colour palette for me - oh, and lots of crackle of course.

A simple tag with the recent Gardening stamps - but it made me happy to create and makes me happy to look at!

My first offering as a full-blown team member, and one of my earliest journalling efforts.  Those Gibson Girls always seem to turn up when I'm in a melancholy mood.

Autumnal fun with a little book of leaves and a book box to keep it in - and the Dates and Journalling Words also put in an appearance.

Journalling words at the heart of this textural page too... (Is there such a thing as "too much crackle"?  I'm going with "no"!)

... and they're the main feature on this gift wallet along with some lovely postal designs - pay a visit to see what happens when you flip over to the other side.

Another early creation - butterflies and Botanica, blue and brown - my obsessions were clear right from the start!

The piece that started it all off - my first creation as a Guest Designer, but it remains a favourite - worth a visit as it's not easy to capture in one photo!


The melancholy Gibson Girls start talking to you when you flip these tags over - and you should see the suitcase they travel in (well, tags are luggage labels, after all).

Another favourite background, and another play with Katy Leitch's fabulous flowers - and more shades of blue and brown.  A creature of habit... who, me?!

A round dozen for you there (plus a couple of cheaty extras over at Words and Pictures today, just to decorate the post!), and that's where I'll have to love you and leave you - with immense and grateful thanks for all your wonderful visits and comments here over the last couple of years.

I know you'll keep dropping by to enjoy the inspirational work of the rest of the team, and I'll see you out there in Craftyblogland I'm sure.  Happy Crafting all!

Friday, 10 April 2015

Stamping for Texture

Hello all, Alison (butterfly) here with some textured tags for you today.

It won't have escaped your notice that I'm pretty obsessed with the new Flourish Background stamp.  I've used it on journalling pages and jars already, and now I've been experimenting with using it to create texture in different ways, and here are two of the tags which arrived as a result.


There's so much gilding and shimmer going on that it was hard to get a photo of them together that does them both justice at the same time - either one was in shadow, or the other was catching too much light - hopefully you'll get the idea from the close-ups as we go!


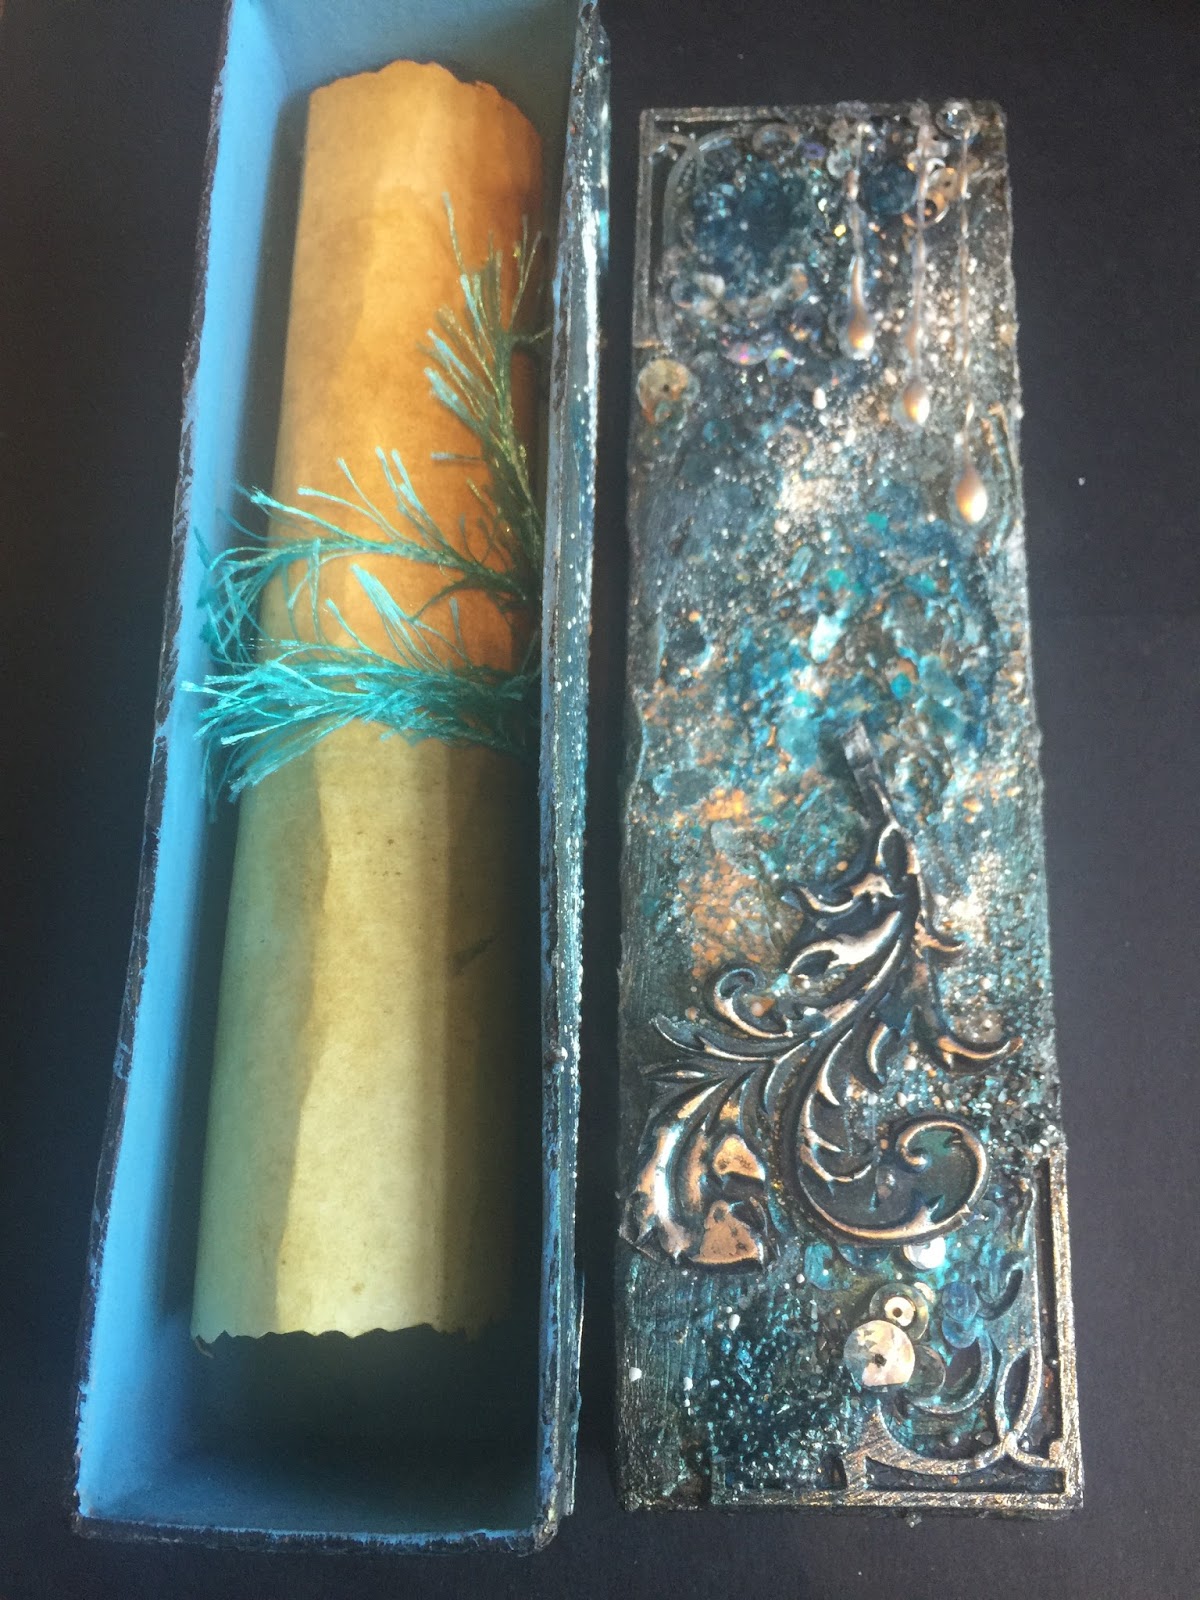
The texture on the blue/gold tag was created with gesso.  I applied a generous coating of heavy gesso to the stamp using Cut'n'Dry foam and pressed it down firmly onto the tag.  As well as the relief stamping of the flourish itself, you get lots of additional textural interest as you peel the rubber away (like when you press two gesso'd or painted tags together and peel them apart) - lots of lovely organic ripple patterns.


Then I spritzed away with a combination of Distress Sprays and Perfect Pearl Mists and a few other sparkly sprays.


The colours settled nicely around the flourish textures, but I wanted to highlight them further so I used gilding waxes to zhuzh them up a little.


I love the golden gleam in the sunlight.


The texture on the coppery green tag has a slightly chunkier look.  I put a layer of texture paste onto the tag and pressed the Flourish Background onto it, just as I did with the gesso - though I don't seem to have a picture of this one "naked".  The texture paste obviously gets you a lot more dimensional bang for your buck!


I started with Dabbers and Distress Paints, including metallics, to get a good covering over the paste, and then added some spritzes of shimmer sprays.


Since I was leaning more to the greens than the blues on this tag, I then found myself reaching for coppery gilding waxes to highlight the textures.


Having created these two backgrounds, I really didn't want to cover them up very much!  I don't often reach for flowers - though for some reason I do have a whole box of paper flowers in my stash! - but that seemed to be the way to go with these tags.


They started out fairly innocuously in various colours... so I got busy with the Distress Sprays again.  I wanted them to look as if they were emerging out of the tags, so I spritzed them to co-ordinate with the respective colour palettes.


The blue-green ones got a spritz of Tarnished Brass to give a hint of a metallic look to fit with the gilded texture.


The flowers for the coppery green tag went through the same process with slightly different colours, and their metallic spray was the Antique Bronze - a warmer shade.


I liked the gilded look, so I emphasised the metallic shimmer even more by adding some gold embossing powder to the edges of the rose flower petals, large and small.  And I used copper embossing powder to add the extra gilding to the tips of the green petals.


It may have been slightly crazy to reach for the kraft card to create my word panels... kraft with all that gilding?!  But I really like the contrast.


The "with thanks" wording comes from Katy Leitch's Leaves set, and it's embossed in gold for one tag and in copper for the other.


It needed a bit more of the rustic earthiness to balance the shimmer, so I mounted the tags onto kraft card with padded tape, edging everything with Archival ink to give little more definition.


And some simple twine at the top completes the look - continuing the contrast between baroque gilded texture and rustic earthiness.


So, I hope you like them - a more gilded look than normal for me.  I think I've been influenced by Dee's fabulous work here!  And with all those flowers these would fit right in to the Flora and Fauna challenge theme here this month.  I hope you'll come and join in.  Remember, we do have to see some stamping, but it doesn't have to be with Artistic Stamper stamps (though if you do use them you get a double entry into the prize draw!!).  Hope to see you there.

Thanks so much for stopping by today, and I'll see you soon.

Ingredients used:
Artistic Stamper stamps: Flourish Background, Leaves
Distress Spray Stains - Faded Jeans, Peeled Paint, Evergreen Bough, Peacock Feathers, Tarnished Brass, Antique Bronze
Distress Paints - Antique Bronze, Peeled Paint, Tarnished Brass, Evergreen Bough
Ranger Paint Dabbers - Copper, Bottle
Perfect Pearls Mists - Blue Smoke, Patina Green, Sour Apple, Heirloom Gold, Perfect Copper, Mint, Patina Blue
Gilding Wax - could use Crafty Notions Gleam or Cosmic Shimmer in various colours
Embossing Powders - Rich Gold, Copper
Texture Paste - PaperArtsy Grunge Paste or Cosmic Shimmer paste should both work
Manila Tags
Kraft Card
Inkssentials Cut'n'Dry Foam
From my stash - paper flowers, twine, gesso

Tuesday, 24 March 2015

With a Light Flourish!

Hello everyone, Alison (butterfly) here, this time with a candle lantern.  Take one old jam jar, some alcohol inks, gilding flakes and the fabulous new Artistic Stamper Flourish Background stamp, and here's what you get.


Let me take you through some of the steps it took to get here...


I started by applying various blue/green alcohol inks to the exterior of the jar... The new colours Mermaid and Botanical are in there, as well as Meadow, Stream and Denim.


I just kept dabbing until I was happy with the effect - I love it on the inside too!  This would be a good place to stop if you just want a really simple way to light your summer garden evenings.


I debated doing some powder embossing with the flourish stamp, but in the end decided it was way too long since I'd played with the gilding flakes I bought way back when I started this whole crafting hoo-ha.  No idea any longer what colour mix this is - and I may even have mixed in various colourways together in my little plastic box.


As you can see, I didn't quite get a clean stamping with the Flitterglu on most of the sides of the jar (wouldn't want to attempt this on a round jar, by the way!), but I actually don't mind that, on two counts.  One: it means you get a really distressed look, like the lantern has been around the block a few times, and has some history...


Two: it means you get a proper look at the alcohol ink patterns in lots of places, which are attractive in themselves.


Again it was pretty cool from the inside...


... but since the flakes were multi-coloured, I found it a bit hard to tell what was going on with only the very translucent alcohol inks underneath.  It was too translucent... I think you can see what I mean here.


So I decided it needed an internal coat of colour too - South Pacific Fresco paint, painted onto the inside of the jar - just to give a slightly stronger background for the flourishes to show against.


I dyed some seam binding with Rusty Hinge Distress Ink and wound some gold and beige satin ribbons together with it to create the finishing touch at the top.


It's a bit wild and extravagant, but I thought it suited the rococo style of the candle lantern itself.


As usual, it's been difficult to capture a photograph of how it looks with the candlelight illuminating it from within, but I hope this gives you a slight idea of the glow.


Thanks so much for stopping by today.  You've still got about a week to come and play in our Spring is Coming challenge here at The Artistic Stamper.  You have to include some stamping, but you don't have to use Artistic Stamper stamps for that... although if you do, you automatically get a double-entry to the prize draw.  Hope to see you there!

Ingredients used:
Artistic Stamper stamps - Flourish Background
Alcohol Inks - Mermaid, Botanical, Stream, Meadow, Denim
Seam Binding
Distress Inks - Rusty Hinge
Gilding Flakes - probably a mixture of various colours
From my stash - Jam Jar, Satin Ribbon (but there are plenty of options here too)