Showing posts with label distress paints. Show all posts

Friday, 13 May 2016

Collage Journal page by Shilpa

Hello Everyone,

We have the theme for this month's challenge - Collage

I created this journal page with Artistic Stamper Collage Art 1 stamp set.

Actually Collage is fun and very easy technique. Here on my pages, first of all I adhered old book pages, Tim's tissue paper, washi tapes. Next I stamped that collage lady image and butterflies images onto the pink paper, fuzzy cut them and attached. 
Further I used distress paints- worn lipstick, Broken china and evergreen bough, to bring on color on the pages.
Hope you liked my page and got inspired,
Don't forget to join us for Collage Challenge this month

Products used from Artistic Stamper:


Sunday, 13 March 2016

Collage Journal page by Shilpa

Hello Everyone,

As we have Spring theme for our March Challenge, I've created journal page with this Lovely "Bird Song" stamp. .from Artistic stamper

(click on image for bigger view)

I've worked in my A4 size journal. Lots of layers have been created with coffee stain papers, doilies, vintage laces, fabric flowers.
I've also used pearls, buttons and Washi tape, Have you checked new Washi tape at Artistic stamper?

If you like to use your old ephemera and papers ....you would like to create this kind of Vintage theme collage  journal page.

Thanks so much for stopping by.

Products used form Artistic stamper:


Friday, 26 February 2016

Heart Journal page Tutorial by Shilpa

Hello Everyone,
Today, I am sharing with you an art journal page and its tutorial.


I've used many Artistic stamper Decay stamps to create the background on this page!

here are the step by step photos...


I stamped squares and rectangles from Decay Journaling Stamp set #2 with Jet blck archival ink. Fussy cut them and adhered them on surface to my satisfaction.


I applied mustered seed distress paint and spritzed water to spread it. I dried it with heat tool. And next I used decay numbers stamps with black archival ink to get more texture.
I also used Calligraphy Mat 3 stamp for text on my background.


For more texture I used stencil and gold embossing paste.


I cut out heart and stamped on it with heart background stamp and Calligraphy mat #13 and Coffee archival ink. Applied Fired brick distress paint on it and spritzed water. Let it dry.


I attached the heart on the texture background and my page was ready? Are you liking it !

You have 4 more days to participate in our this month's challenge - "Theme- Heart"

Thanks so much for stopping by.

Products used from Artistic Stamper:
Decay stamps
Calligraphy Mat 3 stamp
Calligraphy Mat #13
Heart Background stamp
Distress Paints- Mustred seed, Fired brick
Ranger Archival inks - Coffee, Jet black


Sunday, 13 December 2015

Christmas Tag by Shilpa

Hello Everyone,
Shilpa here,
I made this quick tag for Christmas.


Here are the steps of making:
  • Apply Vintage photo distress paint on the surface, let it dry.
  • Cut out harlequin design with die and adhere it at the corner. 
  • Give next coat of color with broken china distress paint. Heat set it.
  • For the next layer I applied tarnished bass distress paint. 
  • On the other white cardstock, stamp steampunk baubles and Merry Christmas sentiment  with Archival ink.Cut it to adhere on tag.
  • Cut out holidays leaves with Tim Holtz die.
  • Arrange everything on the surface and tag is ready.
Hope I inspired you to create your own tags for this season.
Don't forget to join us for this month's challenge -theme is Christmas

Thanks so much for stopping by.


Products from Artistic Stamper Used here:


Tuesday, 13 October 2015

Gibson Girl Triptych

Hello Everyone,
Shilpa here

Today,I would like to share with you Triptych.


I've used Artistic stamper stamps- Gibson Girls, botanical plate1,2

Here are close up views of each panel.


For the background, first I applied distress paints dusty concord, vintage photo and milled lavender.
when it dried, I applied DecoArt crackle glaze randomly on the surface, kept it to dry overnight, which resulted into beautiful crackle texture. To highlight it, I applied little bit of white acrylic paint. Next I stamped text, texture and flowers with archival inks.
Butterflies are stamped, cut and adhered, I've added small lavender pearls on them.


I love all Gibson girls stamps by Artistic Stamper. This image is new in my collection. I stamped her with Ranger jet black archival ink and coloured with distress inks.


Hope you liked my triptych and got inspired!

Thanks so much for stopping by.

Products used from Artistic Stamper:
Background stamps - Calligraphy mat


Friday, 26 June 2015

Altered Art Journal Cover

Hello Everyone,
Shilpa here,

I love to play in my art journal and every now and then I start new journal with different sizes. 
Today, I've altered the journal cover which had black cover, I turned it into Shabby chic.
Let's have a look...


I've used Artistic Stamper Blossoms Large stamp.


I first adhered Ranger Sticky back canvas to my art journal cover. Next I applied Spun sugar and Victorian Velvet distress paints on the surface. I dried it completely with Heat Tool. For text in the background I used  Artistic stamper Calligraphy Mat 13 and Tea Rose Archival Ink.


I created layers with Doily, Tag, lace, gauze and design paper.


At the right bottom corner I added ribbon bow and flowers.


I stamped this beautiful Blossoms large on watercolor paper with Coffee Archival ink and colored with Distress Paints and inks.

Hope you liked my today's Pink project!! Do let me know... :)

Thanks so much for stopping by.

Products used from Artistic stamper:
Debbi Cotton-  blossoms Large stamp
Calligraphy Mat 13
Ranger Sticky Back Canvas
 Distress Paints- Spun sugar, Victorian Velvet
Archival Inks- Jet black, Coffee


Saturday, 13 June 2015

Adventure!!

Hello Everyone,
Shilpa here,


Artistic Stamper has this awesome Vintage Car stamp designed by Debbie cotton. I created masculine mixed media today.


I started off the texture background with steam punk diecuts and texture paste. 


I've used Distress paints in various colors. For texture stamping in the background Artistic Stamper Cogs border stamp was perfect.


I've added some metal charms.


Vintage Car is stamped with Black Archival ink and colored with Distress inks- Mermaid Lagoon, Peacock feathers, Iced spruce 

I tried something new here.....
you will  also find something adventurous to create with at Artistic stamper store today.

Thanks so much for stopping by.


Friday, 13 February 2015

Early Bird

Hello Everyone, Shilpa here,

I made a mixed media canvas using fun stamp 'Early Bird Resort' designed by Debbie cotton.


I love that cute Owl so much. I've worked with only two colors here, Evergreen bough and Dusty Concord.


I stamped these flowers with Ranger Black/ watering can  Archival ink and colored them with distress paints.
Background bubbles are created with stencil and Gelatos


Hope you liked my project today.
Thanks so much for stopping by today.

Material used:
Artistic Stamper Stamps: Early Bird ResortBotanical plate 2
Faber Castell Design Memory Craft Gelatos

Tuesday, 13 January 2015

Explore - Art Journal cover

Hello Everyone,
Happy New Year to you All!! This is my first post of 2015 at Artistic Stamper.
Today I would like to share project with you which is 'New Beginning' which is also a theme of our challenge this month. New beginning of my 'face journal', yes, I took up a challenge for myself  and which I rarely do, and I am totally fascinated about right now,  is to create one mixed media face journal page  every week this year!! :)
and here is Journal cover I made with Artistic stamper stamps.


Let's see how I made this ....


I've used Faber Castell Design Memory Craft Mini Journal board as a base. I applied Gesso as a primer.. When It dried, I applied distress paints (Broken china, Forest Moss, Vintage photo, Brushed corduroy, Tea dye), spritzed water and let them move and this created my base color.


Next I stamped Artistic stamper's Song Bird stamp on tissue paper with ranger jet black Archival ink and adhered that piece on my base. To create dimensional texture on this panel I used stencils and modelling paste.


Here you will see I adhered some of the elements like pearls, wood veneer birds, diecut dragonflies, vintage butterfly washi tape.


and I wanted to add more color but translucent one, so I used Distress stains (Broken China, Evergreen Bough, Wild Honey, peeled paint and Walnut stain)


Another layer of stamping with Artistic Stamper stamps- Calligraphy mats - 4 and small circles from Boarder stamp set 2 I love the texture it gives!!

For final finishing touches, I applied bit of Viva Decor Inka Gold on raised surfaces.
I also used vintage photo and tea dye distress inks to apply on all edges of this piece.


The journaling  word is 'explore'

Let me know if you liked my tutorial and project, it makes my day!!
Thanks so much for stopping by today. Don't forget to participate in our monthly challenge to win some fabulous Artistic Stamper stamps.
 
 
Products used:
From my stash - Design Memory craft Journal board, Crafters workshop stencils, Washi tape, Modelling paste

Saturday, 10 January 2015

The Brighter Side of Journalling

Hello all, Alison (butterfly) here with you again... and with some more art journalling.  But rather than the wintry pages over at Words and Pictures, this is an altogether lighter and brighter bit of journalling!


It does make me smile though to see how similar elements seem to have bobbed up on this very different page.


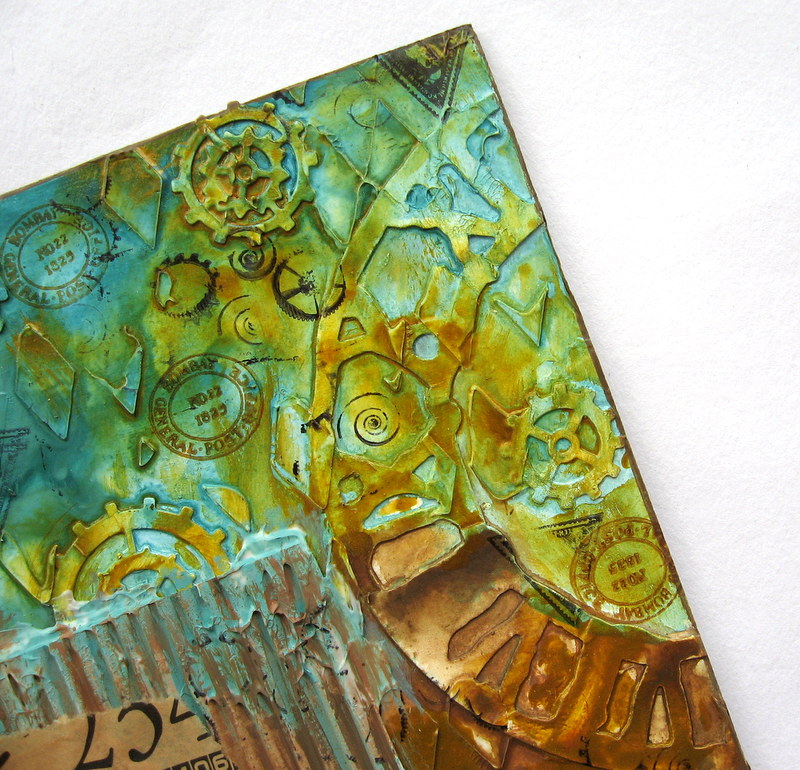
I'm definitely having a thing with circles at the moment - and here there are two layers of them.  First, some Distress Spray spritzed large circles using the Large Sequin Waste mask, and over that I spread a very thin layer of the Viva Decor Croco Crackling Colour through the Large Dot mask and left it to get on with cracking while I went off to do something else.


When the large dots were dry, I did some stamping with Distress Inks in my Jan/Feb colours of vivid blues and greens.  There's the Sequin Waste background stamp in Mowed Lawn and the Mini Polka Dots in Broken China and Peacock Feathers.


Once stamped, I gave them a spritz of water to let the Distress Ink do its magic wicking thing, softening the look.


And I used Distress Stains to add some colour to the large dots, wiping away the excess so that the crackle is highlighted.


So, like the winter pages, there's lots of crackle too.


For my focal point, I chose the word from Journaling Words #5 (oh, for the missing L!  Ah well, the Americans will like it).  I stamped it in the matching Distress Ink colours and clear embossed it on a whitewashed book page.


It's layered up over some wire mesh, tea-dyed tissue paper (transparent - so you can see the stamping and the text through it - love it!) and another book page.


I had great fun with my metal pieces.  The Idea-ology flower is altered with Distress Paint, while the skeleton leaves have had a dose of my Ten Seconds Verday Paint (weathered patinas, until now only really used on dollshouse work).


I used a combination of the Verday Copper finish as well as some Distress Paint in Mowed Lawn and Salty Ocean to get the finished effect, and I love it.


And I edged the page with Vintage Photo and Walnut Stain to pick up the rusty colours of the central layers, so we also have - at heart - the blues and browns of my winter pages, but transformed to a brighter version.


So having set out to do something completely different from the recent art journalling shared over at Words and Pictures, I have got something different, but somehow very closely related!

Thanks so much for stopping by today - it's always lovely to hear what you think.  And do come and play along in our New Beginnings challenge for a chance to win a gift voucher here at The Artistic Stamper - hope to see you there!

Ingredients used:
Artistic Stamper stamps: Journaling Words #5, Mini Polka Dots, Sequin Waste Open
Artistic Stamper masks: Large Sequin Waste, Large Dot
Distress Spray Stains: Broken China, Peacock Feathers
Distress Inks: Mowed Lawn, Broken China, Peacock Feathers, Vintage Photo, Walnut Stain
Distress Paints: Salty Ocean, Mowed Lawn
Distress Stains: Mowed Lawn, Broken China, Peacock Feathers
Clear Embossing Powder
Viva Croco Crackling Colour - White
From my stash - gesso, wire mesh, tissue paper, book pages, metal flower and skeleton leaves, tea(!)

Wednesday, 24 September 2014

A little Bird told me....

Happy Wednesday Everyone,
How are you all?
Shilpa here,
Today I am sharing with you 'a Wall hanging Project' which I have created with Neil Walker designed 'large heart stamp'. 


Let me share with you how I have created this. 
I applied gesso on to the most of the part of brown packaging piece. When it dried completely, I stamped text with  Artistic stamper Calligraphy Mat 4. Also added some texture with Mini sequin background stamp to create a background.


 Next I spritzed water on gessoed area and applied Tattered Rose and Worn Lipstick distress paints randomly. I adhered white lace and brown burlap piece to create layers. 
On another white stamping paper I stamped large hearts with tattered rose distress paint. Fussy cut them. And attached on the surface. Cute little bird is from 'Birds of feather' stamp collection.


I die cut all the flowers from Sizzix Tattered floral die and blue burlap. 'A Little bird Told Me...' sentiment  stamp is from Artistic stamper Birds of Feather collection. I stamped it with Ranger Jet Black Archival Ink.

And here if full view of my wall hanging...


Hope you liked my project. Looking forward to read your lovely comments.
Thanks so much for stopping by today.
Supplies used: