Showing posts with label Seaside Plate No 1. Show all posts

Wednesday, 19 July 2017

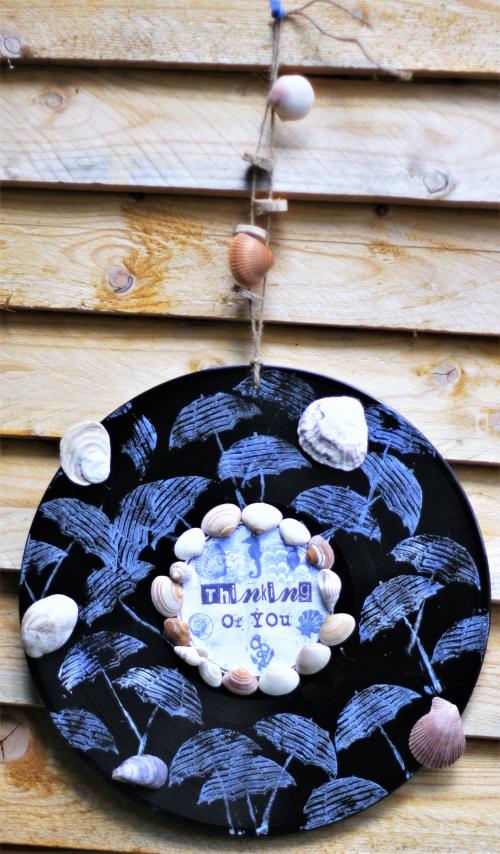
A summer wall hanger by Titbelsoeur

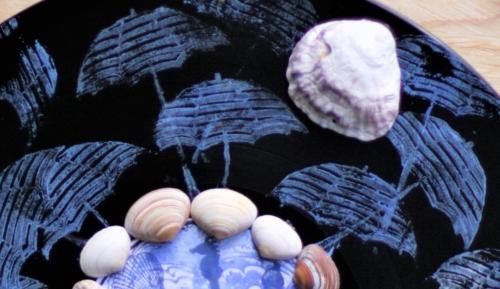
Take a LP record, blue and white acrylic paint, a small size gelli plate, some seashells... AND stamps from The Artistic Stamper, and let's go !
First apply paint on the gelli plate to ink the umbrella from  Seaside No. 1 A5and stamp it here and there on the record :


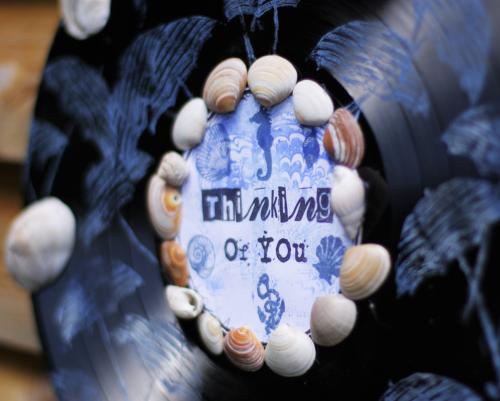
Then, apply white and blue again on the gelli pate and stamp Marbled Background #3 C128 © CaroLines on it, then stamp it on the paper, and apply the plate on another paper, to choose your background. When chosen, cut a circle in it and stamp seahorse and seashells on it, and then the sentiment from Grungy Greetings #2 A6). Then stick it on the circle.


And you may now decorate it with shells, cut corks, string, etc...


Would you like to win these fabulous stamps ? Easy : just participate in our monthly challenge "Black & White" for 3 chances to win !

Thank you so much for stopping by.
Your comments are very much appreciated here, on my blog

Titbelsoeur

Monday, 16 February 2015

...remembering the autumn...

Winter will end soon ...
Soon will come the spring...
 But I remember last fall...
Maybe because I now do not have enough bright colors, which was a lot recently!.. ..?


And if you pay attention, you will notice that I used the stamps at all of the other subjects.


Look, I took the flags from this set of stamps 


and an umbrella from this set:


I hope your autumn was as bright as mine.
And as I dare to hope that spring will be even brighter!

With <3 from Maria Potapovich (mellpellmell).

Wednesday, 17 December 2014

Imagine it!

Hi, dear friends))
It's Maria Potapovich (mellpellmell) here for you today.

If you think I'm going to share with you something related with Christmas or New Year, you are greatly wrong!

Like every year, I will prepare for these holidays exactly one day before their occurrence)))))

So today I am going to show a card, which is made to the birthday of my friend who has a very big plans for good luck! 

I'm sure luck will be with him! 

The main thing is to believe in yourself and allow yourself to "get lucky by the tail"... 

Do you agree with me?


Among my stamps there was no an exclamation point. I decided that I could do it of the letter "I"...


 In the following photo hard to see card, but it is clearly seen that the stamps adhered on three levels.


For this card I've used  Seaside No. 1 # 018  A5 set (as you see, you can color your stamp as you like!)


Have a nice day and always believe in luck!

Thursday, 22 August 2013

Another day at the sea by Titbelsoeur

Not usual that I show you an AJ page, though I am a compulsive art journaler : today I want to show you an art journal page of mine.

I made it just to test the new background stamps from the Artistic Stamper. And also to use these "big girls you are beautiful" from Jeanne Lorioz that I really love !


The combination appeared obvious to me to use the Random Background stamp that looks like sand, since my ladies are having good time on the beach !


Sea and sky are stamped blue on blue with Marbled 2 Background


And to be sure that everyone understands they actually are on the beach, I have added the beach umbrella and shells from the Seaside No. 1 # 018 plate.


Hoping you are having a good time


This AJ page is for you, and I hope you like it,


Thanks for stopping by, I am really looking forward to reading your comments !


A tout bientôt !


Saturday, 6 July 2013

Seaside themed ATC folder by Zuzu.


Anyone who has known me very long will know i love making these ATC folders. I have shared tutorials before and it is really easy but here is a quick guide for anyone who has not come across these folders before. 

For the folder you will need a piece of A4 card. you can use patterned paper if you like or coloured card to match your theme. i have made the example in plain colours so you can see it properly. if you start with plain card, i advise doing your colouring and stamping before assembling the folder with the pockets.
For the pockets you will need 2 sheets of ordinary A4 copier/printer paper.


Step 1. Measure and cut out a piece of card stock, 15cm x 27cm . Using a bone scorer tool, or similar, divide the card in to three parts (you can decide how much you want to make as the fold over flap and you can even tear the edge of the fold over flap.)


 Step 2. Fold the card along the score lines. This forms the basic folder. You can decorate it at this stage if you wish. 
 
Step 3. To make the inside pockets, use a whole sheet of A4 printer paper. Divide it in to three; two sections measuring 10cm (39/16 inches) and a small strip measuring 10mm (1/4 inch) on the end. Using the bone scorer tool again, score these sections to make folding easier. Glue along the small strip and fold the paper along the score lines. It should stick down and form a flat  paper tube.
 
Step 4. cut the tube in half...


Step 5. fold each tube in half...
Step 6. Simply use glue dots, (or doublesided tape or glue) to hold the pockets together and to stick in to place inside the folder.   


You can add more pockets if you wish but don't add too many as the folder will distort when trying to close it.
And there you have your folder. i tied mine closed with a piece of lace and added a little anchor.


Stamps used...


Tuesday, 14 May 2013

Beside the Seaside by Georgina Sweetenham


Hi! It's Georgina again with my second blog post as this month's Guest Designer. My second project is a card with a British seaside feel. I have used stamps from the lovely Seaside No. 1 # and Beside the Seaside stamp sets both of course from The Artistic Stamper. I have used a traditional red, white and blue colour scheme.

I begun by using a range of the stamps from the two stamp sets to create the two background papers.


I used a red and dark red ink pads for the seashell panel. And bright blue and navy blue ink pads for the fish panel. I attached these to scalloped edge panels of coloured card. I like to use stamps from sets to create background designs. You can then easily co-ordinate colours and design, rather than trying to find pre-printed background paper to match.

I stamped the ships wheel design with both a dark brown and Tuxedo Black Memento ink pads. I coloured the stamped images with ProMarkers. I cut out the centre people image from the black stamped image and attached it on top of the brown stamped image. I cut out the wheel and attached it with foam pads onto a white and red die cut circles. I added Glossy Accents to the lenses of the binoculars.


I stamped the umbrella twice in red ink and one in brown. I attached the red layers on top of the brown. For the second red layer I only attached the top front section with foam pads.


The sentiment is also part of the  Beside the Seaside stamp set. I stamped it in red and blue inks onto white card. I cut out the words and attached the to a blue card flag shape.


I attached all the elements to a square card blank. To finish I attached a red and blue stamped anchor design with foam pads.


Sunday, 19 August 2012

Alison's Seaside Giveaway - Part Two


Hello Stampers! As you probably know by now, it's the 2nd Anniversary of The Artistic Stamper's Creative Team Blog, and to mark the occasion, we have lots of giveaways this month.
Each member of the team has chosen some stamps to work with in August, and those are the stamps you could win, just by leaving a comment on our post, or on our personal blog posts. You can see my blog post HERE.
Here are the Seaside stamps that I have chosen to use...
And here is my second piece of artwork for August...
I started off by stamping the central image from the Seaside No. 1 plate, using Black Versafine Ink, then clear embossing it. I masked the image, then inked around it with Tumbled Glass and Gathered Twigs Distress Ink.
I stamped the sandworm image (I think that's what it is!) from the Shells 001 plate, using crushed olive Distress Ink onto my background. I inked the fish with peacock feathers DI, then added some gathered twigs ink around the edge, & stamped it on my background. I smeared some rocky candy distress stickles on the fish, & dried it with a heat gun.
I added a layer of Glossy Accents to the central image, then left this to dry.
I stamped the phrase Carpe Diem from Journaling Words 3 Plate onto white card, then used the alphabet stamps from the Scrabble & Tags Plate to stamp the rest of my quote. I cut out each word, inked them with antique linen DI, then edged them with black versafine ink.
I stamped the fish onto shrink plastic, coloured it with distress ink, then cut it out & shrank it with my heat gun.

I attached a strip of bandage across the card, using 2 brown brads, glued on my words & the shrink fish, then finished by attaching my artwork to a square card blank.
Thanks for looking, and don't forget to leave a comment here & on my own blog, to be in with a chance of winning the Seaside No. 1 plate.
Alison xox


Sunday, 8 July 2012

A summer book by Titbelsoeur

Coucou les amies,

Today I want to show you a(nother) summer book... yes, I have made 2... Don't know yet how I will manage both without any schizophrenia, but... let's wait and see... the tutorial was so nice, that I couldn't resist !
I used 5 scrapbooking sheets that were still remaining in my cabinet (ugly, then)... let me tell you : you fold in 2 on one side and in 4 on the other side. Then you cut the fold of 2 on 3 from the 4 lengths (hey, still here ?) and fold side to side the 4th length, then you make an accordion with both sides... uh... something like that... anyway, once folded and stuck together, here is how it looks like :
Now I just have to collect a lot of papers, sheets, tickets, etc... to hide the ugly paper !

I have made the cover so that every one knows this is a SUMMER BOOK !
I will show it to you when it is done... don't actually know how it will look like, but that's the funny thing !

I have used the same technique as for the previous one : wallpaper, gesso, acrylic paint and the so relevant Seaside stamps !!!

I hope you like my project,
thanks for stopping by, 
I am looking forward to reading your comments! 
A la prochaine !
Titbelsoeur

Sunday, 24 July 2011

Seaside Tag by Alison Hall

Hello Stampers! Today, I have a little seaside themed tag to share with you, as I'm currently sunning myself in Italy! Yes, that's me on the tag, enjoying a paddle in the waves (wrong colour hair, I know, & hopefully I'll have a better tan! lol)!


So, anyway, back to the tag!

I stamped the seahorse & a couple of shells from Seaside Plate 1, a few times, using distress embossing ink, then embossed the images with clear embossing powder. Then I spritzed the tag, using butterscotch & stream colour wash sprays. I wiped the ink away from the embossed images, then stamped the starfish with stream adirondak ink. I stamped the phrase from the Stamper's Anonymous Nature Moments plate, in the top right of the tag, using black archival ink.

Next, I stamped the lady bather from the Seaside Plate on white card. I sprayed a small bit of the colour washes on my craft sheet, then coloured the image, using a waterbrush. I cut the image out, then glued it to the left of the tag.

I stamped a row of shells onto white card, using butterscotch adirondak ink, cut them out, & glued them to the bottom of the tag.

The ribbon is a piece of seam binding, that I spritzed with stream colourwash. Then I stamped it with the seahorse & shell, using black archival ink.

Finally, I added some Tim Holtz lace chain, a few of his pearl Baubles ( currently on special offer HERE), and a little shell charm.

Thanks for looking!
Alison x

Thursday, 24 March 2011

Discover Your Inner Self by Alison Hall

Hello Stampers! I've got a card to share with you today. Now, maybe it isn't quite warm enough to go swimming in the sea just yet, but it's definitely getting there!

First, I made my background, using Tim Holtz's wrinkle free distress technique. You can find this technique and many others in his Compendium of Curiosities. I used mustard seed, scattered straw, broken china & tumbled glass distress inks, with some walnut stain around the edges. Then I stamped the starfish from The Artistic Stamper Seaside no. 1 plate, in broken china.

I stamped the woman bather on a separate piece of card, cut her out, then coloured her in, using a waterbrush & the distress inks. I also stamped the fish & the phrase, cut them out & coloured them in the same way. I layered the woman image on black card, then on a piece of card, embossed with the regal texture fade. I mounted this onto the background, added some silver buttons, then glued the fish on the right, & the phrase underneath.

I inked the edge of a square card with broken china distress ink, then mounted my artwork onto it. Finally, I added some micro beads, using glossy accents to adhere them.

Thanks for looking!
Alison x


Wednesday, 4 August 2010

Bathing Belles! By Lucy Edmondson

I hope you will like this little heart shaped album in a heart shaped tin. I love having the aperture so you can see the front page of the album. I have used some gorgeous vintage double sided papers - those were the days, when you didn't have to worry about exposing too much flesh on the beach!


This is what you will need:-

Seaside Plate No 1
Gibson Girls Plate No 2
Distress Inks
White Gesso
Tim Holtz Distress Crackle Paint in Picket Fence
Fibres or Twill

All available from The Artistic Stamper.

You will also need a tin with an aperture - doesn't have to be heart shaped. My tin was red - which was a difficult starting point! I have also used a fish and some shell art moulds, made up with Fimo and Stickles, but you can use real shells or any seaside ephemera, to decorate the top of the tin. I used a selection of the 'On the Boardwalk' Collection of double sided 12 x 12 papers by Graphic 45, but there are such a lot of images on the Seaside Plate that you could use to make your own backgrounds.

I covered the tin with gesso then added Crackle Paint, and sponged on Distress Inks, and sprayed on some shimmer mists. I cut a front and back cover for the album from mountboard, then the pages from the ds paper, doing a bit of jigsawing so I had the images I wanted, where I wanted them. I added a selection of images from the Seaside plate and the Gibson Girls paddling, stamped in Sepia.


I set eyelets in the top left of each heart shaped piece and attached them together with a book ring and some fibres (the twill Jennie sells would work well too):-


Finally, I took one of the die cut border strips from the paper set, which had an index tab on it, and snipped the words 'On the Boardwalk - By the Beautiful Sea' from the name tab at the top of one of the papers, adhered this to the index tab, blended it in with Antique Linen, added brads, and stuck it diagonally across the front of the tin. The words 'Down the Boardwalk She Came' were positioned on the front page to show through the aperture.

Thanks for looking and your comments are greatly appreciated.

Lucy